Tender Braised Beef Short Ribs — Slow-Simmered Until Fall-Off-the-Bone
There is something deeply satisfying about a pot of beef short ribs simmering on the stove, filling the kitchen with that dark, savory smell that makes everyone wander in from the other room to ask what's cooking. This recipe delivers exactly that — bone-in short ribs seared until deeply browned, then slow-simmered in a rich braising liquid with caramelized onions, garlic, and a glossy barbecue-style sauce until the meat is practically falling off the bone on its own.
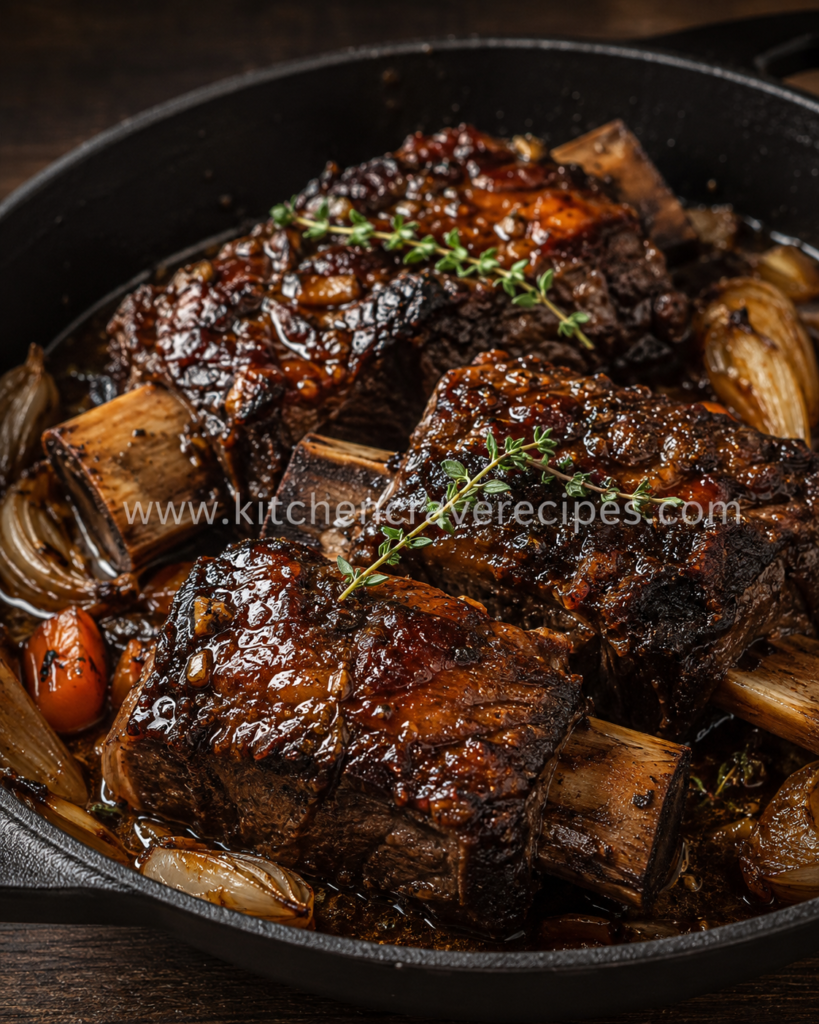
The photo above tells you what you're working toward: thick, lacquered ribs with a mahogany glaze, soft amber onions pooled in the braising liquid, and fresh thyme scattered across the top. That result is absolutely achievable on your stovetop or in a slow cooker with a quick finishing step.
Beef short ribs simmering low and slow is one of those techniques that rewards patience. The collagen in the meat gradually breaks down over a couple of hours of gentle heat, turning the broth silky and the meat impossibly tender. Rush it with a rolling boil and you'll get tough, stringy ribs — but keep it at a quiet simmer and the results are genuinely impressive.
This is a weekend recipe in terms of time, but the hands-on work is minimal. Sear, build the liquid, simmer, and glaze. That's the whole arc.
Why You'll Love This Recipe
- Deep, developed flavor — Searing the ribs first creates a browned crust that adds richness to the entire braising liquid.
- Minimal active cooking time — After the initial sear and aromatics, the stove does most of the work while you do other things.
- Caramelized onions built right in — The onions soften and sweeten directly in the pot, becoming part of the sauce rather than a separate step.
- Glossy, lacquered finish — Brushing with extra glaze at the end gives you that sticky, restaurant-worthy coating without a separate sauce recipe.
- Stovetop accessible — No special equipment required beyond a heavy-bottomed pot or Dutch oven you probably already own.
- Scales easily for a crowd — Double the batch with no change in technique, just a larger pot.
- Even better the next day — The braising liquid thickens overnight in the fridge, making leftovers richer than the original meal.
- Naturally gluten-free adaptable — Swap one ingredient in the sauce and the whole recipe is gluten-free without changing the flavor profile.
Tender Braised Beef Short Ribs — Slow-Simmered
|
|
| Prep Time |
25 minutes |
| Cook Time |
2 hours 30 minutes |
| Total Time |
2 hours 55 minutes |
| Servings |
4 |
| Course |
Main Course / Dinner |
| Cuisine |
American |
| Cooking Method |
Simmering (Stovetop Braise) |
| Difficulty |
Intermediate |
Ingredients
For the Short Ribs
- 4 lbs bone-in beef short ribs (English-cut, about 4–5 pieces)
- 2 teaspoons kosher salt
- 1 teaspoon black pepper
- 1 teaspoon smoked paprika
- 2 tablespoons neutral oil (avocado or vegetable)
For the Braising Liquid
- 2 large yellow onions, sliced into half-moons
- 6 garlic cloves, minced
- 1 cup beef broth (low-sodium preferred)
- ¾ cup barbecue sauce (your favorite store-bought or homemade)
- 2 tablespoons Worcestershire sauce
- 1 tablespoon apple cider vinegar
- 1 tablespoon brown sugar
- 1 teaspoon onion powder
- ½ teaspoon garlic powder
- Fresh thyme sprigs, for garnish
Optional Add-Ins
- ½ teaspoon crushed red pepper flakes (for heat)
- 1 tablespoon Dijon mustard (adds a gentle tang to the sauce)
Ingredient Notes & Substitutions
Short Ribs — English-Cut vs. Flanken-Cut
English-cut ribs are cut parallel to the bone, giving you those thick, meaty pieces shown in the photo. Flanken-cut ribs are thinner and cut across the bone — they work for grilling but are not ideal for long simmering because they cook through quickly and can dry out. Use English-cut here.
Barbecue Sauce
The sauce is the backbone of the glaze. A smoky, slightly sweet sauce works well. If you prefer less sweetness, reduce the brown sugar by half and use a thinner, tangier sauce. I've made this with both Kansas City-style and Carolina-style sauces — the Kansas City version produced the thicker, stickier glaze you see in the photo.
Beef Broth
Low-sodium broth gives you more control over the final salt level. You can substitute chicken broth in a pinch — the flavor will be slightly lighter but still good.
Worcestershire Sauce
This adds depth and a subtle umami layer to the braising liquid. For a gluten-free version, swap for a certified gluten-free Worcestershire sauce or coconut aminos.
Brown Sugar
Light brown sugar is fine here. Dark brown sugar adds a slightly more molasses-forward flavor, which pairs well with smoked paprika.
Kitchen Tools Needed
- Large Dutch oven or heavy-bottomed pot (at least 6-quart capacity) — essential for simmering short ribs with enough room for the liquid and steam
- Tongs — for turning and moving the ribs during searing without piercing the meat
- Sharp chef's knife and cutting board — for slicing onions and mincing garlic
- Wooden spoon or heat-safe spatula — for stirring the braising liquid
- Instant-read meat thermometer — short ribs are done by texture, but a thermometer helps confirm the braise is at the right simmer temperature (190–200°F internal for fully rendered collagen)
- Basting brush — for applying the finishing glaze
- Ladle — for skimming fat from the surface of the braising liquid if needed
- Splatter screen (optional but helpful during the searing step)
How to Make Beef Short Ribs — Step-by-Step
Step 1: Season the Ribs
Pat the short ribs completely dry with paper towels — this is the most important prep step for getting a proper sear. Combine the salt, pepper, and smoked paprika, then rub the mixture generously over all sides of each rib. Let them sit at room temperature for 20–30 minutes before cooking. Cold meat straight from the fridge sears unevenly and lowers the pan temperature too quickly.
Step 2: Sear the Ribs
Heat 2 tablespoons of oil in your Dutch oven over medium-high heat until the oil is shimmering and just beginning to smoke. Add the short ribs in a single layer, bone-side up — do not crowd the pot. If your pot is smaller, sear in two batches. Sear for 3–4 minutes per side without moving them, until each surface is deeply browned and a crust has formed. You're looking for a color that's closer to mahogany than golden. Transfer seared ribs to a plate and set aside.
Tip: Resist the urge to move the ribs during searing. If they're sticking, they're not ready to release yet — give them another 30 seconds.
Step 3: Cook the Onions
Reduce the heat to medium. Add the sliced onions to the same pot with all the browned bits still in it — those bits are flavor. Stir occasionally and cook for 8–10 minutes until the onions have softened and turned lightly golden. Add the minced garlic and cook for 1 more minute, just until fragrant.
Step 4: Build the Braising Liquid
Add the beef broth, barbecue sauce, Worcestershire sauce, apple cider vinegar, brown sugar, onion powder, and garlic powder. Stir everything together and use your wooden spoon to scrape up any remaining browned bits from the bottom of the pot. Bring the liquid to a gentle simmer over medium heat — you want to see small, lazy bubbles breaking the surface, not a rolling boil.
Step 5: Simmer the Short Ribs
Nestle the seared short ribs back into the pot, bone-side down, so the meaty portions are partially submerged in the liquid. The tops of the ribs can sit above the liquid — they will steam and braise from the heat of the covered pot. Cover with a tight-fitting lid, reduce heat to low, and simmer for 2 to 2½ hours. Check every 30 minutes to confirm the liquid is still simmering gently. If it's barely moving, nudge the heat up slightly. If it's boiling actively, lower it immediately — a hard boil toughens the meat.
Tip: At the 90-minute mark, gently press the meat with tongs. If it's starting to pull away from the bone and feels noticeably softer, you're on track. Full tenderness typically comes between 2 and 2½ hours.
For food safety reference, the USDA recommends beef reach an internal temperature of 145°F for safety, but for braised short ribs to become genuinely tender, you want the connective tissue to render — which happens around 190–200°F internal. See the
USDA's beef cooking guidelines for more information.
Step 6: Glaze and Finish
Once the ribs are tender, carefully transfer them to a plate. Brush each rib generously with additional barbecue sauce. At this point, you have two options: serve as-is with the onions and braising liquid spooned over the top, or place the glazed ribs under the broiler for 3–4 minutes for a slightly caramelized, sticky exterior. The broiler step is optional but produces that deeply lacquered look shown in the photo. Garnish with fresh thyme sprigs just before serving.
Pair these with
Slow Cooked Balsamic Beef Roast – Easy 6-Hour Ultimate Recipe for a complete, deeply satisfying meal.
My Best Cooking Tips
Keep the simmer gentle — always. The single biggest factor in getting tender short ribs is heat control. A low, steady simmer with small bubbles breaking the surface slowly melts the collagen over time. The moment it tips into a boil, the liquid agitates the meat fibers and begins to tighten them. I set my burner to its lowest setting after bringing the liquid up to temperature and check it every 30 minutes for the first hour.
Dry the meat before searing. Moisture is the enemy of browning. Even a slightly damp surface will steam rather than sear, and you'll lose that dark, caramelized crust that flavors the entire braising liquid. I press paper towels firmly on all sides of each rib and let them air-dry on the counter for a few minutes before seasoning.
Don't skip the fond. After searing, the pot will have dark browned bits stuck to the bottom. Those are pure flavor, and the onions and braising liquid will lift them completely. If you rinse the pot between steps, you lose a significant layer of depth.
Skim the fat before serving. Short ribs are well-marbled, which is exactly what makes them tender — but the braising liquid will have a visible fat layer after cooking. Use a ladle to skim it off before spooning the liquid over the ribs, or refrigerate overnight and lift the solid fat cap off easily the next day.
The sauce thickens as it rests. If the braising liquid seems thinner than you'd like right off the stove, let the ribs rest covered for 10 minutes. The liquid continues to reduce and cling to the meat as it sits.
Common Mistakes to Avoid
Skipping the sear.
It's tempting to go straight to simmering — especially when you're short on time — but the sear creates the color, the crust, and the fond that give this dish its depth. Unseared short ribs braised in liquid come out pale and noticeably bland by comparison. The 10 minutes of searing makes a genuine difference.
Boiling instead of simmering.
This is the most common mistake with braised short ribs. A rolling boil extracts water from the muscle fibers faster than the collagen can melt, leaving you with dry, fibrous meat floating in watery liquid. You want lazy, slow bubbles — almost like the pot is breathing rather than churning. If you're unsure, lift the lid and watch. A true simmer produces one or two bubbles breaking per second.
Searing in a crowded pot.
Putting all the ribs in at once when the pot is too small drops the temperature of the oil dramatically. Instead of searing, the ribs begin to steam and release moisture. Work in batches and give each piece space — at least an inch between pieces.
Adding cold liquid.
Pouring cold broth into the hot pot after searing can cause a sudden temperature drop and may even warp thinner pots. Room-temperature broth is fine. Warm broth is better. If you only have broth straight from the fridge, let it sit on the counter while you prep.
Lifting the lid too often.
Every time you remove the lid during a braise, you release steam and drop the temperature inside the pot. Check on the ribs at the 30-minute marks, but otherwise, leave the lid on. Trust the process.
Under-seasoning the ribs before searing.
The seasoning rub applied before searing is the only direct seasoning on the meat itself. The braising liquid adds flavor from the outside in, but the interior of a thick short rib needs that initial salt layer. Season generously and don't hold back.
Pulling the ribs too early.
Short ribs that are done at 90 minutes are not tender enough — the collagen hasn't fully converted to gelatin yet. The meat may feel firm or slightly rubbery when pressed. Give them the full 2 to 2½ hours. You'll know they're ready when the meat pulls back visibly from the bone and offers almost no resistance when pressed with tongs.
Forgetting to rest before serving.
Resting braised meat for 10 minutes before plating lets the fibers relax and the juices redistribute. Cutting or pulling immediately after cooking loses moisture onto the plate rather than keeping it in the meat.
Variations
Spicy Korean-Inspired Short Ribs
Replace the barbecue sauce with a mixture of gochujang (Korean chili paste), soy sauce, sesame oil, and a little honey. Use the same simmering method with beef broth and add a 1-inch piece of fresh ginger and two sliced scallions to the braising liquid. The result is deeply savory with a slow, building heat. Finish with sesame seeds and thinly sliced scallions. This variation works well served over steamed white rice.
Red Wine Braised Short Ribs
Substitute half the beef broth with a dry red wine — something like a Cabernet Sauvignon or Merlot. Replace the barbecue sauce with 2 tablespoons of tomato paste and a tablespoon of Dijon mustard. Add a sprig of rosemary and two bay leaves to the pot. The wine adds acidity and a more complex, European-style flavor profile. Remove the herb sprigs before serving and reduce the braising liquid separately if you want a thicker sauce.
Slow Cooker Version
Complete Steps 1 through 4 on the stovetop exactly as written. Transfer everything to a slow cooker and cook on LOW for 7–8 hours or HIGH for 4–5 hours. The results are very similar to the stovetop version, with slightly less control over the texture. For the lacquered finish, brush with glaze and broil for 3–4 minutes after slow cooking.
Gluten-Free Version
Use certified gluten-free Worcestershire sauce or substitute with coconut aminos. Confirm your barbecue sauce is gluten-free (many store brands are, but check the label). No other changes are needed — the rest of the recipe is naturally gluten-free.
Low-Carb Variation
Replace the barbecue sauce with a sugar-free barbecue sauce and omit the brown sugar. Use a zero-sugar Worcestershire sauce alternative. The short ribs themselves are naturally low in carbohydrates — it's the sauce that carries most of the sugar in the original recipe. Serve over cauliflower mash instead of traditional mashed potatoes. Note that this variation reduces the carb count significantly but the original recipe is not low-carb.
What to Serve With This Recipe
- Slow Cooked Balsamic Beef Roast – Easy 6-Hour Ultimate Recipe — the most natural partner; the braising liquid doubles as a sauce and soaks into the potatoes beautifully.
- Crusty bread or dinner rolls — essential for scooping up the onions and braising liquid from the bottom of the pot.
- Roasted garlic green beans — the slight bitterness of green beans cuts through the richness of the ribs.
- Buttered egg noodles — a quick, satisfying base that holds the sauce well and keeps the focus on the ribs.
- Creamy polenta — particularly good with the red wine variation; the smooth texture complements the deeply savory braise.
- Simple garden salad with vinaigrette — a fresh, acidic counterpoint to the richness of the beef.
- Roasted root vegetables — carrots, parsnips, and turnips all hold up well and absorb the flavor of the braising liquid if roasted alongside the ribs in a larger vessel.
- Glazed Garlic Herb Beef – Best Easy 4-Hour Recipe — if you're serving the ribs in a more casual, barbecue-style setting, coleslaw adds crunch and brightness.
Storage & Reheating
Refrigerator Storage
Store leftover short ribs with the braising liquid and onions in an airtight container. They keep well in the refrigerator for up to
4 days. The fat from the meat will solidify on the surface of the liquid overnight, which actually makes it easy to skim off before reheating if you prefer a leaner sauce.
Freezer Storage
Braised short ribs freeze exceptionally well. Place the ribs and braising liquid together in a freezer-safe container or heavy-duty zip-top bag, removing as much air as possible. Freeze for up to
3 months. Thaw overnight in the refrigerator before reheating — do not thaw at room temperature.
Shelf Life Summary
| Storage Method |
Duration |
| Refrigerator (airtight) |
Up to 4 days |
| Freezer (airtight with liquid) |
Up to 3 months |
| Room temperature |
Not recommended beyond 2 hours |
How to Reheat Beef Short Ribs
Stovetop (recommended): Place the ribs and braising liquid in a covered pot over low to medium-low heat. Warm for 15–20 minutes, turning the ribs once halfway through, until heated through. Adding a splash of beef broth if the liquid has thickened too much in the fridge.
Oven: Place ribs and liquid in an oven-safe dish, cover tightly with foil, and reheat at 325°F for 25–30 minutes.
Microwave: Use a microwave-safe dish with a loose-fitting lid or plastic wrap vented at one corner. Heat on medium power (70%) in 90-second intervals, turning the ribs between each interval, until hot throughout. This method works but can dry out the edges if overheated — medium power is important.
For guidance on safe food storage and reheating temperatures, the
USDA FoodSafety.gov resource is a reliable reference.
Nutrition Facts
Nutrition values are estimates based on a 4-serving yield using the stated ingredients. Actual values will vary based on specific brands, exact portion size, and any substitutions.
| Nutrient |
Per Serving (approx.) |
| Calories |
610 kcal |
| Total Fat |
38 g |
| Saturated Fat |
15 g |
| Cholesterol |
145 mg |
| Sodium |
890 mg |
| Total Carbohydrates |
22 g |
| Dietary Fiber |
1 g |
| Total Sugars |
16 g |
| Protein |
42 g |
| Iron |
4.2 mg |
Frequently Asked Questions
What is the difference between English-cut and flanken-cut short ribs?
English-cut ribs are sliced parallel to the bone, producing thick, meaty individual pieces ideal for braising or simmering. Flanken-cut ribs are sliced across the bone and are much thinner — better suited for quick grilling or Korean BBQ preparation. For this recipe, English-cut is strongly recommended because the thickness holds up to the long simmer without drying out.
How do I know when braised short ribs are done?
The most reliable indicator is texture, not time. The meat should pull away visibly from the bone and offer no resistance when gently pressed with tongs. A fork should slide into the thickest part of the meat with almost no effort. If you feel any firmness or resistance, cover and continue simmering in 20-minute increments.
Can I make this recipe in a slow cooker?
Yes — and it works very well. Complete the searing and onion-cooking steps on the stovetop first, then transfer everything to a slow cooker. Cook on LOW for 7–8 hours or HIGH for 4–5 hours. The stovetop sear is worth doing even for slow cooker versions because it adds a layer of flavor that simmering alone cannot replicate.
Why do my short ribs come out tough?
The most likely cause is either too-high heat (boiling instead of simmering) or insufficient cooking time. Braised short ribs need gentle, sustained heat to convert collagen into gelatin. Check that your pot is at a quiet simmer — small bubbles only — and extend cooking time if needed. Rushing with higher heat produces tougher, not faster-cooked, results.
Can I make these ahead of time?
Absolutely, and I'd argue they're even better the next day. The braising liquid thickens overnight as the gelatin sets, and the flavor deepens. Refrigerate in the liquid, skim the solidified fat cap the next day, and reheat gently on the stovetop. For dinner parties, making them a day ahead is a reliable strategy.
Do I need to marinate the ribs before cooking?
No — this recipe does not require a marinade. The seasoning rub before searing provides direct flavor on the meat surface, and the long braise infuses flavor throughout during cooking. A marinade can help if you're grilling short ribs quickly, but for a slow simmer, it's an unnecessary extra step.
How do I keep the simmer from tipping into a boil?
After bringing the braising liquid up to temperature with the lid off, reduce your burner to its lowest setting before covering the pot. Lift the lid at the 30-minute mark and observe the bubbles. A true simmer shows one or two lazy bubbles per second at the edges. If it's churning, lower the heat further — and if your lowest setting still runs hot, crack the lid slightly to let some heat escape.
What cut of beef can I substitute if short ribs aren't available?
Bone-in chuck short ribs are the closest substitute. Boneless short ribs work but will have slightly less flavor since the bone contributes to the braising liquid. Beef chuck roast cut into large pieces is a reasonable alternative in a pinch — it has similar connective tissue content and responds well to long braising, though the texture will be slightly different from true short ribs.
Is it necessary to sear the ribs before simmering?
It's not required for food safety, but skipping the sear noticeably reduces the final depth of flavor. The Maillard reaction during searing creates hundreds of flavor compounds that don't develop during gentle simmering. The braising liquid also benefits from the fond. If you genuinely cannot sear (no suitable pan, cooking in a limited setup), the recipe still produces a result — just a lighter-colored, less intensely flavored one.
Can I thicken the braising liquid into a proper sauce?
Yes. After removing the ribs, pour the braising liquid through a fine mesh strainer into a small saucepan. Simmer over medium heat for 10–15 minutes, stirring occasionally, until it reduces to your preferred consistency. You can also whisk in a teaspoon of cornstarch dissolved in cold water for a quicker thickening method.
Expert Cooking Tips
Build layers, not shortcuts.
The reason this recipe produces such a rich result is because every step — seasoning, searing, building the aromatics, constructing the braising liquid — adds a distinct layer of flavor. Skipping any of them produces a noticeably flatter result. The total active cooking time is only about 25 minutes despite the long total time, so each step is worth its investment.
Match your pot to your batch size.
A 6-quart Dutch oven works for 4 lbs of short ribs with comfortable headroom. If you're doubling the recipe, use an 8-quart pot minimum. Overfilling causes the liquid to bubble up and escape the lid and can prevent even heat distribution around all the pieces.
Rest before pulling.
After 2+ hours of simmering, the meat fibers are relaxed and full of the braising liquid's moisture. Give the ribs 10 full minutes of rest with the lid on and the heat off before serving. This rest period makes a measurable difference in how juicy the meat is when served.
Taste and adjust the braising liquid before serving.
Once the ribs are cooked and resting, taste the braising liquid directly. Depending on your barbecue sauce and broth, it may need a small splash of apple cider vinegar for brightness, a pinch of salt, or a teaspoon more brown sugar for balance. Adjust before spooning it over the finished ribs.
Use the fat to your advantage.
Short ribs release a good amount of fat during the braise. Rather than viewing this as a nuisance, use the skimmed fat as a finishing drizzle over mashed potatoes or vegetables, where its deep beefy flavor adds richness without waste. Alternatively, refrigerate overnight and lift the solid fat cap cleanly — making next-day reheating both easier and slightly leaner.
Recipe Summary
These slow-simmered beef short ribs deliver deeply tender, fall-off-the-bone meat in a rich, glossy braising liquid built from caramelized onions, garlic, barbecue sauce, and beef broth. The method requires patience but very little active effort — sear, build, simmer, glaze. The result is a genuinely impressive dish that gets even better the next day, making it worth cooking for both weekends and planned-ahead gatherings.