Best Cheesy Tater Tot Casserole — Easy 5-Ingredient Bake
Some dishes just hit differently on a cold weeknight, and this
cheesy tater tot casserole is at the very top of that list. Crispy golden tater tots baked over a savory ground beef and cream of mushroom base, then blanketed in a thick, molten layer of shredded cheddar that bubbles and blisters at the edges — it's the kind of casserole that empties a dish before anyone thinks about seconds.
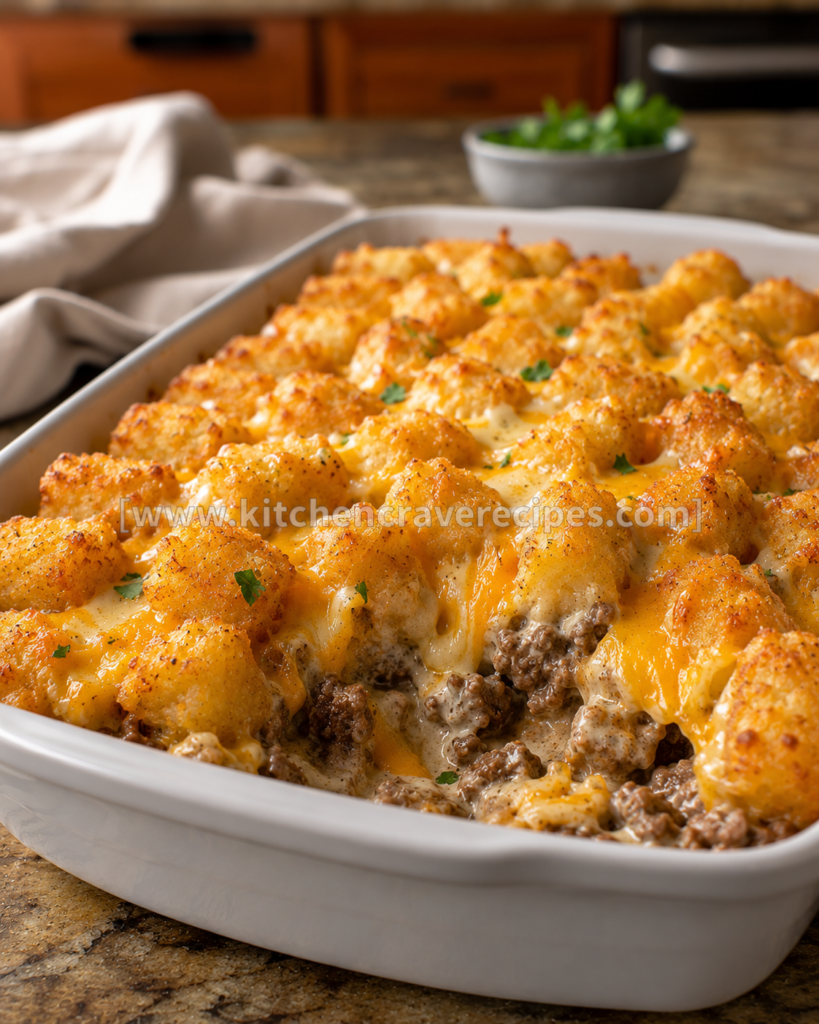
The photo shows exactly what you're working toward: a round, deep white ceramic baking dish absolutely loaded with crispy tots under a glossy, fully melted cheddar topping. No fancy technique, no obscure ingredients. Just a straightforward baked casserole that comes together in about 15 minutes of prep and delivers the kind of comfort food that brings everyone to the table fast. This is a real weeknight workhorse — reliable, satisfying, and endlessly adaptable.
Recipe Quick Info
| Detail |
Info |
| Prep Time |
15 minutes |
| Cook Time |
45 minutes |
| Total Time |
1 hour |
| Servings |
6 servings |
| Cuisine |
American |
| Course |
Main Course / Casserole |
| Cooking Method |
Baking |
| Calories |
~550 kcal per serving |
| Difficulty |
Standard |
Why You'll Love This Cheesy Tater Tot Casserole
- Truly pantry-friendly — Ground beef, a can of cream of mushroom soup, frozen tater tots, and shredded cheddar are the backbone; there's a strong chance you already have most of this on hand tonight.
- One baking dish, minimal cleanup — Everything assembles in a single dish and goes straight into the oven, so there's almost nothing to wash when dinner is done.
- Crispy tots every time — Baking at the right temperature crisps the tater tots from the bottom up through the meat layer while the tops turn golden under the melted cheese — no soggy middles.
- Feeds a hungry crowd — Six generous servings from one dish make this ideal for family dinners, potlucks, or anytime you need to feed more than four people without making two separate things.
- Kids and adults both love it — The flavor profile is approachable and deeply familiar; this is the kind of dinner that gets requested by name after the first time you make it.
- Totally customizable — Swap the protein, add vegetables, dial up the spice, or change the cheese — the base recipe is flexible enough to accommodate nearly any variation without losing what makes it great.
- Leftovers reheat beautifully — Cold cheesy tater tot casserole reheats in the oven with the tots regaining most of their crispiness, making next-day lunch genuinely worth looking forward to.
Ingredients
For the Meat Layer
- 1½ lbs ground beef (80/20 fat ratio)
- 1 medium yellow onion, finely diced
- 3 cloves garlic, minced
- 1 teaspoon kosher salt
- ½ teaspoon black pepper
- ½ teaspoon smoked paprika
- ½ teaspoon Worcestershire sauce
For the Cream Layer
- 1 can (10.5 oz) condensed cream of mushroom soup, undiluted
- ½ cup sour cream
- ¼ cup whole milk
- ½ teaspoon garlic powder
- ¼ teaspoon onion powder
For the Top Layer
- 1 bag (32 oz) frozen tater tots, kept frozen until use
- 2 cups shredded sharp cheddar cheese (freshly shredded melts better than pre-shredded)
Optional Add-Ins
- 1 cup frozen corn or peas, stirred into the cream layer
- ½ cup diced green chiles (canned, drained) for mild heat
- 4 strips bacon, cooked and crumbled, scattered over the tots before the cheese goes on
- 2 tablespoons sliced scallions for garnish after baking
Substitution Guide
| Original Ingredient |
Easy Substitute |
Notes |
| Ground beef (80/20) |
Ground turkey or ground chicken |
Leaner; add 1 tbsp olive oil to the pan to prevent sticking |
| Cream of mushroom soup |
Cream of chicken or cream of celery soup |
Slightly different flavor profile; both work equally well |
| Sour cream |
Plain full-fat Greek yogurt |
Nearly identical texture; slightly tangier flavor |
| Sharp cheddar |
Colby Jack, Pepper Jack, or Velveeta slices |
Pepper Jack adds heat; Velveeta creates an ultra-smooth melt |
| Frozen tater tots |
Frozen crinkle fries or hash brown patties, broken up |
Different texture; crispy hash browns create a more layered top |
| Whole milk |
2% milk or evaporated milk |
Evaporated milk makes the cream layer slightly richer |
Kitchen Tools Needed
- Deep round or oval ceramic baking dish (2–3 quart capacity) — The dish shown in the photo is a round, deep white ceramic casserole dish; this style distributes oven heat evenly and goes straight from the oven to the table beautifully. A standard 9×13 inch baking dish also works perfectly for this recipe.
- Oven — Preheated to 375°F for the main bake; the temperature is calibrated to crisp the tots while heating the meat and cream layers through without drying them out.
- Large skillet — For browning the ground beef and onions on the stovetop before assembling the casserole.
- Wooden spoon or spatula — For breaking up the ground beef and stirring the cream layer.
- Mixing bowl — For combining the cream of mushroom soup, sour cream, milk, and seasonings.
- Colander — For draining excess fat from the browned ground beef.
- Aluminum foil — For covering the dish during the first stage of baking to ensure the casserole heats through evenly before the tot-crisping phase.
- Oven mitts — The ceramic baking dish will be very hot when it comes out; handle with care.
How to Bake Cheesy Tater Tot Casserole Perfectly Every Time
Step 1 — Preheat the Oven and Brown the Beef (15 minutes)
Preheat your oven to
375°F — a full preheat ensures the casserole goes into a stable, even heat environment from the start, which is critical for cooking the base through without burning the top. While the oven heats, place a large skillet over medium-high heat. Add the ground beef and diced onion and cook, breaking the beef into small crumbles with a wooden spoon, for
8–10 minutes until the beef is fully browned and the onion is soft and translucent. You'll hear an active sizzle when the beef first hits the pan — that's exactly what you want.
Add the minced garlic, salt, pepper, smoked paprika, and Worcestershire sauce, stir to combine, and cook for another 60 seconds until fragrant. Drain the excess fat through a colander and return the meat to the skillet (or place it directly into the baking dish).
Embedded tip: Draining the fat after browning is important for this casserole — excess grease sitting under the cream layer will make the bottom soggy and prevent the tater tots from crisping properly from below during baking.
Step 2 — Build the Cream Layer (3 minutes)
In a mixing bowl, whisk together the condensed cream of mushroom soup, sour cream, milk, garlic powder, and onion powder until smooth. The mixture should be thick but pourable — it spreads easily without pooling and will loosen slightly during baking as it heats through. Taste the mixture before it goes into the dish and adjust seasoning if needed; this layer flavors the entire casserole from the inside out.
Step 3 — Assemble the Casserole (4 minutes)
Spread the drained, seasoned ground beef mixture in an even layer across the bottom of the baking dish — press it down lightly so the surface is flat and level. Pour the cream of mushroom mixture over the beef and spread it with a spoon to cover the meat completely. Arrange the frozen tater tots directly from the freezer in a tight, single layer on top of the cream layer — stand them upright if using traditional barrel-shaped tots, or lay them flat if they're a flatter variety. Packing them snugly means every scoop gets a tot; gaps result in patchy portions.
Embedded tip: Use tots straight from frozen — never thawed. Thawed tots release excess water during baking, which steams rather than crisps, and you'll end up with a soft, wet top layer instead of the golden, crunchy surface the photo shows.
Step 4 — First Bake: Covered (25 minutes)
Cover the baking dish tightly with aluminum foil and slide it into the preheated
375°F oven on the middle rack. Bake covered for
25 minutes — this phase heats the meat and cream layers all the way through and begins softening and cooking the tater tots from the inside without browning them yet. The casserole should be visibly bubbling at the edges of the dish when the foil comes off — if it isn't, give it another 5 minutes before proceeding.
Step 5 — Second Bake: Uncovered + Cheese (20 minutes)
Remove the foil carefully — steam will escape when you peel it back. Scatter the shredded sharp cheddar evenly over the top of the tater tots, covering them completely. Return the dish to the oven, uncovered, and bake for another
20 minutes until the cheese is fully melted, glistening, and beginning to blister and bubble at the edges — exactly the glossy, slightly browned cheddar blanket you see in the photo. The tots visible at the edges of the dish should look golden and slightly crisp where the cheese hasn't completely covered them.
Verify the casserole is heated through by inserting an instant-read thermometer into the center of the meat layer — it should read at least
160°F for ground beef, per
USDA ground beef safe temperature guidelines. Let the casserole rest for
5 minutes before serving so the cream layer sets slightly and portions hold their shape when scooped.
Pro Tips for the Best Cheesy Tater Tot Casserole
- Always bake covered first, then uncovered. This two-stage baking method is what makes this casserole work — the covered phase cooks the base through completely, and the uncovered phase crisps the tots and melts the cheese. Skipping the covered stage leaves the meat layer undercooked in the center while the top burns.
- Shred your own cheddar from a block. Pre-shredded bagged cheese contains anti-caking starch that prevents it from melting as smoothly as freshly shredded. The result with block cheese is that glossy, fully melted, pooled cheddar blanket you see in the photo — not a grainy or chalky surface.
- Don't open the oven door during the covered bake. Every time the door opens, the oven temperature drops and the steam that's been building inside the foil-covered dish is disrupted. Set a timer, walk away, and let the even oven heat do its job uninterrupted for the full 25 minutes.
- Season the meat layer boldly. The cream of mushroom soup adds saltiness and depth, but the beef layer needs its own seasoning to hold its own in the final dish. Under-seasoned beef gets lost under the cream and cheese — taste the browned meat before assembling and adjust salt and paprika as needed.
- Rest before serving. Five minutes of rest after pulling the dish from the oven allows the cream layer to re-set enough that a spoon scoops through clean layers rather than a soup of loose filling. It also brings the cheese from screaming-hot to an eating temperature that won't burn anyone's mouth.
Common Mistakes to Avoid
1. Opening the oven door during the covered baking phase.
The foil is doing important work — trapping steam and heat to cook the casserole through from the inside. Peeking breaks that environment and extends your cook time. Commit to the full 25 minutes before lifting the foil.
2. Using thawed tater tots.
Thawed tots release water during baking, which steams the top of the casserole instead of crisping it. Always pull the tots directly from the freezer and arrange them frozen — they'll crisp beautifully during the uncovered bake phase.
3. Not draining the browned beef.
Excess grease from the meat pooling under the cream layer makes the casserole greasy, prevents crisping, and creates an unpleasant texture in the finished dish. Always drain through a colander before assembling.
4. Using pre-shredded cheese.
The anti-caking coating on bagged shredded cheese creates a grainy melt rather than the smooth, glossy finish you want. Block cheddar shredded on a box grater melts far more evenly and produces the beautiful molten layer shown in the photo.
5. Under-filling the dish with tots.
Gaps in the tot layer mean gaps in your final serving. Pack the tots tightly and in a single even layer — if you have a handful left over from the bag, tuck them in wherever you see open space.
6. Skipping the covered bake and going straight to uncovered.
Baking uncovered the entire time will crisp and brown the tots before the meat layer is cooked through, resulting in a hot top and a barely-warm, undercooked center. The two-stage method exists for a reason — don't skip it.
7. Not seasoning the cream layer.
Condensed soup on its own can taste flat. Adding garlic powder, onion powder, and a taste-check before assembly makes the difference between a casserole that's merely filling and one that's genuinely flavorful throughout.
8. Serving immediately from the oven without resting.
The cream layer is essentially liquid right out of the oven — serving too soon means the casserole pours onto the plate rather than scooping cleanly. A 5-minute rest is all it takes for the filling to firm up to a scoopable consistency.
Variations
Healthy Version
Substitute 93/7 lean ground turkey for the beef and replace the sour cream with plain 2% Greek yogurt — Greek yogurt behaves identically in the cream layer but adds protein and cuts saturated fat. Stir 1 cup of frozen peas or corn directly into the cream layer before assembly for added fiber and nutrients. The baking method, temperatures, and times remain exactly the same.
Vegetarian Version
Replace the ground beef with 2 cans (15 oz each) of rinsed and drained black beans, mixed with 1 cup of diced bell pepper sautéed in 1 tablespoon of olive oil until softened. Use cream of mushroom soup (which is already meatless) and keep every other component the same. The bean-and-pepper mixture won't need draining, but make sure to season it well since beans are naturally mild.
Spicy Version
Stir ½ cup of drained diced green chiles and 1 teaspoon of smoked chipotle powder into the cream layer. Swap the sharp cheddar topping for Pepper Jack cheese, which melts beautifully and adds a sustained mild-to-medium heat. A drizzle of your favorite hot sauce over individual portions at serving takes it up another level without altering the bake.
Gluten-Free Version
This recipe is nearly gluten-free as written — the main thing to verify is your specific brand of condensed cream of mushroom soup, as some contain wheat flour as a thickener. Swap in a certified gluten-free cream of mushroom soup (several major brands offer this) and confirm your tater tot brand is gluten-free as well. Everything else in the recipe is naturally gluten-free.
Low-Carb / Keto Version
This variation genuinely requires a structural change: traditional tater tots are potato-based and not keto-compatible. Replace the tater tot layer with riced cauliflower that's been squeezed completely dry in a kitchen towel and seasoned with salt, garlic powder, and shredded cheddar pressed into the top of the cream layer. Bake uncovered at 375°F for 30–35 minutes until the cauliflower topping is golden. It won't replicate the crunch of tots, but the flavor of the casserole carries through.
What to Serve With This Recipe
- Simple green salad with ranch dressing — a cool, crisp counterpoint to the rich, cheesy casserole; ranch ties the flavors together naturally.
- Steamed broccoli or roasted green beans — a straightforward vegetable side that adds color and balances the heaviness of the dish.
- Coleslaw — the creamy, tangy crunch of a good coleslaw cuts through the richness of the cheese and cream filling in exactly the right way.
- Dinner rolls or buttered biscuits — for mopping up the creamy filling; try Best Garlic Herb Roasted Chicken — Easy 1-Pan Dinner for a scratch-made side that takes just 20 minutes.
- Corn on the cob or canned corn — a natural pairing with the American comfort food profile of this casserole.
- Hot sauce or pickled jalapeños on the side — for anyone who wants to bring their own heat to an otherwise mild, crowd-pleasing dish.
- Iced sweet tea or a cold light beer — both are classic pairings with the rich, savory flavors of a baked tater tot casserole.
Storage Instructions
Refrigerator
Allow the casserole to cool completely to room temperature before covering the baking dish tightly with plastic wrap or foil. Store in the refrigerator for
up to 4 days. The cream layer thickens considerably when cold, which actually makes cold portions easier to portion cleanly than the freshly baked dish.
Freezer
This casserole freezes well. After baking and cooling completely, cut individual portions and wrap each tightly in plastic wrap, then foil. Freeze for
up to 2 months. Thaw overnight in the refrigerator before reheating. Alternatively, freeze the entire unbaked assembled casserole (before the cheese layer) for up to 1 month — add the cheese and bake from frozen at 375°F for 55–65 minutes, covered for the first 40 minutes.
Shelf Life Summary
| Component |
Refrigerator |
Freezer |
| Baked casserole (full or portions) |
Up to 4 days |
Up to 2 months |
| Unbaked assembled casserole |
Up to 24 hours |
Up to 1 month |
| Meat and cream layer (prepped) |
Up to 2 days |
Up to 2 months |
Reheating Instructions
Oven (Best Method — Restores Crispiness)
Preheat to
350°F. Place the portion or the whole dish in an oven-safe dish, cover loosely with foil, and heat for
15–20 minutes until warmed through. Remove the foil for the last 5 minutes to re-crisp the tot layer. This is the best method for restoring close to the original texture.
Microwave (Fastest Option)
Place a single serving in a microwave-safe bowl, cover loosely with a damp paper towel, and heat in
60-second intervals at 80% power for 2–3 minutes until steaming hot throughout. The tots will soften in the microwave — they won't re-crisp — but the flavor is fully intact. Per
FDA food safety guidelines, all leftovers should reach
165°F internally before consuming.
Stovetop
Transfer a single portion to a nonstick skillet over
medium heat with a tablespoon of water or broth. Cover with a lid and heat for 6–8 minutes, stirring occasionally, until warmed through. This method works well for the meat and cream layer but won't restore any crispiness to the tots — use the oven method if texture matters to you.
Nutrition Facts
Per serving (approximately ⅙ of recipe)
| Nutrient |
Amount |
| Calories |
~550 kcal |
| Total Fat |
32g |
| Saturated Fat |
13g |
| Cholesterol |
110mg |
| Sodium |
890mg |
| Total Carbohydrates |
38g |
| Dietary Fiber |
3g |
| Sugars |
3g |
| Protein |
28g |
Disclaimer: Nutrition values are estimates calculated using standard ingredient databases and will vary based on the specific brand of tater tots used, the fat content of your ground beef, the amount of cheese applied, and any substitutions made. These figures are for general informational purposes only and do not constitute dietary or medical advice. A registered dietitian can provide personalized nutritional guidance.
Frequently Asked Questions
1. Can I make cheesy tater tot casserole ahead of time and bake it the next day?
Yes — assemble the casserole through the tot layer (without the cheese), cover tightly with plastic wrap, and refrigerate for up to 24 hours. When ready to bake, add the cold dish to a cold oven, then set the temperature to 375°F. Add 8–10 minutes to the covered bake time to account for the cold start, then proceed with the uncovered cheese phase as written.
2. Do I need to cook the tater tots separately before adding them to the casserole?
No — that's one of the great things about this baking method. The tots go in frozen and cook through during the two-stage bake. The covered phase cooks them from the inside, and the uncovered phase crisps the tops under the melted cheese. Pre-cooking would make them soggy by the time the casserole is done.
3. My casserole came out watery — what happened?
Two most likely causes: the ground beef wasn't drained thoroughly, leaving excess grease in the dish, or the tater tots were thawed rather than frozen when they went in, releasing water during baking. Drain the beef completely and always use frozen tots to avoid this issue.
4. Can I use a different size or shape of baking dish?
A standard 9×13 inch baking dish works well and produces a slightly shallower casserole with a higher ratio of crispy tot surface area to filling — many people actually prefer it. A round or oval 2–3 quart deep casserole dish (like the one in the photo) gives you more of a thick, layered casserole with a higher filling-to-tot ratio per bite.
5. What's the best cheese for melting on top of this casserole?
Freshly shredded sharp cheddar is the top choice — it melts smoothly and its flavor is bold enough to stand up to the savory meat and cream layers. Colby Jack gives a milder melt. For an ultra-smooth, almost sauce-like melt, use thinly sliced or cubed Velveeta across the tot layer before baking.
6. Can I add vegetables directly to this casserole?
Absolutely — frozen corn, peas, or diced green chiles can be stirred into the cream layer before assembly without affecting bake time. Fresh vegetables like diced bell pepper or zucchini should be sautéed first to release their moisture; adding them raw risks a watery casserole.
7. How do I keep the tater tot layer crispy after baking?
Serve promptly — the tots are crispiest right out of the oven. If the dish sits for more than 15–20 minutes, the cheese traps steam and the tots begin to soften underneath. Storing and reheating in the oven at 350°F uncovered for the last 5 minutes restores a good portion of the crispiness.
8. Can I double this recipe for a larger crowd?
Yes — double all ingredient quantities and use two 9×13 baking dishes rather than overfilling one deep dish. Two dishes also allow you to stagger the serving so the second dish stays warm in the oven while the first is being served. The baking time stays the same for each dish.
9. Is there a way to make this casserole less salty?
The sodium in this dish comes primarily from the condensed soup and the tater tots. Use a low-sodium cream of mushroom soup (available at most major grocery stores), skip the additional salt in the meat layer (the Worcestershire and soup provide enough), and taste as you go before assembly.
10. Can I cook this in a slow cooker instead of the oven?
The baking method is what crisps the tater tots — a slow cooker will steam everything and produce soft, mushy tots rather than the crispy, golden topping the recipe is built around. If you want a slow cooker version, this becomes a fundamentally different recipe: layer and cook on HIGH for 2.5–3 hours, then top with cheese and cover for the final 15 minutes, accepting that the tots will be soft rather than crispy.
11. What ground beef fat ratio works best here?
80/20 fat-to-lean is the sweet spot — enough fat to keep the meat juicy and flavorful during baking, but not so much that draining leaves you with too little meat. Leaner ground beef (90/10) works but results in a slightly drier meat layer; compensate by adding an extra 2 tablespoons of sour cream to the cream layer.
12. Can kids help make this recipe?
Absolutely — this is a great recipe for involving kids in the kitchen. They can arrange the frozen tater tots across the cream layer (fun and forgiving work), scatter the shredded cheese on top, and help stir the cream mixture in a bowl. Just handle all stovetop browning and oven work as the adult in the kitchen.
Expert Chef Tips
1. Layer flavor at every stage, not just at the end.
Season the beef while it's browning, taste and adjust the cream layer before it goes in, and consider a light sprinkle of smoked paprika or garlic powder directly over the cheese layer before the final bake. Seasoning in layers means every bite of the finished casserole tastes intentional rather than flat.
2. Let the dish rest on a wire rack, not a cold countertop.
Placing a hot ceramic baking dish directly on a cold granite or tile countertop can cause thermal shock that cracks the dish over time. A wire cooling rack or folded kitchen towel beneath the dish during the rest period protects both the dish and your countertop.
3. Press the tater tots gently into the cream layer before baking.
A light press anchors each tot slightly into the cream mixture beneath it, which helps them hold their position during the vigorous bubbling of the covered bake and produces a more uniform top layer after the cheese goes on. Don't push them all the way in — you want the tops exposed and above the cream layer.
4. Add a layer of caramelized onions under the cream for a deeper, sweeter flavor.
Cook a full sliced yellow onion in butter over low heat for 20 minutes until deeply golden and jammy before adding it to the bottom of the baking dish under the beef. This adds a subtle sweetness and umami depth that makes the casserole taste like it came from a restaurant rather than a weeknight kitchen. For another easy comfort food classic, check out
Best Creamy Garlic Meatballs — Easy 45-Minute Bake.
5. Finish with a broil for the ultimate crispy cheese top.
After the 20-minute uncovered bake, switch the oven to broil on high for
90 seconds to 2 minutes, watching constantly. The direct top heat blisters and lightly chars the cheese in a way the standard bake can't replicate — producing the glistening, slightly browned finish you see in the photo. Keep the dish on the middle rack to avoid burning.
Recipe Summary
This
cheesy tater tot casserole is the definition of no-fuss comfort food — browned, seasoned ground beef topped with a creamy mushroom soup layer, blanketed with frozen tater tots, and finished with a full layer of freshly shredded cheddar that melts into a glossy, golden blanket during the final uncovered bake. The two-stage baking method (covered, then uncovered) is what makes everything work: it heats the filling completely through before crisping the tots and melting the cheese to perfection. One dish, 15 minutes of prep, and a casserole that genuinely earns its place in your regular rotation.
Conclusion
Once you make this
cheesy tater tot casserole, it becomes one of those recipes that lives rent-free in your weeknight lineup for good reason. It checks every box — it's fast to assemble, hard to mess up, and delivers that particular combination of crispy, cheesy, savory comfort that's genuinely hard to argue with. Make it for a weeknight dinner, bring it to a potluck, or assemble it the night before and slide it in the oven after a long day. Either way, don't expect leftovers. For another baked dinner the whole family will devour, don't miss
Garlic Butter Salmon Creamy Sauce in 35 Min.