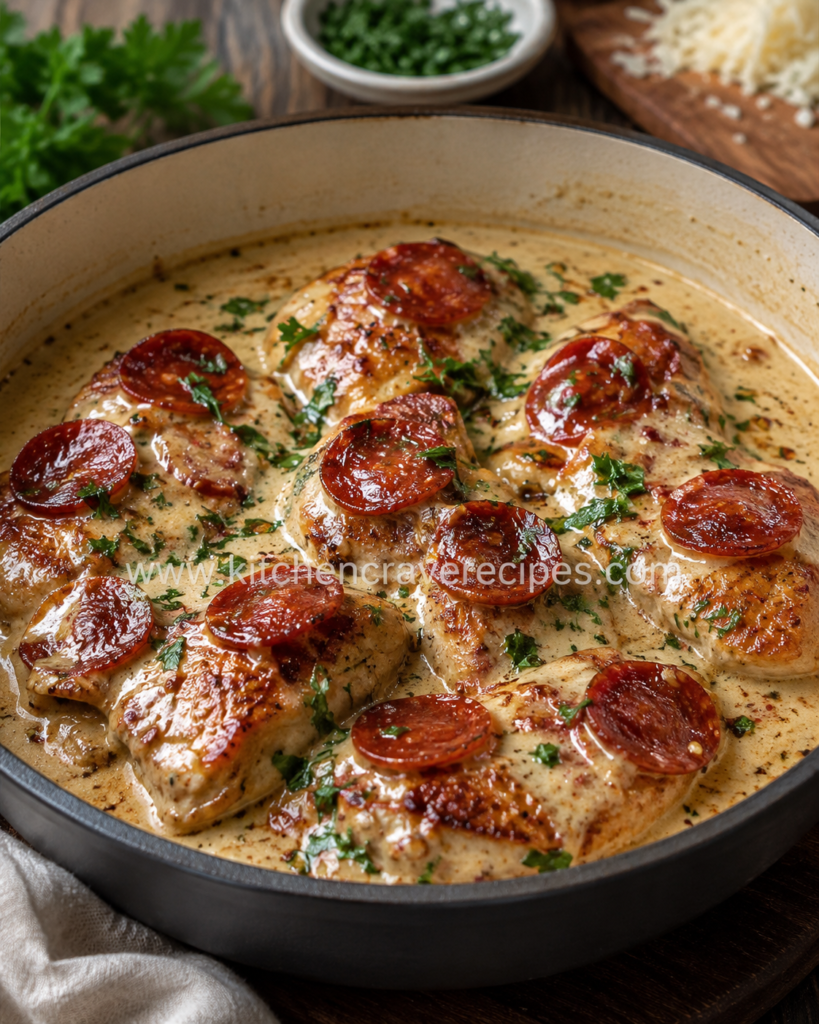
Creamy Pepperoni Chicken — One-Skillet Dinner Ready in 30 Minutes
Creamy pepperoni chicken is the kind of dish that sounds unusual until you taste it — and then it makes complete sense. Seared chicken thighs sitting in a rich, garlicky cream sauce with crispy, slightly curled pepperoni scattered across the top and fresh parsley finishing each plate. The pepperoni does two things here: it renders its spiced fat into the skillet, which flavors the entire sauce, and then it crisps up during the final simmer so each bite has a little texture contrast against the silky cream.
The photo shows chicken thighs in a wide, shallow bowl — skin-on and deeply golden — with mini pepperoni curled and caramelized across the top and fresh chopped parsley scattered over the sauce. That is exactly the version this recipe delivers.
This is a
standard recipe — one protein, a pan sauce built from the drippings, and a short, active cooking process. The whole thing comes together in a single skillet in about 30 minutes, which makes it realistic on a weeknight without cutting any corners on flavor.
Why You'll Love This Creamy Pepperoni Chicken
- The pepperoni does double duty — it builds the sauce's flavor base AND crisps on top for texture in every bite.
- One skillet handles everything — no separate pans, no extra cleanup, just one good heavy pan.
- The cream sauce comes together from the drippings — garlic, cream, and Parmesan build directly on the fond left by the chicken and pepperoni.
- Chicken thighs stay juicy — bone-in, skin-on thighs hold moisture through the sauté and simmer far better than breasts.
- Ready in 30 minutes of active cooking time — prep is minimal and the steps move quickly once you start.
- The sauce has real depth — Italian seasoning, garlic, a touch of tomato paste, and the rendered pepperoni fat give it layers of flavor without any complicated technique.
- It works over pasta, rice, or crusty bread — the sauce is rich enough to be the center of the meal, not just a coating.
- Mini pepperoni works better than standard slices — the smaller rounds crisp more evenly and distribute across every piece of chicken in the final presentation.
|
|
| Recipe Name |
Creamy Pepperoni Chicken |
| Course |
Dinner, Main Course |
| Cuisine |
American, Italian-American |
| Cooking Method |
Sautéing |
| Prep Time |
10 minutes |
| Cook Time |
30 minutes |
| Total Time |
40 minutes |
| Servings |
4 |
| Calories |
~580 kcal per serving (estimated) |
Ingredients
For the Chicken
- 4 bone-in, skin-on chicken thighs (about 2½ lbs total)
- 1 teaspoon fine salt
- ½ teaspoon black pepper
- 1 teaspoon garlic powder
- ½ teaspoon smoked paprika
- 1 tablespoon olive oil
For the Pepperoni and Sauce
- 3 oz mini pepperoni (about ¾ cup)
- 4 garlic cloves, minced
- 1 tablespoon tomato paste
- 1 cup heavy cream
- ½ cup low-sodium chicken broth
- ½ cup freshly grated Parmesan
- 1 teaspoon Italian seasoning
- ¼ teaspoon crushed red pepper flakes (optional)
- Salt and black pepper to taste
Garnish
- 2 tablespoons fresh flat-leaf parsley, roughly chopped
Optional Add-Ins
- ½ cup sliced baby bella mushrooms (sauté before the garlic)
- 2 tablespoons sun-dried tomatoes, drained and chopped
- ¼ teaspoon fennel seeds (toast in the skillet before adding pepperoni)
Ingredient Notes & Substitutions
Chicken thighs vs. breasts: Bone-in, skin-on thighs are the right choice for this method. The skin crisps during the initial sear and holds up through the simmer. Boneless, skinless thighs work as a substitute — reduce searing time to 4 to 5 minutes per side and check for doneness earlier. Chicken breasts can be used, but they require more attention during the simmer to avoid drying out. If you use breasts, pound them to an even thickness before seasoning.
Mini pepperoni vs. standard slices: Mini pepperoni (the kind sold for pizza snacking) crisp up more evenly in the skillet than larger slices. Standard-size pepperoni can be used — just cut each slice into quarters so they render and crisp at a similar rate. Avoid thick-cut deli pepperoni here; it does not render well in a short cook time.
Heavy cream: This sauce is built on heavy cream — it holds up to the simmering heat without breaking. Half-and-half can work in a pinch but produces a thinner sauce and has a higher chance of curdling if the heat is too high. Do not substitute milk.
Tomato paste: Just one tablespoon gives the sauce a subtle warmth and color that ties the pepperoni flavor into the cream. It also helps balance the richness of the cream. Skipping it is fine, but the sauce will be noticeably paler and flatter in flavor.
Parmesan: Freshly grated from a block melts smoothly into hot cream. Pre-grated Parmesan from a canister often contains anti-caking agents that make the sauce slightly grainy. The difference is noticeable in a sauce this simple.
Kitchen Tools Needed
- 12-inch heavy-bottomed skillet or cast iron pan — large enough to hold 4 chicken thighs without crowding
- Tongs — for flipping and maneuvering the chicken safely
- Wooden spoon or silicone spatula — for building the sauce and scraping up the fond
- Instant-read thermometer — for checking chicken doneness accurately
- Measuring cups and spoons
- Box grater or microplane — for fresh Parmesan
- Sharp knife and cutting board
- Splatter screen (recommended — the pepperoni pops when it renders)
How to Make Creamy Pepperoni Chicken — Step-by-Step
Step 1: Season and Dry the Chicken
Pat the chicken thighs completely dry with paper towels. This is one of those steps that genuinely changes the outcome — wet chicken skin steams in the pan instead of searing, and you lose the golden crust that makes this dish visually and texturally what it should be.
Combine the salt, black pepper, garlic powder, and smoked paprika in a small bowl. Rub the mixture evenly over both sides of each thigh, pressing gently so the seasoning adheres.
Step 2: Sear the Chicken
Heat 1 tablespoon of olive oil in a 12-inch skillet over medium-high heat until the oil shimmers. Place the chicken thighs skin-side down in the pan — you should hear an immediate, confident sizzle. If the pan is silent, it is not hot enough yet.
Cook, undisturbed, for 6 to 7 minutes until the skin is deeply golden and releases naturally from the pan. Flip and cook the other side for 4 to 5 minutes. The chicken will not be fully cooked through at this point — that happens during the sauce simmer. Transfer the seared thighs to a plate and set aside.
Tip: Resist moving the chicken during the sear. The skin sticks briefly and then releases on its own when the crust has formed properly. Forcing a flip too early tears the skin.
Step 3: Render and Crisp the Pepperoni
Without wiping the pan, reduce the heat to medium. Add the mini pepperoni to the skillet in a single layer. Cook for 2 to 3 minutes, stirring occasionally, until the pepperoni begins to curl at the edges and turn a deeper red. You will see orange-tinted fat releasing into the pan — that fat is the flavor foundation for the entire sauce.
Use a slotted spoon to remove about two-thirds of the pepperoni and set aside on a paper towel-lined plate. Leave the remaining third in the pan to build into the sauce.
Tip: Keeping some pepperoni in the sauce and reserving the rest for topping gives you two textures — some pieces soften into the sauce and add background flavor, while the reserved ones stay crisp on top.
Step 4: Build the Garlic and Tomato Base
Add the minced garlic to the skillet with the remaining pepperoni and rendered fat. Stir continuously over medium heat for about 45 seconds to 1 minute — the garlic should smell fragrant and just barely turn golden. Do not let it brown fully; garlic that goes too dark turns bitter and will affect the whole sauce.
Add the tomato paste and stir it into the garlic and fat, pressing and spreading it across the pan. Cook for 1 minute, stirring constantly, until the paste darkens slightly from bright red to a deeper brick color. This brief cook removes the raw tomato taste.
Step 5: Add the Cream and Build the Sauce
Pour in the chicken broth first, scraping up any browned bits from the bottom of the pan with a wooden spoon. Those caramelized bits — the fond — carry concentrated flavor from the chicken sear and pepperoni. Don't leave them behind.
Add the heavy cream, Italian seasoning, and crushed red pepper flakes if using. Stir to combine and bring the sauce to a gentle simmer over medium heat — you want small, lazy bubbles around the edges, not a rolling boil. A hard boil can cause the cream to separate and the sauce to turn grainy.
Step 6: Simmer the Chicken Through
Nestle the seared chicken thighs back into the skillet, skin-side up, so the skin stays above the sauce and does not re-soften. Spoon a little sauce over each thigh, then reduce heat to medium-low. Simmer gently for 12 to 15 minutes, spooning the sauce over the chicken every few minutes.
The chicken is done when an instant-read thermometer inserted into the thickest part of the thigh (away from the bone) reads
165°F. Per
USDA guidelines for safe poultry cooking, 165°F is the safe minimum internal temperature for chicken.
Step 7: Finish the Sauce and Serve
Remove the chicken from the heat. Stir the freshly grated Parmesan into the sauce, a few tablespoons at a time, letting each addition melt before adding the next. Taste and adjust seasoning with salt and black pepper.
Scatter the reserved crispy pepperoni across the chicken thighs. Finish with the chopped fresh parsley. Serve directly from the skillet or spoon into wide, shallow bowls over pasta, rice, or alongside crusty bread for soaking up the sauce. For a great pasta pairing, our
Cheesy Beef Deep-Dish Pizza Baked in One Pan works particularly well under this sauce.
My Best Cooking Tips
Dry the chicken skin before it hits the pan. Moisture on the surface of chicken thighs creates steam between the skin and the pan, and steam prevents browning. A quick pat with paper towels before seasoning makes a real difference in how golden the skin gets.
Method-specific sautéing tip — manage your heat carefully. The transition between searing the chicken (medium-high) and building the cream sauce (medium to medium-low) is deliberate. If you add cream to a pan that is still screaming hot, it can reduce too fast and break. Let the pan temperature drop naturally for 30 seconds before adding the broth and cream.
Reserve some pepperoni for the top. Pepperoni that simmers in cream softens and loses its crispness. Keeping the majority of the crisped pepperoni off to the side and scattering it over the finished dish right before serving gives the dish the textural contrast that makes it interesting to eat.
Add Parmesan off the heat or on very low heat. Parmesan added to a rapidly boiling sauce often seizes and turns grainy rather than melting smoothly. Remove the pan from direct heat, stir in the cheese gradually, and let the residual warmth of the sauce do the melting work.
Use a wide skillet, not a saucepan. A wide cooking surface lets the cream sauce reduce and concentrate more efficiently. A saucepan with high sides traps steam and slows the reduction, which can result in a thin, watery sauce even after the cook time is up.
Common Mistakes to Avoid
Not patting the chicken dry before searing. Wet chicken skin doesn't brown — it steams. The sear is what builds the golden crust and the fond at the bottom of the pan that flavors the entire sauce. Take 30 extra seconds to dry the chicken before seasoning and you'll see a noticeably better result.
Overcrowding the skillet during the sear. Sautéing depends on direct contact with a hot pan surface. Squeezing 4 large thighs into a pan that's too small drops the pan temperature significantly and results in pale, grey chicken instead of a golden crust. Use a 12-inch skillet and sear in two batches if your pan is smaller.
Letting the cream sauce boil hard. A rolling boil causes cream-based sauces to separate — the fat and liquid split, leaving a greasy, curdled sauce that cannot be fixed by stirring. Keep the heat at medium-low during the simmer and look for small, occasional bubbles rather than active boiling.
Adding Parmesan to a very hot sauce. Dumping the Parmesan directly into a bubbling sauce causes it to clump or turn stringy. Pull the pan off direct heat, then stir the cheese in gradually — the sauce is hot enough to melt it without the high heat causing problems.
Skipping the fond. The browned bits stuck to the pan after searing the chicken and rendering the pepperoni are not burnt residue — they are concentrated flavor. When you add the chicken broth in Step 5, scrape them up thoroughly. Leaving them behind means leaving flavor behind.
Using pre-grated Parmesan from a canister. Powdery, shelf-stable Parmesan often contains starches and anti-caking agents that prevent clean melting. The result can be a slightly gritty sauce. Freshly grated Parmesan from a block melts cleanly into the warm cream in a way the pre-grated version simply doesn't match.
Putting the chicken skin-side down into the sauce. When you nestle the seared chicken back into the pan for the simmer, always keep the skin-side up and above the sauce. Skin that sits in cream for 12 to 15 minutes goes soft and loses the texture you worked to build during the sear.
Variations
Spicy Calabrian Chili Version
Swap the crushed red pepper flakes for 1 to 2 teaspoons of Calabrian chili paste stirred into the sauce along with the tomato paste. Calabrian chili is fruitier and more complex than standard red pepper flakes, and it adds a different kind of heat that pairs well with the richness of the cream. Add it gradually and taste as you go — it is significantly hotter than flakes by volume.
Mushroom and Pepperoni Variation
Add ½ cup of thinly sliced baby bella mushrooms to the skillet after removing the crisped pepperoni in Step 3. Sauté the mushrooms for 3 to 4 minutes over medium heat until they release their moisture and begin to brown, then proceed with the garlic step. The mushrooms add an earthy layer that complements the pepperoni's spice without competing with the cream sauce.
Boneless Thigh Version (Faster Cook)
Use boneless, skinless chicken thighs and reduce the sear time to 4 to 5 minutes per side. The simmer time also shortens — check for 165°F at around 8 to 10 minutes rather than 12 to 15. The sauce builds the same way, but without the rendered skin fat, adding an extra ½ tablespoon of olive oil or butter to the pan after searing helps maintain richness.
Gluten-Free Version
This recipe is naturally gluten-free as written — no flour thickener is used and the sauce relies on cream reduction and Parmesan for body. Always verify that your specific brand of pepperoni and chicken broth are certified gluten-free, as some products contain fillers or additives that include gluten. Serve over gluten-free pasta or rice rather than regular pasta or bread.
Low-Carb Variation
This is a variation note, not a description of the original recipe. Serve the creamy pepperoni chicken over cauliflower rice or zucchini noodles instead of regular pasta. The sauce and protein are unchanged and naturally low in carbohydrates — the carb reduction comes entirely from the serving base. Check your specific Parmesan brand for any added starch if strict carb counting is important.
What to Serve With This Recipe
- Fettuccine or pappardelle pasta — wide noodles hold the cream sauce well; toss lightly before plating the chicken on top.
- Crusty Italian bread or ciabatta — essential for soaking up every bit of the garlicky cream sauce left in the bowl.
- Creamy garlic mashed potatoes — a rich pairing that works well when you want something more substantial than pasta.
- Simple arugula salad with lemon vinaigrette — the bitterness and acidity cut through the richness of the cream sauce effectively.
- Roasted asparagus or broccolini — a quick oven roast at 400°F while the chicken simmers keeps the sides simple and the cleanup minimal; see our Cheesy Beef Deep-Dish Pizza Baked in One Pan for timing.
- Steamed white or brown rice — absorbs the sauce well and is a neutral base that lets the pepperoni and cream flavors lead.
- Sautéed spinach with garlic — wilts quickly in the same type of skillet and keeps the meal in the same Italian-American flavor profile.
- Sparkling water with lemon or a light Chianti — both work well; the acidity balances the fat in the cream sauce.
Storage & Reheating
Refrigerator Storage
Allow the chicken and sauce to cool to room temperature before transferring to an airtight container. Store in the refrigerator for up to
4 days. Keep the chicken and sauce together — storing separately causes the chicken to dry out faster. Do not leave the dish at room temperature for more than 2 hours; see
FDA guidance on safe food handling and storage for reference.
Freezer Storage
Cream-based sauces do not freeze as cleanly as tomato or broth-based sauces — they have a tendency to separate upon thawing. Freezing is possible but not recommended for this recipe if sauce texture matters to you. If you do freeze, store in a freezer-safe container for up to
6 weeks, thaw overnight in the refrigerator, and reheat gently while stirring to bring the sauce back together.
Shelf Life Summary
| Storage Method |
Duration |
| Room temperature |
2 hours maximum |
| Refrigerator |
Up to 4 days |
| Freezer |
Up to 6 weeks (sauce texture may change) |
How to Reheat Creamy Pepperoni Chicken
Stovetop (recommended): Place the chicken and sauce in a skillet over medium-low heat. Cover loosely and heat for 6 to 8 minutes, turning the chicken once and spooning the sauce over it as it warms. Add a splash of chicken broth or cream (1 to 2 tablespoons) if the sauce has thickened too much in the refrigerator.
Microwave: Place one portion in a microwave-safe dish and cover loosely with a damp paper towel. Heat at 70% power in 90-second intervals, checking and stirring the sauce between each interval, until warmed through. Avoid full power — it can cause the cream sauce to separate and the chicken to toughen.
Oven: Preheat to 325°F. Place the chicken in an oven-safe dish, spoon sauce over the top, and cover tightly with foil. Heat for 15 to 18 minutes until the chicken is warmed through.
Nutrition Facts
Estimated values per serving (1 chicken thigh with sauce, based on 4 servings). Values are estimates and will vary based on exact ingredients, brands, and modifications.
| Nutrient |
Per Serving (approx.) |
| Calories |
580 kcal |
| Total Fat |
44 g |
| Saturated Fat |
20 g |
| Cholesterol |
195 mg |
| Sodium |
890 mg |
| Total Carbohydrates |
5 g |
| Dietary Fiber |
0 g |
| Total Sugars |
2 g |
| Protein |
38 g |
| Calcium |
210 mg |
| Iron |
2 mg |
These values are estimates based on the listed ingredients and serving size. Actual values will vary depending on specific brands used and any modifications to the recipe.
Frequently Asked Questions
Can I use chicken breasts instead of thighs for this creamy pepperoni chicken?
Yes, but they require a bit more care. Pound them to an even thickness of about ¾ inch before seasoning to help them cook through at the same rate. Reduce the simmer time to 8 to 10 minutes and check for 165°F earlier. Breasts have less fat than thighs, so the sauce will be your primary source of moisture — don't rush the simmer.
Why does my cream sauce look grainy or separated?
This usually happens when the sauce is heated too aggressively — either at too high a temperature or when Parmesan is added to a rapidly boiling liquid. For the smoothest sauce, keep the heat at medium-low during the simmer and add the Parmesan off direct heat, stirring it in gradually. If the sauce does separate, whisk in a tablespoon of cold butter over low heat to help bring it back together.
What is the best sautéing tip for getting a good sear on the chicken skin?
Two things matter most: dry skin and a hot pan. Pat the chicken completely dry before seasoning, and make sure the oil is shimmering before the chicken goes in. Once the thighs hit the pan, leave them alone. The skin will stick initially and release on its own when the crust has formed — usually around 6 to 7 minutes. Forcing a flip before it's ready tears the skin.
Can I make this recipe ahead of time?
The dish holds well in the refrigerator for up to 4 days. If making it ahead for a dinner, sear the chicken and build the sauce through Step 5, then refrigerate. Finish the simmer with the chicken in the sauce right before serving. This keeps the chicken from over-cooking during reheating and gives the sauce one final reduction with fresh heat.
Is there a way to make the sauce thicker?
The sauce naturally thickens as it reduces during the simmer and as the Parmesan melts in. If it still seems thin after the chicken is done, remove the chicken to a plate and simmer the sauce alone over medium heat for 3 to 4 additional minutes, stirring frequently, until it coats the back of a spoon. Avoid adding flour or cornstarch — they can dull the flavor of a cream sauce.
What type of pepperoni works best — mini or regular?
Mini pepperoni is the better choice. The smaller size means more surface area in contact with the hot pan, so they render and crisp more evenly and quickly. Regular-size pepperoni slices can be used — cut each one into quarters before adding to the pan. Whole regular slices don't crisp as consistently and can stay chewy in the center.
How do I know when the chicken is fully cooked through?
An instant-read thermometer is the most reliable tool. Insert it into the thickest part of the thigh, away from the bone, and look for a reading of 165°F. Visual cues — juices running clear, no pink near the bone — can be helpful but are less precise than a thermometer reading, especially with bone-in pieces where the heat takes longer to penetrate.
Can I make this dish dairy-free?
The cream and Parmesan are central to the sauce's texture and flavor, so a dairy-free version requires meaningful substitutions. Full-fat canned coconut cream can replace heavy cream — it produces a slightly sweeter, thicker sauce. Nutritional yeast can add a savory note in place of Parmesan, though the flavor profile shifts noticeably. The overall dish will still be good but will taste quite different from the original.
Does the pepperoni stay crispy in the finished dish?
Only the pepperoni reserved and scattered over the top at the end stays crispy. The pepperoni that simmers in the sauce softens and blends into the flavor base. That contrast — some crispy on top, some tender in the sauce — is intentional and gives the dish more textural interest than if all of it were cooked the same way.
What pasta shape works best as a base for this dish?
Wide, flat shapes like fettuccine, pappardelle, or tagliatelle work best because they hold the cream sauce in their flat surface area without letting it slide off. Shorter shapes like rigatoni or penne also work well since the sauce coats the outside and can pool inside the tubes. Avoid very thin pasta like angel hair — the sauce is heavy enough to overwhelm it.
Tips for Better Results
Season the chicken more generously than you think is necessary. Bone-in chicken thighs have a lot of surface area, and the seasoning needs to be present on both sides to come through against the richness of the cream sauce and the strong flavor of the pepperoni. A light dusting will disappear into the sauce. A confident, even coat on both sides makes the chicken itself flavorful rather than just the vehicle for the sauce.
Let the pan come fully to temperature before the chicken goes in. A properly heated skillet means the chicken starts searing immediately on contact rather than sitting in warm fat and slowly beginning to cook. The difference shows up in the crust — immediate high heat creates a crisp sear; a lukewarm pan creates pale, soft skin that sticks to the pan.
Spoon the sauce over the chicken regularly during the simmer. This basting step keeps the top of each thigh moist, distributes flavor evenly, and helps the sauce coat the chicken rather than sitting separately in the pan. It takes about 30 seconds each time you do it and noticeably improves the final dish.
Taste the sauce before adding Parmesan and before serving. Pepperoni and Parmesan are both salty ingredients, and different brands vary considerably in their sodium content. Tasting at two points — once before the cheese and once at the end — lets you adjust rather than ending up with a dish that is too salty to fix at the table.
Use a splatter screen when rendering the pepperoni. The fat that renders out of pepperoni is hot and pops as it hits the surface of the skillet. A splatter screen keeps your stovetop clean and protects your hands during the 2 to 3 minutes it takes for the pepperoni to crisp.
Recipe Summary
Creamy pepperoni chicken is a sautéed skillet dinner built on seared bone-in chicken thighs, crispy mini pepperoni, and a Parmesan garlic cream sauce that comes together in the same pan. The pepperoni renders into the sauce for flavor and stays crispy on top for texture, while the chicken simmers until tender and fully cooked through. From seasoning the chicken to serving, the active cook time is about 30 minutes, making it a reliable option when you want something genuinely satisfying without a long project in the kitchen.