Garlic Herb Butter Lobster Tails — Best 25-Min Foolproof
There are dinners that feel like an occasion, and then there are
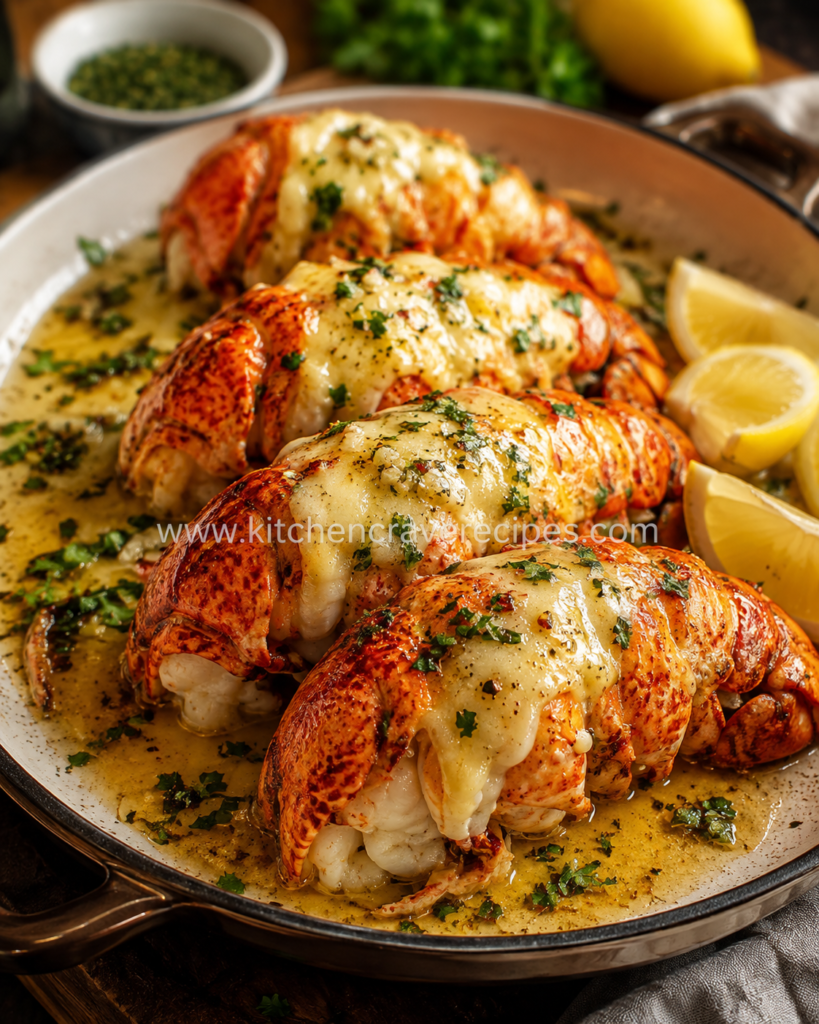
garlic herb butter lobster tails — the kind of dish that makes an ordinary Tuesday feel like a celebration without requiring any advanced culinary skill to pull off. The photo says everything: four split lobster tails arranged in a white ceramic baking dish, their shells vivid orange-red after broiling, the white meat fanned out and lacquered in a pooling, golden garlic herb butter sauce fragrant with fresh parsley, all nestled alongside bright lemon wedges. It's genuinely stunning on the table.
The broiling method is the reason this works as a weeknight recipe. Positioned close to the oven's top heating element at high heat, the lobster meat cooks in minutes — developing a light golden sheen on the surface while the garlic herb butter bastes the meat from above and pools into the baking dish below. There is no flipping, no fussing, and no guesswork. You butterfly the tails, brush on the butter, and let the broiler do every bit of the heavy lifting in under 10 minutes of actual cook time.
Recipe Quick Info
| Detail |
Info |
| Prep Time |
15 minutes |
| Cook Time |
10 minutes |
| Total Time |
25 minutes |
| Servings |
4 |
| Course |
Main Course |
| Cuisine |
American |
| Cooking Method |
Broiling |
| Calories |
~310 per tail |
| Difficulty |
Standard |
Why You'll Love These Garlic Herb Butter Lobster Tails
- Restaurant results in 25 minutes flat — the broiler cooks lobster tails faster and more evenly than most stovetop methods, and the total active time is genuinely minimal for the payoff.
- The garlic herb butter is the whole show — a rich, golden compound butter with fresh garlic, parsley, lemon zest, and a hint of paprika saturates every bite of the meat and pools beautifully in the baking dish.
- Butterflying the tails is easier than it looks — once you do it once, you'll realize it's a 60-second step with kitchen shears, not a complicated knife skill, and it makes the finished presentation spectacular.
- Naturally low-carb and gluten-free — the entire recipe contains zero grains, zero flour, and zero added sugars, making it compatible with keto, paleo, and most low-carb eating patterns without a single swap.
- Scales effortlessly for a dinner party — this recipe doubles or triples without changing the broiling time, provided you use a large enough broiler-safe dish and don't overlap the tails.
- Crowd-pleasing flavor profile — the combination of garlic, butter, lemon, and fresh herbs is one of the most universally appealing combinations in cooking, which means this pleases nearly every palate at the table.
- Pairs with almost anything — from crusty bread and a simple salad for an easy weeknight dinner to surf-and-turf with a filet for a formal celebration, these lobster tails transition across occasions without effort.
Ingredients
For the Lobster Tails
- 4 lobster tails (6–8 oz each), fresh or fully thawed from frozen
- ½ teaspoon kosher salt
- ¼ teaspoon black pepper
- ¼ teaspoon smoked paprika (for color and a subtle depth)
For the Garlic Herb Butter Sauce
- 6 tablespoons unsalted butter, melted
- 4 cloves garlic, finely minced or grated
- 2 tablespoons fresh flat-leaf parsley, finely chopped (plus more for garnish)
- 1 tablespoon fresh lemon juice
- 1 teaspoon lemon zest
- ½ teaspoon dried thyme (or 1 teaspoon fresh thyme leaves)
- ¼ teaspoon crushed red pepper flakes (optional, for gentle heat)
- ¼ teaspoon kosher salt
For Serving
- 2 lemons, halved or cut into wedges (as shown in photo)
- Additional fresh parsley, finely chopped, for finishing
- Crusty bread, for soaking up the pooled butter sauce
Optional Add-Ins
- 1 tablespoon dry white wine stirred into the butter sauce (adds acidity and complexity)
- 1 teaspoon Dijon mustard whisked into the butter (adds emulsification and a subtle tang)
- Pinch of cayenne in place of red pepper flakes (sharper, more direct heat)
Substitution Guide
| Original Ingredient |
Substitution |
Notes |
| Unsalted butter |
Clarified butter (ghee) |
Higher smoke point; slightly nuttier flavor under broiler heat |
| Fresh parsley |
Fresh chives or fresh tarragon |
Tarragon gives a more French flavor profile |
| Fresh lemon juice |
Fresh lime juice |
More tropical; works well with a touch of cilantro |
| Smoked paprika |
Sweet paprika |
Same color contribution, slightly less depth |
| Fresh garlic |
¾ teaspoon garlic powder |
Use only if fresh unavailable; flavor is less pungent and aromatic |
| Lobster tails (fresh) |
Frozen lobster tails, fully thawed |
Thaw overnight in fridge; pat extremely dry before butterflying |
Kitchen Tools Needed
- Broiler-safe baking dish (white ceramic, 9×13 inch or similar, as shown in the photo) — ceramic holds heat evenly and is safe under the broiler's direct high heat
- Kitchen shears — the correct tool for cutting through the top shell of each lobster tail to butterfly; a knife is not recommended for this step
- Small saucepan or microwave-safe bowl — for melting and combining the garlic herb butter
- Pastry brush — for applying the butter sauce generously to each butterflied tail before and during broiling
- Oven rack positioned 6–8 inches from the broiler element — distance is a critical broiling variable; too close burns the shell before the meat is cooked
- Instant-read thermometer — for confirming the lobster meat has reached the FDA-recommended safe internal temperature of 145°F for shellfish
- Aluminum foil — to loosely tent the dish if the shells begin to char before the meat is fully cooked
- Oven mitts — the ceramic baking dish will be extremely hot after broiling; handle with care
- Sharp chef's knife — for halving lemons and chopping herbs
Step-by-Step Instructions
Step 1: Position the Oven Rack and Preheat the Broiler
Move your oven rack to a position
6–8 inches below the broiler element — measure this if you're not sure, since broiling distance is the most critical variable in this entire recipe. Set your broiler to
HIGH and allow it to preheat for a full 5 minutes before the lobster goes in. A properly preheated broiler sears the butter onto the lobster surface from the first second rather than gently warming the tails from a cold start, which is what creates the light golden sheen visible on the meat in the photo.
Step 2: Make the Garlic Herb Butter Sauce
Melt the butter in a small saucepan over low heat or in a microwave-safe bowl in 30-second intervals. Stir in the minced garlic, chopped parsley, lemon juice, lemon zest, dried thyme, red pepper flakes, and salt. The butter should smell immediately fragrant — the garlic blooms quickly in the warm fat and releases its aromatic compounds within seconds of stirring. Set aside half of the butter sauce for basting mid-broil; use the other half for the initial application.
Embedded Tip: Warm the garlic in the melted butter for 60 seconds over very low heat before adding the other ingredients — just enough to take the raw edge off the garlic without cooking it. Raw garlic under a high broiler can turn sharp and slightly bitter by the time the lobster finishes cooking.
Step 3: Butterfly the Lobster Tails
Using kitchen shears, cut straight down the center of the top shell of each tail from the wide end toward the fan, stopping just before the tail fin. Do not cut through the underside of the shell. Use your thumbs to gently spread the shell apart, then reach under the meat and loosen it from the shell on both sides, keeping it attached at the base. Lift the meat up and out, resting it on top of the shell halves so it sits proud above the shell — this is exactly the presentation visible in the photo and it exposes the full surface area of the meat to the broiler's heat.
Step 4: Season and Arrange in the Baking Dish
Place the butterflied lobster tails in the broiler-safe ceramic baking dish, meat-side up, with the tails fitting snugly but not overlapping — snug positioning actually helps here because the pooling butter sauce in the dish bastes the sides of the shells as it gathers. Season the exposed meat lightly with salt, pepper, and smoked paprika. Brush the garlic herb butter generously over each tail, making sure it covers every visible surface of the meat and runs into the crevices along the sides.
Step 5: Broil the Lobster Tails
Slide the baking dish onto the positioned rack and broil on HIGH for
8–10 minutes, depending on the size of the tails. For 6-oz tails, start checking at 8 minutes. For 8-oz tails, plan for the full 10 minutes. Watch the tails closely — unlike baking, broiling happens fast and the difference between perfectly done and overcooked is about 90 seconds. The meat is done when it turns from translucent grey-white to fully opaque white, with a light golden surface sheen from the butter, and the shells have deepened to a vivid orange-red.
Embedded Tip: Do not close the oven door fully during broiling if your oven has a broil vent position — many oven manufacturers recommend propping the door slightly open (a 2–3 inch gap) during broiling to maintain consistent high heat output and prevent the broiler element from cycling off. Check your oven's manual for the recommended position.
Step 6: Baste and Finish
At the 5-minute mark, carefully remove the dish from the oven using oven mitts and spoon or brush the reserved garlic herb butter over each tail. The butter will have pooled golden and fragrant in the bottom of the dish by this point — use it. Return the dish to the broiler for the remaining 3–5 minutes. The second coat of butter is what gives the meat the deeply lacquered, golden-pooled finish you see in the photo, with the herb flecks visible throughout the sauce.
Step 7: Check Doneness and Serve
Remove the dish from the broiler and use an instant-read thermometer to check the internal temperature at the thickest part of the largest tail — it should read
145°F for fully cooked, safe-to-eat lobster. The meat should be completely opaque all the way through, firm when pressed gently, and pull away from the shell cleanly at the sides. Scatter a generous pinch of fresh chopped parsley over the top immediately, nestle the lemon halves alongside the tails in the dish, and serve directly from the ceramic baking dish at the table.
Pro Tips for Perfect Garlic Herb Butter Lobster Tails
Broiling tip — know your oven's hot spots. Most home broilers don't produce perfectly even heat across the entire rack. If one side of your baking dish is closer to the element's coil, the tails on that side will color faster. At the 5-minute baste, rotate the baking dish 180 degrees if you notice uneven browning — this ensures all four tails finish at the same color and doneness level.
Buy tails of identical size. Four 6-oz tails will all finish at the same time. A mix of 5-oz and 8-oz tails in the same dish under the same broiler will result in smaller tails that are overcooked while larger ones are still underdone. When buying, ask the fishmonger to match the sizes as closely as possible.
Thaw frozen lobster tails completely and dry thoroughly. Residual water from improperly thawed or un-patted tails steams the meat under the broiler rather than allowing it to develop the golden surface shown in the photo. Thaw overnight in the refrigerator, then pat each tail dry with paper towels on all sides before butterflying.
Use a ceramic or oven-safe glass dish, not a metal sheet pan. A ceramic baking dish retains heat from the broiler and keeps the pooled butter sauce warm and fluid throughout cooking and serving. A thin metal sheet pan allows the butter to spread flat and can cause the edges to brown unevenly.
Common Mistakes to Avoid
1. Broiling too close to the element (broiling-specific mistake).
Positioning the rack closer than 4–5 inches to the broiler element causes the shells to char and the butter to smoke before the meat cooks through. The 6–8 inch rack position is calibrated for a 6–8 oz tail. If your tails are larger, move the rack down one slot. Char on the shell is not the same as beautiful color — it introduces a bitter, acrid note.
2. Not preheating the broiler fully.
A cold or partially preheated broiler starts the tails in a warming environment rather than a searing one. The result is meat that steams in its own moisture rather than developing a golden surface. Always preheat on HIGH for a minimum of 5 minutes — the element should be glowing red and the oven interior noticeably hot before the dish goes in.
3. Skipping the butterfly step.
Un-butterflied tails cooked shell-side up cook unevenly, with the top of the meat overexposed to heat while the bottom stays undercooked. Butterflying is the single technique that makes garlic herb butter lobster tails look and cook the way they should.
4. Using salted butter without adjusting the seasoning.
Salted butter combined with seasoned lobster and a salted herb mixture can easily produce an overly salty finished dish. Always start with unsalted butter and control the salt through the recipe yourself — this is especially important since lobster itself carries mild natural brininess.
5. Overcooking by even 2 minutes.
Lobster meat goes from perfectly tender to rubbery faster than almost any other protein under a broiler. The only reliable protection is an instant-read thermometer and close watching during the final 2 minutes. Once you see the surface go golden and the meat fully opaque, check the temperature immediately rather than relying on the timer.
6. Applying all the butter at the start only.
A single butter application at the beginning evaporates and browns quickly under the broiler's direct heat. The two-stage approach — half the butter before broiling, the reserved half at the halfway baste — is what creates the deep, golden, herb-flecked sauce pooling in the dish shown in the photo.
7. Serving straight from the broiler without resting.
Lobster meat tightens from the heat of the broiler element. Even 2 minutes of rest with the dish removed from the oven and set on a trivet allows the proteins to relax slightly, improving the texture and allowing the butter sauce to settle around the meat rather than running immediately off when cut.
Variations
Healthy / Lighter Version
Reduce the butter to 3 tablespoons and supplement with 2 tablespoons of good-quality olive oil to maintain the volume of sauce without the saturated fat load. Add an extra tablespoon of lemon juice for brightness. Each tail drops to approximately 220 calories with the same herb and garlic flavor profile. The olive oil handles the broiler heat equally well and the sauce still pools beautifully in the dish.
Vegetarian Version
This recipe is inherently a shellfish dish and cannot be made with the same ingredient. A compelling vegetarian adaptation uses large portobello mushroom caps in place of lobster tails — butterfly the cap by cutting through the stem, place gill-side up in the dish, and brush identically with the garlic herb butter. Broil at the same rack position for 6–8 minutes until the edges char slightly and the butter pools in the gill cavity. The result won't replicate lobster's texture but delivers the same butter-herb flavors.
Spicy Version
Double the crushed red pepper flakes to ½ teaspoon and add ¼ teaspoon of cayenne to the butter sauce. Stir in 1 teaspoon of hot sauce (such as Tabasco or Crystal) to the reserved basting butter for the halfway coat. The heat is noticeable but balanced by the richness of the butter — serve with extra lemon wedges to give guests control over the heat-acid balance on their own plate.
Gluten-Free Version
The base recipe is already completely gluten-free as written. Verify that your Worcestershire sauce or any optional add-ins are certified gluten-free if using. Serve with gluten-free crusty bread or roasted vegetables rather than standard bakery bread, and this dish is fully compatible with celiac and gluten-sensitivity requirements without any changes to technique or timing.
Low-Carb / Keto Version
The recipe is naturally keto-compatible — each tail as written has under 2 grams of net carbs. To make it explicitly keto, replace any optional white wine in the butter with a splash of unsalted chicken broth, and serve alongside roasted asparagus or cauliflower mash rather than bread. Clarified butter (ghee) is an excellent swap for regular butter in a keto context, with a higher fat content and a slightly richer, nuttier flavor.
What to Serve With Garlic Herb Butter Lobster Tails
- Crusty sourdough or French baguette — essential for soaking up the pooled garlic herb butter in the baking dish; don't skip this.
- Garlic Butter Salmon Creamy Sauce in 35 Min — bright, simple, and ready in the same 25-minute window; a natural pairing with both the lemon and herb notes.
- Creamy mashed potatoes — classic, neutral, and good at absorbing the butter sauce that runs off the tails when plated individually.
- Simple arugula salad with shaved Parmesan and lemon vinaigrette — the peppery bitterness balances the richness of the butter sauce without competing with the lobster's flavor.
- Steamed white or brown rice — absorbs the garlic herb butter beautifully and rounds out the meal for guests who want a heartier plate.
- Grilled corn on the cob — particularly good in summer; the sweetness of corn complements the garlic butter and the slight char echoes the broiled shell color.
- Champagne, dry white wine, or sparkling water with lemon — lobster's sweetness pairs most cleanly with dry, acidic beverages that don't overwhelm the delicate meat flavor.
- Seared filet mignon — for a surf-and-turf dinner, sear the filet in a cast iron skillet while the lobster tails are in the broiler; both finish in roughly the same time window.
Storage Instructions
Refrigerator
Store leftover broiled lobster tails in an airtight container in the refrigerator for up to
2 days. Remove the meat from the shell for easier storage — meat stored in the shell can develop a slightly metallic flavor from the shell's minerals after 24 hours. Store any remaining garlic herb butter sauce separately in a sealed jar.
Freezer
Cooked lobster meat can be frozen for up to
1 month, though the texture softens noticeably after freezing and thawing. Wrap the removed meat tightly in plastic wrap, then seal in a zip-top freezer bag with as much air removed as possible. Thaw overnight in the refrigerator. The garlic herb butter sauce freezes well for up to
2 months in a sealed container — rewarm gently over low heat before using.
Shelf Life Summary
| Component |
Refrigerator |
Freezer |
| Broiled lobster meat |
Up to 2 days |
Up to 1 month |
| Garlic herb butter sauce |
Up to 5 days |
Up to 2 months |
| Assembled dish (in shell) |
Up to 2 days |
Not recommended |
Reheating Instructions
Oven (Best Method): Preheat to
300°F and place the lobster meat (out of the shell) in a small oven-safe dish with 1–2 tablespoons of the reserved garlic herb butter drizzled over the top. Cover tightly with foil and heat for
8–10 minutes, until just warmed through. Low-and-slow is the only reheating method that preserves the texture of cooked lobster — high heat makes it rubbery within minutes.
Stovetop (Good for Small Portions): Warm 1 tablespoon of butter in a small non-stick skillet over the lowest heat setting. Add the lobster meat and cover loosely. Heat for
3–4 minutes, turning once, until just warmed through. This method is faster than the oven and works well for one or two leftover tails.
Microwave (Not Recommended, but Possible): Place the meat on a microwave-safe plate, drizzle with a small amount of butter, and cover with a damp paper towel. Heat on
30% power in 30-second intervals — check after every interval. Overcooking by even one cycle will turn the meat rubbery and dry. Use only as a last resort.
For all reheating methods, confirm the internal temperature reaches
145°F per FDA guidelines before serving.
Nutrition Facts (Per Lobster Tail, Based on 4 Servings)
| Nutrient |
Amount |
| Calories |
~310 kcal |
| Total Fat |
19g |
| Saturated Fat |
11g |
| Cholesterol |
215mg |
| Sodium |
640mg |
| Total Carbohydrates |
2g |
| Dietary Fiber |
0g |
| Total Sugars |
0g |
| Protein |
31g |
| Omega-3 Fatty Acids |
~400mg |
Nutrition Disclaimer: These values are estimates calculated using a standard nutrition database based on a 7-oz lobster tail with the full garlic herb butter sauce as written. Actual values will vary depending on the specific size of the lobster tails, the brand of butter used, and any optional add-ins or substitutions. For precise dietary tracking, calculate using your exact ingredient quantities in a verified nutrition tool.
Frequently Asked Questions
Can I bake these instead of broiling them?
Yes, but the result differs meaningfully. Baking at 400°F for 18–20 minutes fully cooks the meat but won't develop the golden surface sheen or lightly caramelized butter visible in the photo — baking produces gentle, moist heat rather than the intense top-down sear of the broiler. If you bake, brush with butter, tent loosely with foil for the first 12 minutes, then uncover for the final 6 to allow some surface color to develop.
How do I know when lobster tails are done without a thermometer?
The clearest visual cue is color. Raw lobster meat is grey-white and translucent; fully cooked meat is completely opaque white throughout. A secondary cue is texture — press the thickest part of the meat gently with a finger; it should feel firm but not hard. If it still gives softly and looks translucent at the thickest point, return to the broiler for 1–2 more minutes.
Fresh or frozen lobster tails — which is better?
Fresh is ideal if you're within a reasonable distance of a quality seafood market. However, frozen lobster tails (fully thawed) are an excellent, widely available option and the quality difference in a well-seasoned, broiled preparation is minimal. The critical step with frozen tails is a full overnight thaw in the refrigerator followed by thorough pat-drying — excess water causes steaming rather than proper broiling.
How do I butterfly a lobster tail without making a mess?
Kitchen shears — not a knife — are the right tool. Hold the tail firmly on a cutting board with one hand, cut straight down the center of the top shell from the wide cut end toward the fan, stopping just before the fin. Then use both thumbs to gently split the shell open and pry the meat upward. The meat naturally separates from the sides of the shell with a little coaxing and lifts cleanly onto the shell halves.
Why does my garlic herb butter sauce turn grainy or separate?
Butter separates when it's overheated — the milk solids separate from the butterfat. Melt the butter over low heat or in short microwave intervals rather than on high. If the sauce separates before you use it, whisk in a teaspoon of cold water and stir vigorously; it will usually emulsify back together. Using clarified butter eliminates the milk solids entirely and prevents this issue completely.
Can I use this same garlic herb butter on shrimp or scallops?
Absolutely, and with minimal timing adjustments. Large shrimp broil in 4–5 minutes total; scallops take 5–6 minutes, depending on their thickness. The same butter recipe, the same rack position, and the same basting approach work identically — just watch them more closely since smaller shellfish overcook faster than lobster tails.
What's the ideal lobster tail size for this recipe?
Tails between 6 and 8 oz are ideal for the 8–10 minute broiling window and produce a portion that's substantial without being unwieldy on the plate. Tails under 5 oz cook in 6–7 minutes and can go from done to rubbery very quickly. Tails over 10 oz need either a lower rack position or a slightly longer broiling time — check temperature early and often.
Can I prep the garlic herb butter ahead of time?
Yes. Make the butter sauce up to 3 days ahead and store it in a sealed jar in the refrigerator. It will solidify when cold — gently rewarm in a small saucepan over low heat, stirring until fluid, before brushing onto the tails. The flavor actually deepens slightly as the garlic infuses the butter over time, which makes ahead-of-time prep a genuine quality improvement.
How far in advance can I butterfly the lobster tails?
Butterfly them up to 2 hours ahead, cover the dish tightly with plastic wrap, and refrigerate until ready to season and broil. Do not season or butter them more than 15 minutes before cooking — salt draws moisture out of the meat, and buttered tails sitting at refrigerator temperature can develop an off texture at the surface.
Is this recipe suitable for a dinner party?
It's an excellent dinner party choice specifically because the entire hands-on portion is under 15 minutes and the broiling requires no intervention until the halfway baste at 5 minutes. Butterfly the tails and make the butter sauce up to 2 hours ahead. When guests are ready to eat, season, brush, and broil — the dish comes to the table from the oven in one beautiful ceramic dish in just over 10 minutes.
Expert Chef Tips
Pull the tails 5°F before the target temperature. Lobster meat continues cooking from residual heat after the dish comes out from under the broiler. Pulling at 140°F internal and resting for 2 minutes before serving brings you reliably to 145°F without going over — this is the technique that keeps the meat tender rather than chewy.
Mince the garlic as finely as possible. Large garlic pieces in the butter sauce can char under the broiler's direct heat before the lobster finishes cooking, introducing bitterness. A microplane grater produces garlic that virtually dissolves into the butter, distributing the flavor evenly without creating any piece large enough to burn.
The dish presentation matters. Serving garlic herb butter lobster tails directly from the ceramic baking dish at the table — rather than plating individually in the kitchen — keeps the butter sauce pooled and warm around the tails and looks dramatically impressive with almost no extra effort. Set the dish on a trivet and let guests serve themselves.
Add a cold-butter finish. After broiling, swirl ½ tablespoon of cold, cubed unsalted butter into the hot pooled sauce in the dish. The cold butter melts into the sauce and creates a glossier, more emulsified, restaurant-quality finish — this technique is borrowed from classic French pan sauce finishing and takes about 10 seconds.
For even more depth, add lemon zest at the end, not just the beginning. The lemon zest that goes into the butter sauce before broiling loses some of its brightness under the heat. Finishing with a fresh pinch of zest right before serving restores that sharp, citrus-forward aroma that makes the dish smell as good as it looks coming to the table.
Recipe Summary
These garlic herb butter lobster tails are a straightforward broiled shellfish recipe built around a rich, fragrant garlic-parsley-lemon butter sauce applied in two stages — before and during broiling — so the finished meat is lacquered, golden, and bathed in an aromatic pool of herb butter. Four tails go into a ceramic baking dish, under the broiler at 6–8 inches from the element, for 8–10 minutes total with a baste at the halfway mark. The result is restaurant-level visually and in flavor, achieved entirely at home with pantry-accessible ingredients and a 25-minute total time commitment. The two most important technique points are the correct rack position and pulling the tails at 145°F internal temperature.
Conclusion
Whether you're cooking for a romantic dinner for two or setting a platter in the middle of the table for a holiday gathering,
garlic herb butter lobster tails deliver an impact that is genuinely hard to match at this level of simplicity. The broiler does the real work, the butter sauce ties everything together, and the whole experience — from the vivid orange shells to the pooling golden herb butter — looks and tastes like considerably more than 25 minutes of effort. Make it once, and you'll never feel intimidated by cooking lobster at home again.