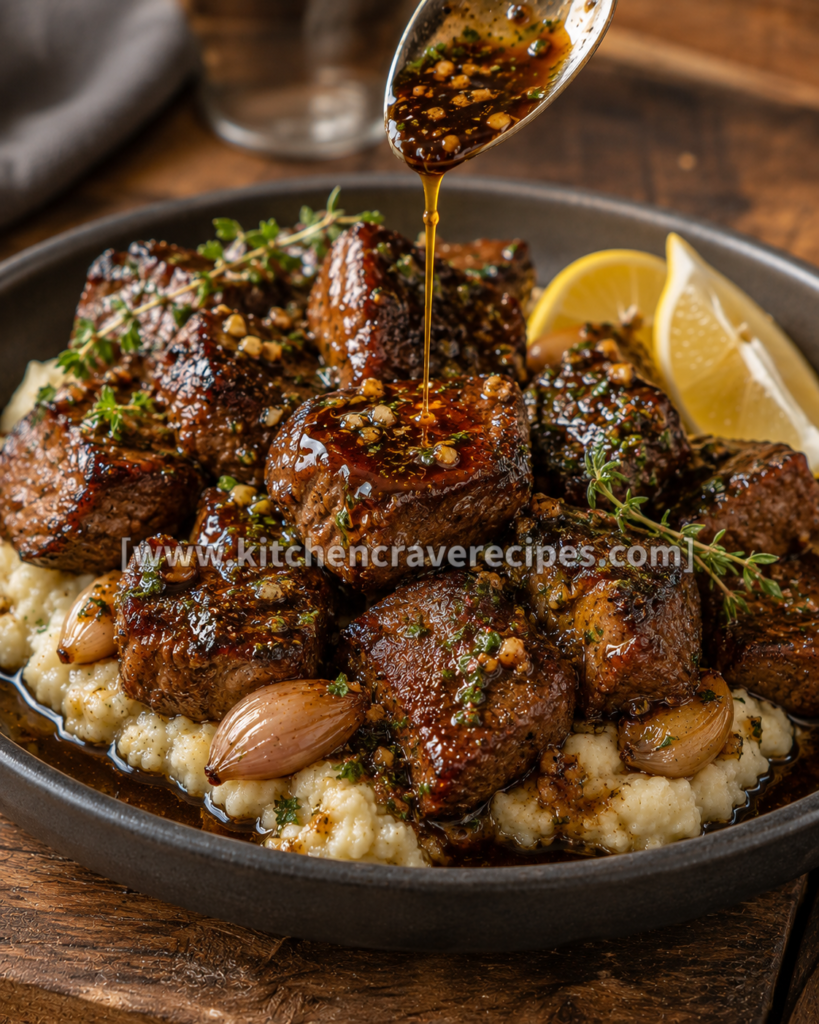
There's a particular kind of dinner that stops conversation at the table — and this
glazed garlic herb beef is exactly that. Beef back ribs slow-simmered in a deeply savory, garlic-forward braising liquid until the meat pulls away from the bone with zero resistance, then lacquered in a thick, glossy herb glaze that clings to every surface. The photo captures it perfectly: dark, caramelized ribs pooled in their own reduced sauce, tongs lifting one glistening rack while the rest wait in that black braising vessel. This is high-protein, low-effort cooking at its best — most of the work happens while you're doing something else entirely. The simmer does the heavy lifting, the glaze does the finishing, and the result is something that genuinely tastes like it took far more skill than it actually did. Weekend cooking, Sunday dinner, meal prep for the week — this recipe fits all of it.
Recipe Quick Info
| Detail |
Info |
| Prep Time |
20 minutes |
| Cook Time |
3 hours 40 minutes |
| Total Time |
4 hours |
| Servings |
4 |
| Cuisine |
American |
| Course |
Main Course |
| Cooking Method |
Simmering |
| Calories |
~520 kcal per serving |
| Difficulty |
Easy |
Why You'll Love This Recipe
- Fall-off-the-bone tender every single time — simmering low and slow breaks down the collagen in beef ribs until the meat releases from the bone effortlessly, no guesswork required.
- That glaze is extraordinary — the braising liquid reduces into a thick, dark, lacquered sauce that clings to every rib and tastes like deeply concentrated garlic, herbs, and savory beef in one bite.
- Serious protein in every serving — beef back ribs deliver roughly 35–40 grams of protein per serving, making this one of the most satisfying high-protein dinners you can make with minimal active effort.
- Mostly hands-off cooking — once the ribs are in the pot and simmering, you have hours of free time before the final glaze step pulls everything together.
- Meal-prep champion — this dish reheats beautifully, tastes better the next day as the glaze continues to develop, and stores well in the refrigerator for up to 4 days.
- Pantry-friendly ingredient list — garlic, soy sauce, beef broth, Worcestershire, fresh herbs, and a touch of honey are all you need to build the braising liquid from scratch.
- Genuinely impressive presentation — the deep mahogany color of the reduced glaze and the visible char on the rib edges look restaurant-level without any technical difficulty.
Ingredients
For the Beef
- 3½ lbs beef back ribs (about 2 racks, cut into individual ribs)
- 1 teaspoon kosher salt
- ½ teaspoon freshly ground black pepper
- ½ teaspoon smoked paprika
- 1 tablespoon neutral oil (for initial searing, optional but recommended)
For the Simmering Braising Liquid
- 1½ cups low-sodium beef broth
- ¼ cup low-sodium soy sauce
- 2 tablespoons Worcestershire sauce
- 2 tablespoons honey
- 6 cloves garlic, minced (about 2 tablespoons)
- 1 tablespoon tomato paste
- 1 teaspoon dried thyme
- 1 teaspoon dried rosemary, crushed between fingers
- ½ teaspoon onion powder
- ¼ teaspoon red pepper flakes (optional)
For the Final Glaze
- 2 tablespoons honey
- 1 tablespoon soy sauce
- 1 teaspoon minced garlic
- 1 teaspoon fresh thyme leaves (or ½ teaspoon dried)
- 1 tablespoon unsalted butter (stirred in off heat for shine)
Optional Add-Ins
- 1 tablespoon balsamic vinegar (adds depth and slight tang to the braising liquid)
- 1 tablespoon Dijon mustard (emulsifies into the glaze for a slightly sharper finish)
- 1 teaspoon fresh rosemary, finely minced (stir into the final glaze for a brighter herb note)
Substitution Table
| Original Ingredient |
Substitution |
Notes |
| Beef back ribs |
Beef short ribs (bone-in) |
Shorter, meatier — reduce simmer time by 30 min |
| Low-sodium soy sauce |
Tamari or coconut aminos |
Coconut aminos gives a slightly sweeter, milder result |
| Honey |
Pure maple syrup |
Earthier sweetness; glaze color stays deep and dark |
| Worcestershire sauce |
A1 steak sauce (½ quantity) |
Stronger flavor — use sparingly to avoid overpowering |
| Dried thyme |
Fresh thyme (use 3× the amount) |
Brighter, more aromatic herb character |
| Tomato paste |
2 tablespoons crushed San Marzano tomatoes, reduced |
Same acidity and depth with slightly looser texture |
| Beef broth |
Bone broth |
Adds extra collagen and a richer, fuller body to the sauce |
Kitchen Tools Needed
- Large heavy-bottomed pot or Dutch oven — the primary vessel for simmering; a tight-fitting lid is essential to maintain consistent low heat and prevent excessive evaporation
- Tongs — for maneuvering the ribs during the initial sear and during the final glaze step
- Wooden spoon or silicone spatula — for stirring and scraping the fond from the pot bottom during simmering
- Measuring cups and spoons — for the braising liquid; precision matters more in a long simmer than in a quick sauté
- Instant-read thermometer — beef ribs are done by texture (fall-off-the-bone tenderness) rather than a single safe temp, but this tool confirms the braising liquid temperature and final meat temperature
- Small saucepan — for reducing and finishing the final glaze separately before applying
- Pastry brush — for applying the final glaze evenly over each rib
- Fine-mesh strainer — optional, for straining the braising liquid before reducing it into the glaze
- Ladle — for skimming rendered fat from the surface of the simmering liquid during cooking
How to Simmer Glazed Garlic Herb Beef to Tender Perfection
Step 1: Season and Sear the Ribs
Pat the beef ribs completely dry with paper towels — removing surface moisture now allows for better browning. Season all sides with kosher salt, black pepper, and smoked paprika. Heat the neutral oil in a large Dutch oven over medium-high heat until it shimmers. Working in batches, sear the ribs for 2–3 minutes per side until a deep brown crust forms on the surface. This step is technically optional for a pure simmering recipe, but that initial sear builds a layer of flavorful fond on the pot bottom that the braising liquid will absorb throughout the long simmer.
Step 2: Build the Braising Liquid
Remove the seared ribs and set aside momentarily. Pour off all but 1 tablespoon of fat from the pot. Add the minced garlic to the pot and stir over medium heat for 30 seconds until fragrant — you'll smell the garlic bloom and turn golden at the edges almost immediately. Add the tomato paste and stir for another 30 seconds until it darkens slightly in color. Pour in the beef broth, soy sauce, Worcestershire sauce, honey, dried thyme, rosemary, onion powder, and red pepper flakes. Stir to combine and scrape up any browned bits from the pot bottom.
Embedded Tip: Scraping the fond thoroughly at this stage is important — those dark bits dissolve into the liquid and contribute a depth of flavor that distinguishes a truly rich braise from a flat, one-dimensional one. Don't rush past this moment.
Step 3: Simmer Low and Slow
Return the ribs to the pot, nestling them into the braising liquid so they're at least halfway submerged. Bring the liquid to a gentle simmer over medium heat — you're looking for small, lazy bubbles rising steadily to the surface, not a rolling boil. Once simmering, reduce heat to low, cover tightly with a lid, and cook for 3 hours. Check every 45–60 minutes to confirm the liquid is maintaining that gentle simmer and hasn't tipped into a hard boil. If it's boiling too aggressively, crack the lid slightly and reduce heat further.
According to the
USDA Food Safety and Inspection Service, beef ribs cooked low and slow should reach a minimum internal temperature of 145°F for safety, though the fall-off-the-bone tenderness associated with braised ribs typically develops between 195°F and 205°F internal meat temperature.
Step 4: Check for Tenderness and Remove the Ribs
After 3 hours, test the ribs by pressing a rib gently with tongs — the meat should yield immediately and pull away from the bone without resistance. If there's still any chewiness, cover and continue simmering for another 20–30 minutes and test again. When fully tender, use tongs to carefully transfer the ribs to a plate or sheet pan and tent loosely with foil to keep warm while you build the glaze.
Embedded Tip: Don't discard the braising liquid — it's the foundation of your glaze. Pour it through a fine-mesh strainer into a bowl, let it settle for 5 minutes, and skim the rendered fat from the surface with a ladle or paper towel dragged across the surface. What remains is a richly flavored base ready for final reduction.
Step 5: Reduce the Braising Liquid into a Glaze
Pour the strained, defatted braising liquid into a small saucepan. Bring to a simmer over medium heat and reduce, stirring occasionally, for 15–20 minutes until the liquid has thickened to a syrupy consistency that coats the back of a spoon. Stir in the additional 2 tablespoons of honey, 1 tablespoon of soy sauce, minced garlic, and fresh thyme. Simmer for 2 more minutes. Remove from heat and stir in the tablespoon of cold butter — this final step adds a glossy sheen to the glaze that you can see clearly in the photo.
Step 6: Glaze and Finish the Ribs
Using a pastry brush, coat each rib generously on all sides with the reduced glaze. For an extra-lacquered finish, brush on a second coat after the first has settled for 60 seconds. If you want the slightly charred, caramelized edges visible in the photo, place the glazed ribs under the broiler on a foil-lined sheet pan for 2–3 minutes — watch closely, as the honey in the glaze burns quickly. Serve immediately with remaining glaze spooned alongside.
Pro Tips for Perfect Glazed Garlic Herb Beef
1. Keep the simmer genuinely gentle — not a rolling boil.
A hard boil makes the meat tough and stringy by agitating the muscle fibers aggressively rather than slowly releasing the collagen. The right simmer looks like a light, irregular bubble pattern — quiet and steady. If in doubt, go lower rather than higher on the heat dial.
2. Simmering-method Pro Tip — use a lid that fits tightly.
A loose lid allows too much steam to escape, which concentrates the liquid too quickly and can leave the ribs exposed and drying out before they're fully tender. If your lid doesn't seal well, place a sheet of foil over the pot before setting the lid on top — the foil creates a tighter seal that keeps all that moisture working for you.
3. Skim the fat twice during simmering.
Beef ribs render a significant amount of fat during a long braise. Skimming at the 90-minute mark and again just before the ribs come out of the pot prevents the finished glaze from being greasy rather than glossy.
4. Don't rush the glaze reduction.
The difference between a thin, watery sauce and the thick, lacquered glaze in the photo is entirely in how far the liquid reduces. Give it the full 15–20 minutes over medium heat and resist adding thickeners like cornstarch — the naturally reduced braising liquid has a cleaner, more complex flavor than any starch-thickened shortcut.
5. Cold butter at the end is the professional finishing move.
Stirring one tablespoon of cold (not room temperature) butter into the finished glaze off heat creates an emulsification that gives the sauce that restaurant-level sheen. Room-temperature butter will incorporate but won't produce the same glossy effect.
Common Mistakes to Avoid
1. Letting the simmer tip into a hard boil. (Method-specific mistake)
Boiling tough cuts of beef doesn't make them more tender faster — it makes them dry and stringy. The connective tissue that produces tenderness breaks down slowly at a low, steady simmer. If you see a vigorous rolling boil at any point, reduce the heat immediately and crack the lid to release excess heat.
2. Not searing the ribs before simmering.
Skipping the sear means skipping the Maillard reaction — the browning that creates hundreds of savory flavor compounds that then infuse the braising liquid. The extra 10 minutes of searing produces a noticeably deeper, richer finished dish.
3. Using too much liquid.
The ribs don't need to be fully submerged — halfway submerged is correct. Too much liquid dilutes the braising concentration and produces a thin glaze that won't reduce to the right consistency. If you accidentally added too much broth, remove the lid for the last 30 minutes of simmering to encourage faster reduction.
4. Skipping the fat-skimming step before reducing the glaze.
Un-skimmed braising liquid will reduce into a greasy sauce rather than a clean, glossy glaze. The rendered beef fat emulsified into the liquid looks fine while warm but separates visually in the finished dish. Two minutes of skimming makes the difference between a glaze and a grease slick.
5. Reducing the glaze in the same large pot.
A wide, large pot requires the glaze to spread thinly across a large surface area, making it hard to gauge thickness and easier to scorch. Transfer to a small saucepan — the concentrated depth in a smaller vessel lets you monitor the reduction accurately.
6. Glazing too far in advance.
Brush the glaze on at the last possible moment before serving. Glaze applied more than 10 minutes ahead softens as the moisture from the meat surface slowly re-hydrates it, eliminating the lacquered texture visible in the photo.
7. Cutting the ribs before simmering.
Some cooks try to reduce cook time by cutting ribs into very small pieces before braising. Smaller pieces release their moisture more quickly, which means they can dry out before the collagen fully breaks down. Keep the ribs in full individual pieces throughout the simmer.
Variations
Healthier Version
Trim visible surface fat from the ribs before simmering to reduce total fat content. Replace the honey in both the braising liquid and the glaze with a monk fruit–sweetened honey substitute to lower the sugar load. Serve over cauliflower rice instead of standard rice or potatoes to keep the meal leaner without changing the flavor of the beef itself.
Vegetarian Version
This recipe is built around bone-in beef ribs and there is no direct vegetarian equivalent that produces the same result. However, the braising liquid and glaze technique translates beautifully to large portobello mushrooms or thick-cut jackfruit. Simmer in the same liquid for 45 minutes to 1 hour until deeply flavored, then glaze and finish the same way. Expect a completely different texture — deeply savory but without the bone-in richness.
Spicy Version
Add 1 tablespoon of gochujang (Korean fermented chili paste) to the braising liquid alongside the tomato paste — it dissolves into the liquid and adds a slow-building, complex heat that develops over the long simmer. Finish the glaze with ½ teaspoon of cayenne. The sweetness of the honey balances the heat, so the spice is present but not overwhelming.
Gluten-Free Version
Swap the standard soy sauce for certified gluten-free tamari in both the braising liquid and the finishing glaze — the flavor profile is virtually identical. Confirm that your Worcestershire sauce brand is gluten-free (Lea & Perrins is certified gluten-free in the US). No other changes are required; every other ingredient in this recipe is naturally gluten-free.
Low-Carb / Keto Version
Replace both quantities of honey (braising liquid and glaze) with a liquid monk fruit sweetener or keto-friendly maple syrup substitute. Use bone broth instead of standard beef broth for additional collagen and fat without adding carbohydrates. The glaze will reduce slightly faster without the honey's natural sugars, so watch the reduction more closely from the 12-minute mark onward.
What to Serve With This Recipe
- Creamy mashed potatoes — the richest possible vehicle for soaking up every drop of the dark, savory glaze pooled on the plate.
- Steamed white or jasmine rice — simple, neutral, and the most natural pairing for a deeply flavored braised beef.
- Roasted garlic broccolini — slightly bitter and charred at the tips, it cuts through the richness of the beef glaze beautifully.
- Crusty sourdough bread — for dragging through the reduced glaze; no justification needed.
- Simple cucumber and vinegar salad — cool, crisp, acidic — a textural and flavor counterpoint to the tender, sticky beef.
- Roasted sweet potatoes — their natural sweetness complements the honey-garlic glaze without competing with it. Try our Easy 30-Minute Sticky Honey Garlic Glazed Chicken for the perfect side.
- Braised white beans — hearty and creamy, they absorb the braising liquid that drips from the ribs and turn into something extraordinary.
- Fresh herb salad with lemon vinaigrette — the brightness of lemon and raw herbs resets the palate between bites of the intensely flavored beef. For a complete high-protein dinner spread, browse Easy 30-Minute Sticky Honey Garlic Glazed Chicken.
Storage Instructions
Refrigerator
Allow the ribs and any remaining glaze to cool to room temperature before storing — no more than 2 hours at room temperature. Transfer to an airtight container with a lid, storing the extra glaze in a separate small jar. Refrigerate for up to 4 days. The glaze will thicken in the refrigerator and may need a brief warm-up before serving.
Freezer
This recipe freezes exceptionally well. Place cooled ribs in a single layer in a freezer-safe zip-top bag or airtight container, with a portion of the glaze poured over the top to protect the surface of the meat. Freeze for up to 3 months. Thaw overnight in the refrigerator before reheating — do not thaw at room temperature.
Shelf Life Summary
| Storage Method |
Duration |
| Room temperature |
Up to 2 hours (discard after) |
| Refrigerator (airtight) |
Up to 4 days |
| Freezer |
Up to 3 months |
Reheating Instructions
Oven (Best for Maintaining Texture)
Preheat oven to 325°F. Place the ribs in an oven-safe baking dish with a few tablespoons of beef broth or leftover glaze added to the bottom. Cover tightly with foil and reheat for 20–25 minutes until warmed through to 145°F internally. Remove foil in the last 5 minutes to re-caramelize the glaze surface.
Microwave (Fastest Method)
Place ribs on a microwave-safe plate and spoon a tablespoon of glaze over the top. Cover loosely with a damp paper towel. Microwave on 70% power in 60-second intervals until warmed through — typically 2–3 intervals for a single rib. Full power tends to dry out the meat surface quickly.
Stovetop (Best for Small Portions)
Place the ribs in a lidded saucepan with 2–3 tablespoons of braising liquid or beef broth. Heat over medium-low heat, covered, for 8–10 minutes until the liquid is gently simmering around the ribs and the meat is heated through. Per the
USDA food safety guidelines for leftovers, reheated beef should reach an internal temperature of 165°F before serving.
Nutrition Facts
Per serving (approximately 2–3 ribs with glaze, based on 4 servings)
| Nutrient |
Amount |
| Calories |
~520 kcal |
| Total Fat |
28g |
| Saturated Fat |
11g |
| Cholesterol |
145mg |
| Sodium |
720mg |
| Total Carbohydrates |
18g |
| Sugars |
15g |
| Protein |
38g |
| Fiber |
0g |
Nutrition Disclaimer: These values are estimates calculated using standard nutritional databases and will vary depending on the specific cut weight, brand of beef broth and soy sauce, and any ingredient substitutions used. Values include the glaze but not any side dishes. This information is for general reference only and should not be used in place of guidance from a registered dietitian or qualified healthcare professional.
Frequently Asked Questions
1. What cut of beef works best in this recipe?
Beef back ribs (the rack cut) are shown in the photo and work best — they're large, flavorful, and hold up beautifully through a long simmer. Bone-in beef short ribs are an excellent alternative with more surface meat per bone. Both cuts have sufficient intramuscular fat and collagen to become tender during a slow braise.
2. Can I make this in a slow cooker instead of simmering on the stovetop?
Yes — cook on LOW for 7–8 hours or HIGH for 4–5 hours. The result will be similar in tenderness, though you'll still want to reduce the braising liquid separately on the stovetop before applying it as a glaze. The slow cooker method requires no active monitoring, which makes it even more hands-off than stovetop simmering.
3. How do I know when the ribs are done simmering?
Tenderness is the indicator, not the clock. Press gently on the meat with tongs — if it yields and pulls away from the bone without resistance, it's ready. If there's any springback or chewiness, continue simmering in 20-minute increments until it passes that test.
4. My glaze isn't thickening — what do I do?
First, confirm you're reducing it in a small saucepan (not a wide, shallow pan where it spreads thin). If it's still not thickening after 20 minutes, mix ½ teaspoon of cornstarch with 1 tablespoon of cold water and stir it in. The starch will thicken the glaze within 2 minutes over medium heat.
5. Can I skip the initial searing step?
You can — the ribs will still become fall-off-the-bone tender through simmering alone. However, the sear develops complex flavor compounds through the Maillard reaction that can't be replicated through braising. The finished glaze will taste noticeably flatter without it. If time allows, the 10 minutes of searing is worth every second.
6. Is this recipe suitable for meal prep?
It's one of the best cuts for meal prep. The ribs taste noticeably better on day 2 and 3 as the glaze flavors continue to penetrate the meat. Portion into individual containers with a spoonful of extra glaze over each serving and refrigerate — they reheat beautifully with minimal quality loss.
7. How do I prevent the glaze from burning if I put the ribs under the broiler?
Position the oven rack at least 6 inches below the broiler element, not the standard top position used for broiling bread. Honey-based glazes burn fast at broiler temperatures — check every 60 seconds and pull immediately once the surface is bubbling and showing slight char at the edges.
8. Can I use boneless beef ribs instead?
Yes, though boneless short ribs or beef chuck will need a shorter braise — check for tenderness at the 2-hour mark rather than 3. Without the bone, the meat also loses some of the marrow-rich flavor that the bone contributes to the braising liquid. The glaze will still be excellent, but slightly less complex.
9. Why is my braising liquid too salty after reducing?
Reduction concentrates all flavors — including salt. If your finished glaze tastes overly salty, add a tablespoon of honey and a splash of unsalted beef broth to dilute and balance it. This is also why using low-sodium broth and soy sauce from the start matters; it gives you control over the final flavor as the liquid reduces.
10. Can this recipe be doubled for a larger group?
Absolutely — double all ingredients and use a larger Dutch oven or divide between two pots. The simmering time stays approximately the same since it depends on the thickness of individual rib pieces, not the total volume. Reduce the glaze in two separate batches to maintain the right ratio of glaze to surface area in the saucepan.
11. What's the difference between simmering and braising?
Braising typically refers to cooking partially submerged meat in liquid in a covered vessel — which is exactly what this recipe does. Simmering is the specific heat level at which the braising occurs. The terms overlap significantly here: these ribs are braised by definition, and the technique used throughout is simmering. The distinction matters mostly in culinary-school contexts; in home cooking, the result is the same.
Expert Chef Tips
1. Season the braising liquid as a complete dish, not just the meat.
Before the ribs go back in, taste the braising liquid and adjust for salt and depth. If it tastes thin or flat, add another teaspoon of Worcestershire or a pinch of smoked paprika. A well-seasoned liquid produces a well-seasoned braise — you can't fix the flavor at the table once it's had 3 hours to set.
2. Let the pot cool slightly before skimming fat.
Fat rises most efficiently to the surface when the liquid is just off the boil — not vigorously simmering. Pull the pot off heat for 5 minutes before skimming; you'll remove significantly more fat in a single pass than you would mid-simmer.
3. Use a thermometer to verify your simmer temperature.
A proper simmer sits between 180°F and 200°F. If you don't have experience reading bubble patterns, an instant-read thermometer dipped into the liquid confirms you're in the right zone. Above 210°F and you're approaching a boil — reduce heat immediately.
4. Rest the ribs after removing from the liquid.
Just like grilled or roasted meat, braised ribs benefit from a brief rest — 5–10 minutes tented loosely under foil — before the final glazing step. This allows the juices to redistribute slightly within the meat and prevents them from streaming out when the ribs are cut or served.
5. Save any leftover glaze as a sauce for other proteins.
The reduced braising liquid is essentially a concentrated garlic-herb beef sauce. Refrigerate any extra in a jar and use it as a glaze for grilled chicken, a sauce for roasted vegetables, or a drizzle over scrambled eggs or a grain bowl. It keeps for 5 days in the refrigerator and adds depth to almost anything.
Recipe Summary
This
glazed garlic herb beef builds flavor in two deliberate stages: a slow, covered simmer in a garlic-herb braising liquid that tenderizes the ribs completely over 3 hours, followed by a final glaze reduction that concentrates all of those flavors into a thick, lacquered sauce brushed over each rib at serving. The simmering method does the real work — all you're managing is heat level and time. High in protein, deeply satisfying, and genuinely impressive on the plate.
Conclusion
Great braised beef doesn't require a culinary degree or a full day of active cooking. It requires good ingredients, a proper simmer, and the patience to let time do what heat alone never can. This
glazed garlic herb beef delivers everything a satisfying, high-protein dinner should: deep flavor, tender texture, and a glossy, aromatic glaze that makes the plate look every bit as good as it tastes. Make it on a Sunday, eat well all week, and don't be surprised if it becomes the most-requested thing you cook.