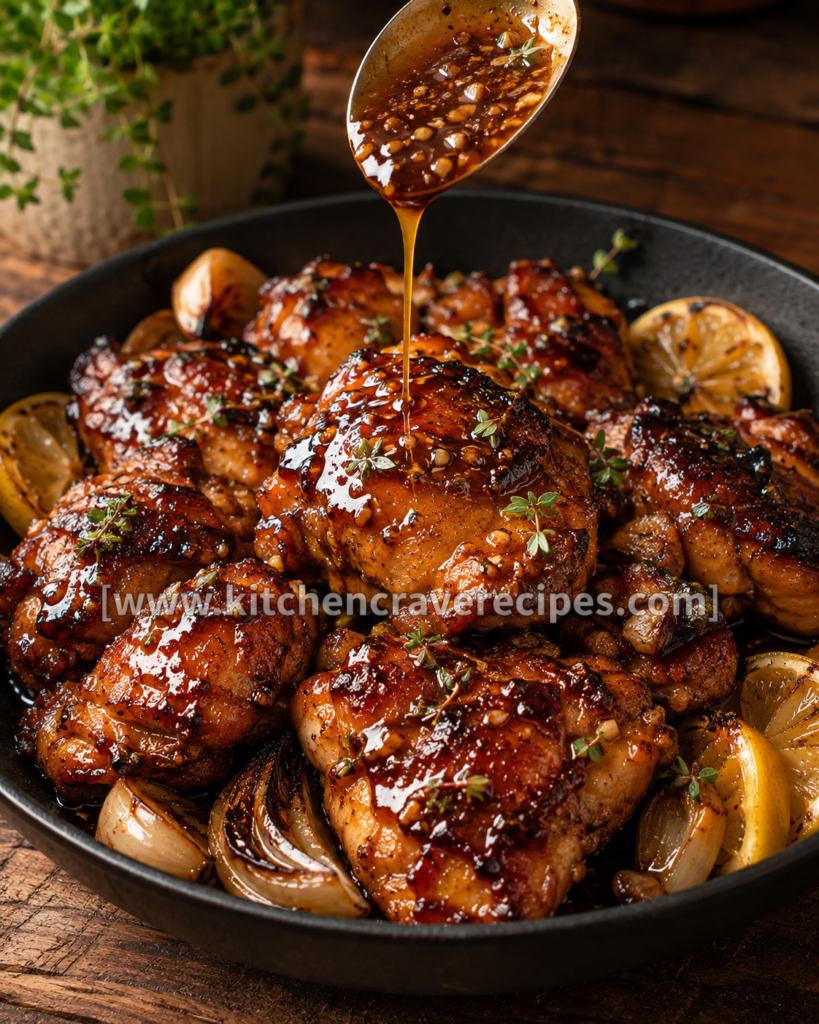
Easy 30-Minute Sticky Honey Garlic Glazed Chicken
There are weeknight dinners you make because you have to — and then there's this
sticky honey garlic glazed chicken, the kind of recipe you actually look forward to making. Bone-in, skin-on chicken thighs hit a screaming-hot skillet until the skin crisps and darkens into something deeply caramelized, then they're bathed in a glossy, amber-colored glaze built from honey, garlic, soy sauce, and a squeeze of lemon. The whole thing is on your table in 30 minutes flat. It's the dish that disappears fastest at dinner parties and gets requested every single week by people who swear they're not big chicken fans. Once you smell that garlic and honey hitting the hot pan together, you'll completely understand why.
Recipe Quick Info
| Detail |
Info |
| Prep Time |
10 minutes |
| Cook Time |
20 minutes |
| Total Time |
30 minutes |
| Servings |
4 |
| Cuisine |
American |
| Course |
Main Course |
| Cooking Method |
Sautéing |
| Calories |
~420 kcal per serving |
| Difficulty |
Easy |
Why You'll Love This Recipe
- Done in 30 minutes flat — from cold skillet to dinner plate, this recipe moves fast without cutting corners on flavor.
- One pan, minimal cleanup — the chicken sautés and the glaze builds in the same skillet, so dishes are kept to a minimum.
- That glossy, sticky glaze is genuinely irresistible — honey caramelizes against the hot pan while garlic turns golden and fragrant, creating layers of sweet-savory depth you can't get from a bottled sauce.
- Incredibly forgiving for a weeknight cook — chicken thighs are naturally juicy and resist drying out, even if your timing is slightly off.
- Restaurant-worthy presentation with zero fuss — the deep mahogany color, fresh thyme sprigs, and charred lemon halves look stunning straight from the skillet.
- Completely customizable heat level — add red pepper flakes or a dash of sriracha for heat, or keep it mellow for picky eaters.
- Pantry-friendly ingredients — honey, soy sauce, and garlic are almost always on hand, making this a true last-minute hero recipe.
Ingredients
For the Chicken
- 2½ lbs bone-in, skin-on chicken thighs (about 6 pieces)
- 1 teaspoon kosher salt
- ½ teaspoon freshly ground black pepper
- ½ teaspoon smoked paprika
- 1 tablespoon neutral oil (avocado or vegetable)
For the Honey Garlic Glaze
- ⅓ cup honey (raw or clover honey both work beautifully)
- 4 cloves garlic, minced (about 1½ tablespoons)
- 3 tablespoons low-sodium soy sauce
- 1 tablespoon fresh lemon juice (plus 2 lemon halves for serving, charred in the pan)
- 1 tablespoon unsalted butter
- ½ teaspoon crushed red pepper flakes (optional)
For Serving (Visible in Dish)
- 4–6 shallot halves, sautéed alongside the chicken
- Fresh thyme sprigs (garnish)
- Whole or halved garlic cloves, lightly charred in the pan
Optional Add-Ins
- 1 teaspoon Dijon mustard (adds subtle tang to the glaze)
- 1 teaspoon apple cider vinegar (brightens and balances sweetness)
- 1 tablespoon sesame oil (adds nuttiness — stir in off heat)
Substitution Table
| Original Ingredient |
Substitution |
Notes |
| Chicken thighs (bone-in) |
Boneless thighs |
Reduce cook time by 4–5 minutes |
| Honey |
Pure maple syrup |
Slightly less sweet, earthier glaze |
| Soy sauce |
Tamari or coconut aminos |
Use coconut aminos for gluten-free |
| Fresh lemon juice |
Rice wine vinegar |
Same brightness, slightly milder |
| Unsalted butter |
Vegan butter or olive oil |
Maintains richness without dairy |
| Fresh thyme |
Fresh rosemary or flat-leaf parsley |
Changes herbal note but works well |
Kitchen Tools Needed
- 12-inch heavy-bottomed skillet or cast-iron pan — essential for sautéing; cast iron holds heat evenly and gives the best sear
- Tongs — for flipping chicken safely without piercing the skin
- Splatter screen — highly recommended; honey-based glazes bubble aggressively at high heat
- Instant-read meat thermometer — to confirm safe internal temperature
- Small mixing bowl or liquid measuring cup — for whisking the glaze together before it hits the pan
- Wooden spoon or silicone spatula — for stirring and basting the glaze
- Sharp chef's knife and cutting board — for mincing garlic and halving shallots
- Paper towels — for patting chicken dry before cooking (non-negotiable for a good sear)
Step-by-Step Instructions
Step 1: Pat the Chicken Dry and Season
Remove the chicken thighs from the refrigerator 10 minutes before cooking. Thoroughly pat every surface dry with paper towels — this is the single most important step for getting crispy, caramelized skin. Season all sides evenly with salt, black pepper, and smoked paprika. Dry skin + hot pan = the golden-brown crust this sticky honey garlic glazed chicken is known for.
Step 2: Whisk the Honey Garlic Glaze
In a small bowl, whisk together the honey, minced garlic, soy sauce, and lemon juice until fully combined. Set it right next to the stove — once the sautéing starts, things move quickly and you won't want to be measuring across the kitchen. Having the glaze pre-mixed ensures the garlic doesn't over-toast while you're scrambling to find the honey.
Step 3: Heat the Skillet
Place your cast-iron or heavy skillet over medium-high heat and add the oil. Let the pan heat for 90 seconds to 2 minutes — you'll know it's ready when a drop of water flicked into the pan evaporates immediately and a faint wisp of smoke rises from the surface. Sautéing requires a genuinely hot pan; don't rush this step or the chicken will steam rather than sear.
Step 4: Sear the Chicken, Skin Side Down
Place the chicken thighs skin-side down in the hot skillet in a single layer without crowding. You should hear an immediate, aggressive sizzle — that's exactly what you want. Add the shallot halves and whole garlic cloves cut-side down around the chicken. Sauté undisturbed for 7–8 minutes until the skin is deeply golden-brown and releases easily from the pan. Resist the urge to move them early.
Embedded Tip: If your skillet is smaller than 12 inches, sauté in two batches rather than crowding. Crowding drops the pan temperature and traps steam, which prevents the caramelization that makes this dish so visually stunning.
Step 5: Flip and Add the Lemon Halves
Flip the chicken thighs to the flesh side using tongs. Add the lemon halves cut-side down to the pan. Sauté for another 5–6 minutes on medium heat until the flesh side has colored and the internal temperature reads at least 155°F on an instant-read thermometer — the temperature will carry over to the USDA-recommended 165°F during the glaze step. According to the
USDA Food Safety Guidelines, poultry must reach an internal temperature of 165°F to be safe to eat.
Step 6: Add the Butter and Glaze
Reduce heat to medium. Add the tablespoon of butter directly to the pan and let it melt around the chicken. Pour the honey garlic glaze over and around the chicken pieces. The mixture will bubble immediately and begin reducing — use a spoon to baste the tops of the thighs every 30 seconds. Sauté in the glaze for 3–4 minutes, continuing to baste, until the sauce has thickened to a syrupy consistency and clings to the back of a spoon. The garlic will be fragrant and golden, the chicken lacquered in that deep amber color you see in the photo.
Embedded Tip: If the glaze reduces too fast and starts to look like it's scorching at the edges, add a tablespoon of water or chicken broth and stir — it'll loosen immediately without breaking the flavor.
Step 7: Rest, Garnish, and Serve
Remove the skillet from heat and let the chicken rest in the pan for 3 minutes. Garnish generously with fresh thyme sprigs. Serve directly from the skillet or transfer to a wide, dark serving bowl as shown — spoon the extra pan glaze over the top right before it hits the table.
Pro Tips for Perfect Sticky Honey Garlic Glazed Chicken
1. Use bone-in thighs for maximum flavor.
The bone conducts heat evenly while also adding richness to the pan drippings that become part of your glaze. Boneless thighs cook faster but lose some of that depth.
2. Don't lower the heat too soon during sautéing.
Medium-high heat during the initial sear is what creates the Maillard reaction — the browning that develops complex, nutty flavor in the skin. Dropping to low too early gives you pale, rubbery skin instead of that gorgeous mahogany crust.
3. Baste constantly during the glaze stage — it's not optional.
The basting action builds layers of glaze on the surface of the chicken rather than leaving it thin and watery. Each spoonful adds another coat, which is how you get that restaurant-level lacquered finish.
4. Sauté-method Pro Tip: Let the pan do the work on the first side.
When sautéing chicken with a sticky glaze, the single biggest mistake is lifting the chicken too early. Skin sticking to the pan doesn't mean it's burning — it means it hasn't released yet. A properly seared thigh will let go of the pan naturally when the crust has formed. Trust the process and wait for that release before flipping.
5. Char the lemon halves in the same pan.
Pressing lemon halves cut-side down into the hot skillet for a few minutes produces a slightly caramelized, less sharp lemon juice when squeezed. It adds a beautiful citrus-bitter counterpoint to the sweet glaze without overpowering it.
Common Mistakes to Avoid
1. Skipping the pat-dry step.
Wet chicken skin will steam instead of sear, giving you a pale, flabby result. Paper towels are your best friend here — dry the chicken thoroughly before seasoning.
2. Crowding the sauté pan. (Method-specific mistake)
This is the most common error when sautéing skin-on chicken. Too many pieces in the pan drops the surface temperature rapidly, generating steam that prevents browning. Work in batches if your skillet is smaller than 12 inches.
3. Using a low-quality honey.
Thin, overly processed honey doesn't caramelize the same way — it can burn at the edges before the center thickens. Use a good-quality raw or clover honey for the best glaze behavior.
4. Adding the glaze before the chicken is sufficiently seared.
If the skin isn't golden before the glaze goes in, the sugars in the honey will seize around undercooked skin and you'll end up with a sticky but pale result. Sear fully first, then glaze.
5. Letting the glaze boil instead of gently sauté.
Once the glaze is in the pan, a rolling boil will cause the sugars to seize, crystallize, or burn quickly. Keep the heat at medium and watch for steady, active bubbling — not a violent boil.
6. Not resting the chicken before serving.
Cutting into sautéed chicken thighs immediately causes the juices to run out onto the cutting board instead of redistributing through the meat. Three minutes of resting makes a real difference in juiciness.
7. Using cold chicken straight from the fridge.
Cold chicken dropped into a hot pan lowers the surface temperature immediately. Pull the chicken out 10 minutes before cooking for a more even sear.
8. Over-mincing the garlic to a paste.
Garlic minced too fine can burn before the chicken is done. A medium mince — small pieces with some texture — holds up better in the hot pan and adds visible flecks of golden garlic to the finished dish.
Variations
Healthier Version
Swap the butter for 1 teaspoon of olive oil and reduce the honey to ¼ cup. Use boneless, skinless chicken thighs to cut saturated fat significantly. The glaze will be slightly thinner, so let it reduce an extra minute to reach the right consistency. Serve over cauliflower rice to keep it light. For a complete healthy weeknight spread, check out
Easy 30-Minute Grilled Chicken Broccoli Bowl (Ultimate Recipe).
Vegetarian Version
Replace chicken with 1½ lbs of extra-firm tofu (pressed and cubed) or thick-cut cauliflower steaks. The sauté method still applies — sear on medium-high until golden, then add the glaze and baste. Note that tofu won't develop the same rendered-fat richness as chicken skin, so adding a teaspoon of sesame oil off heat brings back that savory depth.
Spicy Version
Add 1 teaspoon of sriracha and ½ teaspoon of gochujang to the glaze mixture before whisking. The heat blooms beautifully against the honey sweetness and the garlic amplifies it. This version pairs especially well with steamed white rice to balance the heat.
Gluten-Free Version
Replace standard soy sauce with certified gluten-free tamari or coconut aminos (use 3½ tablespoons of coconut aminos since it's slightly less salty). Every other ingredient in this recipe is naturally gluten-free — no other changes needed.
Low-Carb / Keto Version
Substitute the honey with a sugar-free honey alternative such as Bee Free Honee or a monk fruit–based honey substitute. Reduce quantity slightly to 3 tablespoons since keto sweeteners can be more intensely sweet. The glaze will thicken a touch faster, so watch it closely during the basting stage and pull the pan off heat a minute earlier than usual.
What to Serve With This Recipe
- Steamed jasmine rice — absorbs every drop of that sticky glaze, making it the obvious first choice.
- Garlic mashed potatoes — creamy and rich, a perfect textural contrast to the caramelized chicken skin.
- Roasted broccolini with lemon — the slight bitterness of charred broccolini cuts through the sweet glaze beautifully.
- Simple cucumber and sesame salad — cool, crisp, and refreshing alongside the warm, sticky chicken.
- Crusty sourdough bread — for mopping up every last bit of pan glaze (no judgment here).
- Creamy coleslaw — the tang of vinegar-dressed cabbage balances the sweetness of the honey perfectly.
- Roasted sweet potatoes — naturally sweet but earthy, they complement rather than compete with the glaze. Try pairing with Easy 30-Minute Grilled Chicken Broccoli Bowl (Ultimate Recipe).
- Simple green salad with lemon vinaigrette — keeps the plate light and adds freshness to balance a rich, sticky main.
Storage Instructions
Refrigerator
Let the chicken cool completely before storing — no more than 2 hours at room temperature. Transfer to an airtight container and refrigerate for up to 4 days. Store any leftover pan glaze separately in a small jar; it's fantastic drizzled over rice or roasted vegetables the next day.
Freezer
This sticky honey garlic glazed chicken freezes well. Place cooled chicken pieces in a single layer on a parchment-lined baking sheet and freeze for 1 hour before transferring to a zip-top freezer bag or airtight container. This prevents pieces from freezing together. Freeze for up to 3 months. Label with the date and contents.
Shelf Life Summary
| Storage Method |
Duration |
| Room temperature |
Up to 2 hours (discard after) |
| Refrigerator |
Up to 4 days |
| Freezer |
Up to 3 months |
Reheating Instructions
Oven (Best Method)
Preheat oven to 350°F. Place chicken in an oven-safe dish, add a splash of chicken broth or water to the bottom to prevent the glaze from scorching, and cover tightly with foil. Reheat for 15–18 minutes until warmed through to 165°F internally.
Microwave (Fastest Method)
Place chicken on a microwave-safe plate and cover loosely with a damp paper towel. Microwave on 70% power in 60-second intervals, checking after each interval, until the internal temperature reaches 165°F. High power tends to toughen the chicken and can make the glaze rubbery.
Stovetop (Best for Crispy Skin Recovery)
Heat a skillet over medium heat with a tiny drizzle of oil. Place chicken skin-side down and reheat for 3–4 minutes until the skin crisps back up, then flip and cook for 2 more minutes. This method gives the closest result to freshly made. Per the
FDA Food Safety guidelines, reheated poultry should always reach an internal temperature of 165°F before serving.
Nutrition Facts
Per serving (approx. 1–2 chicken thighs with glaze, based on 4 servings)
| Nutrient |
Amount |
| Calories |
~420 kcal |
| Total Fat |
22g |
| Saturated Fat |
6g |
| Cholesterol |
145mg |
| Sodium |
680mg |
| Total Carbohydrates |
22g |
| Sugars |
20g |
| Protein |
32g |
| Fiber |
0g |
Nutrition Disclaimer: Nutrition values are estimates calculated using standard ingredient databases and will vary based on exact ingredient brands, portion sizes, and any substitutions made. This information is provided for general reference only and should not be used as a substitute for guidance from a registered dietitian or healthcare provider.
Frequently Asked Questions
1. Can I use boneless, skinless chicken thighs instead of bone-in?
Yes — boneless, skinless thighs work great and reduce the cook time by about 4–5 minutes. Just watch them closely during the sear; without the bone, they cook faster and can dry out slightly if left too long before the glaze stage.
2. Can I bake this instead of sautéing it on the stovetop?
You can — bake at 400°F for 35–40 minutes, adding the glaze during the last 10 minutes. However, you'll lose the deep caramelization that a hot skillet creates. If you choose the oven, consider finishing under the broiler for 2–3 minutes to develop some surface color.
3. My glaze is too thin — what do I do?
Let it reduce longer on medium heat while continuing to baste. If you're in a rush, remove the chicken temporarily, crank the heat briefly to medium-high, and let the glaze reduce by itself for 60–90 seconds before returning the chicken. It thickens quickly once the water content cooks off.
4. Can I marinate the chicken in the honey garlic mixture overnight?
You can marinate for up to 4 hours in the refrigerator — but avoid overnight marinating because the acid from lemon juice will start to break down the texture of the surface proteins, giving you a mushy exterior rather than a clean sear.
5. What's the best pan to use for this recipe?
A 12-inch cast-iron skillet is ideal — it holds heat evenly, handles high temperatures without warping, and goes from stovetop to oven if needed. A heavy stainless-steel skillet is a close second. Avoid non-stick pans for this recipe; they can't handle the high initial heat needed for a proper sear.
6. Is this dish very sweet?
The honey gives it definite sweetness, but the soy sauce and lemon juice provide savory and acidic balance that keeps it from feeling like a dessert glaze. If you prefer a less sweet result, reduce honey to ¼ cup and add an extra teaspoon of soy sauce.
7. Can I make the glaze ahead of time?
Yes — whisk the glaze ingredients together and store in a covered jar in the refrigerator for up to 3 days. Give it a quick stir before using since honey can settle. Bring it to room temperature for a few minutes before adding it to the hot pan.
8. What if my garlic burns before the chicken is done?
If the garlic in the pan is darkening too fast, reduce the heat immediately and add a tablespoon of water or broth to the pan — it slows the cooking and prevents burning. For the glaze garlic, it's pre-mixed with liquid so it's buffered from direct heat.
9. Can I double this recipe for a crowd?
Definitely — double all ingredients, but sauté the chicken in two separate batches to avoid crowding the pan. You can keep the first batch warm in a 200°F oven while you finish the second batch. Combine everything in a large serving dish at the end and spoon over the combined glaze.
10. Does this recipe work with chicken breasts?
It works, but results vary. Chicken breasts are leaner and easier to overcook; they won't deliver the same richness or natural juiciness as thighs. If using breasts, pound them to an even thickness of about ¾ inch, reduce cook time, and use a thermometer to pull them at exactly 160°F (they'll carry over to 165°F during rest).
11. How do I get that deeply lacquered color shown in the photo?
Three things make the difference: fully dry skin before searing, not moving the chicken during the initial sear, and constant basting during the glaze stage. Each baste layer adds color. A cast-iron pan also holds heat more consistently than lighter pans, which helps build deeper browning.
12. Can I add vegetables to cook alongside the chicken?
Absolutely. The shallots and garlic in this recipe are already cooked in the pan. You can add sliced bell peppers, snap peas, or mushrooms during the last 4–5 minutes of sautéing — just be aware that additional vegetables will release moisture, which can slightly thin the glaze.
Expert Chef Tips
1. Season at least two layers deep.
Don't just season the skin — get salt and pepper under the skin too where possible by gently loosening it with your fingers. This flavors the meat directly and doesn't all wash away when the glaze goes on.
2. Use a wooden spoon to deglaze any fond.
After the initial sear, there will be golden-brown bits stuck to the pan bottom — don't scrape them away. When the butter and glaze hit the pan, use a wooden spoon to gently scrape them up. That fond is concentrated flavor and becomes part of the sauce.
3. Match your skillet size to your batch size.
A 12-inch skillet comfortably holds 4–5 thighs. Trying to fit 6 into a 10-inch pan will absolutely crowd them. If you're feeding a larger group, use two pans simultaneously rather than stacking or overcrowding — this maintains quality across the full batch.
4. Pull the pan off heat to finish basting.
In the final 30 seconds of glazing, remove the pan from the burner entirely and tilt it slightly. The residual heat will keep the glaze active while eliminating the risk of scorching. Baste one final time off heat for the glossiest possible finish.
5. Let the serving vessel complement the dish.
As shown in the photo, presenting this directly in the dark skillet or a wide, dark-rimmed bowl makes the mahogany glaze and fresh thyme pop visually. It's a small detail that makes a genuinely big impression when serving guests.
Recipe Summary
This sticky honey garlic glazed chicken is built on four core moves: dry the chicken, sear it hard in a hot skillet, build the glaze from pantry staples, and baste constantly for a lacquered finish. The sauté method develops deep caramelization on the skin while keeping the meat juicy and tender throughout. With a 10-minute prep and 20-minute cook, it delivers a genuinely impressive result on any weeknight.
Conclusion
Some recipes earn a permanent spot in the weekly rotation not because they're complicated, but because they're genuinely satisfying every single time. This
sticky honey garlic glazed chicken is one of those recipes. It's honest, fast, and deeply flavorful — the kind of dinner that makes the whole kitchen smell incredible and leaves everyone at the table reaching for more. Whether it's a Tuesday night or a casual dinner with friends, it delivers every time. Make it once, and it won't be the last time.