Best 30-Min Stuffed Bell Pepper Cheeseburger Bake
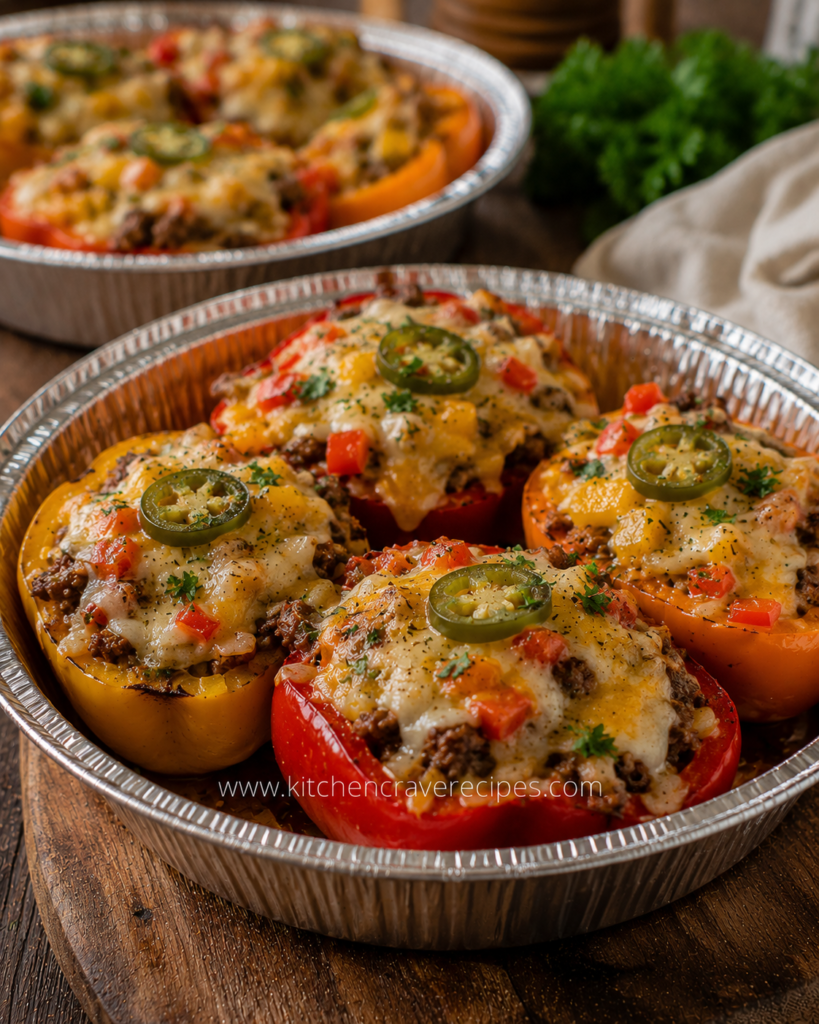
If you’ve ever wanted the flavor of a backyard cheeseburger without the bun — and without sacrificing the satisfying, melty, savory bite — this stuffed bell pepper cheeseburger bake delivers exactly that. The photo shows vibrant red, yellow, and orange bell pepper halves arranged in disposable foil pans, each generously filled with seasoned ground beef, topped with bubbling cheddar and Monterey Jack, and finished with sliced jalapeños and a sprinkle of chopped parsley. The peppers are tender but still hold their shape, and the cheese has that golden, lightly blistered surface that tells you it’s perfectly baked.
This stuffed bell pepper cheeseburger bake isn’t just about flavor; it’s about structure and protein. Instead of mixing everything into a casserole base, the seasoned beef filling is packed directly into halved bell peppers, creating individual, portion-controlled servings. With lean ground beef as the base and no breadcrumbs or rice, it’s naturally low in carbs and high in protein — a low-carb dinner that feels indulgent but fits squarely into a high-protein meal plan.
Recipe Quick Info
| Detail |
Info |
| Prep Time |
10 minutes |
| Cook Time |
30 minutes |
| Total Time |
40 minutes |
| Servings |
6 stuffed pepper halves |
| Cuisine |
American |
| Course |
Main Course |
| Calories |
~365 per stuffed half |
| Difficulty |
Simple |
Why You’ll Love This Recipe
- All the cheeseburger flavor, zero bun required. Seasoned ground beef, sautéed onions, melty cheddar, and optional jalapeños recreate the classic cheeseburger profile inside tender bell pepper halves.
- Naturally low-carb and gluten-free. No breadcrumbs, no rice, no fillers — just protein-rich beef and fresh vegetables baked together.
- High protein per serving. Each stuffed pepper half delivers over 30 grams of protein thanks to lean ground beef and a generous cheese topping.
- Perfect for meal prep. The individual stuffed format makes storing and reheating straightforward, with built-in portion control.
- Visually impressive with minimal effort. The colorful bell peppers and golden cheese topping make the dish look vibrant and intentional straight from the oven.
- Customizable heat level. Jalapeño slices on top add a mild kick, and you can easily adjust the spice level to suit your preference.
- One skillet, one baking dish. Brown the beef, fill the peppers, bake — cleanup stays manageable even on a busy weeknight.
Ingredients
For the Bell Peppers
- 3 large bell peppers (red, yellow, or orange), halved lengthwise and seeds removed
- 1 tablespoon olive oil
- ¼ teaspoon fine sea salt
- ¼ teaspoon black pepper
For the Cheeseburger Filling
- 1½ lbs lean ground beef (90/10 preferred)
- ½ medium yellow onion, finely diced
- 2 cloves garlic, minced
- 1 tablespoon tomato paste
- 1 teaspoon Worcestershire sauce
- 1 teaspoon smoked paprika
- ½ teaspoon garlic powder
- ½ teaspoon onion powder
- ½ teaspoon fine sea salt
- ½ teaspoon black pepper
For the Topping
- 1 cup shredded sharp cheddar cheese
- ½ cup shredded Monterey Jack cheese
- 1–2 fresh jalapeños, thinly sliced (optional but shown in photo)
- 2 tablespoons diced fresh tomato
- 1 tablespoon chopped fresh parsley
Optional Add-Ins
- 2 tablespoons sugar-free ketchup mixed into the beef
- 2 tablespoons yellow mustard stirred into the filling
- ¼ cup diced pickles folded into the beef mixture
Substitution Table
| Original Ingredient |
Easy Substitution |
| Lean ground beef |
Ground turkey or ground chicken |
| Sharp cheddar |
Colby Jack or pepper jack |
| Monterey Jack |
Mozzarella |
| Jalapeños |
Banana peppers or omit |
| Tomato paste |
¼ cup crushed tomatoes (reduce slightly) |
Kitchen Tools Needed
- Large skillet (12-inch)
- 9×13-inch baking dish or foil pans (as shown in photo)
- Sharp chef’s knife and cutting board
- Wooden spoon or silicone spatula
- Measuring spoons
- Instant-read thermometer
- Aluminum foil (optional for tenting)
Step-by-Step Instructions
Step 1: Preheat and Prep the Peppers (5 minutes)
Preheat your oven to 400°F. Slice the bell peppers lengthwise and remove the seeds and membranes. Brush the insides lightly with olive oil and sprinkle with salt and black pepper. Arrange them cut-side up in a 9×13-inch baking dish or foil pans, as shown in the photo, so they sit snugly without tipping.
Embedded Tip: If a pepper half rocks or won’t sit flat, shave a very thin slice from the bottom exterior to create a stable base. Don’t cut into the cavity — just level it.
Step 2: Brown the Ground Beef (8–10 minutes)
Heat a large skillet over medium-high heat. Add the ground beef and cook, breaking it apart with a spoon, until browned and no pink remains — about 6–8 minutes. Ground beef must reach an internal temperature of 160°F, per USDA ground beef safety guidelines. Drain excess fat if necessary.
Add diced onion and cook for 2–3 minutes until softened. Stir in garlic and cook for 30 seconds until fragrant.
Step 3: Season the Filling (2 minutes)
Stir in tomato paste, Worcestershire sauce, smoked paprika, garlic powder, onion powder, salt, and pepper. Cook for 1–2 minutes to allow the tomato paste to deepen slightly in color and the spices to bloom. The mixture should smell distinctly savory and slightly smoky — very much like a cheeseburger on the grill.
Embedded Tip: Let the tomato paste cook until it darkens slightly before stirring — this removes raw acidity and intensifies umami flavor.
Step 4: Fill the Peppers (3 minutes)
Spoon the beef mixture evenly into each bell pepper half, pressing gently to pack it in. Fill generously, slightly mounding the top. Scatter diced fresh tomato over the beef in each pepper, matching the red flecks visible in the photo.
Step 5: Add Cheese and Bake (20 minutes)
Sprinkle shredded cheddar and Monterey Jack evenly over each filled pepper. Top with sliced jalapeños if using. Bake uncovered at 400°F for 18–22 minutes, until the peppers are tender and the cheese is melted and bubbling with light golden spots.
If you prefer deeper browning, switch to broil for the final 2 minutes — watch closely to prevent burning.
Step 6: Garnish and Rest (3–5 minutes)
Remove from oven and let rest for 3–5 minutes. Sprinkle chopped parsley over the top before serving. Resting allows the filling to settle slightly so each portion holds together when lifted.
Pro Tips
- Choose large, thick-walled peppers. They hold their shape better and soften evenly without collapsing.
- Use lean beef for best texture. 90/10 beef keeps the filling moist but prevents grease pooling in the pepper cavity.
- Shred your own cheese. Pre-shredded cheese contains anti-caking agents that reduce melt quality and browning.
- Pack the filling firmly. Loose filling falls apart when served; gentle pressing creates cohesive portions.
- Broil strategically. Keep the rack in the upper-middle position, not the topmost slot, to avoid burnt cheese edges.
Common Mistakes to Avoid
1. Under-cooking the beef before stuffing.
Ground beef must be fully cooked in the skillet before baking. The oven phase is for melting cheese and softening peppers, not finishing raw meat.
2. Overbaking the peppers.
Bell peppers become watery and overly soft if baked too long. Aim for tender but structured — 18–22 minutes is usually perfect.
3. Using high-fat beef without draining.
80/20 beef releases significant grease, which can collect in the bottom of the pepper and make the filling soggy. Always drain excess fat thoroughly.
4. Overfilling with cheese too early.
If you add cheese before the beef mixture has cooled slightly from the skillet, it may melt prematurely and lose structure before baking.
5. Skipping seasoning layers.
Season the beef generously — peppers themselves are mildly sweet and need bold seasoning in the filling to balance.
6. Cutting peppers too thin.
Thin-walled peppers collapse under heat. Choose firm, thick peppers that feel heavy for their size.
Variations
Healthy Version
Use 93/7 ground turkey instead of beef and reduce cheddar to ¾ cup total. The flavor remains strong thanks to the spice blend, and fat content drops slightly per serving.
Vegetarian Version
Replace ground beef with 2 cups finely chopped mushrooms sautéed until deeply browned plus 1 cup cooked black beans. Add an extra teaspoon of smoked paprika for depth. The mushrooms provide umami similar to beef.
Spicy Version
Double the jalapeño slices and add ½ teaspoon cayenne to the beef mixture. Pepper jack can replace Monterey Jack for extra heat.
Gluten-Free Version
This recipe is already gluten-free as written. Confirm Worcestershire sauce is gluten-free if cooking for someone with celiac disease.
Low-Carb/Keto Version
Skip tomato paste and use sugar-free ketchup instead. Increase cheese topping slightly for higher fat macros while keeping carbs minimal.
What to Serve With This Recipe
- Crisp romaine salad with vinaigrette
- Garlic roasted broccoli
- Cauliflower mash
- Sliced avocado with lime
- Cucumber tomato salad
- Lemon Vanilla Greek Yogurt Loaf Cake in Best 1-Bowl
- Dill pickle spears
- Sparkling water with lime
Storage Instructions
Refrigerator
Store cooled stuffed peppers in an airtight container for up to 4 days. Reheat individually for best texture.
Freezer
Wrap each cooled pepper tightly in plastic wrap and foil. Freeze up to 2 months. Thaw overnight before reheating.
Shelf Life Summary
| Storage Method |
Duration |
Notes |
| Room Temp |
Up to 2 hours |
Refrigerate promptly |
| Refrigerator |
4 days |
Airtight container |
| Freezer |
2 months |
Thaw before reheating |
Reheating Instructions
Oven: Reheat at 350°F for 12–15 minutes until hot throughout.
Microwave: 60–90 seconds per pepper at 70% power.
Stovetop: Cover and heat in skillet over medium-low for 6–8 minutes.
For safe reheating temperature guidelines, see the USDA leftovers safety page.
Nutrition Facts
Per stuffed half (approximate):
| Nutrient |
Amount |
| Calories |
~365 kcal |
| Protein |
32g |
| Total Fat |
22g |
| Net Carbs |
8g |
| Fiber |
2g |
| Sodium |
540mg |
Nutrition Disclaimer: Values are estimates and vary by brand and exact ingredient quantities. For precise tracking, calculate using your specific products.
Frequently Asked Questions
Can I make this stuffed bell pepper cheeseburger bake ahead of time?
Yes. Assemble fully, cover, and refrigerate up to 24 hours before baking. Add 5 extra minutes to bake time if starting cold.
Can I grill instead of bake?
Yes. Grill at medium heat with lid closed for 15–18 minutes using indirect heat. Ensure internal beef temp reaches 160°F.
Why are my peppers watery?
Overbaking or using very thin peppers causes excess moisture. Choose thick peppers and avoid baking beyond 22 minutes.
Can I add rice?
Yes, but it changes carb count. Add 1 cup cooked rice to the beef mixture for a more traditional stuffed pepper version.
Can I use pre-cooked ground beef?
You can, but reheating pre-cooked beef reduces flavor depth. Fresh browning produces better texture and seasoning.
Are these good for meal prep?
Absolutely. Each pepper is individually portioned and reheats easily without losing structure.
How do I keep cheese from burning?
Bake covered for first 10 minutes if needed, then uncover to finish browning.
Can I make mini versions?
Yes. Use smaller peppers and reduce bake time to 15–18 minutes.
Expert Chef Tips
1. Let the beef caramelize slightly before stirring.
Resist constant stirring in the skillet. Allowing the beef to sit undisturbed briefly creates deeper browning and stronger flavor.
2. Don’t skip the Worcestershire.
It adds subtle umami and depth that mimics grilled burger flavor.
3. Preheat the baking dish.
Place the empty dish in the oven for 3 minutes before filling to jump-start cooking.
4. Rest before serving.
Even 3 minutes improves structure dramatically.
5. Use foil pans for gatherings.
As shown in the photo, foil pans transport easily and keep cleanup simple.
Recipe Summary
This stuffed bell pepper cheeseburger bake combines seasoned lean ground beef, sautéed onion, cheddar and Monterey Jack cheese, and colorful bell pepper halves into a high-protein, low-carb dinner baked in just 40 minutes. Each pepper half delivers bold cheeseburger flavor without bread or fillers, making it naturally gluten-free and keto-friendly. With simple prep and minimal cleanup, it’s ideal for weeknights or meal prep.
Conclusion
When you want comfort food that still aligns with high-protein goals, this stuffed bell pepper cheeseburger bake checks every box. It’s colorful, satisfying, and packed with flavor from the first bite to the last. The golden cheese, tender peppers, and savory beef filling create a dinner that feels indulgent while staying low in carbs and high in protein. Make it once, and it quickly becomes a staple in your rotation.
✅ Quick Tips: Read the recipe in its entirety before you start cooking. This will help you understand the ingredients, steps, and timing involved, and allow you to prepare any necessary equipment or ingredients beforehand.