The Banana Pudding Dessert Everyone Asks You to Bring
Some desserts earn a permanent spot in your rotation after the very first bite — and this
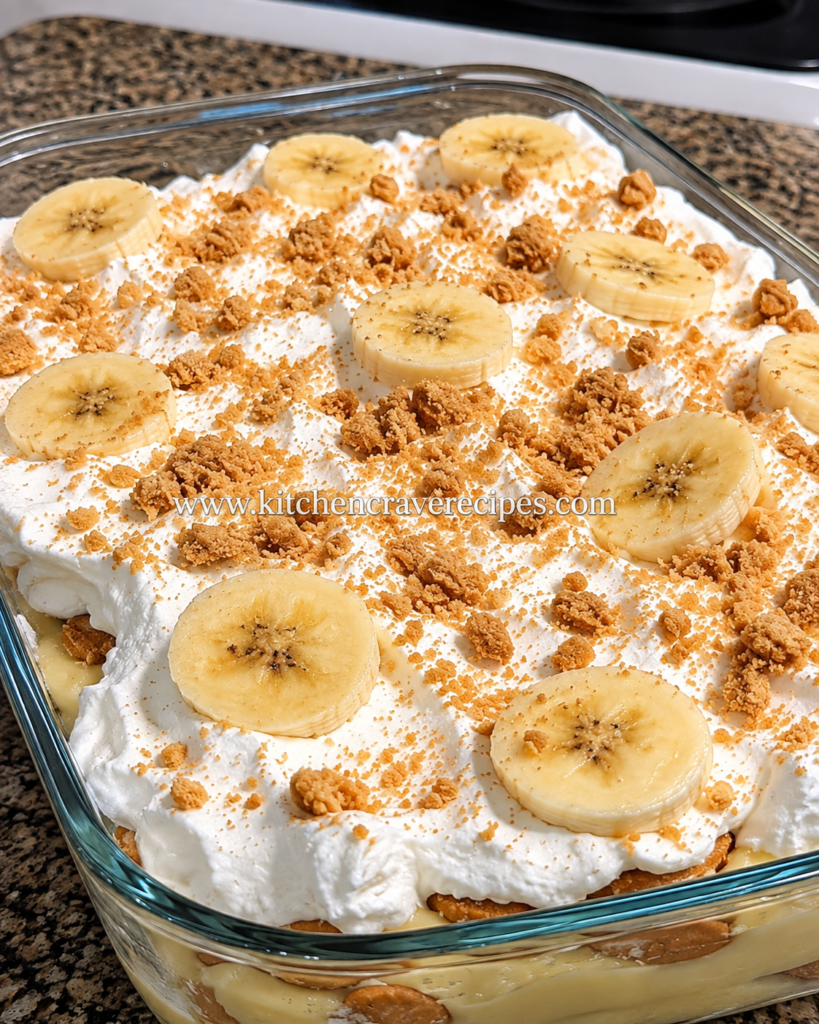
banana pudding dessert is exactly that kind of recipe. The photo tells the whole story: a deep glass baking dish packed with clouds of whipped cream, golden vanilla wafer crumbles scattered across the top, and fresh banana rounds arranged across every inch of the surface. Underneath that gorgeous crown, there are warm-golden custard layers and softened wafers that have absorbed every bit of the simmered vanilla cream.
What makes this version stand out is the custard base. Instead of tearing open an instant packet, we simmer a from-scratch vanilla pudding on the stovetop — whole milk, egg yolks, cornstarch — until it thickens into something genuinely silky and rich. That 10 minutes at the stove is the difference between good and the kind of
banana pudding dessert people talk about on the drive home.
Recipe Quick Info
| Detail |
Info |
| Prep Time |
20 minutes |
| Cook Time |
10 minutes |
| Chill Time |
30 minutes |
| Total Time |
1 hour |
| Servings |
12 |
| Cuisine |
American |
| Course |
Dessert |
| Cooking Method |
Simmering |
| Calories |
~295 per serving |
| Difficulty |
Standard |
Why You'll Love This Banana Pudding Dessert
- Real simmered custard makes every layer richer — the gentle stovetop cook coaxes deep vanilla flavor that no instant mix can match in body or depth.
- No oven required — the simmering happens entirely on the stovetop, keeping your kitchen cool and your cleanup minimal.
- Feeds a crowd beautifully — this generous 9×13 dish serves 12 and travels perfectly to potlucks, cookouts, or family dinners.
- Visually stunning without decorating skills — the clear glass dish shows off every layer, and the banana-and-crumb-topped surface looks like it came from a bakery.
- Better the next day — overnight chilling lets the wafers soften to a cake-like texture and the flavors deepen into something extraordinary.
- Endlessly customizable — swap the wafers, fold in peanut butter, or make it dairy-free with coconut cream and the results are equally delicious.
- Consistently reliable — simmering the custard at a controlled, gentle heat gives you a foolproof result every time, no candy thermometer needed.
Ingredients
For the Simmered Vanilla Custard
- ½ cup granulated sugar
- ⅓ cup cornstarch
- ½ teaspoon fine salt
- 3 cups whole milk
- 4 large egg yolks
- 2 tablespoons unsalted butter
- 2 teaspoons pure vanilla extract
For the Whipped Cream
- 2 cups heavy whipping cream, very cold
- ¼ cup powdered sugar
- 1 teaspoon pure vanilla extract
For the Layers
- 1 box (11 oz) vanilla wafers (approximately 60–70 wafers)
- 4 medium ripe bananas, sliced into ¼-inch rounds
For the Topping (as shown in photo)
- ½ cup crushed vanilla wafer crumbles
- Banana rounds for garnish (1 additional banana, sliced just before serving)
- Light dusting of ground cinnamon or nutmeg (optional)
Optional Add-Ins
- 4 oz cream cheese, softened (fold into cooled custard for a tangier, denser layer)
- 2 tablespoons caramel sauce, drizzled between layers
- ¼ cup chopped toasted pecans mixed into crumb topping
Substitution Guide
| Original Ingredient |
Substitution |
Notes |
| Whole milk |
Full-fat oat milk or 2% milk |
Oat milk yields a slightly thinner custard; increase cornstarch by 1 tsp |
| Heavy whipping cream |
Chilled coconut cream |
Scoop solidified fat from a refrigerated can; whips to stiff peaks |
| Unsalted butter |
Vegan butter |
Flavor is nearly identical; custard sets the same way |
| Egg yolks |
Increase cornstarch to 5 tbsp total, omit yolks |
Custard is less rich but still thickens cleanly |
| Vanilla wafers |
Graham crackers or shortbread cookies |
Graham crackers add a honey note; shortbread is butterier |
| Granulated sugar |
Coconut sugar |
Adds a light caramel undertone; slight color change in custard |
Kitchen Tools Needed
Because the custard layer is built through
simmering, stovetop equipment is the heart of this setup — invest in a heavy-bottomed pan and the results will show.
- Medium heavy-bottomed saucepan (3–4 quart)
- Balloon whisk
- Rubber spatula
- Heatproof medium mixing bowl (for tempering egg yolks)
- Fine-mesh strainer (for ultra-smooth custard)
- Stand mixer or hand mixer with whisk attachment
- Deep 9×13-inch clear glass baking dish
- Cutting board and sharp knife
- Measuring cups and spoons
- Plastic wrap (to prevent custard skin)
- Offset spatula or large spoon for layering
Step-by-Step Instructions
Step 1: Simmer the Vanilla Custard (10 minutes)
Whisk together the sugar, cornstarch, and salt in your heavy-bottomed saucepan until evenly blended — no lumps. Slowly pour in the whole milk while whisking continuously. In a separate heatproof bowl, whisk the egg yolks until smooth and pale, then gradually stream about ½ cup of the cold milk mixture into the yolks to temper them. Pour the tempered yolks back into the saucepan and whisk to combine.
Set the saucepan over medium heat. Stir constantly with the whisk as the mixture heats — you'll notice it shifting from thin and pale to slightly opaque as it approaches the simmer point. Watch for small, steady bubbles forming around the outer edge of the pan: that's your simmer signal. The liquid will begin to thicken visibly once you reach a sustained simmer; keep whisking in slow, wide circles for 4 to 5 more minutes until the custard coats the back of a spoon and holds a clean line when you drag your finger across it.
Embedded Tip: Resist the urge to crank the heat. A true simmer — small gentle bubbles, never a rolling boil — is what produces a smooth, glossy custard. High heat scrambles the yolks and breaks the texture irreparably.
Remove from heat. Stir in the butter and vanilla extract until the butter melts fully. Pour the custard through a fine-mesh strainer into a clean bowl, then press plastic wrap directly onto the surface. Let cool at room temperature for 20 minutes before using.
Step 2: Whip the Cream (5 minutes)
Pour the cold heavy whipping cream into a chilled bowl. Beat on medium-high speed until slightly thickened, then add the powdered sugar and vanilla. Continue beating until stiff peaks form — the cream should stand firm when you lift the beater without drooping. Stop immediately at stiff peaks; another 30 seconds tips it toward butter.
Embedded Tip: Chill your mixing bowl and beaters in the freezer for 10 minutes before whipping. Cold equipment keeps the fat molecules stable and gives you a faster, more voluminous whip.
Once the custard has cooled to room temperature and feels neutral to the touch, gently fold two-thirds of the whipped cream into it using wide, sweeping strokes. Reserve the remaining whipped cream for the final top layer.
Step 3: Prep the Bananas and Wafers (5 minutes)
Slice 4 bananas into clean ¼-inch rounds — uniform thickness ensures even layering and consistent texture in every scoop. Slice the garnish banana just before serving to minimize browning. For the crumb topping, place a handful of wafers in a zip-top bag and crush them with a rolling pin until you have ½ cup of irregular crumbles (not fine powder — visible chunky pieces look better and add texture).
Step 4: Build the Layers (10 minutes)
Spread a thin layer of custard cream across the bottom of your glass dish — just enough to anchor the first cookie layer. Arrange vanilla wafers in a single tight layer over the custard, fitting them edge to edge and breaking pieces to fill the gaps.
Layer 1: Spread one-third of the remaining custard cream over the wafers in an even layer. Arrange banana rounds over the cream in a single layer, covering as much surface as possible.
Layer 2: Lay down a second complete layer of vanilla wafers over the bananas. Spread another third of the custard cream on top, then add another layer of banana slices.
Layer 3: Add a third layer of wafers, then spread the final third of the custard cream smoothly over the top. Spoon or pipe the reserved whipped cream across the entire surface and spread it into an even, cloud-like layer reaching all the way to the edges.
Step 5: Garnish and Chill (30 minutes minimum)
Scatter the crushed vanilla wafer crumbles across the whipped cream in irregular clusters — as shown in the photo, generous and rustic looks better than perfect. Arrange banana rounds decoratively across the top, spacing them evenly. Add a light dusting of cinnamon or nutmeg if using.
Cover loosely with plastic wrap and refrigerate for at least 30 minutes. For the best texture and cleanest scoops, chill for 2 to 4 hours — or overnight. The wafers will soften into a tender, almost cake-like layer, and the custard firms into scoopable, sliceable portions. Per
USDA food safety guidelines, desserts made with eggs and dairy should remain refrigerated and not sit at room temperature for more than 2 hours.
How to Simmer Custard for Banana Pudding Dessert Perfectly
Control the simmer, not the clock. The single biggest pro tip for simmered custard is learning to read heat visually rather than relying purely on a timer. A proper simmer shows small, consistent bubbles forming around the edge and occasionally breaking through the center — not the turbulent, vigorous roll of a hard boil. Set your burner to medium, and if you see big bubbles forming quickly, drop to medium-low immediately.
Temper the yolks every time. Even experienced cooks skip this step and then wonder why there are yellow flecks in the finished custard. Streaming a small amount of warm liquid into the yolks before adding them to the full pan brings them up to temperature gradually, preventing any scrambling at the point of contact with the hot saucepan.
Strain for insurance. Even if your custard looks smooth, run it through a fine-mesh strainer before cooling. It takes 10 extra seconds and catches any micro-lumps you'd never detect until someone gets a spoonful.
Use ripe but firm bananas. A few small brown spots on the peel signals peak sweetness. Bananas that are too green taste starchy; too ripe and they'll turn mushy and brown within hours in the layers.
Assemble in a clear glass dish. The visible layers are half the appeal of this
banana pudding dessert — a clear dish lets everyone see what they're about to eat and creates natural excitement before the first scoop.
Common Mistakes to Avoid
1. Letting the custard boil instead of simmer.
A rolling boil breaks down the egg proteins and causes the custard to turn grainy or lumpy, with a sulfurous egg smell. Fix: Keep the heat at medium and watch for small, steady edge bubbles — that's your target temperature. If it boils, lower the heat immediately and whisk hard.
2. Whisking only at the beginning and stopping mid-cook.
Once the custard begins to heat, stopping your whisk — even briefly — allows the bottom to scorch and creates lumps that can't be fully corrected. Fix: Keep the whisk moving in continuous, wide circles from the moment liquid hits the pan until you pull it off the heat.
3. Skipping plastic wrap directly on the custard surface.
Cooling custard uncovered, or covered loosely, develops a thick rubbery skin that creates lumps when folded with whipped cream. Fix: Press the plastic wrap flush against the custard the moment it comes off the stove — no gaps, no air pockets.
4. Folding whipped cream into warm custard.
Heat deflates whipped cream instantly, turning your light, airy mixture into a flat, runny layer. Fix: Cool the custard completely to room temperature before folding — touch the outside of the bowl; it should feel neutral, not warm.
5. Slicing bananas too far in advance.
Cut bananas begin browning within 15 to 20 minutes of air exposure, which affects the presentation of interior layers and the garnish. Fix: Slice bananas for the layers right before assembly, and slice the garnish banana only right before serving.
6. Rushing the chill time.
Cutting into the dish immediately after assembly gives you runny, unstable scoops and wafers that haven't had time to soften. Fix: Refrigerate for a minimum of 30 minutes — and ideally 2 to 4 hours — before serving. The dessert genuinely improves with time.
7. Using fine wafer powder for the crumb topping.
Finely crushed crumbs disappear into the whipped cream and lose their visual and textural impact. Fix: Crush wafers into chunky, irregular pieces — some the size of a pea, some larger — for a more satisfying topping that holds its shape.
Variations
Healthy Version
Reduce sugar to ⅓ cup and use 2% milk in the custard — the lower fat content means increasing cornstarch to 5 tablespoons to maintain thickness. Replace heavy whipping cream with chilled coconut cream for a dairy-lighter topping. Add extra banana layers for natural sweetness, and use a reduced-sugar or honey-sweetened wafer if available.
Vegetarian Version
This recipe is already fully vegetarian as written. Double-check your vanilla wafer brand, as a small number contain gelatin — read the ingredient label before purchasing to confirm.
Peanut Butter Version
Whisk 3 tablespoons of creamy peanut butter into the warm custard just after removing it from the heat, before adding the butter. The peanut butter melts smoothly into the hot custard and creates a nutty, slightly salty depth that pairs extraordinarily well with banana. Scatter chopped roasted peanuts over the finished crumb topping.
Gluten-Free Version
Swap vanilla wafers for certified gluten-free vanilla cookies or gluten-free shortbread. Confirm your cornstarch is labeled gluten-free (cross-contamination varies by brand). All other ingredients in this recipe are naturally gluten-free, so one straight swap is all it takes.
Low-Carb / Keto Version
This version requires a different approach to both the custard thickener and the cookie layers. Use 2 teaspoons of glucomannan powder (konjac starch) instead of cornstarch — whisk it in off heat, as it activates at lower temperatures than cornstarch. Sweeten with erythritol or allulose at the same volume as sugar. Replace vanilla wafers with keto almond flour shortbread cookies (store-bought or homemade). Limit banana to half a banana total across all layers, sliced very thin to spread the natural sugars further.
What to Serve With This Banana Pudding Dessert
- Fresh brewed iced coffee or cold brew — the slight bitterness cuts the custard's sweetness and cleanses the palate between bites.
- Warm caramel sauce on the side — let guests drizzle their own portion for an indulgent finishing touch.
- Easy 5-Layer Strawberry Banana Creamy Dessert (Ultimate Guide) — serve both desserts side by side at large gatherings for a beautiful fruit dessert spread.
- Sparkling water with lemon — a simple, bright palate cleanser that works better with creamy desserts than most people expect.
- Toasted coconut flakes — scatter over individual scooped portions for a tropical texture contrast.
- Vanilla bean ice cream — a small scoop alongside a serving portion amplifies the vanilla notes in the custard without competing with the banana flavor.
- Thin shortbread cookies — serve a few on the side for guests who want an extra crunch element with their creamy portion.
Storage Instructions
Refrigerator
Store the assembled
banana pudding dessert tightly covered with plastic wrap in the refrigerator for up to
3 days. The texture continues to improve through day two as the wafers soften further. By day three, the wafers will be very soft and the banana slices may show some browning — the flavor remains good but the appearance is less fresh.
Freezer
Freezing the fully assembled dish is
not recommended. The custard separates on thawing, the whipped cream loses its structure, and the bananas turn dark and watery. If you need to freeze components separately, the simmered custard (before whipped cream is folded in) can be frozen airtight for up to 1 month — thaw overnight in the refrigerator and re-whisk before use.
Shelf Life Summary
| Storage Location |
Duration |
Notes |
| Refrigerator (assembled) |
Up to 3 days |
Cover tightly; best within 48 hours |
| Refrigerator (custard only) |
Up to 4 days |
Store with plastic wrap on surface |
| Freezer (assembled) |
Not recommended |
Texture degrades significantly |
| Freezer (custard only) |
Up to 1 month |
Thaw overnight; re-whisk before layering |
Reheating Instructions
This is a chilled dessert designed to be served cold —
do not reheat the assembled dish. If you've stored the custard separately and want to loosen it slightly for easier layering, here are your options:
Stovetop: Pour refrigerated custard into a small heavy-bottomed saucepan over low heat. Stir gently and continuously for 3 to 4 minutes until it reaches a smooth, spreadable consistency. Do not let it return to a simmer — warm it just enough to loosen. According to
food safety guidance from FoodSafety.gov, dairy-based dishes with eggs should be handled carefully and kept cold when not actively in use.
Microwave (custard only): Transfer to a microwave-safe bowl and heat in 15-second intervals on 50% power, stirring thoroughly between each interval. Typically takes 45 to 60 seconds total. Stir vigorously after each interval to redistribute heat — uneven warming can create hot spots that partially cook the custard surface.
Stovetop is preferred for the most controlled result. Whisk the re-warmed custard smooth before folding in fresh whipped cream if rebuilding a new dish.
Nutrition Facts
(Per serving, based on 12 servings — values are estimates)
| Nutrient |
Amount |
| Calories |
~295 |
| Total Fat |
14g |
| Saturated Fat |
8g |
| Cholesterol |
105mg |
| Sodium |
200mg |
| Total Carbohydrates |
37g |
| Dietary Fiber |
1g |
| Total Sugars |
21g |
| Protein |
5g |
| Vitamin C |
6% DV |
| Calcium |
11% DV |
| Iron |
4% DV |
| Potassium |
8% DV |
Nutrition Disclaimer: Nutritional values are estimates calculated using standard ingredient amounts and may vary based on specific brands, substitutions, or portion sizes. This information is provided for general reference only and is not intended as medical or dietary advice. For precise nutritional data, use a certified nutrition calculator with your exact ingredients. Consult a registered dietitian for personalized dietary guidance.
Frequently Asked Questions
What makes this banana pudding dessert different from store-bought versions?
The simmered-from-scratch custard is the defining difference. It uses real egg yolks, whole milk, and butter cooked gently on the stovetop, which produces a silky richness that instant mixes — which rely on modified starches and artificial flavoring — simply can't replicate in body or depth.
Can I use instant pudding mix instead of simmering custard from scratch?
Yes. Prepare two boxes of instant vanilla pudding according to package directions and fold in the whipped cream as instructed. The result is quicker but noticeably lighter in flavor. If you're making this for the first time, try the simmered version — the difference is worth 10 extra minutes.
Why does my custard turn lumpy during simmering?
Lumps form when heat is too high and the egg proteins seize, or when whisking stops during cooking. If your custard is only slightly lumpy, strain it through a fine-mesh sieve while still warm to smooth it out. Severe lumping indicates scrambled yolks — start the custard over with fresh ingredients.
How long should I chill the banana pudding dessert before serving?
A minimum of 30 minutes is needed for the custard to firm and the wafers to begin softening. For the best texture — tender, cake-like wafer layers and clean, scoopable portions — refrigerate for 2 to 4 hours. Overnight chilling produces the best result of all.
Can I make this banana pudding dessert without eggs?
Yes — omit the yolks and increase cornstarch to 5 tablespoons total. The custard will be slightly less rich and a shade lighter in color, but it will still thicken cleanly and hold its layers well. This also makes the recipe suitable for those with egg allergies.
How do I prevent the bananas from turning brown inside the layers?
Slice bananas right before you build the layers — exposure to air is what causes browning. A brief toss in ½ teaspoon of fresh lemon juice also slows oxidation without significantly affecting flavor once layered between custard and wafers.
What's the best dish size for this recipe?
A deep 9×13-inch glass baking dish is ideal for the ingredient quantities in this recipe and gives you 3 full layers with a generous whipped cream top. A 9×9-inch dish can work if you want taller, more dramatic layers — you may need to reduce the number of wafer and banana layers slightly to fit.
Can I make individual portions instead of one large dish?
Absolutely. Layer the components in individual mason jars, clear cups, or small trifle dishes. Individual portions are easier to serve at parties, chill faster (about 20 minutes), and make beautiful presentations. Reduce the garnish per portion proportionally.
Why is the simmering method better than baking for this custard?
Simmering on the stovetop gives you full visual and tactile control over the custard at every second of cooking. You can see the texture change, feel the resistance on your whisk increase, and adjust heat instantly — something an oven cannot offer. Baked custards (like crème brûlée or custard cups) set through ambient oven heat, which works beautifully for individual portions but is harder to scale accurately for a large layered dish.
Can I add cream cheese to this recipe?
Yes — beat 4 oz of softened cream cheese until smooth and fold it into the cooled custard before adding the whipped cream. It adds a pleasant tang and creates a slightly denser layer that holds its shape especially well after overnight chilling.
How should I serve this at a large gathering?
Use a deep spoon or large ice cream scoop to portion generous scoops that capture all three layers. Serve directly from the cold glass dish — the visible layers are part of the presentation. Have extra wafer crumbles on the side for guests who want more crunch on their portion.
Expert Chef Tips
Read the custard with your eyes, not just your timer. Watch for the moment the mixture shifts from thin and translucent to opaque and viscous — that visual thickening, combined with the first steady small bubbles, tells you the cornstarch is activating and you're in the final stretch. No clock can tell you that.
Build even wafer layers for structural integrity. Gaps in the cracker layer collapse when you scoop, turning a beautiful slice into a jumbled mess. Take an extra minute to break wafers into puzzle pieces and tile them tightly — it pays off in every serving.
Fold whipped cream in two stages. Add one-third of the whipped cream to the custard first and stir it in fully — this lightens the custard and makes it easier to fold in the remainder without deflating it. The final two-thirds get folded gently with broad, slow strokes.
Toast the crumb garnish for better flavor. Spread crushed vanilla wafer crumbles in a dry skillet over medium-low heat and stir for 2 to 3 minutes until golden and fragrant. The toasted crumbs add a caramelized depth to the topping and stay slightly crunchier on the surface even after chilling.
Let the dish rest at room temperature for 5 minutes before serving. Pulling it straight from the fridge means very firm, cold custard that's harder to scoop cleanly. Five minutes of rest softens the layers just enough for beautiful, easy portions without losing structural integrity.
Recipe Summary
This
banana pudding dessert layers simmered-from-scratch vanilla custard with ripe banana rounds, vanilla wafers, and whipped cream in a clear glass baking dish, finished with golden crumbles and fresh banana garnish. The custard is built on the stovetop through a controlled simmer — whole milk, egg yolks, and cornstarch whisked continuously until silky and thick — then folded with freshly whipped cream for a lighter, mousse-like texture between the layers. Thirty minutes of chilling (or ideally overnight) transforms the wafers into tender, cake-like layers that hold every scoop together. Simple ingredients, precise technique, and an unforgettable result.
Make It Once and It Becomes Your Signature Dish
There's a reason this style of layered cream dessert never goes out of style — it's deeply satisfying, genuinely shareable, and somehow tastes better every time you make it. The simmering step sounds intimidating on paper but takes less than 10 minutes and produces a custard that puts every shortcut version to shame. Once you've made this
banana pudding dessert from scratch, you'll understand why the people who bring it to gatherings always leave with an empty dish and a dozen requests for the recipe.
Build it the night before, keep it cold, and show up with the best dessert in the room. That's the whole plan — and it works every time.