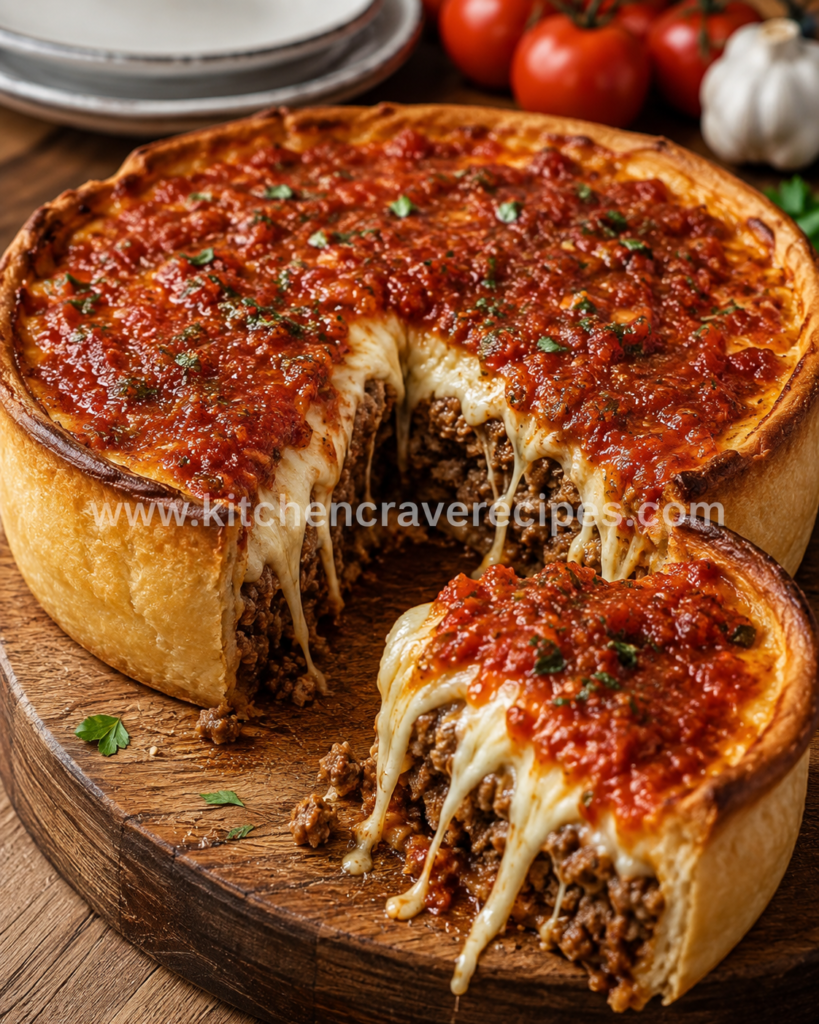
Cheesy Beef Deep-Dish Pizza Baked in One Pan
If you have ever cut into a deep-dish pizza and watched layers of melted mozzarella stretch away from a thick, golden crust packed with seasoned ground beef, you know exactly why this style of pizza has such a dedicated following. This cheesy beef deep-dish pizza delivers that same experience at home — a buttery, crisp-edged crust, a generous filling of well-seasoned beef and low-moisture mozzarella, and a chunky tomato sauce spread thick across the top the way Chicago-style pizza is meant to be built.
The photo above shows the pizza just after the first slice was pulled — the cheese is still molten, the beef filling is visible in thick layers, and the crust has that deeply golden, almost bread-like edge that makes every bite satisfying. That is exactly what you are aiming for with this recipe.
What makes this version work is the order of layers. The cheese goes directly on the dough, the beef goes on top of the cheese, and the sauce goes on top of everything. This keeps the crust from getting soggy and lets the sauce reduce and concentrate during baking while the cheese melts underneath without burning. I made the mistake early on of putting the sauce on first — the crust turned out dense and the cheese browned too fast. Flipping the order made all the difference.
This recipe is classified as a
complex recipe because it involves making a dough, preparing a seasoned beef filling, building a pan sauce, and assembling multiple layers before baking. Allow yourself about 2.5 to 3 hours from start to finish — most of that is dough resting time, not active cooking.
Why You'll Love This Cheesy Beef Deep-Dish Pizza
- The crust is genuinely thick and sturdy — buttery enough to hold its shape when you lift a slice without flopping.
- The cheese-to-sauce ratio is intentional — mozzarella goes under the sauce so it melts without charring.
- One baking pan handles the whole job — no pizza stone, no special equipment beyond a deep cake or cast iron pan.
- The beef filling is boldly seasoned — Italian seasoning, garlic, and a pinch of red pepper give it real depth.
- The sauce is chunky and reduces beautifully — it thickens during baking rather than going watery on top.
- You control the thickness — press the dough thinner for a slightly lighter crust or let it rise fully for maximum depth.
- It reheats exceptionally well — a slice warmed in the oven the next day is nearly as good as fresh out of the pan.
- It feeds a crowd from one pan — a 12-inch deep-dish comfortably serves 6 to 8 people.
Ingredients
For the Deep-Dish Dough
- 2¼ teaspoons active dry yeast (1 standard packet)
- 1 teaspoon granulated sugar
- 1 cup warm water (110°F)
- 3 cups all-purpose flour, plus more for dusting
- ½ cup yellow cornmeal
- 1 teaspoon fine salt
- ½ cup unsalted butter, melted (divided — 6 tablespoons for dough, 2 tablespoons for pan)
For the Beef Filling
- 1½ pounds ground beef (80/20 blend)
- 1 small yellow onion, finely diced
- 4 garlic cloves, minced
- 1½ teaspoons Italian seasoning
- ½ teaspoon crushed red pepper flakes
- ½ teaspoon fine salt
- ¼ teaspoon black pepper
- 1 tablespoon olive oil
For the Cheese Layer
- 3 cups low-moisture whole-milk mozzarella, shredded (about 12 oz)
- ½ cup freshly grated Parmesan
For the Tomato Sauce (Top Layer)
- 1 can (28 oz) crushed San Marzano tomatoes
- 3 garlic cloves, minced
- 1 teaspoon olive oil
- 1 teaspoon dried oregano
- 1 teaspoon granulated sugar
- ½ teaspoon fine salt
- ¼ teaspoon black pepper
- 2 tablespoons fresh basil, chopped (plus more for garnish)
Optional Add-Ins
- ½ cup sliced green bell pepper (visible in the photo, adds mild sweetness)
- ¼ cup sliced black olives
- ½ teaspoon fennel seeds added to the beef while browning
Ingredient Notes & Substitutions
Ground beef (80/20): The fat content matters here. Leaner beef tends to dry out inside the deep dish because the long bake time pulls moisture away. If you only have 90/10, add a tablespoon of olive oil to the pan when browning. Drain excess grease thoroughly after cooking — too much fat left in the filling will make the crust greasy from the inside.
Low-moisture mozzarella: I use block mozzarella and shred it myself rather than buying pre-shredded bags. Pre-shredded cheese contains anti-caking agents that affect how cleanly it melts. The difference in the final pull of cheese is noticeable.
Cornmeal in the dough: The cornmeal gives the crust that slightly gritty, structured texture that separates deep-dish from standard thick-crust pizza. You can substitute semolina flour at a 1:1 ratio if that is what you have. Omitting it entirely gives you a softer, more bread-like crust.
San Marzano tomatoes: These are sweeter and less acidic than standard crushed tomatoes, which matters because the sauce sits on top without caramelizing through a long cook. Regular crushed tomatoes work but may taste sharper — add another half teaspoon of sugar to balance.
Dough substitution: Store-bought pizza dough works as a shortcut. Let it come to room temperature for 30 minutes before pressing into the pan. The crust will be softer and less buttery but still holds together well.
Fresh basil: The fresh basil visible on top in the photo is scattered on after baking, not before. If you add it before baking, it turns black. Add it in the last 2 minutes or right after the pizza comes out.
Kitchen Tools Needed
- 12-inch round deep-dish cake pan or cast iron skillet (at least 2 inches deep — this is non-negotiable for the structure)
- Stand mixer with dough hook, or large mixing bowl and sturdy spoon
- Large skillet for the beef filling
- Medium saucepan for the tomato sauce
- Pastry brush (for buttering the pan and edges)
- Measuring cups and spoons
- Box grater or food processor for shredding cheese
- Sharp knife and cutting board
- Instant-read thermometer (recommended — see food safety note in Step 8)
- Oven with working temperature control (baking at 425°F)
- Wire cooling rack
How to Make Cheesy Beef Deep-Dish Pizza — Step-by-Step
Step 1: Activate the Yeast and Make the Dough
Combine the warm water, sugar, and yeast in a large bowl or the bowl of your stand mixer. Stir once and let it sit for 5 to 8 minutes until the surface looks foamy and you can smell a faint yeasty aroma. If nothing happens after 10 minutes, your yeast is likely old — start with a fresh packet before going further.
Add 6 tablespoons of the melted butter, the salt, cornmeal, and flour to the yeast mixture. Mix on low speed with the dough hook for 2 minutes, then increase to medium and knead for 5 to 6 minutes until the dough is smooth and slightly tacky but not sticky. If mixing by hand, knead on a lightly floured surface for 8 minutes.
Tip: The dough should pull cleanly away from the sides of the bowl but still feel soft. If it is tearing or stiff, add water a tablespoon at a time. If it is sticking to your hands entirely, add flour a tablespoon at a time.
Step 2: Let the Dough Rise
Shape the dough into a ball and place it in a lightly oiled bowl. Cover with plastic wrap or a damp kitchen towel. Let it rise at room temperature for 60 to 90 minutes, until roughly doubled in size. If your kitchen is cold, set the bowl in an unheated oven with just the oven light on — the gentle warmth is enough.
Step 3: Make the Beef Filling
While the dough rises, heat 1 tablespoon of olive oil in a large skillet over medium-high heat. Add the diced onion and cook for 3 to 4 minutes until softened and slightly translucent. Add the minced garlic and stir for 30 seconds until fragrant.
Add the ground beef and break it apart with a wooden spoon. Cook for 7 to 9 minutes, stirring occasionally, until no pink remains and the beef has some light browning on the edges. Drain any excess grease from the pan — I tilt the skillet and use a spoon to pull out the fat rather than dumping the filling into a colander, which keeps the fond in the pan.
Season with Italian seasoning, red pepper flakes, salt, and black pepper. Stir to combine and remove from heat. Let it cool slightly while you make the sauce.
Step 4: Make the Tomato Sauce
In a medium saucepan, warm 1 teaspoon of olive oil over medium heat. Add the minced garlic and stir for about 30 seconds. Pour in the crushed tomatoes, then add the oregano, sugar, salt, and black pepper.
Simmer over medium-low heat for 12 to 15 minutes, stirring occasionally, until the sauce thickens slightly. It should hold its shape when spooned onto the pizza rather than running. Remove from heat and stir in the fresh basil. Taste and adjust seasoning — the sauce should be bold because it will sit on top of a thick, filling-heavy pizza.
Tip: Don't skip the simmer step. A quick raw sauce poured over the pizza will turn out watery and thin after baking. Even 12 minutes of simmering makes a noticeable difference in texture.
Step 5: Preheat the Oven and Prepare the Pan
Preheat your oven to
425°F. Use the remaining 2 tablespoons of melted butter to coat the bottom and sides of your 12-inch deep-dish pan generously. The butter is what creates the crispy, almost fried edge on the crust — don't substitute oil here if you can avoid it.
Step 6: Press the Dough Into the Pan
Punch down the risen dough and transfer it to the buttered pan. Use your hands to press the dough outward from the center, working it up the sides of the pan to a height of about 1½ to 2 inches. If the dough keeps springing back, let it rest for 5 minutes and try again — the gluten just needs time to relax.
The dough layer at the bottom should be about ¼ inch thick. You want it thick enough to hold the filling but thin enough to bake through properly.
Step 7: Layer the Pizza — Cheese First, Then Beef, Then Sauce
This layering order is what separates a properly built deep-dish from one that comes out soggy.
Layer 1: Spread the shredded mozzarella evenly over the bottom of the pressed dough. Push it into the corners and up toward the dough edges slightly.
Layer 2: Spoon the seasoned beef filling evenly over the cheese. Press it down gently with the back of a spoon so it settles into an even layer. If you are adding green bell pepper slices, scatter them over the beef now.
Layer 3: Spoon the tomato sauce over the top of the beef, spreading it evenly to the edges. Sprinkle the grated Parmesan over the sauce.
Step 8: Bake the Deep-Dish Pizza
Place the pan on the center rack of the preheated 425°F oven. Bake for
28 to 32 minutes, until the crust edges are deeply golden brown and the sauce on top looks slightly reduced and set. The crust color along the outer edge is your clearest visual doneness cue — pale means undercooked, deep amber means ready.
For food safety, the internal temperature of the beef filling should reach
165°F when checked with an instant-read thermometer at the thickest part. You can reference
USDA safe minimum internal temperatures for guidance on ground beef.
Do not open the oven door during the first 20 minutes. Deep-dish pizza needs sustained, even heat to bake the thick crust through from bottom to top. Opening the door early drops the oven temperature and can leave the inner dough undercooked even when the edges look done.
Step 9: Rest Before Slicing
Remove the pizza from the oven and let it rest in the pan for
8 to 10 minutes before slicing. This rest allows the cheese layer to firm up slightly so that when you cut and lift a slice, it holds together rather than collapsing. I know it is tempting to cut into it immediately — the smell alone makes waiting difficult — but the structure genuinely improves with those extra minutes.
Scatter fresh basil over the top right before serving. Use a sharp knife or pizza wheel to cut into wedges directly in the pan, then lift with a wide spatula.
My Best Cooking Tips
Use a light-colored metal pan if possible. Dark pans absorb heat faster, which can over-brown the bottom of the crust before the center of the filling is fully cooked through. A light-colored aluminum or silver-toned cake pan gives you more control.
Let the dough come fully to room temperature before pressing. Cold dough resists being shaped and tends to shrink back, making it harder to build up the sides. If your kitchen is cold, give the dough an extra 15 minutes after the rise before pressing.
Drain the beef thoroughly. Excess fat left in the filling will pool underneath the cheese layer during baking and create a greasy, dense bottom crust. I drain into a folded paper towel lining a bowl, not directly down the sink — it prevents clogged drains.
Method-specific tip — baking a thick crust evenly: Place the pizza pan directly on the oven rack rather than on a baking sheet. The direct heat from the rack helps bake the bottom of the crust without steaming it. If your oven runs uneven, rotate the pan at the 20-minute mark rather than earlier.
Shred your own cheese. Blocks of low-moisture mozzarella shredded fresh melt into smooth, stretchy layers. The bagged pre-shredded kind melts adequately but tends to look slightly grainy in the final pull of cheese — less like the photo above, more like a standard frozen pizza.
Common Mistakes to Avoid
Putting the sauce directly on the dough. This is the most common deep-dish error. Tomato sauce contains a significant amount of liquid that soaks straight into raw dough and prevents the crust from crisping properly. Always layer cheese first, directly on the dough, to create a barrier.
Not draining the beef enough. Cooked ground beef releases fat, and if that fat stays in the filling, it migrates down through the cheese into the crust during baking. The result is a greasy, heavy base that feels unpleasant to eat. Always drain well before layering.
Skipping the dough rest during pressing. When dough shrinks back repeatedly as you try to shape it, the natural instinct is to keep forcing it. Forcing tight, elastic dough only makes it spring back harder. Let it rest for 5 minutes — the gluten relaxes and the dough becomes much easier to work with.
Opening the oven too early. Deep-dish pizza relies on sustained heat to bake through a thick dough layer. Opening the oven door before the 20-minute mark causes a temperature drop that can leave the dough gummy in the center even when the outside appears done. Set a timer and resist the urge.
Not buttering the pan generously. The butter in the pan is not just for non-stick purposes — it fries the outer edge of the crust as it bakes, creating that signature golden-brown, slightly crispy shell. A lightly greased pan produces a pale, soft edge. Use all 2 tablespoons.
Using fresh mozzarella instead of low-moisture. Fresh mozzarella contains significantly more water. It will melt and release that water into the pizza, creating steam that makes the crust soggy and watery pools inside the filling layer. Save fresh mozzarella for Neapolitan-style pies.
Slicing too soon. The filling and cheese need 8 to 10 minutes to settle after baking. Slicing immediately causes the layers to slide apart when you lift a piece. The pizza looks just as appealing after the rest, and it holds together far better.
Under-seasoning the beef. The beef filling is sandwiched between thick layers of cheese and sauce. If the beef itself is bland, the overall pizza tastes flat despite the bold sauce. Season the filling generously — taste it before layering.
Variations
Spicy Italian Sausage Variation
Swap half the ground beef for spicy Italian sausage (casings removed). The sausage brings its own seasoning — fennel, red pepper, garlic — which gives the filling a sharper, more complex flavor than beef alone. Brown them together in the same skillet and drain well. The added fat from sausage means draining is even more important here.
Green Pepper and Onion Classic Variation
This is the version closest to what you see in the photo. Sauté ½ cup of sliced green bell pepper with the onion in Step 3. The peppers soften completely during baking and add a mild sweetness that balances the bold tomato sauce. They also add a noticeable color contrast when you pull a slice.
Vegetarian Deep-Dish Variation
Replace the beef filling entirely with a combination of sautéed mushrooms (8 oz), diced zucchini (1 medium), and wilted spinach (2 packed cups). Cook the vegetables until most of their moisture has evaporated before layering — watery vegetables will make the crust soggy in the same way wet sauce does. Season with the same Italian seasoning and garlic as the beef version.
Low-Carb Variation
This is a variation — not a description of the original recipe. Use a cauliflower crust pressed into the pan in place of the yeasted dough. The structure is less sturdy and the sides will not rise as high, so treat it more as a shallow-dish version. Bake at 400°F for 20 to 25 minutes. The filling and sauce remain the same. Protein per serving increases and carbohydrates decrease significantly depending on the cauliflower crust recipe used.
Pepperoni and Beef Combination
Layer 2 oz of thinly sliced pepperoni directly on top of the beef filling before adding the sauce. The pepperoni crisps slightly under the tomato sauce during baking and adds a salty, smoky layer that complements the beef without overwhelming it.
What to Serve With This Recipe
- Simple green salad with Italian dressing — the acidity cuts through the richness of the deep-dish very effectively.
- Garlic bread or garlic knots — great for scooping up any extra sauce; check out our Cheesy Garlic Bread Bake – Easy 5-Ingredient Recipe for a quick homemade version.
- Roasted broccoli or broccolini — a light, slightly bitter green vegetable balances the heavy cheese and beef layers.
- Caesar salad — the crisp romaine and tangy dressing are a classic pairing with any cheese-heavy Italian-American dish.
- Sparkling water with lemon — the carbonation helps cut through richness between bites; a light red wine like Chianti also works well.
- Roasted cherry tomatoes — if you want something warm and simple on the side without competing with the pizza flavors.
- Stuffed mushrooms — serves as a lighter starter to balance the main dish; see our Mushroom Spinach Scramble: 5-Ingredient Easy Recipe for a quick option.
- Pickled banana peppers or giardiniera — the tang and crunch are a traditional Chicago side that works especially well here.
Storage & Reheating
Refrigerator Storage
Allow the pizza to cool completely before storing. Wrap individual slices tightly in aluminum foil or store in an airtight container. Refrigerate for up to
4 days. Do not leave the pizza at room temperature for more than 2 hours — see
FDA food safety guidance on leftovers for reference.
Freezer Storage
Deep-dish pizza freezes well. Wrap individual slices in plastic wrap, then in a layer of aluminum foil. Store in a zip-top freezer bag for up to
2 months. Thaw overnight in the refrigerator before reheating — do not reheat from frozen directly as the crust will be unevenly heated.
Shelf Life Summary
| Storage Method |
Duration |
| Room temperature |
2 hours maximum |
| Refrigerator |
Up to 4 days |
| Freezer |
Up to 2 months |
How to Reheat Cheesy Beef Deep-Dish Pizza
Oven (recommended): Preheat to 375°F. Place slices on a baking sheet and cover loosely with foil. Heat for 10 to 12 minutes until warmed through and the crust is crisp again. Remove foil for the last 3 minutes to re-crisp the top.
Skillet: Place a slice in a dry skillet over medium-low heat. Cover with a lid and heat for 5 to 7 minutes. The bottom crust re-crisps on the pan and the cheese melts from the trapped steam. This is my preferred method for a single slice.
Microwave: Heat on 70% power for 90 seconds to 2 minutes. The crust will soften, but the filling and cheese reheat evenly. Place a cup of water in the microwave alongside the slice to prevent the cheese from drying out.
Nutrition Facts
Estimated values per serving (1 slice, based on 8 slices from a 12-inch pizza). Values are estimates and will vary based on exact ingredients and brands used.
| Nutrient |
Per Serving (approx.) |
| Calories |
520 kcal |
| Total Fat |
28 g |
| Saturated Fat |
14 g |
| Cholesterol |
90 mg |
| Sodium |
780 mg |
| Total Carbohydrates |
41 g |
| Dietary Fiber |
3 g |
| Total Sugars |
5 g |
| Protein |
27 g |
| Calcium |
280 mg |
| Iron |
4 mg |
These values are estimates based on the listed ingredients and standard serving size. Actual values will vary depending on specific product brands and any modifications made to the recipe.
Frequently Asked Questions
Can I use store-bought pizza dough for this cheesy beef deep-dish pizza?
Yes. Let the dough sit at room temperature for 30 minutes before pressing it into the pan — cold dough is stiff and will spring back. Store-bought dough produces a softer, slightly less buttery crust than the homemade version, but the layering and filling remain the same. It is a reliable shortcut on busy days.
Why does the sauce go on top instead of under the cheese?
This is how traditional Chicago-style deep-dish is built. Putting sauce directly on raw dough makes the crust soggy. The cheese acts as a barrier layer that protects the dough from the sauce's moisture during the long bake time. It also means the cheese melts gently underneath rather than burning directly under the broiler-level heat.
What pan size works best?
A 12-inch round cake pan or cast iron skillet that is at least 2 inches deep is ideal. A 9x13-inch baking dish works as a substitute — the crust will be thinner and the pizza will be more rectangular, but the layering method is the same. Adjust the bake time down by 3 to 4 minutes since a thinner crust bakes faster.
How do I know when the pizza is fully baked?
The crust edges should be deeply golden brown — not just pale gold but a rich, amber color. The sauce on top should look slightly reduced and set rather than glossy and wet. An instant-read thermometer inserted into the center of the beef filling should read at least 165°F.
Can I make the dough ahead of time?
Yes. After the first rise, punch down the dough, wrap it tightly in plastic wrap, and refrigerate for up to 24 hours. Before using, let it sit at room temperature for 30 to 45 minutes until it is pliable and no longer cold to the touch.
Why is my crust pale and soft on the bottom?
Two common causes: the pan was not buttered generously enough, or the pan was placed on a baking sheet instead of directly on the oven rack. Butter creates the fried edge and bottom crust — do not reduce it. Direct rack contact ensures the pan bottom gets full heat. A light-colored pan also helps by avoiding over-absorption of heat.
What is the best baking method tip for deep-dish pizza specifically?
Place the pan on the lowest oven rack for the first 15 minutes, then move it to the center rack for the remaining bake time. The lower rack position gets the bottom crust cooking quickly, and moving it to center ensures the top sauce and cheese layer finish properly. I started doing this after noticing the center dough was undercooked when I used only the center rack the whole time.
Can I add vegetables to the beef filling?
Yes — just cook them thoroughly first and drain any excess moisture before layering. Vegetables like mushrooms, zucchini, and spinach release a significant amount of water as they cook. Adding them raw or undercooked into the filling will make the crust soggy.
How do I prevent the sides of the dough from collapsing during baking?
Make sure the dough is pressed firmly and evenly up the sides of the pan, not just draped loosely. The weight of the filling will push against the sides as the pizza bakes. A dough that is well-pressed and at least ¼ inch thick on the sides holds up well. If the sides collapse after filling, use your fingers to gently press them back up before baking.
Is this recipe freezer-friendly?
Yes, and it reheats well from frozen if you thaw it in the refrigerator overnight first. Wrap individual slices in plastic wrap and then foil, and freeze for up to 2 months. Reheat in a 375°F oven for 12 to 15 minutes from thawed.
Can I make this recipe dairy-free?
You can substitute dairy-free mozzarella shreds and dairy-free butter, though the melting behavior and flavor will differ. Many dairy-free mozzarella options do not stretch the same way as whole-milk mozzarella — the visual pull of cheese you see in the photo is specific to dairy mozzarella. The recipe still works structurally, but the cheese layer will be less dramatic.
How long does this pizza take from start to finish?
Allow approximately 2.5 to 3 hours total — roughly 20 minutes to make the dough, 60 to 90 minutes for the dough to rise, 25 minutes for filling and sauce preparation (which can happen during the rise), and 30 to 35 minutes of baking plus 10 minutes resting. If you use store-bought dough, you can reduce the total time to about 70 to 80 minutes.
Tips for Better Results
Measure flour by the spoon-and-level method. Scooping the measuring cup directly into the flour bag compacts the flour and can result in up to 20% more flour than the recipe calls for. Extra flour makes the dough stiff and the crust tough. Spoon flour into the cup and level off the top with a straight edge.
Let the pizza cool in the pan, not on a rack. The cast iron or cake pan retains heat and continues crisping the bottom crust for several minutes after the pizza comes out of the oven. Sliding it onto a cooling rack too early stops that process. Leave it in the pan for the full 8 to 10 minute rest before removing or slicing.
Taste the tomato sauce before spreading it. San Marzano tomatoes vary by brand in their sweetness and salt content. Some batches are quite acidic, others are already sweet. Taste after simmering and adjust — a little more sugar softens sharpness, a pinch more salt adds depth. A well-seasoned sauce makes a noticeable difference in the final pizza.
Brown the beef in batches if needed. If you crowd the skillet with all 1½ pounds of beef at once, the pan temperature drops and the meat steams instead of browning. A bit of browning on the beef adds a savory depth of flavor to the filling. If your skillet is 10 inches or smaller, brown the beef in two additions.
Grate Parmesan fresh from a block. Pre-grated Parmesan from a canister is dry and powdery and does not melt or incorporate the same way as freshly grated. A microplane or the fine side of a box grater gives you fluffy, moist Parmesan that melts smoothly into the top of the sauce layer during baking.
Recipe Summary
This cheesy beef deep-dish pizza is built in layers — buttery cornmeal dough pressed into a pan, topped with low-moisture mozzarella, a seasoned ground beef filling, and a thick, simmered tomato sauce. The whole thing bakes at 425°F for about 30 minutes until the crust is deeply golden and the filling is bubbling hot. It takes a bit of time because of the dough rise, but the actual hands-on work is straightforward. Every component can be prepped while the dough rises, which makes the process feel manageable even on a weekend afternoon.