
Cheesy Beef and Biscuit Skillet — Easy 45 Min
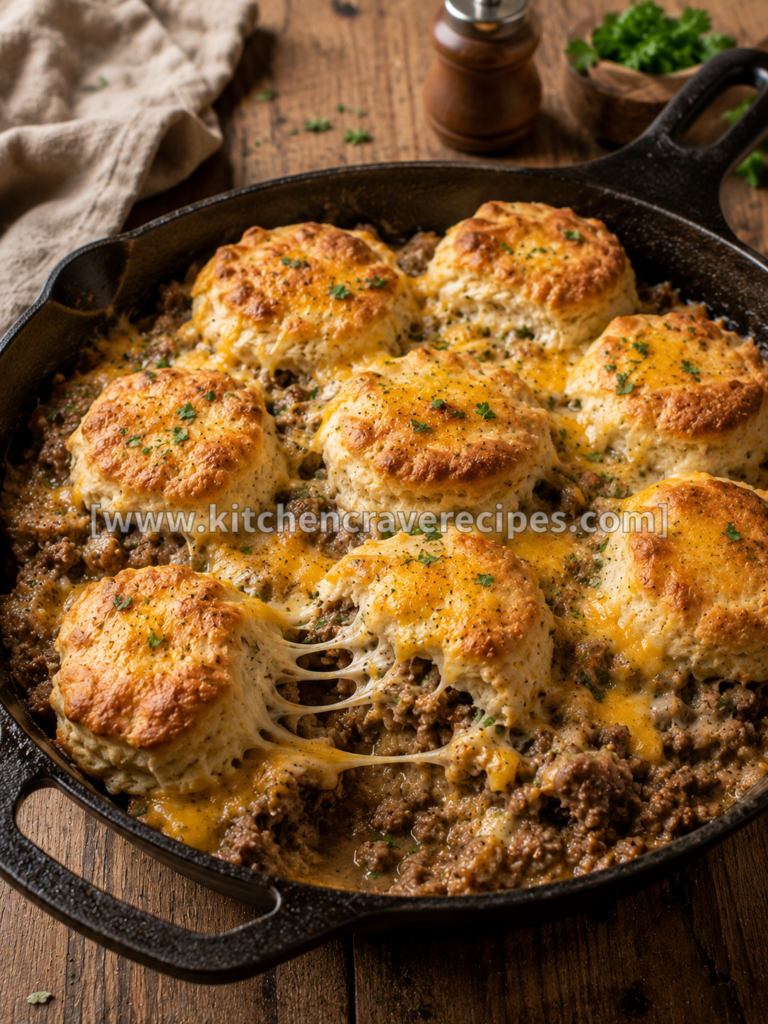
Some dinners earn their place in the regular rotation on the first bite, and this cheesy beef and biscuit skillet is exactly that kind of recipe. Ground beef and diced red onion are browned in a cast-iron skillet, brought together in a rich, savory gravy, and then topped with drop biscuits that bake directly on top of the filling in the same pan — no separate baking dish, no extra steps. As shown in the photo, the biscuits puff up golden and herb-flecked, with melted cheddar draped across every dome and the beefy gravy bubbling up between them. The entire dish goes from stovetop to oven in under 45 minutes and comes to the table in the skillet it was cooked in. One pan, one meal, zero complaints.
Recipe Quick Info
| Detail | Info |
|---|---|
| Prep Time | 15 minutes |
| Cook Time | 30 minutes |
| Total Time | 45 minutes |
| Servings | 6 portions |
| Cuisine | American Comfort Food |
| Course | Main Dish |
| Cooking Method | Sautéing + Baking |
| Calories | ~520 per serving |
| Difficulty | Standard |
Why You’ll Love This Recipe
- True one-pan cooking — the beef filling is built entirely on the stovetop, then the biscuits are dropped right on top and the whole skillet slides into a 400°F oven, exactly as the photo shows.
- Comfort food with real depth of flavor — browning the ground beef and onion properly before adding the gravy builds a savory, caramelized base that makes this taste like it cooked far longer than 45 minutes.
- Golden biscuits with melted cheddar on every single one — the biscuits bake directly in the steam of the gravy below, staying soft underneath while the tops turn golden and the cheese melts into every crevice.
- Family-scale portions with simple pantry ingredients — everything here — ground beef, canned biscuits or homemade drop biscuit dough, cheddar, broth — is either already in your kitchen or one grocery aisle away.
- Minimal cleanup after dinner — one cast-iron skillet, one mixing bowl if making biscuits from scratch, and the serving spoon you used at the table.
- Endlessly adaptable without changing the method — swap in ground turkey, add mushrooms, use pepper jack instead of cheddar — the sauté-then-bake structure stays the same regardless of the variation.
- Leftovers reheat better than expected — the biscuits absorb the gravy overnight in the refrigerator and reheat into something even more satisfying the next day.
Ingredients
For the Beef Filling
- 1½ lbs ground beef (80/20 blend recommended)
- 1 medium red onion, diced (as visible in the photo)
- 3 cloves garlic, minced
- 2 tablespoons all-purpose flour
- 1½ cups low-sodium beef broth
- ½ cup whole milk
- 1 tablespoon Worcestershire sauce
- 1 teaspoon kosher salt
- ½ teaspoon black pepper
- ½ teaspoon smoked paprika
- ½ teaspoon onion powder
For the Drop Biscuits
- 2 cups all-purpose flour
- 1 tablespoon baking powder
- ½ teaspoon kosher salt
- ½ teaspoon garlic powder
- 1 teaspoon dried parsley (plus more for garnish, as shown)
- ¾ cup cold whole milk
- ⅓ cup cold unsalted butter, cubed
- ½ cup shredded sharp cheddar cheese (folded into biscuit dough)
For the Topping
- 1½ cups shredded sharp cheddar cheese (for melting over biscuits before baking)
- 1 teaspoon dried parsley (for garnish, as visible in the photo)
Optional Add-Ins
- ½ cup sliced cremini mushrooms (sauté with the onion)
- ¼ cup diced green bell pepper
- Pinch of red pepper flakes in the gravy
Substitution Table
| Ingredient | Substitution | Notes |
|---|---|---|
| Ground beef (80/20) | Ground turkey or ground bison | Turkey is leaner; may need a teaspoon of olive oil to prevent sticking |
| Red onion | Yellow onion or shallots | Yellow onion is slightly sweeter when browned |
| Beef broth | Chicken broth | Lighter flavor; still works with the gravy |
| Whole milk (filling) | 2% milk or half-and-half | Half-and-half makes a richer gravy |
| Sharp cheddar | Colby Jack or pepper jack | Pepper jack adds heat; Colby melts more smoothly |
| Homemade biscuit dough | 1 can (16.3 oz) refrigerated biscuit dough | Cut each biscuit into thirds and arrange on top; baking time stays the same |
| All-purpose flour (biscuit) | Gluten-free 1:1 flour blend | Use same quantity; see Gluten-Free variation |
Kitchen Tools Needed
- 10–12 inch oven-safe cast-iron skillet — the primary piece of equipment; goes from stovetop sauté directly into the oven without transferring the filling (as shown in the photo)
- Oven — preheated to 400°F for the baking phase
- Wooden spoon or silicone spatula — for breaking up and browning the beef on the stovetop
- Whisk — for incorporating flour into the beef drippings without lumps
- Large mixing bowl — for combining the drop biscuit dough
- Pastry cutter or two forks — for cutting cold butter into the biscuit flour
- Large spoon or 2-tablespoon cookie scoop — for dropping biscuits evenly over the filling
- Oven mitts — the cast-iron handle retains heat intensely during and after baking
- Instant-read thermometer — to confirm ground beef reaches 160°F during the sauté phase
How to Make Cheesy Beef and Biscuit Skillet Step by Step
Step 1 — Preheat the Oven and Prep the Ingredients
Preheat your oven to 400°F and position the rack in the center of the oven. Dice the red onion, mince the garlic, and measure out all the filling ingredients before you heat the skillet — once the beef hits the hot pan, things move quickly. If you’re making the biscuit dough from scratch, do that now too and keep it refrigerated until ready to use (cold butter in the dough is what produces a tender, fluffy biscuit rather than a dense one).
Step 2 — Brown the Ground Beef (Sauté Phase)
Heat the cast-iron skillet over medium-high heat for 2 minutes — the pan should feel intensely hot when you hold your palm 3 inches above it. Add the ground beef and spread it into a thin, even layer with a wooden spoon. Sauté without stirring for 2–3 minutes until the bottom develops a deep brown crust, then break it up and continue cooking for another 3–4 minutes until fully browned and no pink remains. Use an instant-read thermometer to confirm the beef has reached 160°F, per USDA safe handling guidelines for ground beef — see https://www.fsis.usda.gov/food-safety/safe-food-handling-and-preparation/meat/ground-beef.
Drain excess fat, leaving about 1 tablespoon in the pan for flavor.
Step 3 — Sauté the Aromatics
Add the diced red onion to the skillet with the beef and sauté over medium-high heat for 3–4 minutes, stirring frequently, until the onion softens and the edges begin to turn translucent and slightly golden. Add the minced garlic and stir for 30 seconds — the garlic should smell fragrant and toasty but not brown. Season with the smoked paprika, onion powder, salt, and black pepper and stir to coat the meat and onion evenly.
Step 4 — Build the Gravy
Sprinkle the flour evenly over the beef and onion mixture and stir constantly for 1–2 minutes until the raw flour smell disappears and the mixture looks slightly paste-like — this is the roux that will thicken the gravy. Pour in the beef broth in a slow, steady stream, whisking as you go to prevent lumps. Add the milk and Worcestershire sauce and stir to combine. Embedded tip: The gravy will look thin at first — keep the heat at medium and stir occasionally for 3–4 minutes until it thickens enough to coat the back of a spoon. It will thicken further in the oven. Taste and adjust salt at this point before adding the biscuits.
Step 5 — Make and Drop the Biscuits
In a large bowl, whisk together the flour, baking powder, salt, garlic powder, and dried parsley. Add the cold cubed butter and work it in with a pastry cutter or two forks until the mixture resembles coarse crumbs with some pea-sized butter pieces remaining — those pieces are what create steam pockets and flakiness in the oven. Pour in the cold milk and fold gently with a rubber spatula until just combined (a few dry streaks are fine). Fold in the ½ cup of shredded cheddar. Embedded tip: Do not overmix the biscuit dough — working it too long develops gluten and produces a tough, dense biscuit rather than a tender one. Stop the moment the dough comes together.
Using a large spoon or 2-tablespoon scoop, drop 8–9 biscuits evenly over the surface of the beef filling, spacing them so they have room to expand. Scatter the remaining 1½ cups of shredded cheddar across the tops of all the biscuits — as shown in the photo, the cheese should cover each biscuit dome generously.
Step 6 — Bake Until Golden
Transfer the skillet to the preheated 400°F oven and bake for 18–20 minutes, or until the biscuits are puffed, golden brown on top, and the cheddar is fully melted and beginning to bubble and brown at the edges. The gravy should be visibly bubbling up between the biscuits around the edges of the skillet — that’s the visual cue that the filling is hot through, not just the top. Remove the skillet from the oven carefully using both hands with heavy oven mitts — cast iron retains extreme heat for a long time after coming out of a 400°F oven.
Step 7 — Garnish and Serve
Sprinkle dried parsley or fresh parsley over the finished skillet, just as shown in the photo. Let the dish rest for 3–4 minutes before serving — the gravy needs a brief moment to settle from actively boiling so it doesn’t splash when spooned. Serve directly from the skillet with a large spoon, scooping a biscuit and a generous ladle of the beef gravy beneath it into each bowl or plate.
Pro Tips for the Best Cheesy Beef and Biscuit Skillet
Don’t skip browning the beef properly during the sauté phase. The golden, caramelized crust that forms on ground beef when it’s left undisturbed in a hot cast-iron skillet is the foundation of the gravy’s flavor. Stirring constantly prevents browning — let it sit for 2–3 minutes before breaking it apart.
Keep the biscuit ingredients cold until the last possible moment. Cold butter, cold milk, and even a chilled mixing bowl help the fat stay in solid pieces throughout the mixing process. Those solid fat pieces create steam in the oven’s heat, which is what makes biscuits tall and layered rather than flat.
The baking phase needs consistent oven heat — don’t open the door early. Opening the oven door during the first 12 minutes of baking can cause the biscuits to deflate before they set. Set a timer for 15 minutes and check once — if they’re golden and puffed, they’re done; if not, give them 3–5 more minutes.
Use an 80/20 ground beef blend, not lean. The fat content in 80/20 beef renders into the pan during browning and contributes to the gravy’s body and flavor in a way that 90/10 doesn’t. A tablespoon of that rendered fat mixed into the flour makes a better-tasting roux than adding oil separately.
Rest the skillet before serving, not just the meat. Three to four minutes of resting after the skillet comes out of the oven lets the gravy come down from a full rolling boil to a gentle, scoopable consistency — and it prevents burned mouths at the table.
Common Mistakes to Avoid
1. Not browning the beef before adding liquid.
Adding broth directly to grey, unseared ground beef produces a thin, washed-out gravy with little depth of flavor. Brown the beef fully — until actual color develops on the surface — before you build the gravy.
2. Opening the oven door during the first 12 minutes of baking (baking-specific mistake).
Biscuits need a sustained burst of heat to set their structure and rise. Opening the oven prematurely drops the temperature and causes flat, dense biscuits that don’t recover. Wait for the 15-minute mark before peeking.
3. Overmixing the biscuit dough.
Mixing until the dough is smooth and uniform develops too much gluten, which makes the biscuits tough. Stop folding the moment no large dry streaks remain — lumpy dough is exactly what you want.
4. Making the gravy too thick before adding the biscuits.
The gravy thickens significantly in the oven as moisture evaporates and the biscuits absorb some of the liquid below. If it’s already very thick on the stovetop, it will be pasty and stiff by the time the biscuits are done. Aim for a consistency just thick enough to coat a spoon — it will reach the right body in the oven.
5. Crowding the biscuits too closely together.
Biscuits placed edge-to-edge don’t have room to expand and end up merging into a dense, gummy layer rather than individual golden domes. Leave a small gap between each scoop so the tops can puff and brown properly.
6. Using warm or room-temperature milk in the biscuit dough.
Warm milk starts melting the butter pieces before they hit the oven, eliminating the steam pockets that create rise. Always use cold milk straight from the refrigerator.
7. Forgetting that cast iron stays dangerously hot after baking.
The handle of a cast-iron skillet coming out of a 400°F oven is as hot as the oven itself. Use both heavy oven mitts — not a dish towel — and keep the skillet on a trivet or heat-safe surface throughout serving.
Variations
Healthy Lightened-Up Version
Substitute 93/7 lean ground turkey for the beef and use 2% milk in both the filling and the biscuit dough. The gravy will be slightly less rich, so add an extra ½ tablespoon of Worcestershire sauce for depth. The baking method and timing stay identical — lighter macros without changing any part of the process.
Vegetarian Version
Replace the ground beef with 2 cans (15 oz each) of drained, rinsed lentils and 1½ cups of diced cremini mushrooms. Sauté the mushrooms over medium-high heat until deeply browned and most of their moisture has evaporated — this takes about 8 minutes and builds the savory depth that the beef would normally provide. Use vegetable broth in place of beef broth. The baking phase is unchanged.
Spicy Version
Add 1 teaspoon of cayenne pepper and 1 tablespoon of hot sauce (such as Frank’s RedHot) directly to the gravy. Use pepper jack cheese in place of sharp cheddar for the topping. Fold finely diced pickled jalapeños into the biscuit dough for heat that builds from the inside out — a genuinely spicy result that still uses the exact same cooking method and timing.
Gluten-Free Version
Use a certified gluten-free 1:1 all-purpose flour blend (such as Bob’s Red Mill) in both the biscuit dough and the gravy roux — it behaves identically in both applications. Verify your beef broth and Worcestershire sauce are labeled gluten-free, as some brands contain wheat. The baking time and temperature are unchanged.
Low-Carb / Keto Version
Replace the drop biscuits with a simple almond flour cheddar drop biscuit made from 2 cups almond flour, 1 teaspoon baking powder, 2 eggs, ¼ cup melted butter, and ½ cup shredded cheddar. These bake in the same 400°F oven over the same 18–20 minutes but stay denser than wheat-based biscuits — they work as a satisfying topping while keeping carbs very low. Skip the flour in the gravy and thicken with 1 tablespoon of cream cheese stirred in at the end instead.
What to Serve With This Recipe
- Simple green salad with apple cider vinaigrette — the crisp acidity cuts through the richness of the gravy and melted cheddar beautifully.
- Steamed or roasted broccoli — a neutral, slightly bitter vegetable that balances the savory, creamy filling without competing with it.
- Canned or homemade corn — sweet corn is a natural complement to the beefy, cheesy flavors in this skillet.
- Sliced pickles on the side — the brine and crunch provide a sharp contrast to the soft, yielding texture of the biscuits and filling.
- Cold sweet tea or sparkling water with lemon — a light, refreshing beverage that doesn’t compete with the bold, hearty dish.
- Extra hot sauce on the table — particularly if serving to heat-seekers who want to customize their own portion.
- A simple fruit salad — a bright, sweet finish that rounds out the meal and keeps the overall plate from feeling too heavy.
For more hearty one-pan dinners, try Ultimate Creamy Spinach Stuffed Chicken Breast — 40 Min or Best High Protein Loaded Chicken Quesadilla (Easy 30-Min) — both use pantry staples and land on the table fast.
Storage Instructions
Refrigerator
Allow the skillet to cool to room temperature before transferring portions to an airtight container. The biscuits will absorb some of the gravy as they sit overnight, becoming softer and even more flavorful the next day. Refrigerate for up to 3 days. Do not store in the cast-iron skillet itself — the moisture from the gravy can affect the seasoning of the pan.
Freezer
Portion the cooled beef filling and biscuits into separate freezer-safe containers — the filling freezes well for up to 3 months, but baked biscuits become slightly gummy after freezing. If you plan to freeze, consider making a fresh batch of biscuit dough and baking it over the reheated filling rather than freezing the assembled dish.
Shelf Life Summary
| Storage Method | Duration |
|---|---|
| Refrigerator (airtight container) | Up to 3 days |
| Freezer — beef filling only | Up to 3 months |
| Freezer — assembled dish | Up to 1 month (texture affected) |
| Room temperature | No longer than 2 hours |
Reheating Instructions
Oven (Best for Biscuit Texture)
Preheat to 325°F. Place portions in an oven-safe dish, add 2–3 tablespoons of beef broth over the top to restore moisture to the gravy, and cover loosely with foil. Bake for 15–18 minutes until heated through and bubbling. Remove the foil for the last 3–4 minutes to re-crisp the biscuit tops.
Microwave
Transfer a single portion to a microwave-safe bowl. Cover loosely with a damp paper towel and microwave on medium power (70%) in 90-second intervals until steaming hot. The biscuits will be soft rather than crispy using this method — it’s fastest but not ideal for texture.
Stovetop
Transfer portions to a saucepan over medium-low heat with 3–4 tablespoons of beef broth. Cover with a lid and heat for 6–8 minutes, stirring gently once or twice. This method works well for the beef filling — break the biscuits into pieces and stir them in if you don’t mind a more stew-like consistency.
For safe reheating temperature guidelines, visit https://www.foodsafety.gov/food-safety-charts/safe-minimum-cooking-temperature.
Nutrition Facts
(Per serving — based on 6 servings total)
| Nutrient | Amount |
|---|---|
| Calories | ~520 |
| Total Fat | 28g |
| Saturated Fat | 13g |
| Cholesterol | 95mg |
| Sodium | 780mg |
| Total Carbohydrates | 38g |
| Dietary Fiber | 2g |
| Total Sugars | 4g |
| Protein | 30g |
| Calcium | 260mg |
Nutrition Disclaimer: These values are estimates calculated using standard nutritional databases and vary based on specific brands, the fat content of the ground beef used, and any ingredient substitutions. For precise dietary tracking, use a verified nutrition calculator with the exact products and quantities you purchase.
Frequently Asked Questions
Can I use canned refrigerated biscuit dough instead of homemade?
Yes — one 16.3-oz can of refrigerated biscuit dough works well. Separate the biscuits, cut each into thirds, and arrange the pieces over the filling before adding cheese and baking. The baking time stays the same at 18–20 minutes at 400°F, and the result is nearly indistinguishable from scratch biscuits in terms of flavor once the cheese and gravy are involved.
Do I have to use a cast-iron skillet?
A cast-iron skillet is strongly recommended because it transitions from stovetop to oven seamlessly and holds heat evenly. If you don’t have one, use any oven-safe skillet (stainless steel or enameled cast iron). Do not use a nonstick skillet with a plastic or silicone handle — most are rated only to 350–375°F and will be damaged at 400°F.
Can I make this cheesy beef and biscuit skillet ahead of time?
You can prepare the beef filling up to 2 days in advance and refrigerate it. When ready to serve, reheat the filling in the skillet on the stovetop over medium heat until gently simmering, then drop the freshly made biscuit dough on top and bake as directed. This gives you a fresher biscuit texture than reheating an already-assembled dish.
Why did my biscuits come out dense and flat?
The most common cause is overmixed dough or warm ingredients. Cold butter and cold milk are non-negotiable — they maintain the fat in solid pieces that create steam and lift in the oven. Overmixing develops gluten that makes the biscuit tough and prevents it from rising. Mix only until the dough just comes together.
How do I know the cheesy beef and biscuit skillet is done baking?
Look for three things simultaneously: biscuit tops that are golden brown and puffed, cheddar that is fully melted and beginning to bubble and brown at the edges, and gravy visibly simmering up between the biscuits around the perimeter of the skillet. If all three are present, the dish is done regardless of what the clock says.
Can I make this with ground turkey or chicken instead of beef?
Yes. Ground turkey (93/7) works particularly well and keeps the fat content lower. Use the same sauté technique, but add 1 teaspoon of olive oil before browning since turkey is much leaner and can stick to the cast iron without added fat. Chicken broth can replace beef broth for a lighter-flavored gravy.
What’s the best way to reheat leftover biscuits without making them rubbery?
The oven method (325°F, covered with foil, with a splash of broth added) is the only reheating method that keeps biscuits from becoming rubbery. Microwaving on high power makes the exterior of the biscuit tough very quickly. If the biscuits have fully absorbed the gravy overnight, stir the whole portion together into a hearty stew-style bowl — it’s equally satisfying in a different way.
Can I add vegetables to the filling?
Absolutely. Sliced cremini mushrooms and diced bell pepper are the most natural additions — sauté them with the onion in Step 3, giving them 4–5 minutes to soften and release their moisture before adding the garlic. Adding raw vegetables directly to the gravy without sautéing first releases excess water and thins the gravy.
Can I bake this in a different dish if I don’t have an oven-safe skillet?
Yes. Transfer the completed beef gravy to a 9×13-inch baking dish, drop the biscuits on top, add the cheese, and bake at 400°F for the same 18–20 minutes. The result is nearly identical — the only thing you lose is the concentrated, cast-iron sear on the beef from the beginning, which affects flavor slightly but not significantly.
How do I prevent the gravy from drying out in the oven?
Two things help: don’t reduce the gravy too far on the stovetop before adding the biscuits (it should still move easily when the skillet is tilted), and make sure the biscuits don’t fully seal the surface. Small gaps between the biscuit mounds allow steam to vent rather than building pressure under the dough, which keeps the gravy moist and the biscuit bottoms from becoming gummy.
Expert Chef Tips
Build the roux in the beef drippings, not in a separate pan. Sprinkling flour directly onto the browned beef and fat in the skillet gives you a roux that’s already packed with savory flavor before a single drop of liquid goes in. A separate roux made with plain butter will taste noticeably blander in the finished gravy.
Shred your own cheddar for the topping. Pre-shredded cheddar is coated in potato starch or cellulose to prevent clumping in the bag — this same coating makes it melt unevenly and turn slightly grainy on top of the biscuits. A block of sharp cheddar grated on a box grater melts into that glossy, cohesive layer you see in the photo.
Taste the gravy before dropping the biscuits. Once the biscuits go on top, you can’t adjust the seasoning of the filling without taking them all off. Season to your preference at the end of Step 4, remembering that the cheese will add saltiness and the biscuits will absorb some of the gravy’s flavor as they bake.
A cookie scoop produces the most uniform biscuits. Consistent biscuit size means consistent baking — every dome finishes at the same time. Uneven drops produce smaller biscuits that overbake while larger ones are still raw in the center. A 2-tablespoon scoop takes the guesswork out completely.
Recipe Summary
This cheesy beef and biscuit skillet brings together browned ground beef, red onion, and a rich savory gravy built in the same cast-iron pan, then bakes under a crown of cheddar-topped drop biscuits at 400°F for 18–20 minutes until golden and bubbling. The sauté-then-bake method means the entire dish cooks in one pan from start to finish, cutting cleanup to almost nothing. Homemade biscuit dough takes only 5 minutes to mix, but a can of refrigerated biscuits works just as well for even faster assembly. Total time is 45 minutes — enough for a genuinely impressive weeknight dinner with zero drama.
Conclusion
When you want something hearty, satisfying, and genuinely easy to pull off on a weeknight, this cheesy beef and biscuit skillet delivers on every count. The cast-iron skillet does the heavy lifting — browning the beef, building the gravy, and baking the biscuits all in one vessel — and the result is the kind of golden, bubbling, cheese-covered comfort food that disappears fast at the dinner table. Make it once and you’ll keep the ingredients stocked on purpose. Drop a comment below and let us know which variation you tried first.
Cheesy Beef and Biscuit Skillet — Easy 45 Min
Description
Some dinners earn their place in the regular rotation on the first bite, and this cheesy beef and biscuit skillet is exactly that kind of recipe. Ground beef and diced red onion are browned in a cast-iron skillet, brought together in a rich, savory gravy, and then topped with drop biscuits that bake directly on top of the filling in the same pan — no separate baking dish, no extra steps. As shown in the photo, the biscuits puff up golden and herb-flecked, with melted cheddar draped across every dome and the beefy gravy bubbling up between them. The entire dish goes from stovetop to oven in under 45 minutes and comes to the table in the skillet it was cooked in. One pan, one meal, zero complaints.
Ingredients
Instructions
-
How to Make Cheesy Beef and Biscuit Skillet Step by Step
-
Step 1 — Preheat the Oven and Prep the Ingredients
-
Preheat your oven to 400°F and position the rack in the center of the oven. Dice the red onion, mince the garlic, and measure out all the filling ingredients before you heat the skillet — once the beef hits the hot pan, things move quickly. If you're making the biscuit dough from scratch, do that now too and keep it refrigerated until ready to use (cold butter in the dough is what produces a tender, fluffy biscuit rather than a dense one).
-
Step 2 — Brown the Ground Beef (Sauté Phase)
-
Heat the cast-iron skillet over medium-high heat for 2 minutes — the pan should feel intensely hot when you hold your palm 3 inches above it. Add the ground beef and spread it into a thin, even layer with a wooden spoon. Sauté without stirring for 2–3 minutes until the bottom develops a deep brown crust, then break it up and continue cooking for another 3–4 minutes until fully browned and no pink remains. Use an instant-read thermometer to confirm the beef has reached 160°F, per USDA safe handling guidelines for ground beef — see https://www.fsis.usda.gov/food-safety/safe-food-handling-and-preparation/meat/ground-beef.
-
Drain excess fat, leaving about 1 tablespoon in the pan for flavor.
-
Step 3 — Sauté the Aromatics
-
Add the diced red onion to the skillet with the beef and sauté over medium-high heat for 3–4 minutes, stirring frequently, until the onion softens and the edges begin to turn translucent and slightly golden. Add the minced garlic and stir for 30 seconds — the garlic should smell fragrant and toasty but not brown. Season with the smoked paprika, onion powder, salt, and black pepper and stir to coat the meat and onion evenly.
-
Step 4 — Build the Gravy
-
Sprinkle the flour evenly over the beef and onion mixture and stir constantly for 1–2 minutes until the raw flour smell disappears and the mixture looks slightly paste-like — this is the roux that will thicken the gravy. Pour in the beef broth in a slow, steady stream, whisking as you go to prevent lumps. Add the milk and Worcestershire sauce and stir to combine. Embedded tip: The gravy will look thin at first — keep the heat at medium and stir occasionally for 3–4 minutes until it thickens enough to coat the back of a spoon. It will thicken further in the oven. Taste and adjust salt at this point before adding the biscuits.
-
Step 5 — Make and Drop the Biscuits
-
In a large bowl, whisk together the flour, baking powder, salt, garlic powder, and dried parsley. Add the cold cubed butter and work it in with a pastry cutter or two forks until the mixture resembles coarse crumbs with some pea-sized butter pieces remaining — those pieces are what create steam pockets and flakiness in the oven. Pour in the cold milk and fold gently with a rubber spatula until just combined (a few dry streaks are fine). Fold in the ½ cup of shredded cheddar. Embedded tip: Do not overmix the biscuit dough — working it too long develops gluten and produces a tough, dense biscuit rather than a tender one. Stop the moment the dough comes together.
-
Using a large spoon or 2-tablespoon scoop, drop 8–9 biscuits evenly over the surface of the beef filling, spacing them so they have room to expand. Scatter the remaining 1½ cups of shredded cheddar across the tops of all the biscuits — as shown in the photo, the cheese should cover each biscuit dome generously.
-
Step 6 — Bake Until Golden
-
Transfer the skillet to the preheated 400°F oven and bake for 18–20 minutes, or until the biscuits are puffed, golden brown on top, and the cheddar is fully melted and beginning to bubble and brown at the edges. The gravy should be visibly bubbling up between the biscuits around the edges of the skillet — that's the visual cue that the filling is hot through, not just the top. Remove the skillet from the oven carefully using both hands with heavy oven mitts — cast iron retains extreme heat for a long time after coming out of a 400°F oven.
-
Step 7 — Garnish and Serve
-
Sprinkle dried parsley or fresh parsley over the finished skillet, just as shown in the photo. Let the dish rest for 3–4 minutes before serving — the gravy needs a brief moment to settle from actively boiling so it doesn't splash when spooned. Serve directly from the skillet with a large spoon, scooping a biscuit and a generous ladle of the beef gravy beneath it into each bowl or plate.
Nutrition Facts
Servings 6
- Amount Per Serving
- Calories 520kcal
- % Daily Value *
- Total Fat 28g44%
- Saturated Fat 13g65%
- Protein 30g60%
* Percent Daily Values are based on a 2,000 calorie diet. Your daily value may be higher or lower depending on your calorie needs.