
The Snack That Disappears Before It Hits the Table
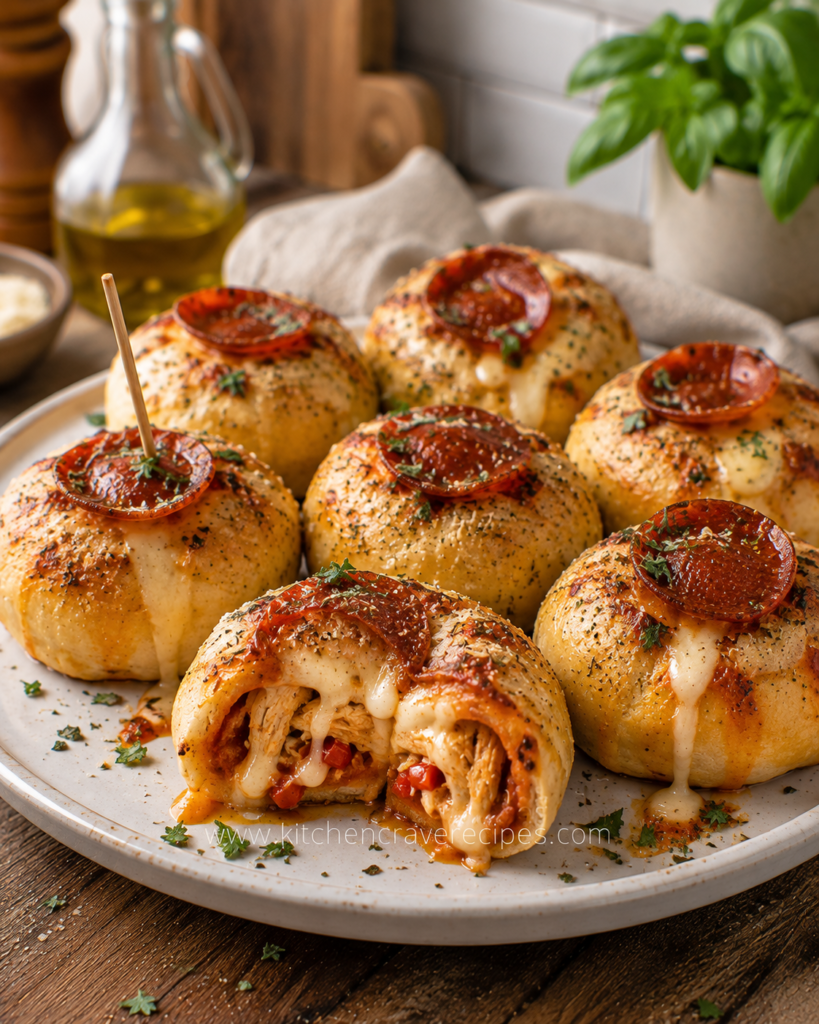
The moment you set a plate of cheesy chicken pizza bombs in front of people, they’re gone — that’s not an exaggeration, it’s what happens every single time. Golden, herb-dusted dough balls each topped with a crisped pepperoni slice, concealing a hot, stretchy interior packed with shredded chicken, pizza sauce, diced peppers, and melted mozzarella that pulls dramatically when one gets torn open. They look like something from a sports bar appetizer menu, but they take about 35 minutes to make at home with ingredients you likely already have.
What makes these genuinely high-protein is the chicken-forward filling — not a token sprinkle of meat buried under cheese, but a real, substantial shredded chicken base. Each bomb delivers enough protein to work as a post-workout snack or a satisfying lunch alongside a salad. Make a batch once and you’ll understand immediately why the plate never makes it to the center of the table.
Recipe Quick Info
| Prep Time | 15 minutes |
| Cook Time | 20 minutes |
| Total Time | 35 minutes |
| Servings | 8 bombs |
| Cuisine | American |
| Course | Snack / Appetizer |
| Calories | ~290 per bomb |
| Difficulty | Standard |
Why You’ll Love This Recipe
- Every bite has a dramatic cheese pull. The mozzarella melts into the shredded chicken filling and oozes from the cut edge — as visible in the photo, it’s not subtle, and that’s entirely the point.
- The pepperoni on top is more than decoration. Each bomb gets a pepperoni slice pressed into the top before baking, which crisps and chars slightly in the oven and adds a concentrated savory punch to every first bite.
- Real chicken filling, not token protein. The filling is predominantly seasoned shredded chicken with pizza sauce and diced peppers — enough that each bomb genuinely satisfies rather than just teasing.
- Crowd-proof for parties and game days. Eight individual self-contained bombs mean no slicing, no serving utensils, and no mess — just grab one and go.
- Customizable fillings without changing the technique. The dough-wrapping method stays identical whether you change the filling to pepperoni-only, mushroom and olive, or BBQ chicken — the approach transfers to whatever pizza flavor profile you prefer.
- Ready in 35 minutes from cold ingredients. No yeast activation, no rising time, no complicated dough work — store-bought biscuit or pizza dough does the heavy lifting so you can focus on the filling.
- Freezer-friendly for planned-ahead snacking. Bake a full batch, freeze individually, and you have grab-and-reheat protein snacks available all week without any additional cooking.
Ingredients
For the Filling
- 2 cups cooked chicken breast, shredded (from rotisserie chicken or poached breast, as shown — visible as the main filling component)
- ½ cup pizza sauce (plus extra for dipping)
- ½ cup diced roasted red peppers or diced fresh red bell pepper (visible in the torn-open bomb)
- 1½ cups shredded low-moisture mozzarella cheese, divided
- ½ teaspoon Italian seasoning
- ½ teaspoon garlic powder
- ¼ teaspoon black pepper
- ¼ teaspoon red pepper flakes (optional, for mild heat)
For the Dough and Assembly
- 1 can (16.3 oz) refrigerated biscuit dough, 8 biscuits (standard Pillsbury-style — the easiest and most reliable base for this format)
- 8 pepperoni slices (for topping, one per bomb, as shown)
- 2 tablespoons unsalted butter, melted
- 1 teaspoon dried Italian seasoning (for topping)
- ½ teaspoon garlic powder (for topping)
- 1 tablespoon fresh flat-leaf parsley, finely chopped (for garnish, as scattered across the finished plate)
- Pinch of kosher salt (for topping)
Optional Add-Ins
- 2 tablespoons diced black olives (stir into the filling for a classic pizza flavor)
- 2 tablespoons diced jalapeño (for a spicier version)
- 1 tablespoon grated Parmesan (mixed into the butter topping for extra savory depth)
Ingredient Substitutions
| Original Ingredient | Substitution | Notes |
|---|---|---|
| Refrigerated biscuit dough | Store-bought pizza dough, portioned | Slightly crispier exterior; portion into 8 equal pieces |
| Shredded chicken breast | Canned chicken breast, well-drained | Works in a pinch; pat very dry to avoid soggy filling |
| Pizza sauce | Marinara sauce | Very similar flavor; use same quantity |
| Low-moisture mozzarella | Provolone, shredded | Melts similarly; mild flavor shift |
| Roasted red peppers | Fresh diced red bell pepper, sautéed | Sauté briefly first to remove excess moisture |
| Pepperoni (topping) | Mini pepperoni, 3 per bomb | More coverage; same crisp result |
| Butter topping | Olive oil | Less richness; slightly lighter finish on the crust |
Kitchen Tools Needed
- Large baking sheet
- Parchment paper or silicone baking mat
- Large mixing bowl
- Small bowl (for the garlic butter topping)
- Rolling pin or clean hands (for flattening biscuit rounds)
- Pastry brush
- Instant-read thermometer (to verify filling temperature)
- Toothpicks (optional, for presentation as shown in the photo)
- Sharp chef’s knife (for cutting open one bomb to check doneness)
Step-by-Step Instructions
Step 1: Preheat the Oven and Prep the Pan
Preheat your oven to 375°F. Line a large baking sheet with parchment paper and set aside. Spacing matters for these — you want enough room between bombs so the oven heat circulates freely around each one, giving you an even golden color all the way around rather than pale spots where they’ve touched.
Step 2: Make the Chicken Filling
In a large mixing bowl, combine the shredded chicken, pizza sauce, diced red peppers, 1 cup of the mozzarella, Italian seasoning, garlic powder, and black pepper. Stir until everything is evenly mixed. Tip: The filling should be moist but not wet — if your pizza sauce is particularly thin or your peppers released a lot of liquid, stir in the filling and let it sit for 2 minutes, then drain off any pooled liquid. Excess moisture is the main cause of leaking bombs.
Step 3: Flatten the Biscuit Dough
Open the biscuit dough and separate all 8 biscuits. Using your hands or a rolling pin, press and stretch each one into a round disc roughly 5–6 inches in diameter. You want enough surface area to wrap the filling completely without the dough tearing at the seam. Work on a lightly floured surface if the dough is sticking.
Step 4: Fill and Seal Each Bomb
Place approximately 3 tablespoons of the chicken filling into the center of each flattened biscuit round. Add a pinch of the remaining mozzarella on top of each filling mound — this extra cheese inside melts into the chicken and creates the visible cheese pull when the bomb is torn open. Gather the edges of the dough up and over the filling, pinching firmly to seal. Roll the sealed ball lightly between your palms to smooth the seam. Tip: Place each finished bomb seam-side down on the parchment-lined baking sheet immediately — gravity helps the seal hold during baking.
Step 5: Apply the Garlic Butter Topping and Pepperoni
In a small bowl, stir together melted butter, Italian seasoning, garlic powder, and a pinch of salt. Brush the top and sides of each bomb generously with the garlic butter. Press one pepperoni slice firmly onto the top of each bomb — it will adhere to the buttered surface and crisp against the dough as it bakes, creating the golden, slightly charred top visible in the finished dish.
Step 6: Bake Until Golden
Bake at 375°F for 18–20 minutes, until the bombs are deep golden brown all over and the pepperoni on top has crisped and darkened at the edges. To confirm the filling is fully heated through, insert an instant-read thermometer into the center of one bomb — the internal temperature should reach at least 165°F. Per USDA food safety guidelines, all dishes containing cooked poultry must reach this temperature when reheated or baked with other ingredients.
Step 7: Garnish and Serve
Remove the pan from the oven and let the bombs cool for 3–4 minutes before handling — the filling inside holds heat intensely and can burn. Scatter fresh chopped parsley over the entire plate, add toothpicks to a few for easy handling at parties (as shown in the photo), and serve immediately with extra pizza sauce or marinara on the side for dipping.
Pro Tips
-
Use rotisserie chicken for the fastest, most flavorful filling. It’s already well-seasoned, perfectly tender, and shreds in minutes. Pull the meat from a whole rotisserie bird and you’ll have more than enough for a double batch.
-
Don’t overfill each bomb. Three tablespoons of filling is the sweet spot — enough for a satisfying interior without splitting the dough seam during baking. More filling sounds better in theory but causes blow-outs in practice.
-
Seal the dough tightly and place seam-side down immediately. The seam is the weakest point of each bomb. A firm pinch followed by seam-down placement on the pan keeps the filling contained through the full bake time.
-
Brush with a second coat of garlic butter halfway through baking. Pull the pan at the 10-minute mark and quickly re-brush the tops. This double-coat is what creates the deeply golden, herb-flecked exterior visible in the finished dish.
-
Let them rest 3–4 minutes before serving. The cheese and sauce inside reach an extremely high temperature during baking. A short rest allows the filling to settle slightly and reduces the risk of burning anyone who bites in immediately.
Common Mistakes to Avoid
1. Wet filling that makes the dough soggy.
If the pizza sauce or peppers contain excess liquid, it seeps into the dough during baking and prevents crisping. Mix the filling, let it sit for 2 minutes, and drain any pooled liquid before loading into the dough.
2. Stretching the biscuit dough too thin.
Over-stretched dough tears during sealing and splits open in the oven. Keep each disc to 5–6 inches across — thick enough to hold the filling and seal without tearing at the pinch point.
3. Not sealing the seam firmly enough.
A loose pinch looks sealed but opens under oven heat. Press the gathered dough edges firmly together, roll the ball between your palms to smooth the seam, and place it seam-side down without moving it again.
4. Crowding the baking sheet.
Bombs placed too close together trap steam between them, which softens the sides and prevents even browning. Leave at least 1½ inches between each one for proper air circulation.
5. Skipping the resting time after baking.
The interior of a freshly baked pizza bomb is significantly hotter than the exterior crust suggests. Three to four minutes of rest makes the difference between a safe, pleasant eating temperature and a filling that burns the roof of your mouth.
6. Using fresh mozzarella instead of low-moisture.
Fresh mozzarella contains much more water than low-moisture block mozzarella. In a sealed dough bomb, that water has nowhere to go and creates a watery, loose filling instead of a melted, stretchy one. Always use shredded low-moisture mozzarella for this recipe.
7. Applying only one layer of garlic butter.
A single butter brush before baking produces a decent result, but the exterior won’t achieve the deep golden color visible in the finished dish. A mid-bake second coat makes a visible difference in both color and flavor.
Variations
Lighter / Higher-Protein Version
Replace the biscuit dough with store-bought whole-wheat pizza dough, portioned into 8 equal pieces. Reduce the mozzarella to 1 cup total and increase the shredded chicken filling by ¼ cup. The whole-wheat dough adds fiber and a nuttier flavor that works well with the pizza sauce and chicken, and the additional chicken per bomb increases the protein content by approximately 4 grams.
Vegetarian Version
Omit the chicken entirely and replace it with a mixture of ½ cup finely diced mushrooms (sautéed dry until all moisture evaporates), ½ cup diced black olives, and ½ cup diced roasted red peppers. The filling volume stays the same. Sautéing the mushrooms first is non-negotiable — raw mushrooms release so much liquid they’ll make the dough soggy before it bakes through.
Spicy Version
Add 1 tablespoon of Calabrian chili paste or 2 teaspoons of hot sauce to the chicken filling mixture. Swap the regular pepperoni topping for spicy pepperoni. The filling heat is subtle at one tablespoon — increase to 1½ if you want something that genuinely bites back. The spice plays well against the melted mozzarella and pizza sauce.
Gluten-Free Version
Use certified gluten-free pizza dough (available at most major grocery stores in the refrigerated or freezer section). Every other component in this recipe is naturally gluten-free — verify your pizza sauce label, as some brands add wheat-derived thickeners. Handle gluten-free dough gently; it’s more fragile than standard dough and needs a slightly more careful pinch-seal.
Low-Carb Version
Use a fathead dough made from 1½ cups shredded low-moisture mozzarella, 2 oz cream cheese, and 1 cup almond flour — pre-melt the cheeses in the microwave, stir in the flour, and divide into 8 portions. The filling stays identical. These are denser and richer than the original, but they deliver significantly fewer carbohydrates while keeping the cheesy chicken pizza bomb flavor profile intact.
What to Serve With This Recipe
- Extra pizza sauce for dipping — the obvious and essential partner; warm it in a small saucepan while the bombs bake.
- Ranch dressing or garlic aioli — cool, creamy dipping sauces that contrast the hot, savory filling beautifully.
- Simple green salad with Italian vinaigrette — balances the richness and rounds the meal out if serving as lunch rather than a pure snack.
- Caesar salad — try Zucchini Chicken Parmesan Bake (Ultimate)Best 5-Layer for a from-scratch pairing that takes these from snack to proper meal.
- Marinara soup or tomato bisque — a bowl of warm tomato soup alongside makes this a genuinely satisfying dinner for two.
- Cold sparkling water with lemon — the carbonation and acidity cut through the richness of the cheese and garlic butter in a way that soda doesn’t.
- Celery and carrot sticks with blue cheese dip — classic game-day spread components that work alongside the pizza bombs without competing for attention.
Storage Instructions
Refrigerator
Allow baked bombs to cool completely before transferring to an airtight container. Store in the refrigerator for up to 4 days. The dough stays surprisingly intact — it softens slightly but doesn’t become soggy if stored uncovered for the first 30 minutes of cooling to let steam escape before sealing.
Freezer
Cheesy chicken pizza bombs freeze exceptionally well. Arrange cooled bombs on a baking sheet and freeze for 1 hour until solid, then transfer to a freezer-safe zip-top bag. This prevents them from freezing together in a clump. Frozen bombs keep for up to 3 months and reheat directly from frozen in the oven without thawing.
Shelf Life Summary
| Storage Method | Duration |
|---|---|
| Refrigerator (airtight) | Up to 4 days |
| Freezer (flash-frozen, bagged) | Up to 3 months |
| Room temperature | Do not exceed 2 hours |
Reheating Instructions
Oven (Best Method)
Place refrigerated or frozen bombs on a baking sheet lined with parchment. Reheat refrigerated bombs at 350°F for 10–12 minutes; frozen bombs at 350°F for 18–22 minutes. Cover loosely with foil for the first half of reheating to prevent the dough from over-browning before the center is hot.
Microwave (Quickest Method)
Place one or two bombs on a microwave-safe plate. Cover with a damp paper towel and microwave on medium power (70%) for 60–90 seconds for refrigerated, or 2–3 minutes for frozen, checking after each interval. Per the USDA guidelines for reheating leftovers, the internal temperature of the filling must reach 165°F before eating. The microwave softens the crust — finish in a toaster oven for 2 minutes if you want to restore some crispness.
Toaster Oven
The most practical method for 1–2 bombs. Heat at 350°F for 8–10 minutes from refrigerated. The crust crisps back up nicely and the filling heats evenly — a better result than the microwave for small portions.
Nutrition Facts
Per serving (1 bomb, based on 8 bombs total):
| Nutrient | Amount |
|---|---|
| Calories | ~290 |
| Total Fat | 14g |
| Saturated Fat | 6g |
| Cholesterol | 62mg |
| Sodium | 580mg |
| Total Carbohydrates | 22g |
| Dietary Fiber | 1g |
| Total Sugars | 3g |
| Protein | 22g |
| Calcium | 18% DV |
Disclaimer: Nutrition values are estimates calculated using standard ingredient databases and will vary based on specific brands used, exact portion sizes, and any ingredient substitutions made. For precise dietary tracking, enter your specific ingredients into a verified nutritional calculator. These figures are for general informational reference and are not intended as medical or dietary advice.
Frequently Asked Questions
1. Can I use homemade pizza dough instead of biscuit dough?
Yes — homemade or store-bought pizza dough works well. Portion it into 8 equal pieces (about 2 oz each) and roll into rounds. Pizza dough produces a slightly chewier, crispier exterior than biscuit dough, which is a great result for anyone who prefers that texture.
2. How do I prevent the cheesy chicken pizza bombs from leaking in the oven?
Three things prevent leaking: drain any excess liquid from the filling before stuffing, don’t overfill (3 tablespoons maximum), and seal the dough seam firmly by pinching and rolling, then place seam-side down immediately. Any one of these skipped tends to result in a burst bomb.
3. Can I make these ahead and bake them the next day?
Yes — assemble the bombs fully through Step 5, place seam-side down on the parchment-lined pan, cover tightly with plastic wrap, and refrigerate overnight. Brush with garlic butter and add pepperoni just before baking. Add 2–3 extra minutes to the bake time since they’ll start cold.
4. What’s the best chicken to use for the filling?
Rotisserie chicken breast is the top choice — it’s already flavorful, perfectly tender, and requires zero additional cooking. Poached chicken breast shredded at home is a close second. Avoid canned chicken if possible; it needs to be very well-drained and tends to be softer in texture than shredded whole chicken.
5. Can I add more cheese to the filling?
You can increase the mozzarella to 1¾ cups total in the filling, but going beyond that risks too much moisture release during baking. Cheese releases water as it melts. More isn’t always better inside a sealed dough pocket — the current ratio gives you that pull without turning the interior watery.
6. How many calories are in each pizza bomb?
Each bomb comes in at approximately 290 calories with 22 grams of protein, based on the recipe as written. Using whole-wheat pizza dough instead of biscuit dough and reducing mozzarella slightly can bring each bomb closer to 250 calories if you’re tracking closely.
7. Are these good for meal prep?
Genuinely excellent for it. Bake a full batch, cool completely, freeze individually, and you have protein-forward snacks available for weeks. They reheat in 10 minutes from refrigerated or 20 minutes from frozen — no prep required on busy days.
8. Can I use an air fryer instead of the oven?
Yes — air fry at 350°F for 10–12 minutes until golden and the filling reaches 165°F. Work in batches and don’t stack them. The air fryer produces a slightly crispier exterior than the oven, which is a great result for the dough texture.
9. What dipping sauces work best besides pizza sauce?
Ranch dressing, garlic aioli, and honey mustard all work well. For a Tuscan-style variation, try a simple mixture of olive oil, minced garlic, and dried herbs warmed in a small saucepan — it pairs beautifully with the Italian-seasoned dough and chicken filling.
10. Can kids make this recipe?
The filling mixing and the garlic butter brushing are very kid-friendly tasks. The sealing step takes a little practice to get right, but it’s a good hands-on technique for older kids (8+) to learn. Supervision is needed during the oven step and when handling the hot baked bombs immediately out of the oven.
Expert Chef Tips
1. Mix the filling and refrigerate it for 15 minutes before stuffing. A briefly chilled filling firms up slightly and is much easier to portion cleanly into the center of each dough round. It also reduces the risk of the filling spreading to the edges before you can seal the dough.
2. Use the palm of your hand, not a rolling pin, to flatten the biscuits. Your hand gives you better pressure control and prevents over-thinning at the edges where you need thickness for a strong seal. A rolling pin can quickly take a biscuit round past the point where it’s structurally sound enough to hold the filling.
3. Rotate the baking sheet at the 10-minute mark. Most home ovens have hot spots, and rotating the pan ensures all eight bombs brown at the same rate. It’s also the ideal moment to apply that second coat of garlic butter for maximum color and flavor.
4. Score the top of each bomb lightly before baking. A shallow X cut in the top of the dough (about ¼ inch deep) gives steam a controlled exit point, which prevents random blowouts and also creates a natural opening that frames the pepperoni topper attractively. Press the pepperoni into the scored X rather than just onto the smooth dough surface.
5. Serve on a warm plate. Cheesy chicken pizza bombs cool down faster than you’d expect because they’re individually sized. A warm plate — run under hot water and dried, or placed in the turned-off oven for 2 minutes — keeps them at the ideal serving temperature for the full time they’re on the table.
Recipe Summary
These cheesy chicken pizza bombs are golden biscuit dough rounds stuffed with seasoned shredded chicken, pizza sauce, diced red peppers, and melted mozzarella, then topped with a pepperoni slice and a garlic-herb butter glaze and baked at 375°F for 18–20 minutes. Each bomb delivers approximately 22 grams of protein and 290 calories, making them a legitimate high-protein snack or appetizer rather than a purely indulgent treat. The recipe makes 8 bombs, takes 35 minutes from start to finish, and freezes beautifully for up to 3 months.
A Snack Worth Making Every Single Week
Once a batch of cheesy chicken pizza bombs hits your regular rotation, they tend to stay there — because they solve the problem of needing something that’s simultaneously satisfying, portable, high in protein, and crowd-pleasing without requiring two hours of cooking. Make them for game day, pack two for a post-gym lunch, or freeze a batch and pull them out on nights when cooking from scratch isn’t happening. If you love this style of handheld protein-forward snacking, also check out Creamy Tuscan Chicken Orzo Skillet – Easy 30-Minute and Zucchini Chicken Parmesan Bake (Ultimate)Best 5-Layer for two more recipes built around the same idea — great food that actually fuels you.
✅ Quick Tips: Read the recipe in its entirety before you start cooking. This will help you understand the ingredients, steps, and timing involved, and allow you to prepare any necessary equipment or ingredients beforehand.
Cheesy Chicken Pizza Bombs – Easy 35-Minute Snack
Description
The moment you set a plate of cheesy chicken pizza bombs in front of people, they're gone — that's not an exaggeration, it's what happens every single time. Golden, herb-dusted dough balls each topped with a crisped pepperoni slice, concealing a hot, stretchy interior packed with shredded chicken, pizza sauce, diced peppers, and melted mozzarella that pulls dramatically when one gets torn open. They look like something from a sports bar appetizer menu, but they take about 35 minutes to make at home with ingredients you likely already have.
Ingredients
Instructions
-
Step-by-Step Instructions
-
Step 1: Preheat the Oven and Prep the Pan
-
Preheat your oven to 375°F. Line a large baking sheet with parchment paper and set aside. Spacing matters for these — you want enough room between bombs so the oven heat circulates freely around each one, giving you an even golden color all the way around rather than pale spots where they've touched.
-
Step 2: Make the Chicken Filling
-
In a large mixing bowl, combine the shredded chicken, pizza sauce, diced red peppers, 1 cup of the mozzarella, Italian seasoning, garlic powder, and black pepper. Stir until everything is evenly mixed. Tip: The filling should be moist but not wet — if your pizza sauce is particularly thin or your peppers released a lot of liquid, stir in the filling and let it sit for 2 minutes, then drain off any pooled liquid. Excess moisture is the main cause of leaking bombs.
-
Step 3: Flatten the Biscuit Dough
-
Open the biscuit dough and separate all 8 biscuits. Using your hands or a rolling pin, press and stretch each one into a round disc roughly 5–6 inches in diameter. You want enough surface area to wrap the filling completely without the dough tearing at the seam. Work on a lightly floured surface if the dough is sticking.
-
Step 4: Fill and Seal Each Bomb
-
Place approximately 3 tablespoons of the chicken filling into the center of each flattened biscuit round. Add a pinch of the remaining mozzarella on top of each filling mound — this extra cheese inside melts into the chicken and creates the visible cheese pull when the bomb is torn open. Gather the edges of the dough up and over the filling, pinching firmly to seal. Roll the sealed ball lightly between your palms to smooth the seam. Tip: Place each finished bomb seam-side down on the parchment-lined baking sheet immediately — gravity helps the seal hold during baking.
-
Step 5: Apply the Garlic Butter Topping and Pepperoni
-
In a small bowl, stir together melted butter, Italian seasoning, garlic powder, and a pinch of salt. Brush the top and sides of each bomb generously with the garlic butter. Press one pepperoni slice firmly onto the top of each bomb — it will adhere to the buttered surface and crisp against the dough as it bakes, creating the golden, slightly charred top visible in the finished dish.
-
Step 6: Bake Until Golden
-
Bake at 375°F for 18–20 minutes, until the bombs are deep golden brown all over and the pepperoni on top has crisped and darkened at the edges. To confirm the filling is fully heated through, insert an instant-read thermometer into the center of one bomb — the internal temperature should reach at least 165°F. Per USDA food safety guidelines, all dishes containing cooked poultry must reach this temperature when reheated or baked with other ingredients.
-
Step 7: Garnish and Serve
-
Remove the pan from the oven and let the bombs cool for 3–4 minutes before handling — the filling inside holds heat intensely and can burn. Scatter fresh chopped parsley over the entire plate, add toothpicks to a few for easy handling at parties (as shown in the photo), and serve immediately with extra pizza sauce or marinara on the side for dipping.
Nutrition Facts
Servings 6
- Amount Per Serving
- Calories 290kcal
- % Daily Value *
- Total Fat 14g22%
- Saturated Fat 6g30%
- Total Carbohydrate 56.5g19%
- Sugars 3g
- Protein 24g48%
- Vitamin A 302 IU
- Vitamin C 12 mg
- Calcium 135 mg
- Iron 7 mg
* Percent Daily Values are based on a 2,000 calorie diet. Your daily value may be higher or lower depending on your calorie needs.