Cheesy Pepperoni Pizza Bread: Best Easy 40-Minute Bake


The Cheesy Pepperoni Pizza Bread That Wins Every Time
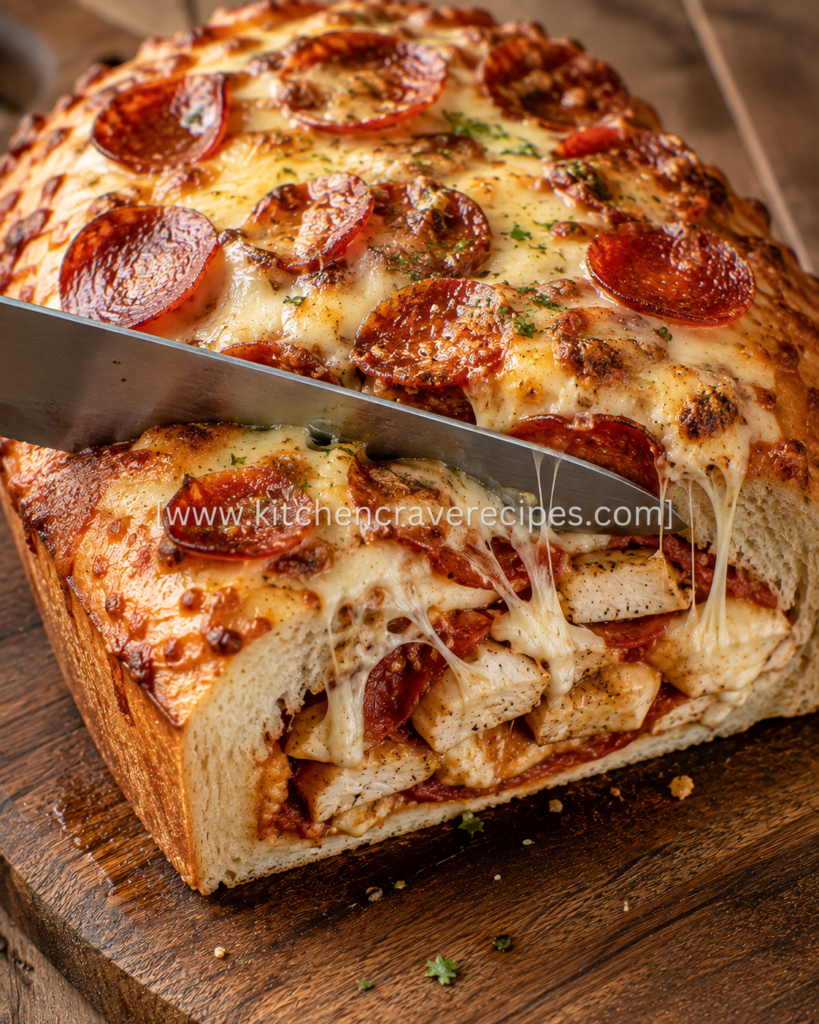
There’s a very specific kind of recipe that makes everyone stop talking the moment it hits the table. This cheesy pepperoni pizza bread is that recipe — a golden, crisp-edged loaf stuffed with pizza sauce, generous layers of mozzarella, and pepperoni slices that crisp and curl against the top of the dough during baking, their edges turning deep red and slightly charred in the oven heat. The photo says it all: a bread knife lifting away from a freshly cut loaf on a wooden board, strings of melted mozzarella pulling in long, glossy ropes from the cross-section.
This baked stuffed bread uses store-bought pizza dough as the base, which keeps the prep fast and accessible. The filling — pizza sauce, mozzarella, and pepperoni — is layered inside the rolled dough before sealing, while additional pepperoni is pressed directly onto the outside of the loaf before baking. Fresh parsley scattered across the top and that molten cheese pull visible at the cut edge finish the picture.
Recipe Quick Info
| Detail | Info |
|---|---|
| Prep Time | 15 minutes |
| Cook Time | 25 minutes |
| Total Time | 40 minutes |
| Servings | 6–8 slices |
| Cuisine | American-Italian |
| Course | Appetizer / Side / Snack |
| Cooking Method | Baking |
| Calories | ~420 per serving |
| Difficulty | Easy |
Why You’ll Love This Recipe
- That cheese pull is completely real and repeatable — Freshly grated mozzarella inside a sealed, baked loaf produces exactly the long, stretchy pull visible at the cut edge — every single time you make it.
- Pepperoni crisps directly on the outside of the loaf — Pressing pepperoni slices onto the surface before baking lets them brown and crisp in the oven, giving you both an interior and exterior pepperoni hit in every slice.
- Store-bought dough makes this genuinely weeknight-friendly — No proofing, no yeast activation, no bread-making experience — just roll, fill, seal, and bake in one session under 40 minutes.
- It looks dramatically more impressive than the effort required — The golden crust, crispy surface pepperoni, and cheese-pull cross-section make this look like something from a restaurant, but the technique is completely straightforward.
- Shareable and crowd-ready — Six to eight generous slices make this equally at home as a party appetizer, a game-day snack, or a casual family dinner alongside a salad.
- Completely customizable beyond the base recipe — The pizza sauce and mozzarella format accepts virtually any pizza topping you want to stuff inside without changing the baking time or temperature.
- Leftovers reheat beautifully — Unlike most bread-based dishes, this one reheats in the oven with the crust crisping back up and the interior cheese melting fresh again in under 10 minutes.
Ingredients
For the Dough
- 1 lb store-bought pizza dough, at room temperature
- 1 tablespoon all-purpose flour, for dusting the work surface
For the Filling
- ⅓ cup pizza sauce (not marinara — pizza sauce is thicker and less watery)
- 2 cups shredded low-moisture mozzarella cheese
- 3 oz pepperoni slices (about 30 slices), divided — half for the interior, half for the exterior
For the Topping
- 2 tablespoons unsalted butter, melted
- 2 cloves garlic, finely minced
- ½ teaspoon dried Italian seasoning
- 1 tablespoon fresh parsley, finely chopped (visible as green flecks in the photo)
- Pinch of kosher salt
Optional Add-Ins
- 2 tablespoons grated Parmesan stirred into the butter topping
- ¼ teaspoon red pepper flakes inside the filling for heat
- 4 slices provolone layered with the mozzarella for a more complex cheese interior
Ingredient Substitutions
| Original Ingredient | Substitution | Notes |
|---|---|---|
| Store-bought pizza dough | Crescent roll dough (2 tubes) | Flakier texture; bakes 3–4 minutes faster |
| Pizza sauce | Crushed tomatoes reduced by half | Thicken on the stovetop for 5 minutes first |
| Mozzarella (shredded) | Provolone or an Italian blend | Both melt comparably; provolone is slightly sharper |
| Pepperoni | Turkey pepperoni | Lower fat; crisps slightly less but still flavorful |
| Unsalted butter | Olive oil (same quantity) | Less rich; still produces a golden crust |
| Fresh parsley | Dried parsley (½ tsp) | Convenient; less vibrant color on the surface |
| Garlic (fresh) | ½ tsp garlic powder | Milder; no risk of burning on the crust surface |
Kitchen Tools Needed
- Oven — Preheated to 400°F; the primary cooking appliance for this recipe
- Rimmed baking sheet — The loaf bakes directly on a parchment-lined sheet; the rim catches any cheese that escapes during baking
- Parchment paper — Prevents sticking without greasing and allows the bottom crust to bake evenly without over-browning
- Rolling pin — For rolling the dough to an even, thin rectangle before layering the filling
- Pastry brush — For applying the garlic butter topping evenly across the surface of the loaf before and during baking
- Sharp bread knife — For slicing the finished loaf cleanly through the crispy exterior without compressing the cheese inside
- Wooden cutting board — For resting the loaf after baking and slicing at the table
- Small bowl — For mixing the garlic butter topping
- Aluminum foil — For tenting the loaf if the top darkens before the interior is fully heated through
Step-by-Step Instructions: How to Bake Cheesy Pepperoni Pizza Bread Perfectly
Step 1 — Preheat the Oven and Rest the Dough (10 minutes)
Preheat your oven to 400°F and position the oven rack in the center — center placement ensures the loaf receives even radiant heat from above and below, which is what produces a uniformly golden crust rather than a dark bottom or pale top. Line a rimmed baking sheet with parchment paper. If your pizza dough came from the refrigerator, let it rest at room temperature for at least 15 minutes before rolling — cold dough tears at the edges and snaps back during shaping, making an even rectangle nearly impossible to achieve.
Step 2 — Roll the Dough and Layer the Filling (8 minutes)
Lightly flour your work surface and roll the dough into a rectangle approximately 12×14 inches, keeping the thickness as even as possible across the entire surface. Uneven thickness creates spots that are simultaneously doughy in the thick areas and prone to tearing in the thin ones. Spread the pizza sauce in a thin, even layer across the dough, leaving a clean 1-inch border on all four sides — this border is what you’ll seal the loaf with. Layer half the pepperoni slices across the sauce, then scatter the shredded mozzarella evenly on top.
Embedded Tip: Use pizza sauce — not marinara — for the filling. Marinara is thinner and more liquid than pizza sauce, and excess moisture inside the rolled loaf creates steam during baking that makes the interior doughy rather than the cohesive, melted filling you want. If you only have marinara, simmer it in a small saucepan over medium heat for 5 minutes to reduce it before spreading.
Step 3 — Roll, Seal, and Place the Loaf (4 minutes)
Starting from one long edge, roll the dough tightly and evenly around the filling — consistent tension prevents air pockets and keeps the pepperoni and cheese distributed throughout rather than bunching at one end. Once fully rolled, press the seam firmly closed along its entire length with your fingertips, then fold and tuck both short ends under the loaf. Transfer the loaf seam-side down onto the prepared baking sheet — the weight of the loaf sitting on the seam keeps it closed during baking without needing any additional sealing agent.
Step 4 — Add the Topping and Exterior Pepperoni (3 minutes)
Mix the melted butter, minced garlic, Italian seasoning, and a pinch of salt in a small bowl. Brush this mixture generously across the entire surface of the loaf — top, sides, and ends — until every visible area glistens. Press the remaining pepperoni slices directly onto the top of the loaf, spacing them evenly. These surface pepperoni slices will brown and crisp against the oven heat during baking, curling at their edges and developing a deeper red color, just as visible in the photo.
Embedded Tip: Reserve about 1 tablespoon of the garlic butter and set it aside. At the 20-minute mark during baking, pull the loaf briefly and brush the reserved butter across the top one final time before returning it to the oven. This second coat intensifies the golden color and gives the surface the slightly blistered, rich finish visible in the photo.
Step 5 — Bake to Golden and Melted (22–25 minutes)
Bake the loaf at 400°F for 22–25 minutes until the crust is deep golden brown across the entire surface, the exterior pepperoni slices are visibly crisped and curled, and any cheese that has escaped at the seams is golden and set. The bottom should feel firm when tapped lightly. If the top browns faster than expected before 22 minutes, tent loosely with aluminum foil and continue baking — the interior needs the full time to heat through and melt the cheese completely.
The loaf is fully baked when the crust sounds slightly hollow when tapped and the internal bread temperature reads approximately 190°F. Transfer to a wooden cutting board and rest for 5 minutes before slicing — the cheese inside needs this brief window to shift from completely molten to the thick, stretchy pull visible in the photo. Use a sharp bread knife with a gentle sawing motion for the cleanest cross-section.
For another baked stuffed bread recipe with a different filling profile, try Cheesy Chicken Green Pepper Casserole: Best 5-Ingredient Bake using the same technique.
Pro Tips for Perfect Cheesy Pepperoni Pizza Bread
- Two butter coats beat one, every time. The first coat applied before baking seasons the crust and starts the browning process. The second coat applied at the 20-minute mark produces that deeply golden, slightly lacquered surface with visible herb flecks — one coat gives you good color, two coats give you the result in the photo.
- Press the surface pepperoni down firmly before baking. Pepperoni that isn’t pressed flat against the dough lifts and slides off during baking as the loaf expands. Press each slice with your fingertips so it adheres to the buttered surface — they’ll crisp in place and stay put through the full bake.
- Don’t skip resting the dough at room temperature first. This is the single most impactful prep step. Cold dough resists rolling, tears unevenly, and contracts around the filling. Fifteen minutes on the counter transforms it from rigid to cooperative and makes the entire shaping process take half the time with twice the results.
- Shred your own mozzarella from a block. Pre-shredded bags contain cellulose anti-caking agents that reduce melt quality and produce a greasier, less cohesive interior. Block mozzarella freshly grated creates the long, elastic cheese pull in the photo — no shortcuts here.
- Seal the seam tightly and place it face-down without exception. A loose seam means the filling escapes onto the pan rather than staying inside the loaf. Once sealed, the seam-side-down position and the weight of the loaf hold it closed throughout baking without any need for egg wash or water sealing.
Common Mistakes to Avoid
1. Opening the oven door repeatedly during baking.
Each time the oven door opens, the temperature drops 25–50°F and the baking heat becomes uneven — which means the bottom continues cooking while the top stalls. This is the most common baking mistake with stuffed bread. Set your timer, use the oven light if you need a visual check, and keep the door closed until the 20-minute second-butter mark.
2. Using marinara instead of pizza sauce.
Marinara is significantly thinner than pizza sauce and releases steam inside the sealed loaf, making the bread interior doughy and wet rather than the cohesive, melted filling you’re aiming for. If marinara is all you have, simmer it for 5 minutes to reduce before using.
3. Rolling the dough while it’s still cold from the refrigerator.
Cold dough tears, contracts immediately after rolling, and fights you at every step. The 15-minute room-temperature rest makes the dough pliable and responsive — this step takes no active effort and changes the experience of shaping from frustrating to straightforward.
4. Over-saucing the filling.
More pizza sauce sounds better until the loaf bursts at the seam from excess moisture and filling pressure. A thin, even spread of ⅓ cup is the right amount for this size of dough — enough to taste clearly in every bite without compromising the structural integrity of the sealed loaf.
5. Not pressing the surface pepperoni onto the dough.
Pepperoni that isn’t pressed flat against the buttered crust lifts and slides as the dough expands in the oven. Press each slice firmly with your fingertips after placing it — they’ll crisp in place and produce the visually striking surface visible in the photo.
6. Cutting the loaf immediately out of the oven.
The cheese inside is completely liquid when the loaf first comes out of the oven. Cutting immediately sends it flooding out as a pool rather than the stretchy, pulled cheese in the photo. Five minutes of resting on the cutting board transforms the cheese from liquid to the thick, elastic pull that photographs well and tastes better.
7. Using a non-serrated knife to slice the loaf.
A straight-edged chef’s knife compresses the crispy crust rather than cutting through it, which drags and distorts the cross-section. A serrated bread knife used with a gentle sawing motion slices cleanly without pressure — the difference in the final appearance of each slice is significant.
Variations
Healthier / Lighter Version
Use turkey pepperoni (which has significantly less fat than regular pork pepperoni) and reduced-fat mozzarella in place of full-fat block mozzarella. The reduced-fat cheese melts slightly differently — it produces a less elastic pull and a thinner melt — but the flavor and appearance are comparable for a lighter version. Swap the butter topping for 2 tablespoons of olive oil to reduce saturated fat further.
Vegetarian Version
Replace all pepperoni with a combination of sliced black olives, roasted red pepper strips (patted completely dry before using), and sautéed mushrooms (cooked and drained of all moisture before filling). The mushrooms are the critical step — raw mushrooms release substantial liquid during baking and will make the interior soggy. Pre-cooking them until dry takes 5 minutes and completely solves the problem.
Spicy Version
Add ½ teaspoon of crushed red pepper flakes directly to the pizza sauce before spreading, and use hot pepper pepperoni or mix in 10–12 sliced pickled jalapeños with the mozzarella inside the loaf. Stir a pinch of cayenne into the garlic butter topping for an additional surface heat note that hits immediately with the first bite.
Gluten-Free Version
Use certified gluten-free pizza dough — available in refrigerated sections from several national brands. The filling and garlic butter topping are naturally gluten-free; verify that your pizza sauce and Italian seasoning blend carry no gluten-containing additives or shared-facility warnings. Gluten-free dough is typically stickier and less elastic than standard pizza dough — roll it between two sheets of parchment rather than directly on a floured surface for easier handling.
Low-Carb / Keto Version
This variation requires a completely different dough and is therefore a different cooking approach. Use fathead dough (2 cups shredded mozzarella, 2 tablespoons cream cheese, 1 egg, and ¾ cup almond flour, microwaved and kneaded) rolled between parchment sheets. Fill identically, seal carefully, and bake at 375°F for 18–20 minutes. The exterior won’t achieve the same deep golden color as standard pizza dough, but the pepperoni and cheese interior is nearly identical.
What to Serve With This Recipe
- Warm marinara or pizza sauce for dipping — The natural companion; serve in a small bowl alongside the sliced loaf
- A crisp Caesar salad — The sharpness of the dressing and Parmesan contrast cleanly with the rich, cheesy bread
- Minestrone or tomato soup — Makes this bread the centerpiece of a full Italian-American dinner
- Garlic butter green beans — Fast, low-carb, and a clean vegetable contrast to the bold pepperoni and cheese
- A cold beer or sparkling water with lemon — Cuts through the fat of the mozzarella and pepperoni between bites
- Pickle spears — The acidity resets the palate effectively between slices of this rich, savory bread
- A side of ranch dressing — Works surprisingly well as an alternative dip alongside the pizza sauce
This bread pairs perfectly with Cheesy Chicken Green Pepper Casserole: Best 5-Ingredient Bake for a complete and crowd-pleasing dinner.
Storage Instructions
Refrigerator
Allow the baked cheesy pepperoni pizza bread to cool completely, then wrap individual slices in plastic wrap or store in an airtight container. Refrigerate for up to 3 days. The crust softens as it sits — expected behavior for any baked bread — but reheating in the oven restores most of the original crispiness within 8 minutes.
Freezer
Both baked and unbaked versions of this loaf freeze well. For baked leftovers, wrap slices individually in plastic wrap then foil and freeze for up to 2 months. For an unbaked assembled loaf, wrap tightly in plastic wrap, freeze flat until solid, then transfer to a zip-top freezer bag. Bake from frozen at 375°F for 35–38 minutes, tenting with foil after the first 20 minutes to prevent over-browning before the interior heats through.
Shelf Life Summary
| Component | Refrigerator | Freezer |
|---|---|---|
| Baked loaf (whole or sliced) | Up to 3 days | Up to 2 months |
| Unbaked assembled loaf | Up to 24 hours | Up to 1 month |
| Garlic butter topping (mixed) | Up to 5 days | Up to 3 months |
Reheating Instructions
Oven (Best for Crust Texture)
Preheat to 350°F. Place slices on a parchment-lined baking sheet and bake uncovered for 8–10 minutes until the crust is crisp and the cheese is re-melted and bubbling. This method restores the original texture far more effectively than any other reheating approach.
Microwave (Fastest Option)
Wrap a single slice in a lightly damp paper towel and microwave on medium power for 45–60 seconds. The crust will soften but the filling heats through evenly and the cheese re-melts. Per food safety guidance from FoodSafety.gov, reheated leftovers should reach an internal temperature of 165°F before eating.
Stovetop
Place a slice in a dry skillet over medium-low heat and cover with a lid. Heat for 3–4 minutes per side until the cheese melts and the bottom crust crisps again. This method produces a noticeably crispier bottom crust than the microwave and is an excellent option for a single-serving reheat when you don’t want to run the oven.
Nutrition Facts (Per Serving — based on 8 slices)
| Nutrient | Amount |
|---|---|
| Calories | ~420 kcal |
| Protein | ~17g |
| Total Fat | ~21g |
| Saturated Fat | ~10g |
| Carbohydrates | ~38g |
| Dietary Fiber | ~1g |
| Sugars | ~3g |
| Sodium | ~870mg |
| Cholesterol | ~50mg |
Nutrition Disclaimer: These values are estimates calculated using standard USDA nutritional data and will vary depending on the specific brand of pizza dough, pepperoni sodium content, cheese brand, amount of garlic butter applied, and exact portion size. This information is a general nutritional reference and is not intended as personalized medical or dietary advice. For precise tracking, use a certified nutrition calculator with the exact products and weights you use.
Frequently Asked Questions
1. Can I make this cheesy pepperoni pizza bread ahead of time?
Yes — assemble the loaf fully through the garlic butter and surface pepperoni step, wrap it tightly in plastic wrap, and refrigerate for up to 24 hours before baking. When ready, unwrap and bake directly from refrigerated temperature at 400°F, adding 6–8 extra minutes to the baking time to account for the cold start.
2. What kind of pizza dough works best here?
Refrigerated pizza dough from the grocery store is the most reliable and widely available option. Fresh dough from a local pizzeria or bakery also works very well and typically produces a chewier, more rustic crust. Both require 15 minutes at room temperature before rolling; skip this and the dough will fight you every step of the way.
3. Why does the recipe specify pizza sauce instead of marinara?
Pizza sauce is formulated to be thicker and less liquid than marinara specifically because it needs to stay in place on a hot surface without releasing excess moisture. Inside a sealed loaf, the extra moisture from marinara turns to steam and makes the bread interior doughy and wet. Pizza sauce bakes into a cohesive, concentrated filling rather than a wet layer.
4. Can I bake this in a loaf pan instead of flat on a baking sheet?
A loaf pan works, but the result will be taller and more compressed, with less surface area exposed to direct oven heat — which means the crust won’t develop the same crispiness across the bottom and sides. The surface pepperoni will still crisp on top. Baking time stays the same; check for the hollow-tap doneness cue and 190°F internal temperature regardless of vessel shape.
5. How do I get that dramatic cheese pull when I slice the loaf?
Two factors create it: using freshly grated block mozzarella (not pre-shredded) and slicing while the bread is still warm but not hot — specifically after the 5-minute rest. Slicing immediately out of the oven causes the cheese to flood out as liquid. Waiting until fully cooled causes it to set solid. The 5-minute window produces exactly the stretchy pull you want.
6. My loaf split open during baking — what went wrong?
Two common causes: the seam wasn’t pinched firmly enough before baking, or the loaf was over-filled. Pinch the seam firmly along its entire length and always set the loaf seam-side down on the pan. For the filling, stick to the ⅓ cup pizza sauce and 2 cups mozzarella measurements — excess filling creates internal pressure that forces the seam open as the dough expands.
7. Can I use a different cheese inside the loaf?
Yes — provolone, an Italian five-cheese blend, or Fontina all melt comparably to mozzarella inside the loaf and complement the pizza sauce and pepperoni well. Avoid cheeses with very high moisture content (like fresh mozzarella) or very low melt points (like feta), which won’t produce the stretchy interior the recipe is built around.
8. Can I cook this in an air fryer instead of baking it?
An air fryer can produce this loaf, but the loaf must fit inside the basket without touching the sides — which typically means a smaller loaf from half the dough recipe. Cook at 360°F for 16–18 minutes, checking at 14 minutes since air fryers circulate heat more aggressively than conventional ovens and the exterior can darken faster than the interior heats through.
9. Does pepperoni on the outside actually get crispy in the oven?
Yes — pressing the pepperoni directly onto the buttered surface of the loaf and baking at 400°F produces a noticeably crisped, curled edge on each slice within 22–25 minutes. The direct contact with the dry oven heat does what a covered or foil-wrapped cooking environment cannot. This is one of the most visually distinctive qualities of this specific recipe.
10. How do I reheat leftover slices without losing the crust texture?
The oven at 350°F for 8–10 minutes on a bare baking sheet (no foil, no cover) is by far the best reheating method for maintaining crust quality. The microwave is fast but softens the crust. The stovetop skillet method is the best middle ground for a single serving — it re-crisps the bottom without running the full oven.
Expert Chef Tips
1. Score the top of the loaf before baking for even expansion.
Three or four shallow diagonal cuts across the top of the loaf with a sharp knife allow steam to vent in a controlled direction during baking, which helps the loaf expand evenly upward rather than splitting randomly at the seam or sides. It also gives the finished bread a more intentional, bakery-style appearance.
2. Press surface pepperoni at an even spacing before the oven.
Evenly spaced pepperoni on top ensures every slice gets at least one crispy pepperoni slice when the loaf is cut into 6–8 portions. Cluster them randomly and some slices will have two while others have none. Count the slices you plan to cut and space the surface pepperoni accordingly.
3. Use a light-colored or aluminum baking sheet, not dark.
Dark baking sheets absorb heat more aggressively and can overbrown the bottom crust before the top has finished. A light-colored aluminum sheet with parchment produces the most even baking environment for a stuffed bread loaf — a uniformly golden bottom and a golden, blistered top that finish at the same time.
4. Add the parsley after baking, not before.
Fresh parsley added to the garlic butter before baking will scorch and turn brown in the oven heat, which looks and tastes bitter. Stir the parsley into the melted butter, brush it on, then add any additional fresh parsley as a garnish after the loaf comes out of the oven for the brightest color and cleanest flavor.
5. Rest the loaf on a wire rack, not directly on the cutting board.
Resting a hot loaf on a flat wooden surface traps steam underneath, which softens the bottom crust during the resting period. A wire rack allows air to circulate below the loaf during the 5-minute rest, keeping the bottom crust as crisp as the top when you slice and serve.
Recipe Summary
This cheesy pepperoni pizza bread brings together pizza sauce, mozzarella, and pepperoni rolled inside store-bought pizza dough, brushed with garlic herb butter, topped with crispy surface pepperoni, and baked at 400°F until deeply golden in 40 minutes total. The two-coat butter technique and center-rack baking position are the two decisions that produce the consistently golden crust and crispy surface pepperoni visible in the photo. Naturally shareable and adaptable to nearly any pizza topping combination, this baked loaf works as an appetizer, game-day snack, or casual dinner centerpiece with equal success.
Make This the Recipe Everyone Asks For
Some dishes earn a reputation. Once you bring this cheesy pepperoni pizza bread to a table — whether it’s a family dinner, a gathering, or a casual weekend lunch — people remember it. The golden crust, the crisped surface pepperoni, the cheese that pulls when the knife goes through: it’s a combination that’s hard to forget and easy to make again.
Cheesy Pepperoni Pizza Bread: Best Easy 40-Minute Bake
Description
There's a very specific kind of recipe that makes everyone stop talking the moment it hits the table. This cheesy pepperoni pizza bread is that recipe — a golden, crisp-edged loaf stuffed with pizza sauce, generous layers of mozzarella, and pepperoni slices that crisp and curl against the top of the dough during baking, their edges turning deep red and slightly charred in the oven heat. The photo says it all: a bread knife lifting away from a freshly cut loaf on a wooden board, strings of melted mozzarella pulling in long, glossy ropes from the cross-section.
Ingredients
Instructions
-
Step-by-Step Instructions: How to Bake Cheesy Pepperoni Pizza Bread Perfectly
-
Step 1 — Preheat the Oven and Rest the Dough (10 minutes)
-
Preheat your oven to 400°F and position the oven rack in the center — center placement ensures the loaf receives even radiant heat from above and below, which is what produces a uniformly golden crust rather than a dark bottom or pale top. Line a rimmed baking sheet with parchment paper. If your pizza dough came from the refrigerator, let it rest at room temperature for at least 15 minutes before rolling — cold dough tears at the edges and snaps back during shaping, making an even rectangle nearly impossible to achieve.
-
Step 2 — Roll the Dough and Layer the Filling (8 minutes)
-
Lightly flour your work surface and roll the dough into a rectangle approximately 12×14 inches, keeping the thickness as even as possible across the entire surface. Uneven thickness creates spots that are simultaneously doughy in the thick areas and prone to tearing in the thin ones. Spread the pizza sauce in a thin, even layer across the dough, leaving a clean 1-inch border on all four sides — this border is what you'll seal the loaf with. Layer half the pepperoni slices across the sauce, then scatter the shredded mozzarella evenly on top.
-
Embedded Tip: Use pizza sauce — not marinara — for the filling. Marinara is thinner and more liquid than pizza sauce, and excess moisture inside the rolled loaf creates steam during baking that makes the interior doughy rather than the cohesive, melted filling you want. If you only have marinara, simmer it in a small saucepan over medium heat for 5 minutes to reduce it before spreading.
-
Step 3 — Roll, Seal, and Place the Loaf (4 minutes)
-
Starting from one long edge, roll the dough tightly and evenly around the filling — consistent tension prevents air pockets and keeps the pepperoni and cheese distributed throughout rather than bunching at one end. Once fully rolled, press the seam firmly closed along its entire length with your fingertips, then fold and tuck both short ends under the loaf. Transfer the loaf seam-side down onto the prepared baking sheet — the weight of the loaf sitting on the seam keeps it closed during baking without needing any additional sealing agent.
-
Step 4 — Add the Topping and Exterior Pepperoni (3 minutes)
-
Mix the melted butter, minced garlic, Italian seasoning, and a pinch of salt in a small bowl. Brush this mixture generously across the entire surface of the loaf — top, sides, and ends — until every visible area glistens. Press the remaining pepperoni slices directly onto the top of the loaf, spacing them evenly. These surface pepperoni slices will brown and crisp against the oven heat during baking, curling at their edges and developing a deeper red color, just as visible in the photo.
-
Embedded Tip: Reserve about 1 tablespoon of the garlic butter and set it aside. At the 20-minute mark during baking, pull the loaf briefly and brush the reserved butter across the top one final time before returning it to the oven. This second coat intensifies the golden color and gives the surface the slightly blistered, rich finish visible in the photo.
-
Step 5 — Bake to Golden and Melted (22–25 minutes)
-
Bake the loaf at 400°F for 22–25 minutes until the crust is deep golden brown across the entire surface, the exterior pepperoni slices are visibly crisped and curled, and any cheese that has escaped at the seams is golden and set. The bottom should feel firm when tapped lightly. If the top browns faster than expected before 22 minutes, tent loosely with aluminum foil and continue baking — the interior needs the full time to heat through and melt the cheese completely.
-
The loaf is fully baked when the crust sounds slightly hollow when tapped and the internal bread temperature reads approximately 190°F. Transfer to a wooden cutting board and rest for 5 minutes before slicing — the cheese inside needs this brief window to shift from completely molten to the thick, stretchy pull visible in the photo. Use a sharp bread knife with a gentle sawing motion for the cleanest cross-section.
Nutrition Facts
Servings 6
- Amount Per Serving
- Calories 420kcal
- % Daily Value *
- Total Fat 21g33%
- Saturated Fat 10g50%
- Protein 17g34%
* Percent Daily Values are based on a 2,000 calorie diet. Your daily value may be higher or lower depending on your calorie needs.