Cheesy Chicken Green Pepper Casserole: Best 5-Ingredient Bake


The Cheesy Chicken Green Pepper Casserole That Belongs in Every Family Kitchen
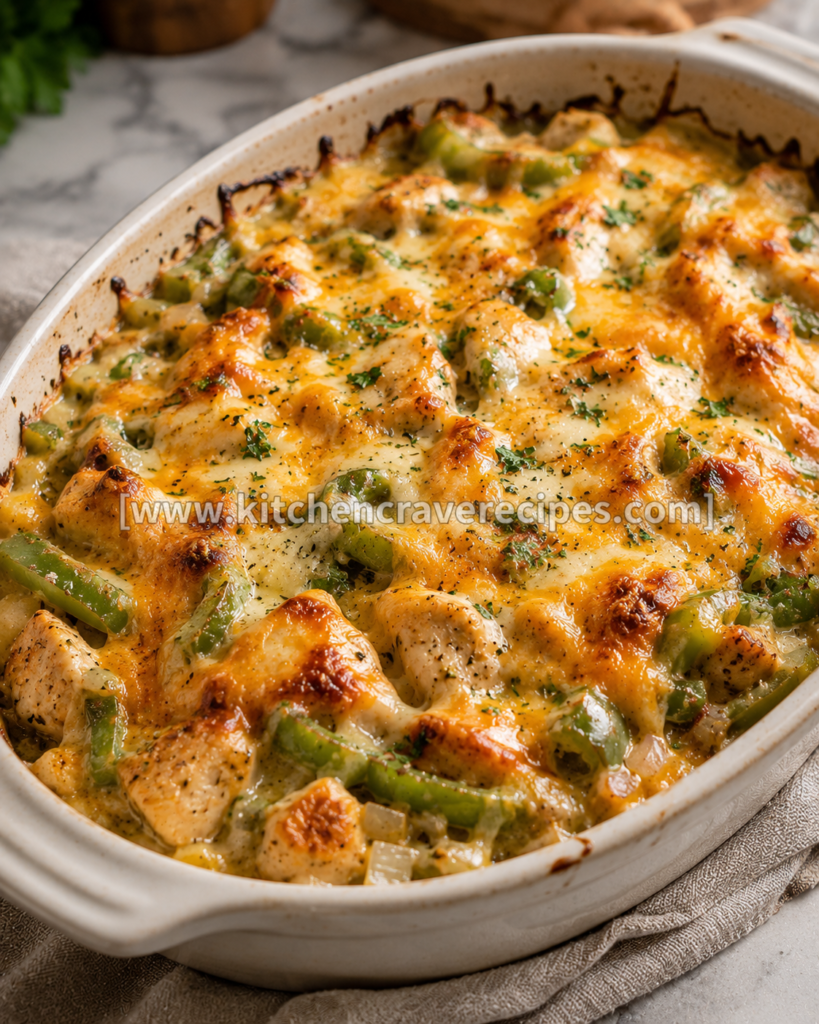
There’s a certain kind of dinner that earns itself a permanent spot on the table — not because it’s complicated, but because it’s completely reliable. This cheesy chicken green pepper casserole is exactly that recipe. Tender chicken nestled into a bed of soft green bell peppers and onions, blanketed under a melted, golden-edged layer of shredded cheddar and mozzarella that bubbles and crisps at the edges of the white ceramic baking dish — just like the photo shows.
This isn’t a casserole that hides behind a can of condensed soup. The flavor here comes from properly seasoned chicken, soft-cooked green peppers, and enough cheese to create a genuinely golden, molten top. It’s high in protein, straightforward to assemble, and bakes hands-off while you set the table or prep a simple side. If you’ve been looking for a weeknight baked dinner that actually satisfies, this is it.
Recipe Quick Info
| Detail | Info |
|---|---|
| Prep Time | 15 minutes |
| Cook Time | 40 minutes |
| Total Time | 55 minutes |
| Servings | 6 portions |
| Cuisine | American |
| Course | Main Course / Family Dinner |
| Cooking Method | Baking |
| Calories | ~410 per serving |
| Difficulty | Easy |
Why You’ll Love This Recipe
- Golden, bubbly cheese top every time — The two-cheese blend of shredded cheddar and mozzarella melts into a uniformly golden, crispy-edged top that you can see pulling away from the dish as it bakes.
- High-protein without the effort — Chicken breast is one of the leanest proteins available, and a full casserole serving delivers serious staying power for the whole family.
- Green peppers do real work here — Soft-baked green bell pepper chunks aren’t just filler; they add mild bitterness that balances the rich cheese layer and keeps the casserole from feeling heavy.
- One baking dish, minimal cleanup — Everything goes into a single white ceramic casserole dish — no extra pots, no multiple skillets, and very little to wash after dinner.
- Completely hands-off once it’s in the oven — After a quick assembly, the oven does 40 minutes of work while you focus on anything else. No stirring, no monitoring, no intervention needed.
- Naturally low-carb and gluten-free — No pasta, no breadcrumbs, no flour-based sauce — just protein, vegetables, and cheese in a clean, satisfying bake.
- Easy to double for a crowd or batch for meal prep — Use two baking dishes and the recipe scales perfectly without any adjustment to the baking time or temperature.
Ingredients
For the Chicken Layer
- 2 lbs boneless, skinless chicken breasts, sliced into thick strips or left whole
- 1 tablespoon olive oil
- 1 teaspoon garlic powder
- 1 teaspoon onion powder
- 1 teaspoon smoked paprika
- ½ teaspoon dried Italian seasoning
- ½ teaspoon kosher salt
- ¼ teaspoon freshly ground black pepper
For the Pepper and Onion Layer
- 3 large green bell peppers, sliced into thick rings or chunks (matches the photo’s visible green pepper pieces)
- 1 medium yellow onion, sliced into half-moons
- 2 cloves garlic, minced
- 1 tablespoon olive oil
- ½ teaspoon kosher salt
- ¼ teaspoon black pepper
- ½ teaspoon dried oregano
For the Cheese Layer
- 1½ cups shredded sharp cheddar cheese (the golden-orange color visible in the photo)
- 1 cup shredded low-moisture mozzarella cheese (the white, stretchy layer underneath the cheddar)
- 2 tablespoons cream cheese, softened (optional — adds creaminess beneath the shredded layer)
Optional Add-Ins
- ¼ cup sour cream stirred into the pepper layer for extra moisture
- Red pepper flakes, for heat
- Fresh parsley or chives, chopped, for serving
Ingredient Substitutions
| Original Ingredient | Substitution | Notes |
|---|---|---|
| Chicken breast | Boneless chicken thighs | More forgiving in the oven; slightly richer flavor |
| Green bell peppers | Poblano peppers | Mild heat; similar texture when baked |
| Sharp cheddar | Colby Jack or pepper jack | Melts equally well; pepper jack adds subtle heat |
| Mozzarella | Provolone | Similar melt behavior; slightly sharper flavor |
| Yellow onion | White onion | Interchangeable; white onion is slightly milder |
| Olive oil | Avocado oil | Higher smoke point; neutral flavor |
| Cream cheese | Full-fat Greek yogurt | Adds protein; slightly tangier underneath the cheese |
Kitchen Tools Needed
- Oven — Preheated to 375°F; the primary cooking appliance for this entire recipe
- Large white ceramic or glass baking dish (9×13 inch) — Matches the dish visible in the photo; ceramic retains heat evenly and produces even browning at the edges
- Aluminum foil — For the covered baking phase, which keeps the chicken moist before the cheese top browns
- Large skillet — For briefly sautéing the peppers and onion before layering (optional but recommended for better texture)
- Sharp chef’s knife and cutting board — For slicing the chicken, peppers, and onion
- Mixing bowl — For tossing the chicken in the spice blend
- Box grater — Block cheese grated fresh melts significantly better than pre-shredded
- Instant-read meat thermometer — For confirming the chicken reaches a safe internal temperature
- Oven mitts — The ceramic baking dish retains heat intensely; always use mitts when handling it
Step-by-Step Instructions: How to Bake This Cheesy Chicken Green Pepper Casserole Perfectly
Step 1 — Preheat the Oven and Season the Chicken (10 minutes)
Preheat your oven to 375°F and position the rack in the center of the oven — center placement allows even heat circulation above and below the casserole dish throughout the full baking time. In a mixing bowl, combine the olive oil, garlic powder, onion powder, smoked paprika, Italian seasoning, salt, and pepper. Add the chicken strips or breasts and toss until every surface is evenly coated. Set aside while you prepare the peppers.
Step 2 — Briefly Sauté the Peppers and Onion (6–8 minutes)
Heat 1 tablespoon of olive oil in a large skillet over medium heat. Add the green bell pepper chunks, sliced onion, and minced garlic, season with salt, pepper, and oregano, and sauté for 5–6 minutes until the vegetables are slightly softened but still hold their shape. This brief pre-cook prevents the peppers from releasing excessive moisture inside the casserole during baking, which would otherwise dilute the cheese layer above.
Embedded Tip: Don’t fully cook the peppers in the skillet — you want them about 60% done. They’ll finish softening in the oven, and retaining some structure gives the casserole better texture in every serving.
Step 3 — Assemble the Casserole (5 minutes)
Spread the sautéed peppers and onion in an even layer across the bottom of the baking dish. Lay the seasoned chicken pieces in a single layer directly on top of the vegetables, pressing them down gently so they nestle into the pepper layer. If using cream cheese, dot small spoonfuls across the chicken at this stage — it will melt down into the casserole as it bakes and create a creamy base beneath the shredded cheese.
Step 4 — Add the Cheese and Bake Covered (20 minutes)
Scatter the shredded mozzarella evenly across the entire surface of the chicken, then cover completely with the shredded cheddar. The cheddar goes on top — its orange color is what produces that visible golden top layer in the photo. Cover the dish tightly with aluminum foil and bake at 375°F for 20 minutes. The foil traps steam during this phase, which gently cooks the chicken through without drying it out or burning the cheese prematurely.
Per USDA safe minimum internal temperature guidelines, chicken must reach an internal temperature of 165°F at its thickest point before the casserole is safe to serve.
Embedded Tip: During the covered baking phase, avoid opening the oven door — each opening drops the oven temperature by 25–50°F and extends the total baking time unevenly. Set a timer and wait.
Step 5 — Uncover and Bake to Golden (18–20 minutes)
Remove the foil and return the casserole to the oven uncovered. Bake for an additional 18–20 minutes until the cheddar is fully melted, golden across the surface, and beginning to crisp and darken at the edges where it meets the dish — exactly as visible in the photo. Insert a meat thermometer into the thickest chicken piece; pull the casserole when the chicken reads 165°F.
Let the baking dish rest on a heat-safe surface for 5 minutes before serving. The cheese will settle slightly, and portions will lift more cleanly from the dish after that brief rest.
Pro Tips for the Best Cheesy Chicken Green Pepper Casserole
- Cover first, uncover to finish — this is non-negotiable for baking. The covered phase keeps the chicken moist and prevents the cheese from browning before the chicken is cooked through. The uncovered phase creates the golden, crisped top. Both stages are essential and neither should be skipped.
- Grate your own cheese. Block cheddar and block mozzarella, freshly grated, melt and brown at a rate that pre-shredded cheese simply cannot match. Pre-shredded bags contain anti-caking starches that create a greasier, less cohesive melt — the clean golden top in the photo comes from freshly grated block cheese.
- Use a thermometer, not the clock, to confirm doneness. Chicken breast thickness varies significantly between pieces and between brands. Pull the casserole when the thickest piece reads 165°F — not a minute before or after.
- Pre-cook the peppers before layering. Raw green peppers release significant liquid in the oven, which pools in the bottom of the casserole and steams the chicken from below instead of baking it. Six minutes in a skillet first makes a meaningful difference in the final texture.
- Rest the casserole before cutting. Five minutes out of the oven allows the cheese to firm up and the chicken juices to redistribute. Serving immediately means loose, watery portions; resting means clean, structured cuts.
Common Mistakes to Avoid
1. Opening the oven door during the covered baking phase.
Every time the oven door opens, the temperature drops and the baking time extends unpredictably. This is one of the most common baking mistakes — it disrupts the gentle, even heat that cooks the chicken through safely during the covered phase. Set a timer and trust it.
2. Using pre-shredded cheese straight from the bag.
The cellulose coating on pre-shredded cheese prevents it from melting cleanly. The result is a greasy, patchy top rather than the even golden melt visible in the photo. Shredding your own block cheese takes two minutes and makes a noticeable visual and textural difference.
3. Skipping the pre-sauté on the peppers.
Raw green bell peppers in a casserole release a large volume of water during baking. That liquid steams the bottom of the casserole, dilutes the seasoning, and creates a watery pool under the cheese. Six minutes in a skillet before assembling prevents this entirely.
4. Using chicken pieces of very different thicknesses.
Thin pieces overcook and dry out while thick pieces are still undercooked in the center. Slice chicken to a consistent thickness, or butterfly thick breasts before layering so the entire casserole reaches 165°F at the same time.
5. Not resting the casserole before serving.
A freshly pulled casserole is too hot and loose to serve cleanly. The cheese is still flowing, and the chicken juices haven’t settled. Five minutes of resting makes portions significantly cleaner and keeps the cheese layer intact over each serving.
6. Over-seasoning the cheese layer.
The shredded cheddar and mozzarella are already salt-forward. Adding more salt on top of the cheese before baking can make the finished casserole unpleasantly salty, especially as the moisture reduces during the uncovered baking phase. Trust the seasoning in the chicken and pepper layers.
7. Baking in a dish that’s too small.
Overcrowding the chicken pieces so they overlap prevents even cooking. Use a full 9×13-inch dish and arrange the chicken in a single layer — overlapping pieces will steam rather than bake, and the center pieces won’t brown.
Variations
Healthy / Lighter Version
Replace the full-fat cheddar with reduced-fat sharp cheddar and use 2% mozzarella in place of low-moisture whole-milk mozzarella. The baking time and temperature remain identical — reduced-fat cheeses melt slightly slower, but 18–20 minutes uncovered still produces a fully melted, golden top. Omit the cream cheese to reduce the calorie count further without affecting the casserole’s structure.
Vegetarian Version
Swap the chicken breast for 2 cans (15 oz each) of drained, rinsed white beans or 1 lb of extra-firm tofu pressed dry and sliced into thick planks. The bean version bakes beautifully in the same vessel at the same temperature; the cheese crust forms identically regardless of the protein underneath. The tofu version benefits from the pre-sauté step — brown the tofu slices in a skillet for 3–4 minutes per side before layering.
Spicy Version
Add ½ teaspoon of cayenne to the chicken spice rub and replace the green bell peppers with an equal mix of sliced poblano peppers and sliced jalapeños (seeds in or out, depending on your heat preference). Swap the cheddar for pepper jack, which melts comparably and adds a distinct heat to every bite.
Gluten-Free Version
This recipe is naturally gluten-free as written — no flour, no breadcrumbs, and no pasta. Verify that your shredded cheese, Italian seasoning blend, and smoked paprika carry certified gluten-free labels, as some spice blends and cheese products are processed in shared facilities that handle wheat.
Low-Carb / Keto Version
No modifications are needed — the casserole is already keto-compliant without any substitutions. For a higher fat ratio, add 2 tablespoons of butter dotted over the chicken layer before adding the cheese, and use full-fat cream cheese as the base layer beneath the shredded cheeses.
What to Serve With This Recipe
- Steamed white rice — A neutral base that soaks up the cheese and pepper juices from the bottom of the baking dish
- Cauliflower rice — Keeps the meal fully low-carb while adding a mild, satisfying bulk to the plate
- Roasted broccoli — The slight bitterness of roasted broccoli complements the richness of the cheese perfectly
- Warm dinner rolls or cornbread — For scooping the melted cheese and soft peppers directly from the dish
- Simple green salad with lemon vinaigrette — A light, acidic contrast to the rich baked cheese layer
- Garlic butter green beans — Fast to make, naturally low-carb, and a clean vegetable pairing with this dish
- Sliced avocado with a pinch of salt — Cool, creamy, and ready in seconds with no cooking required
For another high-protein baked casserole the whole family loves, take a look at Mediterranean Chicken and Peppers: Easy 30-Minute Best Meal.
Storage Instructions
Refrigerator
Allow the cheesy chicken green pepper casserole to cool completely before covering the baking dish with plastic wrap or transferring portions to airtight containers. Store in the refrigerator for up to 4 days. The cheese layer firms as it chills, which actually makes individual portions easier to remove cleanly from the dish on days two and three.
Freezer
This casserole freezes very well. Portion into individual freezer-safe containers or wrap the entire cooled dish tightly in two layers of plastic wrap followed by foil. Freeze for up to 3 months. Thaw overnight in the refrigerator before reheating — do not attempt to reheat directly from frozen, as the chicken will heat unevenly and the cheese layer may separate.
Shelf Life Summary
| Component | Refrigerator | Freezer |
|---|---|---|
| Full baked casserole | Up to 4 days | Up to 3 months |
| Unbaked, assembled casserole | Up to 24 hours | Up to 1 month |
| Chicken layer only (cooked) | Up to 4 days | Up to 3 months |
Reheating Instructions
Oven (Best Results)
Preheat to 350°F. Place the portion or full dish in an oven-safe vessel, add a small splash of water or chicken broth, cover tightly with foil, and bake for 18–22 minutes until warmed through. Remove the foil for the final 3–4 minutes to re-crisp the cheese top.
Microwave (Quickest Option)
Transfer a single portion to a microwave-safe dish and cover loosely with a damp paper towel. Reheat on medium power in 90-second intervals until hot throughout. Per reheating safety guidance from FoodSafety.gov, leftovers should reach an internal temperature of 165°F before eating.
Stovetop
Add a portion to a small skillet over medium-low heat with a tablespoon of water or chicken broth. Cover and heat for 6–8 minutes, stirring gently once or twice, until warmed through. The cheese re-melts beautifully this way, though the crispiness of the top won’t fully return without oven heat.
Nutrition Facts (Per Serving)
| Nutrient | Amount |
|---|---|
| Calories | ~410 kcal |
| Protein | ~44g |
| Total Fat | ~22g |
| Saturated Fat | ~11g |
| Carbohydrates | ~8g |
| Dietary Fiber | ~2g |
| Sugars | ~4g |
| Sodium | ~620mg |
| Cholesterol | ~145mg |
Nutrition Disclaimer: These values are estimates based on standard USDA nutritional data and will vary depending on the exact size of chicken breasts used, specific cheese brands, and any ingredient substitutions or add-ins. This information is intended as a general nutritional reference only and does not constitute personalized medical or dietary advice. For precise macro tracking, use a certified nutrition calculator with the exact weights and brands you use.
Frequently Asked Questions
1. Can I assemble this casserole the night before and bake it the next day?
Yes — this is one of the most convenient things about a layered baked casserole. Assemble everything through the cheese layer, cover tightly with foil, and refrigerate overnight. Add 8–10 minutes to the covered baking phase the following day to account for the cold start from the refrigerator.
2. Why does this recipe call for baking in two stages — covered, then uncovered?
The covered phase uses trapped steam to gently cook the chicken through without drying it out or burning the cheese before the interior is ready. The uncovered phase then allows the cheddar and mozzarella to brown and blister. Skipping either stage results in either undercooked chicken or an overbrowned, dried-out cheese top.
3. Can I use rotisserie chicken instead of raw chicken breast?
Yes — rotisserie chicken works well and reduces the bake time significantly. Shred or chunk the cooked chicken and layer it over the peppers, then skip the covered baking phase entirely since the chicken is already cooked. Bake uncovered at 375°F for 15–18 minutes until the cheese is fully melted and golden.
4. My casserole came out watery — what went wrong?
The most likely cause is skipping the pre-sauté on the green peppers. Raw bell peppers release significant moisture during baking, which pools at the bottom of the dish. Six minutes in a skillet before layering removes most of that excess liquid and produces a much cleaner, firmer casserole.
5. Can I use a different color bell pepper instead of green?
Yes — red, yellow, or orange bell peppers all bake well in this format. Red and yellow peppers are sweeter and less bitter than green, which will change the overall flavor profile slightly. Green bell peppers have the most assertive flavor and hold up best during the longer baking time without becoming mushy.
6. How do I know when the casserole is fully done baking?
The most reliable indicator is an instant-read thermometer reading 165°F in the thickest piece of chicken. Visually, the cheese should be fully melted, golden across the entire surface, and darkening slightly at the edges where it contacts the dish — consistent with what’s visible in the reference photo.
7. Is this cheesy chicken green pepper casserole freezer-friendly?
Very much so. Bake it, cool it completely, portion it into individual containers, and freeze for up to 3 months. The chicken stays moist and the peppers maintain acceptable texture after thawing and reheating. The cheese layer softens when frozen but re-melts well in the oven.
8. Can I add rice or pasta directly to the casserole before baking?
Rice and pasta require significantly more liquid than this casserole contains in order to cook through in the oven. Adding them raw without adjusting the recipe will result in undercooked grains or pasta. Serve rice or pasta as a side dish instead — or stir in pre-cooked rice after assembly, which works without changing the baking time.
9. What cheese combination makes the best top layer?
The combination visible in the photo — sharp cheddar over mozzarella — is ideal because each cheese contributes differently. Mozzarella provides stretch and mild creaminess; cheddar provides the orange color, sharper flavor, and the slight crispiness at the edges. Together they create a more complex cheese top than either alone.
10. Can I make this recipe in individual ramekins for meal prep portions?
Yes — divide the assembled casserole into individual oven-safe ramekins, reduce the covered baking time to 15 minutes, and the uncovered time to 12–14 minutes. Individual portions cook faster because the heat reaches the center of each ramekin more quickly than in a full 9×13-inch dish.
11. Does the cream cheese make a big difference?
It’s genuinely optional, but it adds a subtle creaminess to the layer directly under the shredded cheeses that makes each portion feel richer and more cohesive. Without it, the casserole is still excellent — but the cream cheese contributes a noticeable smoothness that’s particularly appreciated in the middle and bottom portions of the dish.
Expert Chef Tips
1. Season the chicken and the vegetables separately.
The cheese layer is salt-forward on its own, so the seasoning needs to be built into the layers underneath — not compensated for by piling more salt on top. Properly seasoned chicken and well-seasoned peppers mean every bite is flavorful all the way through, not just on the surface.
2. Let the casserole rest on a wire rack, not a damp towel.
After pulling from the oven, resting the ceramic dish on a wire rack allows air circulation underneath, which prevents the bottom of the dish from continuing to steam the casserole from trapped heat below. This keeps the pepper layer from overcooking during the resting period.
3. Use a sharp, thin spatula for clean serving portions.
A wide, flexible spatula with a thin edge cuts through the cheese layer cleanly without dragging. Run the spatula all the way to the bottom of the dish on your first scoop — the cheese-pepper-chicken layers lift best together when you go all the way through rather than trying to scoop from the top down.
4. Add the cheddar on top of the mozzarella, not mixed in.
Mozzarella melts faster and forms the stretchy, cohesive base of the cheese layer. Cheddar browns more slowly and develops the golden color and slight crispiness when exposed to direct oven heat on the surface. Layering them in order — mozzarella first, cheddar second — produces the exact top visible in the photo.
5. Don’t skip the spiced oil rub on the chicken.
The spice blend isn’t just for flavor — olive oil helps the seasonings adhere evenly and creates a light barrier that keeps the chicken surface from drying out during the covered baking phase. Dry-seasoned chicken without oil tends to develop a powdery, chalky exterior rather than a flavorful crust under the cheese.
Recipe Summary
This cheesy chicken green pepper casserole delivers high-protein comfort food with a genuinely golden, blistered cheddar and mozzarella top, tender seasoned chicken breast, and soft-baked green bell peppers — all from a single ceramic baking dish in under an hour. The two-stage baking method (covered first, then uncovered) is what keeps the chicken moist while producing the perfectly browned cheese surface you see pulled from the oven. Naturally low-carb, gluten-free, and easy to prepare ahead, this is the kind of weeknight bake that serves the whole family without requiring any technical skill — just good ingredients layered correctly.
One Dish, Done Right
Weeknight cooking should feel like a win, not a compromise. This cheesy chicken green pepper casserole gives you a bubbling, golden-topped baked dinner that looks impressive, tastes deeply satisfying, and takes only 15 minutes of actual hands-on work before the oven handles everything else. Whether you’re cooking for your family tonight or batch-prepping for the week, this casserole is the kind of recipe that makes both scenarios feel effortless.
Make it once and you’ll understand why a single white ceramic baking dish pulled from the oven can stop a room. For more high-protein baked dinners that follow the same simple method, browse Mediterranean Chicken and Peppers: Easy 30-Minute Best Meal for ideas that fit the same weeknight energy.
Cheesy Chicken Green Pepper Casserole: Best 5-Ingredient Bake
Description
There's a certain kind of dinner that earns itself a permanent spot on the table — not because it's complicated, but because it's completely reliable. This cheesy chicken green pepper casserole is exactly that recipe. Tender chicken nestled into a bed of soft green bell peppers and onions, blanketed under a melted, golden-edged layer of shredded cheddar and mozzarella that bubbles and crisps at the edges of the white ceramic baking dish — just like the photo shows.
Ingredients
Instructions
-
Step-by-Step Instructions: How to Bake This Cheesy Chicken Green Pepper Casserole Perfectly
-
Step 1 — Preheat the Oven and Season the Chicken (10 minutes)
-
Preheat your oven to 375°F and position the rack in the center of the oven — center placement allows even heat circulation above and below the casserole dish throughout the full baking time. In a mixing bowl, combine the olive oil, garlic powder, onion powder, smoked paprika, Italian seasoning, salt, and pepper. Add the chicken strips or breasts and toss until every surface is evenly coated. Set aside while you prepare the peppers.
-
Step 2 — Briefly Sauté the Peppers and Onion (6–8 minutes)
-
Heat 1 tablespoon of olive oil in a large skillet over medium heat. Add the green bell pepper chunks, sliced onion, and minced garlic, season with salt, pepper, and oregano, and sauté for 5–6 minutes until the vegetables are slightly softened but still hold their shape. This brief pre-cook prevents the peppers from releasing excessive moisture inside the casserole during baking, which would otherwise dilute the cheese layer above.
-
Embedded Tip: Don't fully cook the peppers in the skillet — you want them about 60% done. They'll finish softening in the oven, and retaining some structure gives the casserole better texture in every serving.
-
Step 3 — Assemble the Casserole (5 minutes)
-
Spread the sautéed peppers and onion in an even layer across the bottom of the baking dish. Lay the seasoned chicken pieces in a single layer directly on top of the vegetables, pressing them down gently so they nestle into the pepper layer. If using cream cheese, dot small spoonfuls across the chicken at this stage — it will melt down into the casserole as it bakes and create a creamy base beneath the shredded cheese.
-
Step 4 — Add the Cheese and Bake Covered (20 minutes)
-
Scatter the shredded mozzarella evenly across the entire surface of the chicken, then cover completely with the shredded cheddar. The cheddar goes on top — its orange color is what produces that visible golden top layer in the photo. Cover the dish tightly with aluminum foil and bake at 375°F for 20 minutes. The foil traps steam during this phase, which gently cooks the chicken through without drying it out or burning the cheese prematurely.
-
Per USDA safe minimum internal temperature guidelines, chicken must reach an internal temperature of 165°F at its thickest point before the casserole is safe to serve.
-
Embedded Tip: During the covered baking phase, avoid opening the oven door — each opening drops the oven temperature by 25–50°F and extends the total baking time unevenly. Set a timer and wait.
-
Step 5 — Uncover and Bake to Golden (18–20 minutes)
-
Remove the foil and return the casserole to the oven uncovered. Bake for an additional 18–20 minutes until the cheddar is fully melted, golden across the surface, and beginning to crisp and darken at the edges where it meets the dish — exactly as visible in the photo. Insert a meat thermometer into the thickest chicken piece; pull the casserole when the chicken reads 165°F.
-
Let the baking dish rest on a heat-safe surface for 5 minutes before serving. The cheese will settle slightly, and portions will lift more cleanly from the dish after that brief rest.
Nutrition Facts
Servings 6
- Amount Per Serving
- Calories 410kcal
- % Daily Value *
- Total Fat 22g34%
- Saturated Fat 11g56%
- Protein 44g88%
* Percent Daily Values are based on a 2,000 calorie diet. Your daily value may be higher or lower depending on your calorie needs.