
Turkey Bacon Cheeseburger Stuffed Onions
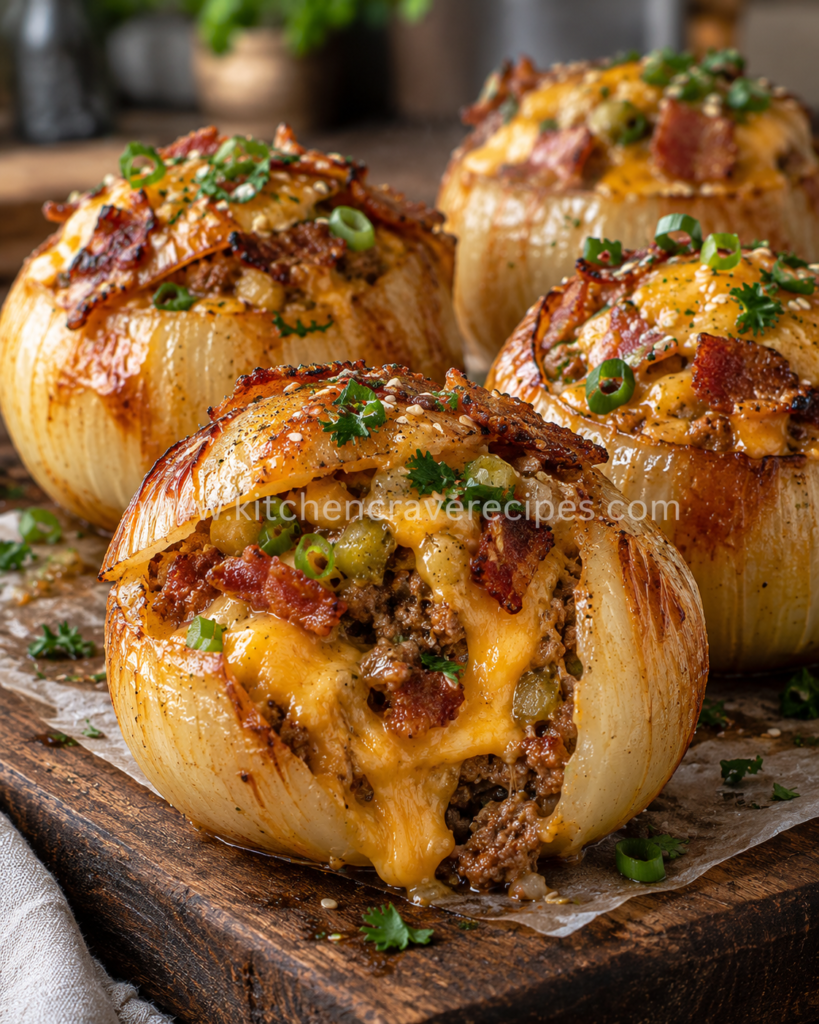
If you’ve been searching for a weeknight dinner that feels exciting without requiring a culinary degree, turkey bacon cheeseburger stuffed onions are exactly what your recipe rotation needs. Sweet yellow onions are hollowed out and packed with a savory mixture of seasoned ground turkey, crispy turkey bacon, and melted cheddar — then baked in the oven until the filling is bubbling, the cheese is golden, and the onion shells are perfectly tender. Every bite delivers that classic cheeseburger flavor in a low-carb, wholesome shell you didn’t expect to love this much.
These stuffed onions come together with minimal prep, and the oven does the heavy lifting for you. Whether you’re cooking for a family of four or meal-prepping for the week, this recipe is reliable, satisfying, and genuinely delicious every single time.
Recipe Quick Info
| Detail | Info |
|---|---|
| Prep Time | 20 minutes |
| Cook Time | 40 minutes |
| Total Time | 60 minutes |
| Servings | 4 |
| Cuisine | American |
| Course | Main Course |
| Cooking Method | Baking |
| Calories | ~390 per serving |
| Difficulty | Standard |
Why You’ll Love This Recipe
- Classic cheeseburger flavor in every bite — seasoned ground turkey, turkey bacon, and cheddar deliver all the nostalgia of a drive-through favorite in a totally new format.
- Baked, not fried — the oven does the work, keeping the filling juicy while the onion shell softens beautifully without any added grease.
- Lower-carb than a traditional burger — swapping the bun for a whole onion cuts refined carbs significantly while adding natural sweetness and fiber.
- Meal-prep friendly — these reheat exceptionally well and hold their shape, making them ideal for prepping Sunday and eating well into the week.
- Crowd-pleasing presentation — the natural onion “bowl” looks impressive on a plate, yet the whole dish comes together with pantry staples you likely already have.
- Customizable to almost any diet — swap the cheese for dairy-free, go spicier with jalapeños, or add a drizzle of sugar-free ketchup for that true burger vibe.
- One-pan cleanup — everything bakes together in a single dish, which means fewer dishes and more time to enjoy your meal.
Ingredients
For the Onion Shells
- 4 large yellow onions (about 3–4 inches in diameter)
- 1 tablespoon olive oil
- ½ teaspoon kosher salt
- ¼ teaspoon black pepper
For the Turkey Bacon Cheeseburger Filling
- 1 lb ground turkey (93% lean)
- 6 strips turkey bacon, cooked and roughly chopped
- 1 cup sharp cheddar cheese, shredded (divided — ¾ cup in filling, ¼ cup on top)
- ½ cup finely diced onion (use the scooped-out centers — no waste!)
- 2 cloves garlic, minced
- 2 tablespoons ketchup
- 1 tablespoon yellow mustard
- 1 teaspoon Worcestershire sauce
- ½ teaspoon smoked paprika
- ½ teaspoon onion powder
- ½ teaspoon kosher salt
- ¼ teaspoon black pepper
Optional Add-Ins
- 2 tablespoons dill pickle relish (for true burger flavor)
- 1 teaspoon hot sauce or a pinch of red pepper flakes
- 2 tablespoons cream cheese (adds richness and helps the filling stay together)
Garnishes
- Chopped fresh parsley or chives
- A drizzle of sugar-free ketchup or burger sauce
- Sesame seeds (for visual burger nod)
Substitution Guide
| Original Ingredient | Substitution | Why It Works |
|---|---|---|
| Ground turkey | Ground chicken | Similar lean protein; comparable moisture and flavor |
| Turkey bacon | Regular beef bacon or pork bacon | Richer flavor; adds more fat to the filling naturally |
| Sharp cheddar | Pepper jack or Colby Jack | Melts beautifully; adds mild heat or creamy stretch |
| Yellow onions | Sweet Vidalia onions | Slightly sweeter shell; works especially well for picky eaters |
| Ketchup | Sugar-free ketchup or tomato paste | Keeps the flavor profile; reduces sugar for low-carb needs |
| Worcestershire sauce | Coconut aminos | Gluten-free; provides similar umami depth |
Kitchen Tools Needed
- 9×13-inch oven-safe baking dish — the primary vessel for baking the stuffed onions; choose one with at least 2-inch sides to prevent spillover
- Oven — preheated to 375°F; this is a baking recipe, so a reliable oven temperature is essential
- Aluminum foil — used to tent the dish during the initial bake so the onions steam and soften without drying out
- Large skillet — for browning the ground turkey and sautéing the filling aromatics before stuffing
- Sharp chef’s knife and cutting board — for halving onions and scooping out the centers
- Melon baller or sturdy spoon — for hollowing out onion shells without tearing the outer layers
- Instant-read thermometer — to confirm the filling reaches a safe internal temperature of 165°F (per USDA guidelines)
- Mixing bowl — for combining the filling ingredients before stuffing
- Tongs — for handling the hot onion shells
- Rimmed baking sheet (optional backup) — place beneath the baking dish to catch any drips in the oven
Step-by-Step Instructions
Step 1: Preheat the Oven and Prep Your Onions
Preheat your oven to 375°F and position the rack in the center — this is the sweet spot for even, consistent heat during baking. While the oven heats, peel your four large yellow onions and slice off a thin layer from the bottom of each so they sit flat and stable without rocking. Cut about ½ inch off the tops.
Using a melon baller or a sturdy teaspoon, hollow out the center of each onion, leaving at least two to three firm outer layers intact — those layers are your vessel, and you want them thick enough to hold the filling without collapsing during baking. Reserve the scooped-out onion centers; you’ll use them in the filling. You should have about ½ cup of diced onion once roughly chopped.
Embedded Tip: Run your knife around the inside edge in a circle first, about ¼ inch from the outer wall — this gives the spoon a clear guide and prevents accidentally piercing through the side.
Step 2: Cook the Turkey Bacon
If your turkey bacon isn’t already cooked, lay the strips flat in a large skillet over medium-high heat. Cook for 3–4 minutes per side until the edges are crisp and the surface has deepened to a rich amber-brown — you want visible crispness, not soft and rubbery strips. Transfer to a paper towel-lined plate to drain, then roughly chop once cooled. Set aside.
Step 3: Brown the Ground Turkey Filling
In the same skillet (don’t rinse it — those turkey bacon drippings add flavor), heat the olive oil over medium-high heat. Add the finely diced reserved onion and the minced garlic. Sauté for 2–3 minutes until softened and translucent, stirring frequently. Add the ground turkey, breaking it into small crumbles with a wooden spoon as it cooks.
Cook the turkey for 6–8 minutes, stirring occasionally, until no pink remains and the meat has taken on a light golden color. Drain any excess liquid from the pan — too much moisture in the filling will make the stuffed onions soggy after baking. Season with smoked paprika, onion powder, salt, and pepper, then stir in the ketchup, mustard, and Worcestershire sauce. Cook for 1 more minute until everything is evenly coated and fragrant.
Remove the skillet from heat. Fold in the chopped turkey bacon and ¾ cup of the shredded cheddar. The residual heat will begin to melt the cheese slightly, which helps bind the filling together.
Embedded Tip: Don’t skip draining the cooked turkey. Ground turkey releases more liquid than beef during cooking, and that excess moisture can waterlog the onion shells during the bake, making the bottoms fall apart.
Step 4: Stuff the Onions
Place the hollowed onion shells into your 9×13-inch baking dish. Lightly drizzle or brush the outside of each onion with olive oil and season with salt and pepper — this encourages the outer layers to soften evenly during baking rather than drying out.
Spoon the filling generously into each onion shell, pressing it down lightly so it’s compact but not packed so tightly that it spills over immediately. Mound the filling slightly above the rim — it will settle as it bakes. Divide the remaining ¼ cup of shredded cheddar evenly over the top of each stuffed onion.
Step 5: Bake Covered, Then Uncovered
Cover the baking dish tightly with aluminum foil and place it on the center rack of your preheated 375°F oven. Bake covered for 25 minutes — the foil traps steam, which helps the onion shells soften all the way through without the tops burning before the centers are done.
After 25 minutes, carefully remove the foil (steam will escape — use oven mitts). Return the dish to the oven and bake uncovered for an additional 12–15 minutes, until the cheese on top is melted, bubbly, and starting to turn golden at the edges. The tops will develop a beautiful, slightly caramelized crown.
Use your instant-read thermometer to check the center of the filling — it should read at least 165°F to confirm the ground turkey is fully cooked and safe to serve (USDA recommended safe internal temperature for poultry).
Step 6: Rest and Garnish
Remove the baking dish from the oven and let the turkey bacon cheeseburger stuffed onions rest for 5 minutes before serving. This brief rest allows the filling to set slightly so it holds together when you plate or cut into them. Scatter fresh chopped parsley or chives over the top, add a drizzle of ketchup or burger sauce if you like, and serve immediately.
Pro Tips for Perfect Turkey Bacon Cheeseburger Stuffed Onions
- Choose onions with flat bottoms naturally. Round onions tip and rock in the baking dish, which can cause filling to spill mid-bake. At the grocery store, give each onion a gentle flat test on the counter. A slight wobble is fine — a major lean is not, no matter how much you trim.
- Let the filling cool slightly before stuffing. If the filling goes into the shells piping hot, the onion layers can begin to break down too early before the oven bake even starts. Give it 5 minutes off the heat — the texture of the final dish will be noticeably better.
- Use freshly shredded cheddar, not pre-shredded. Pre-shredded cheese is coated in anti-caking agents (typically cellulose) that prevent it from melting as smoothly. Block cheddar that you shred yourself creates a silkier, more cohesive melt both inside the filling and on top.
- Baking-specific tip — trust the foil tent for the first phase. The biggest mistake when baking stuffed vegetables is skipping the covered portion of the cook because you want to see browning. The foil-covered first phase is what ensures the onion walls become fully tender. If you skip it, the cheese will brown and the filling will set while the outer onion layers are still crunchy and raw-tasting. Don’t lift the foil early.
- Don’t overcrowd the baking dish. The four stuffed onions should fit snugly but not be wedged against each other — a little breathing room allows hot oven air to circulate around each one for even baking. If needed, use two smaller baking dishes rather than one cramped one.
Common Mistakes to Avoid
1. Hollowing the onion walls too thin.
If you scoop too aggressively, the walls will split during baking and filling will leak out into the dish. Leave at least two to three firm outer layers — approximately ¼ inch thick — on all sides.
2. Skipping the bottom trim.
An onion that rocks in the baking dish is an onion that spills. Even a 1/16-inch trim from the bottom creates enough of a flat surface to keep each shell stable for the entire bake time.
3. Using very wet ground turkey without draining.
Ground turkey holds more water than beef. If you skip draining after browning, that liquid steams inside the shell and makes the bottom layers of the onion mushy. Drain it well — or pat the cooked turkey with paper towels before mixing in the other filling ingredients.
4. Removing the foil too early during baking. (Method-specific mistake — Baking)
This is the most common baking error with stuffed vegetables. Pulling the foil off in the first 15 minutes because you’re eager to see browning causes the cheese to brown and harden before the onion shell has had enough time to soften. Always honor the full covered bake time before uncovering.
5. Over-seasoning after adding Worcestershire and ketchup.
Both ketchup and Worcestershire sauce contain salt. Taste the filling after adding them before adding any additional kosher salt — it’s easy to over-salt a filling that already has two salty condiments in it.
6. Packing the filling too tightly.
Aggressively tamping down the filling compresses it so densely that the center can remain slightly underdone even when the outer temperature is correct. Fill firmly but loosely — the oven will do the rest.
7. Skipping the temperature check.
Don’t rely solely on visual cues or timing to judge doneness for ground turkey. Always verify with an instant-read thermometer. Ground poultry must reach 165°F throughout — color alone is not a reliable indicator.
8. Not allowing a rest before serving.
Cutting into a just-baked stuffed onion immediately causes the hot filling to run. A 5-minute rest off the heat lets everything tighten up for a cleaner, more satisfying presentation.
Variations
Healthy Version
Swap the regular ketchup for a no-added-sugar version and replace ¾ of the cheddar with reduced-fat part-skim mozzarella. Use extra-lean 99% ground turkey breast and skip the optional cream cheese. This variation shaves approximately 60–80 calories per serving while keeping the core flavor profile intact. The baking method and timing stay exactly the same.
Vegetarian Version
Replace the ground turkey and turkey bacon with a mixture of cooked lentils (1 cup) and finely diced cremini mushrooms (8 oz sautéed until their liquid evaporates). The lentils provide a hearty, meaty texture while the mushrooms contribute deep umami. Use vegetarian Worcestershire sauce (Lea & Perrins is not vegetarian; look for a certified vegetarian version). Keep all other seasonings and baking instructions identical.
Spicy Version
Add 1 teaspoon of chipotle chili powder and 2 tablespoons of pickled jalapeños (drained and finely chopped) directly into the filling before stuffing. Swap the sharp cheddar topping for pepper jack cheese, which melts into a spicy, creamy crown. This variation pairs brilliantly with a cool drizzle of Greek yogurt-based ranch after baking.
Gluten-Free Version
This recipe is naturally very close to gluten-free — the main potential source of hidden gluten is the Worcestershire sauce and ketchup. Confirm both are labeled gluten-free (Lea & Perrins classic is typically GF in the US, but always check the label). All other ingredients in this recipe are inherently gluten-free. No changes to technique or baking time are needed.
Low-Carb / Keto Version
Replace the ketchup with 1 tablespoon of tomato paste plus a tiny pinch of stevia or erythritol to replicate sweetness, and use a sugar-free Worcestershire. Increase the cheddar slightly and add 2 tablespoons of cream cheese to the filling for richness. Yellow onions do contain natural carbohydrates, so for a stricter keto approach, serve only the filling and use the onion as a partial cup rather than eating the entire shell.
What to Serve With Turkey Bacon Cheeseburger Stuffed Onions
These stuffed onions are a hearty main, so keep the sides simple and complementary.
- Crispy oven-baked sweet potato fries — the natural sweetness plays beautifully against the savory filling.
- Classic diner coleslaw — creamy, cool, and crunchy; a perfect textural contrast.
- Garlic-roasted broccoli — a 15-minute sheet-pan side that bakes at the same temperature, so it can go in alongside the stuffed onions for the uncovered phase.
- Dill pickle spears — a nod to classic burger accompaniments; no recipe needed.
- Simple green salad with buttermilk ranch — keeps the plate fresh and bright.
- Cauliflower mash — for low-carb meals, a silky cauliflower mash is a natural pairing that soaks up any savory juices from the dish.
- Check out Tender Braised Beef Short Ribs — Slow-Simmered Until Fall-Off-the-Bone for another protein-packed dinner idea that pairs well with similar sides.
Storage Instructions
Refrigerator
Allow the turkey bacon cheeseburger stuffed onions to cool to room temperature (no more than 2 hours out of the oven, per food safety guidelines) before transferring to an airtight container or covering the baking dish tightly with plastic wrap. Store in the refrigerator for up to 4 days. The filling actually deepens in flavor overnight as the seasonings continue to meld.
Freezer
For longer storage, wrap each stuffed onion individually in plastic wrap, then place them in a zip-top freezer bag or airtight freezer container. Freeze for up to 2 months. Thaw overnight in the refrigerator before reheating — do not attempt to reheat directly from frozen, as the onion shells can become overly soft on the outside while the center remains cold.
Shelf Life Summary
| Storage Method | Container Type | Duration |
|---|---|---|
| Room temperature | Covered dish | Up to 2 hours only |
| Refrigerator | Airtight container | Up to 4 days |
| Freezer | Wrapped + freezer bag | Up to 2 months |
Reheating Instructions
For best results reheating these baked stuffed onions, avoid the microwave when possible — it can make the onion shell slightly rubbery and the filling dense. That said, here are all three methods:
Oven (Best Method)
Place the stuffed onions in a baking dish, add 2 tablespoons of water to the bottom of the dish to create a little steam, and cover tightly with foil. Bake at 350°F for 15–18 minutes until the filling is heated through and registers 165°F on an instant-read thermometer. Remove the foil for the last 3 minutes to re-crisp the cheese topping.
Microwave (Quickest Method)
Place one stuffed onion on a microwave-safe plate and cover loosely with a damp paper towel. Microwave on medium power (70%) in 90-second intervals, checking temperature between each interval, until the center reaches 165°F. Avoid high power, which heats the outside while leaving the center cold.
Stovetop (Alternative for Filling Only)
If the onion shell has softened too much to hold its shape after storage, scoop out the filling and reheat it in a small nonstick skillet over medium heat for 4–5 minutes, stirring occasionally, until steaming throughout. Serve the filling over a salad, in a lettuce wrap, or in a low-carb tortilla for a completely different but equally satisfying meal.
Nutrition Facts
(Per serving — 1 stuffed onion, based on the base recipe with no optional add-ins. Calculated estimates only.)
| Nutrient | Amount Per Serving |
|---|---|
| Calories | ~390 kcal |
| Total Fat | 18g |
| Saturated Fat | 7g |
| Cholesterol | 105mg |
| Sodium | 740mg |
| Total Carbohydrates | 18g |
| Dietary Fiber | 2g |
| Total Sugars | 9g |
| Protein | 38g |
| Calcium | 230mg |
| Iron | 2.1mg |
Nutrition Disclaimer: Nutrition values are estimates calculated using standard ingredient databases and may vary based on specific brands, portion sizes, and optional add-ins used. For precise dietary needs, use a certified nutrition calculator with your exact ingredients. This information is provided as a general guide only and is not intended as medical dietary advice.
Frequently Asked Questions
Can I use regular ground beef instead of ground turkey?
Absolutely. Ground beef (80/20 or 85/15) works beautifully and adds richer fat content to the filling. Brown and drain it just as you would the turkey. The baking time and temperature remain exactly the same — just verify the internal temp reaches 160°F for beef rather than 165°F for poultry.
Can I bake these ahead of time and reheat them for a party?
Yes — and they’re excellent for this. Bake the stuffed onions fully, let them cool, and refrigerate up to 2 days ahead. When ready to serve, reheat covered at 350°F for 15–18 minutes, then uncover for 3 minutes to re-melt the cheese. The flavor is often even better on day two.
What size onions work best for stuffing?
Large yellow onions in the 3- to 4-inch diameter range are ideal. Smaller onions don’t have enough interior room for a satisfying amount of filling. If your grocery store only has medium onions, use six instead of four and reduce the baking time by about 5 minutes.
My onion shells keep cracking when I hollow them out — what am I doing wrong?
The most common cause is starting with a chilled onion straight from the refrigerator. Let the onions sit at room temperature for 20–30 minutes before you prep them — slightly warmer onions are more pliable. Also use a small, controlled tool like a melon baller rather than a large spoon, which applies too much lateral pressure at once.
Is turkey bacon necessary, or can I leave it out?
Turkey bacon adds smokiness and a textural contrast that really sells the “cheeseburger” character of the filling. That said, you can skip it entirely and the stuffed onions are still very good — just increase the smoked paprika to ¾ teaspoon to compensate for some of that smoky depth.
How do I know the onion shell is fully cooked?
A properly baked onion shell will be visibly softened, slightly translucent, and will yield easily when pressed gently with a spoon — but it should not fall apart. If you slice into one and the outer layers still feel firm and raw, add another 5–7 minutes of uncovered bake time and check again.
Can I make these turkey bacon cheeseburger stuffed onions in an air fryer?
The air fryer can work for a smaller batch of 1–2 onions, but it requires a different approach than baking. Preheat the air fryer to 350°F, place the stuffed onions in the basket, and cover loosely with a small piece of foil for the first 18 minutes. Remove the foil and cook for another 8–10 minutes until the cheese is golden and the internal temp reaches 165°F. Results may vary by air fryer model and onion size.
Will a sweeter onion like Vidalia change the flavor significantly?
Vidalia or other sweet onions will produce a noticeably sweeter shell — some people love this because it mimics a sweet brioche bun quality, while others find it too sweet against the savory filling. Yellow onions are the most balanced choice. White onions are sharper and hold their structure very well but aren’t as pleasant to eat whole.
Can I make this recipe dairy-free?
Yes. Substitute your preferred dairy-free shredded cheese (many cashew-based cheddar-style options melt reasonably well). Skip the optional cream cheese add-in or replace it with a dairy-free cream cheese alternative. All other ingredients are naturally dairy-free.
How do I prevent the filling from falling out when I serve these?
Two things help most: first, let the stuffed onions rest for 5 full minutes after baking before serving — the filling sets as it cools slightly. Second, use a wide flat spatula when transferring from the baking dish to the plate so the entire onion bottom is supported from below rather than lifted from the side.
Can I prepare the filling in advance and stuff the onions later?
Yes — the filling can be made up to 2 days ahead and stored in an airtight container in the refrigerator. Hollow out the onions the day of baking and stuff them cold right before they go into the oven. You may need to add 5 minutes to the covered bake time since the filling is starting from a colder temperature.
What’s the best cheese besides cheddar for this recipe?
Sharp cheddar is the classic choice, but Colby Jack, Gruyère, or a smoked gouda all work wonderfully. Smoked gouda in particular reinforces the turkey bacon smokiness in a way that feels intentional and sophisticated. Avoid very soft cheeses like brie — they melt and pool rather than forming that nice golden cap on top.
Expert Chef Tips
1. Build flavor in layers, not all at once.
The most common beginner mistake with stuffed anything is treating the filling as one uniform mixture. Cook the onion and garlic first until truly softened, then add the turkey, then the seasonings, then the condiments — each step lets the previous flavors toast and bloom slightly before the next is added. The difference in depth is significant and worth those extra 5 minutes of attention.
2. Use the scooped onion centers — never throw them away.
This recipe uses the scooped-out onion flesh directly in the filling, which adds flavor and keeps the filling moist without any extra ingredients. This is called nose-to-tail cooking applied to vegetables: zero waste, maximum flavor. The finely diced onion also acts as a natural binder in the filling as it softens during the stovetop cook.
3. Let your turkey bacon get genuinely crisp before chopping.
Soft, undercooked turkey bacon added to the filling will steam further during the 40-minute bake and become rubbery rather than textured. Take the extra 2 minutes to cook each strip until the edges are clearly crisp — that crunch survives the bake and gives every bite a satisfying contrast.
4. A light foil tent creates a mini steam oven inside your dish.
When you cover the baking dish tightly during the first phase of baking, you’re creating a contained humid environment that softens the dense onion walls without drying the filling. This technique is borrowed from professional braising and works beautifully here — it’s the reason these stuffed onions taste restaurant-quality when so many home versions end up tough.
5. Taste and adjust the filling before stuffing.
The filling is fully cooked on the stovetop before going into the shells, which means you can taste it and adjust seasoning right then. Too flat? A bit more Worcestershire. Too salty? A squeeze of lemon or a pinch of sugar balances it out. You cannot adjust seasoning once the onions are baked — so this is your one best opportunity to get it exactly right.
Recipe Summary
Turkey bacon cheeseburger stuffed onions transform a humble yellow onion into an impressive, flavor-forward main course that brings together seasoned ground turkey, crispy turkey bacon, and melted sharp cheddar in one cohesive, satisfying bite. The two-stage baking method — covered first, then uncovered — ensures perfectly tender shells and a golden, bubbly cheese topping every single time. This is a weeknight dinner that punches well above its effort level, and it stores and reheats beautifully for days of easy leftovers.
Conclusion
Once you try turkey bacon cheeseburger stuffed onions, the concept of eating your burger in a bun starts to feel almost unnecessary. These are hearty, packed with real flavor, and genuinely fun to make and serve. Whether you’re cutting carbs, feeding a family who’s bored of the usual rotation, or just looking for something a little different on a Tuesday night, this recipe delivers every single time. Give them a try this week — and don’t be surprised when they disappear faster than you expected.
Best 4-Ingredient Turkey Bacon Cheeseburger Stuffed Onions
Description
If you've been searching for a weeknight dinner that feels exciting without requiring a culinary degree, turkey bacon cheeseburger stuffed onions are exactly what your recipe rotation needs. Sweet yellow onions are hollowed out and packed with a savory mixture of seasoned ground turkey, crispy turkey bacon, and melted cheddar — then baked in the oven until the filling is bubbling, the cheese is golden, and the onion shells are perfectly tender. Every bite delivers that classic cheeseburger flavor in a low-carb, wholesome shell you didn't expect to love this much.
Ingredients
Instructions
-
Step 1: Preheat the Oven and Prep Your Onions
-
Preheat your oven to 375°F and position the rack in the center — this is the sweet spot for even, consistent heat during baking. While the oven heats, peel your four large yellow onions and slice off a thin layer from the bottom of each so they sit flat and stable without rocking. Cut about ½ inch off the tops.
-
Using a melon baller or a sturdy teaspoon, hollow out the center of each onion, leaving at least two to three firm outer layers intact — those layers are your vessel, and you want them thick enough to hold the filling without collapsing during baking. Reserve the scooped-out onion centers; you'll use them in the filling. You should have about ½ cup of diced onion once roughly chopped.
-
Embedded Tip: Run your knife around the inside edge in a circle first, about ¼ inch from the outer wall — this gives the spoon a clear guide and prevents accidentally piercing through the side.
-
Step 2: Cook the Turkey Bacon
-
If your turkey bacon isn't already cooked, lay the strips flat in a large skillet over medium-high heat. Cook for 3–4 minutes per side until the edges are crisp and the surface has deepened to a rich amber-brown — you want visible crispness, not soft and rubbery strips. Transfer to a paper towel-lined plate to drain, then roughly chop once cooled. Set aside.
-
Step 3: Brown the Ground Turkey Filling
-
In the same skillet (don't rinse it — those turkey bacon drippings add flavor), heat the olive oil over medium-high heat. Add the finely diced reserved onion and the minced garlic. Sauté for 2–3 minutes until softened and translucent, stirring frequently. Add the ground turkey, breaking it into small crumbles with a wooden spoon as it cooks.
-
Cook the turkey for 6–8 minutes, stirring occasionally, until no pink remains and the meat has taken on a light golden color. Drain any excess liquid from the pan — too much moisture in the filling will make the stuffed onions soggy after baking. Season with smoked paprika, onion powder, salt, and pepper, then stir in the ketchup, mustard, and Worcestershire sauce. Cook for 1 more minute until everything is evenly coated and fragrant.
-
Remove the skillet from heat. Fold in the chopped turkey bacon and ¾ cup of the shredded cheddar. The residual heat will begin to melt the cheese slightly, which helps bind the filling together.
-
Step 4: Stuff the Onions
-
Place the hollowed onion shells into your 9×13-inch baking dish. Lightly drizzle or brush the outside of each onion with olive oil and season with salt and pepper — this encourages the outer layers to soften evenly during baking rather than drying out.
-
Spoon the filling generously into each onion shell, pressing it down lightly so it's compact but not packed so tightly that it spills over immediately. Mound the filling slightly above the rim — it will settle as it bakes. Divide the remaining ¼ cup of shredded cheddar evenly over the top of each stuffed onion.
-
Step 5: Bake Covered, Then Uncovered
-
Cover the baking dish tightly with aluminum foil and place it on the center rack of your preheated 375°F oven. Bake covered for 25 minutes — the foil traps steam, which helps the onion shells soften all the way through without the tops burning before the centers are done.
-
After 25 minutes, carefully remove the foil (steam will escape — use oven mitts). Return the dish to the oven and bake uncovered for an additional 12–15 minutes, until the cheese on top is melted, bubbly, and starting to turn golden at the edges. The tops will develop a beautiful, slightly caramelized crown.
-
Use your instant-read thermometer to check the center of the filling — it should read at least 165°F to confirm the ground turkey is fully cooked and safe to serve (USDA recommended safe internal temperature for poultry).
-
Step 6: Rest and Garnish
-
Remove the baking dish from the oven and let the turkey bacon cheeseburger stuffed onions rest for 5 minutes before serving. This brief rest allows the filling to set slightly so it holds together when you plate or cut into them. Scatter fresh chopped parsley or chives over the top, add a drizzle of ketchup or burger sauce if you like, and serve immediately.
Nutrition Facts
Servings 4
- Amount Per Serving
- Calories 390kcal
- % Daily Value *
- Total Fat 18g28%
- Saturated Fat 7g35%
- Protein 38g76%
* Percent Daily Values are based on a 2,000 calorie diet. Your daily value may be higher or lower depending on your calorie needs.