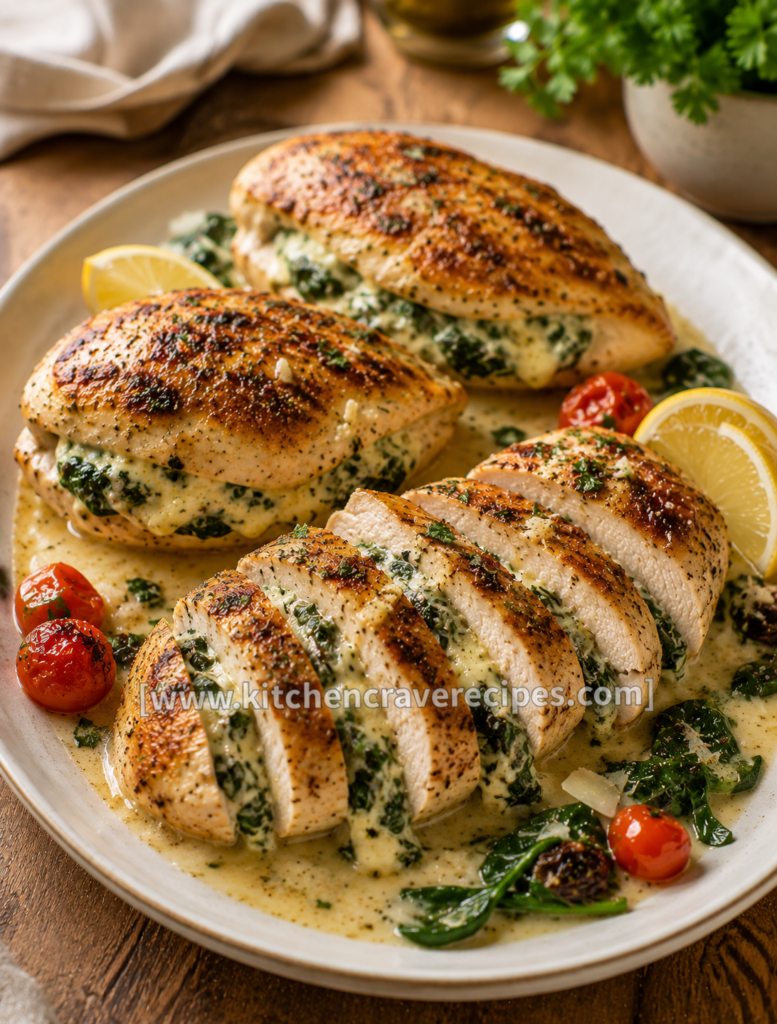

Cut into one of these and you’ll understand immediately why this recipe earns a permanent spot in any home cook’s rotation. The creamy spinach stuffed chicken breast delivers everything you want from a proper dinner: a deeply golden, herb-seasoned exterior that’s been seared in a hot oven-safe skillet, a juicy, fully cooked interior, and a lush, garlicky cream cheese and spinach filling that stays molten and rich through every slice. As visible in the photo, the filling is generous — bright wilted spinach suspended in a creamy white cheese mixture that spills slightly as the fork pulls the breast open. This recipe uses a sear-then-bake method that builds real color on the outside before finishing in the oven at 400°F, ensuring the chicken is cooked through and the filling is piping hot without either drying out.
Recipe Quick Info
| Detail | Info |
|---|---|
| Prep Time | 15 minutes |
| Cook Time | 25 minutes |
| Total Time | 40 minutes |
| Servings | 4 stuffed chicken breasts |
| Cuisine | American |
| Course | Main Dish |
| Cooking Method | Sautéing + Baking |
| Calories | ~410 per serving |
| Difficulty | Standard |
Why You’ll Love This Recipe
- A restaurant-quality result at home — the sear-then-bake method gives you genuinely golden, browned skin and a juicy interior that looks and tastes like something from a proper dinner menu, not a weeknight scramble.
- The filling stays creamy, not watery — squeezing the spinach thoroughly before mixing it with cream cheese is the one step that prevents a soggy pocket; the photo shows exactly how thick and rich that filling should be.
- Ready in just 40 minutes — 15 minutes of prep and 25 minutes of cooking time means this lands on the table faster than most people expect from a stuffed protein dish.
- High protein, lower carb by nature — each breast delivers around 40 grams of protein with minimal carbohydrates, making it a smart choice for anyone eating with macros or nutrition in mind.
- One oven-safe skillet does everything — the same pan goes from searing on the stovetop to finishing in the oven, which means fewer dishes and more concentrated, pan-fond flavor.
- Genuinely impressive for guests — sliced open at the table, the vivid green spinach against the white cream cheese filling and golden exterior makes a visual impact far beyond the effort involved.
- Highly adaptable to what’s in your refrigerator — the cream cheese base pairs naturally with many mix-ins, from sun-dried tomatoes to artichoke hearts, without changing the cooking method or timing.
Ingredients
For the Creamy Spinach Filling
- 4 oz cream cheese, softened to room temperature
- 2 cups fresh baby spinach (or 10 oz frozen, thawed and squeezed very dry)
- 2 cloves garlic, finely minced
- ¼ cup grated Parmesan cheese
- ¼ cup shredded mozzarella cheese
- ¼ teaspoon kosher salt
- ¼ teaspoon black pepper
- Pinch of red pepper flakes (optional)
For the Chicken
- 4 large boneless, skinless chicken breasts (about 8 oz each)
- 1 teaspoon smoked paprika
- 1 teaspoon garlic powder
- ½ teaspoon onion powder
- ½ teaspoon dried Italian seasoning
- ½ teaspoon kosher salt
- ¼ teaspoon black pepper
- 2 tablespoons olive oil (for searing)
For Securing the Pocket
- 6–8 toothpicks or 2–3 short metal skewers
Optional Add-Ins (mix into filling)
- 2 tablespoons finely chopped sun-dried tomatoes
- 2 tablespoons chopped artichoke hearts (drained)
- 1 tablespoon fresh basil, chiffonade
Substitution Table
| Ingredient | Substitution | Notes |
|---|---|---|
| Cream cheese | Neufchâtel cheese | Lower fat; nearly identical texture when baked |
| Fresh baby spinach | Frozen chopped spinach | Must be thawed and squeezed bone-dry |
| Parmesan | Pecorino Romano | Slightly saltier — reduce added salt by a pinch |
| Mozzarella | Provolone or fontina | Both melt smoothly inside the pocket |
| Chicken breast | Thick chicken thighs | Require a pocket cut with care; bake time stays the same |
| Olive oil | Avocado oil | Higher smoke point — good for a hotter sear |
Kitchen Tools Needed
- Oven-safe skillet (10–12 inch) — cast iron or stainless steel; goes directly from stovetop sear to oven — this is the core piece of equipment for this sear-then-bake method
- Oven — preheated to 400°F for the baking phase
- Sharp boning or paring knife — for cutting a clean, deep pocket into each breast without tearing through the sides
- Toothpicks or short skewers — to seal the pocket opening so the filling stays inside during searing and baking
- Instant-read thermometer — to confirm the chicken reaches 165°F internally before serving
- Mixing bowl — for combining the cream cheese filling
- Rubber spatula — for filling the pocket neatly without tearing the meat
- Paper towels — for patting the chicken dry before seasoning, which is essential for a proper sear
- Tongs — for turning the chicken in the hot skillet without piercing the meat
How to Bake Creamy Spinach Stuffed Chicken Breast Perfectly Every Time
Step 1 — Make the Creamy Spinach Filling
If using fresh spinach, heat a dry nonstick skillet over medium heat and wilt the spinach for 1–2 minutes, stirring constantly, until fully collapsed and deep green. Transfer to a clean kitchen towel or several layers of paper towels and squeeze out as much liquid as possible — you should end up with a dense, compact ball of spinach rather than a wet clump. Chop it roughly and set aside.
In a mixing bowl, combine the softened cream cheese, minced garlic, Parmesan, mozzarella, salt, pepper, and red pepper flakes (if using). Fold in the squeezed spinach until everything is evenly distributed. The filling should look thick, cohesive, and rich — similar to what’s visible in the cross-section in the photo. Embedded tip: If your cream cheese isn’t fully soft, the filling will be lumpy and difficult to pipe into the pocket. Give it 30 minutes at room temperature, or microwave for 15 seconds.
Step 2 — Preheat the Oven and Prep the Chicken
Preheat your oven to 400°F and position the rack in the center. While the oven heats, pat each chicken breast completely dry with paper towels — surface moisture is the enemy of a golden sear, and skipping this step means the chicken will steam in the pan instead of browning.
Lay each breast flat on a cutting board. Using a sharp boning or paring knife, cut a deep horizontal pocket into the thickest side of the breast — aim for about 3 inches deep and as wide as you can go without breaking through the top, bottom, or far end. The pocket should open like a book when you press it gently with your finger.
Step 3 — Fill and Secure the Chicken
Spoon about 2–3 tablespoons of the cream cheese-spinach filling into each pocket. Use a small rubber spatula or the back of a spoon to press the filling toward the far end of the pocket so it’s evenly distributed rather than bunched at the opening. Don’t overfill — if the filling mounds above the pocket edge, it will spill out during searing. Secure the opening of each breast with 2 toothpicks, threading them through the top flap and out the other side to pin the edges closed.
Step 4 — Season the Outside of the Chicken
Combine the smoked paprika, garlic powder, onion powder, Italian seasoning, salt, and black pepper in a small bowl. Rub this mixture evenly over all surfaces of each stuffed breast, including the sides. The seasoning gives the exterior that deep, golden-brown color visible in the photo and adds flavor to every bite of the outer meat.
Step 5 — Sear the Chicken (Sauté Phase)
Heat the olive oil in your oven-safe skillet over medium-high heat until it shimmers and you can see faint wisps of smoke rising from the surface — that’s the signal the pan is hot enough. Add the stuffed breasts carefully, sealed-side up, and sear for 3–4 minutes without moving them. The chicken should release from the pan cleanly when a proper golden crust has formed — if it sticks, it’s not ready to flip. Flip each breast and sear the second side for another 2–3 minutes until equally golden. Embedded tip: Don’t crowd the pan — searing more than two large breasts at a time in a standard 12-inch skillet drops the pan temperature and causes steaming rather than browning. Work in batches if needed.
Step 6 — Transfer to the Oven (Baking Phase)
Without wiping out the skillet, transfer it directly to the preheated 400°F oven. Bake the seared stuffed chicken breasts for 18–20 minutes, or until an instant-read thermometer inserted into the thickest part of the meat (not the filling) reads 165°F. The exterior should be deeply golden and the juices at the base of the pan should be gently bubbling. According to the USDA, poultry must reach 165°F at its thickest point for safe consumption — for the full reference, see https://www.fsis.usda.gov/food-safety/safe-food-handling-and-preparation/poultry.
Step 7 — Rest, Remove Toothpicks, and Serve
Remove the skillet from the oven — use oven mitts on the handle, since cast iron and stainless handles become dangerously hot during baking. Transfer the chicken breasts to a plate or cutting board and let them rest for 5 minutes before slicing. This resting period is not optional: it allows the internal juices to redistribute so the meat stays moist rather than pooling on the board. Remove all toothpicks before serving, then slice each breast crosswise to reveal the creamy spinach interior — just as shown in the photo.
Pro Tips for Perfect Creamy Spinach Stuffed Chicken Breast
Dry the chicken inside the pocket too. After cutting the pocket, fold it open and press a paper towel inside briefly. A moist inner surface causes the filling to loosen and slide during cooking — a dry pocket holds the cream cheese mixture in place from the first minute on the stovetop.
The sear-then-bake method is what gives you both color and safe doneness. Sautéing alone would require cooking the thick breast entirely on the stovetop, which risks burning the outside before the center reaches 165°F. Starting in a hot skillet builds the crust; the oven’s surrounding heat finishes the inside safely and evenly.
Use a thermometer, not a timer, as your final judge. Chicken breast thickness varies significantly between packages — a 10-oz breast may need 22 minutes in the oven while a 6-oz breast might be done in 16. The thermometer is the only reliable way to confirm doneness without cutting in early.
Chill the filling for 10 minutes before stuffing if it feels too soft. Room-temperature cream cheese filling can be runny enough to leak during the sear. A brief refrigerator rest firms it up just enough to stay put in the pocket while the skillet heat begins to set it.
Toothpick placement matters. Thread toothpicks at a slight angle — going through both the top flap of the breast and catching a small amount of the lower layer — rather than straight across the opening. This creates a more secure closure that doesn’t pop open when the filling expands with heat.
Common Mistakes to Avoid
1. Not squeezing the spinach dry enough.
Wet spinach releases liquid into the cream cheese as it heats, turning a thick, rich filling into a watery one that leaks out during cooking. Squeeze cooked or thawed spinach aggressively — far more than feels necessary — until no moisture releases when you press it.
2. Overfilling the pocket.
More filling seems appealing but causes the breast to bulge and the pocket to force open even when toothpicked. Two to three tablespoons per breast keeps the filling contained and ensures even cooking through the meat.
3. Skipping the sear and going straight to the oven.
Placing an unseared stuffed breast directly into the oven produces pale, steamed-looking chicken with a rubbery skin texture. The stovetop sear is what builds the golden-brown exterior visible in the photo — don’t skip it to save time.
4. Using a pan that isn’t hot enough before searing (Sauté-specific mistake).
A medium or lukewarm pan causes the chicken to stick and stew in its own moisture rather than developing a crust. The oil should shimmer visibly and show faint wisps of smoke before the chicken touches the pan — that’s the window for a proper sear.
5. Cutting the pocket too shallow.
A shallow pocket means the filling is bunched at the opening, which unbalances the breast and increases the chance of it spilling out. Cut at least 3 inches deep — nearly to the far edge — and create as much interior space as the breast allows without piercing through.
6. Forgetting to remove toothpicks before serving.
This is a safety issue, not just a presentation one. Do a physical count of toothpicks before serving — if you inserted 8, confirm 8 come out.
7. Opening the oven repeatedly during baking.
Each time the oven door opens, the temperature drops briefly, which extends the bake time and leads to uneven cooking. Set a timer, trust it, and only open the oven to check the thermometer once near the end of the cook time.
Variations
Healthy Lightened-Up Version
Replace the cream cheese with reduced-fat Neufchâtel and reduce the mozzarella to 2 tablespoons. The filling will be slightly less rich but still holds together well during baking. Serve over steamed vegetables rather than a starchy side to keep the full meal lighter without changing any part of the cooking technique.
Vegetarian Version
This recipe is built around chicken breast, so a true vegetarian version requires a different protein base. Large portobello mushroom caps can be stuffed with the same cream cheese-spinach filling and baked at 400°F for 15–18 minutes — a genuinely different dish but one that uses the identical filling and oven method.
Spicy Version
Add 1 teaspoon of finely minced chipotle in adobo and ¼ teaspoon of cayenne pepper directly into the cream cheese filling. Swap the smoked paprika in the spice rub for hot smoked paprika. The heat builds gradually through the filling rather than hitting all at once — a noticeable but approachable level of spice that doesn’t overpower the creaminess.
Gluten-Free Version
This recipe is naturally gluten-free as written — no flour, breadcrumbs, or thickeners are used in the filling or on the exterior. Simply verify that your chicken broth (if using as a pan sauce) and any dipping sauce served alongside are certified gluten-free.
Low-Carb / Keto Version
The recipe is already low in carbohydrates. To lean further into keto macros, increase the cream cheese to 6 oz and add 2 tablespoons of full-fat sour cream to the filling. Serve alongside a butter-sautéed vegetable such as asparagus or zucchini to complete the meal within a very low-carb profile.
What to Serve With This Recipe
- Garlic roasted asparagus — tender, slightly charred spears complement the richness of the cream cheese filling without competing with its flavor.
- Creamy mashed cauliflower — a lower-carb alternative to mashed potatoes that mirrors the richness of the stuffed chicken beautifully.
- Simple arugula salad with lemon vinaigrette — bright acidity from the lemon cuts through the richness of the cream cheese and refreshes each bite.
- Roasted cherry tomatoes — their natural sweetness and slight char pair naturally with the garlicky spinach filling.
- Crusty sourdough bread — ideal for soaking up the pan juices left in the skillet after baking.
- Steamed white or brown rice — a neutral base that lets the flavors of the stuffed chicken breast take center stage.
- A crisp glass of dry white wine or sparkling water with lemon — balances the richness on the plate without overpowering it.
For more protein-forward dinners that pair with these same sides, try Best Creamy Cheesy Chicken Enchiladas (Easy 45-Minute Recipe) or Best High Protein Loaded Chicken Quesadilla (Easy 30-Min) — both use the same oven-safe skillet technique.
Storage Instructions
Refrigerator
Let the stuffed chicken breasts cool completely before storing — sealing in residual heat creates condensation that makes the exterior soggy. Wrap each breast individually in plastic wrap, or store in an airtight container with a sheet of parchment between pieces. Refrigerate for up to 3 days. Remove toothpicks before storing if you haven’t already.
Freezer
Wrap each fully cooled breast tightly in plastic wrap, then a second layer of foil, and freeze for up to 2 months. Thaw overnight in the refrigerator before reheating — do not thaw at room temperature, as this creates uneven temperature zones in the dense, filled meat. The filling texture holds well after freezing.
Shelf Life Summary
| Storage Method | Duration |
|---|---|
| Refrigerator (wrapped/airtight) | Up to 3 days |
| Freezer (double-wrapped) | Up to 2 months |
| Room temperature | No longer than 2 hours |
Reheating Instructions
Oven (Best Method)
Preheat your oven to 325°F. Place the stuffed chicken breast in a small baking dish, add 2 tablespoons of water or chicken broth to the bottom, and cover tightly with foil. Bake for 15–18 minutes until the center reads 165°F on an instant-read thermometer. The lower temperature and added liquid prevent the exterior from over-browning while the filling re-melts gently.
Microwave
Place the breast on a microwave-safe plate and cover with a damp paper towel. Microwave on medium power (70%) in 60-second increments until heated through — typically 2–3 cycles for a full breast. High power tends to make the outer meat rubbery and can cause the filling to bubble unevenly.
Stovetop
Slice the breast into thick rounds first. Heat a nonstick skillet over medium-low heat with 1 teaspoon of butter or oil. Place the slices cut-side down and cover with a lid. Heat for 3–4 minutes, flipping once, until warmed through. This method gives you a slightly re-crisped exterior on the cut surfaces.
For food-safe reheating temperature standards, see https://www.foodsafety.gov/food-safety-charts/safe-minimum-cooking-temperature.
Nutrition Facts
(Per serving — 1 stuffed chicken breast, based on 4 servings total)
| Nutrient | Amount |
|---|---|
| Calories | ~410 |
| Total Fat | 20g |
| Saturated Fat | 9g |
| Cholesterol | 145mg |
| Sodium | 610mg |
| Total Carbohydrates | 4g |
| Dietary Fiber | 1g |
| Total Sugars | 1g |
| Protein | 49g |
| Calcium | 180mg |
Nutrition Disclaimer: These values are estimates generated using standard nutritional databases and will vary based on the exact size of the chicken breasts, specific brands used, and any ingredient substitutions made. For medically precise dietary tracking, use a verified nutrition calculator with the exact products and quantities you purchase.
Frequently Asked Questions
Can I prepare the creamy spinach stuffed chicken breast ahead of time?
Yes — stuff and secure the chicken breasts up to 24 hours in advance, cover tightly, and refrigerate. Pull them out 15–20 minutes before cooking so they’re not ice-cold going into the pan. Cold meat placed directly into a hot skillet reduces pan temperature quickly and causes uneven searing.
How do I keep the filling from leaking out during cooking?
Three things working together prevent leakage: squeezing the spinach completely dry before mixing, not overfilling the pocket (2–3 tablespoons maximum), and securing the opening firmly with two toothpicks at slightly different angles. The sear also helps — the first few minutes in the hot skillet begin to set the filling before it has time to melt and run.
What’s the best way to cut the pocket without tearing the chicken?
Use the sharpest knife you own — a boning knife or a narrow paring knife works best. Hold the breast flat on the cutting board with one hand pressing gently on top. Insert the knife into the thickest side and use slow, controlled horizontal strokes to widen the pocket rather than sawing. Go slowly and the meat will part cleanly.
Can I cook these entirely on the stovetop without the oven?
You can, but it requires careful attention. Use a lid and medium heat after the sear, turning once or twice, and plan on 8–12 additional minutes depending on breast thickness. You lose the even, surrounding heat of the oven, which makes hitting 165°F at the center harder to achieve consistently — a thermometer is non-negotiable in this case.
Can I use frozen spinach instead of fresh?
Yes — frozen chopped spinach is actually a reliable choice because it’s pre-cooked and only needs to be thawed and squeezed dry. Use one 10-oz package, thaw fully, and squeeze it in a clean kitchen towel until no moisture releases. The volume compresses significantly, which is exactly what you want for a thick, non-watery filling.
How do I know when the stuffed chicken breast is fully cooked?
The only reliable method is an instant-read thermometer inserted into the thickest part of the meat (not the filling). It should read 165°F. Visual cues support this — the juices at the base of the pan run clear, the exterior is deeply golden, and the breast feels firm rather than soft when pressed lightly with a finger. Never rely on color alone for a thick, stuffed breast.
Can I add sun-dried tomatoes or artichokes to the filling?
Both work well and don’t affect the cooking time or method. Finely chop sun-dried tomatoes (oil-packed, drained) and fold in up to 2 tablespoons per batch of filling. Artichoke hearts should be drained, pressed dry, and chopped small. Both add a savory, slightly acidic note that pairs well with the cream cheese base.
What size skillet do I need?
A 10–12 inch oven-safe skillet is ideal for four chicken breasts. Anything smaller causes crowding, which drops the pan temperature and produces steaming rather than searing. If your skillet fits only two comfortably, sear in two batches, then transfer all four breasts to a baking dish for the oven phase.
How do I prevent the chicken from drying out?
Three factors keep the meat moist: patting it dry before searing (so it browns rather than steams), resting it for 5 full minutes after baking (so the juices redistribute), and not exceeding 400°F in the oven. The cream cheese filling also contributes — it stays moist inside the pocket and radiates a small amount of heat and steam into the surrounding meat as it bakes.
Can I make this recipe dairy-free?
The filling relies on cream cheese and mozzarella for both structure and flavor, so going fully dairy-free changes the character of the dish significantly. That said, dairy-free cream cheese alternatives (such as Kite Hill or Violife) can be used in the same quantity — they’re softer and slightly less rich but will hold in the pocket during baking.
What if my chicken breast is too thin to cut a proper pocket?
Choose breasts that are at least 8 oz each and at least 1¼ inches thick at the thickest point — these are usually labeled “large” or sold as split breasts. If you’re working with thinner breasts, butterfly them open instead, spread the filling across one half, and fold the other half over it, securing the edges with toothpicks.
Expert Chef Tips
Season the inside of the pocket lightly before filling it. A small pinch of salt and garlic powder pressed onto the inner walls of the pocket ensures the meat closest to the filling is also seasoned — the outer rub can’t reach there, and unseasoned interior meat tastes flat next to a boldly flavored filling.
Let the pan tell you when to flip. During the sear phase, the chicken will stick to the pan if it isn’t ready to turn. Don’t force it — give it another 30–60 seconds and try again. When a proper golden crust has set, the breast will release cleanly from the skillet surface with almost no resistance.
Deglaze the pan with a splash of chicken broth after removing the chicken from the oven. While the chicken rests, set the skillet on the stovetop over medium heat, add ¼ cup of broth, and scrape up the browned bits with a wooden spoon. This makes an instant, flavorful pan sauce that costs nothing extra and elevates the plating significantly.
Use a piping bag or zip-top bag for cleaner filling. Spoon the filling into a zip-top bag, cut a corner off, and pipe it directly into the pocket. This gets the filling to the far end of the pocket evenly without smearing it on the edges, which is what causes burning on the exterior during the sear.
Recipe Summary
This creamy spinach stuffed chicken breast combines a stovetop sear and a 400°F oven finish to produce genuinely golden, juicy chicken with a rich, garlicky cream cheese and spinach filling that stays molten from the first slice to the last. The sear-then-bake method takes only 25 minutes of active cooking and gives results that are visually impressive and deeply satisfying on the plate. Prep all four breasts in 15 minutes, bake to 165°F, and rest before slicing — a straightforward process that rewards attention to detail at each step.
Conclusion
There are a handful of recipes that manage to look impressive, taste genuinely satisfying, and come together on a regular Tuesday night without drama — and this creamy spinach stuffed chicken breast is one of them. The combination of a golden, herb-seasoned exterior and a warm, rich filling makes every plate feel considered and complete. Whether you’re cooking for a dinner party or just making something worth sitting down for, this recipe delivers consistently. We’d love to see how yours turns out — drop a comment below with any variations you tried.
Ultimate Creamy Spinach Stuffed Chicken Breast — 40 Min
Description
Cut into one of these and you'll understand immediately why this recipe earns a permanent spot in any home cook's rotation. The creamy spinach stuffed chicken breast delivers everything you want from a proper dinner: a deeply golden, herb-seasoned exterior that's been seared in a hot oven-safe skillet, a juicy, fully cooked interior, and a lush, garlicky cream cheese and spinach filling that stays molten and rich through every slice. As visible in the photo, the filling is generous — bright wilted spinach suspended in a creamy white cheese mixture that spills slightly as the fork pulls the breast open. This recipe uses a sear-then-bake method that builds real color on the outside before finishing in the oven at 400°F, ensuring the chicken is cooked through and the filling is piping hot without either drying out.
Ingredients
Instructions
-
How to Bake Creamy Spinach Stuffed Chicken Breast Perfectly Every Time
-
Step 1 — Make the Creamy Spinach Filling
-
If using fresh spinach, heat a dry nonstick skillet over medium heat and wilt the spinach for 1–2 minutes, stirring constantly, until fully collapsed and deep green. Transfer to a clean kitchen towel or several layers of paper towels and squeeze out as much liquid as possible — you should end up with a dense, compact ball of spinach rather than a wet clump. Chop it roughly and set aside.
-
In a mixing bowl, combine the softened cream cheese, minced garlic, Parmesan, mozzarella, salt, pepper, and red pepper flakes (if using). Fold in the squeezed spinach until everything is evenly distributed. The filling should look thick, cohesive, and rich — similar to what's visible in the cross-section in the photo. Embedded tip: If your cream cheese isn't fully soft, the filling will be lumpy and difficult to pipe into the pocket. Give it 30 minutes at room temperature, or microwave for 15 seconds.
-
Step 2 — Preheat the Oven and Prep the Chicken
-
Preheat your oven to 400°F and position the rack in the center. While the oven heats, pat each chicken breast completely dry with paper towels — surface moisture is the enemy of a golden sear, and skipping this step means the chicken will steam in the pan instead of browning.
-
Lay each breast flat on a cutting board. Using a sharp boning or paring knife, cut a deep horizontal pocket into the thickest side of the breast — aim for about 3 inches deep and as wide as you can go without breaking through the top, bottom, or far end. The pocket should open like a book when you press it gently with your finger.
-
Step 3 — Fill and Secure the Chicken
-
Spoon about 2–3 tablespoons of the cream cheese-spinach filling into each pocket. Use a small rubber spatula or the back of a spoon to press the filling toward the far end of the pocket so it's evenly distributed rather than bunched at the opening. Don't overfill — if the filling mounds above the pocket edge, it will spill out during searing. Secure the opening of each breast with 2 toothpicks, threading them through the top flap and out the other side to pin the edges closed.
-
Step 4 — Season the Outside of the Chicken
-
Combine the smoked paprika, garlic powder, onion powder, Italian seasoning, salt, and black pepper in a small bowl. Rub this mixture evenly over all surfaces of each stuffed breast, including the sides. The seasoning gives the exterior that deep, golden-brown color visible in the photo and adds flavor to every bite of the outer meat.
-
Step 5 — Sear the Chicken (Sauté Phase)
-
Heat the olive oil in your oven-safe skillet over medium-high heat until it shimmers and you can see faint wisps of smoke rising from the surface — that's the signal the pan is hot enough. Add the stuffed breasts carefully, sealed-side up, and sear for 3–4 minutes without moving them. The chicken should release from the pan cleanly when a proper golden crust has formed — if it sticks, it's not ready to flip. Flip each breast and sear the second side for another 2–3 minutes until equally golden. Embedded tip: Don't crowd the pan — searing more than two large breasts at a time in a standard 12-inch skillet drops the pan temperature and causes steaming rather than browning. Work in batches if needed.
-
Step 6 — Transfer to the Oven (Baking Phase)
-
Without wiping out the skillet, transfer it directly to the preheated 400°F oven. Bake the seared stuffed chicken breasts for 18–20 minutes, or until an instant-read thermometer inserted into the thickest part of the meat (not the filling) reads 165°F. The exterior should be deeply golden and the juices at the base of the pan should be gently bubbling. According to the USDA, poultry must reach 165°F at its thickest point for safe consumption — for the full reference, see https://www.fsis.usda.gov/food-safety/safe-food-handling-and-preparation/poultry.
-
Step 7 — Rest, Remove Toothpicks, and Serve
-
Remove the skillet from the oven — use oven mitts on the handle, since cast iron and stainless handles become dangerously hot during baking. Transfer the chicken breasts to a plate or cutting board and let them rest for 5 minutes before slicing. This resting period is not optional: it allows the internal juices to redistribute so the meat stays moist rather than pooling on the board. Remove all toothpicks before serving, then slice each breast crosswise to reveal the creamy spinach interior — just as shown in the photo.
Nutrition Facts
Servings 4
- Amount Per Serving
- Calories 410kcal
- % Daily Value *
- Total Fat 20g31%
- Saturated Fat 9g45%
- Protein 49g98%
* Percent Daily Values are based on a 2,000 calorie diet. Your daily value may be higher or lower depending on your calorie needs.