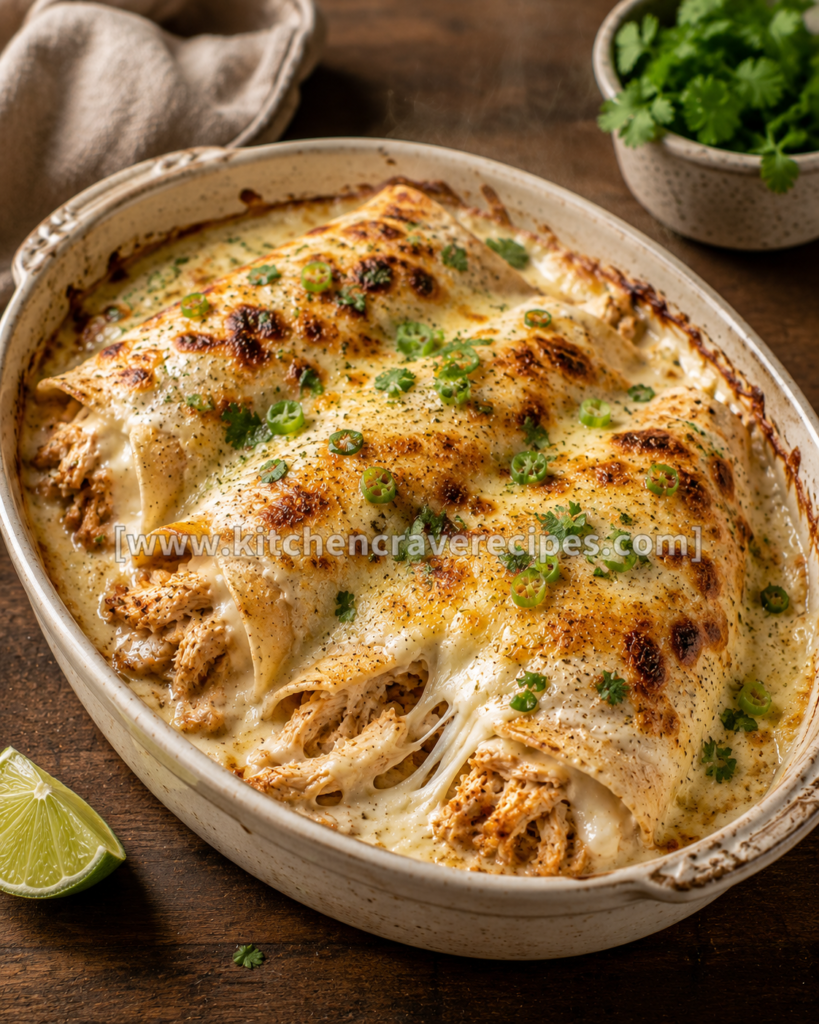

There are weeknight dinners that get the job done, and then there are dinners that make everyone at the table go quiet for a moment — fork mid-air, eyes wide. These creamy cheesy chicken enchiladas are firmly in the second category. Flour tortillas stuffed with tender shredded chicken and a rich, garlicky cream cheese filling, then smothered in a velvety white sauce and blanketed in golden, bubbly melted cheese — baked until the edges crisp and the top turns gloriously spotty-brown. This is pure comfort food built for a real oven, and once you pull that white ceramic baking dish out and see the cheese still bubbling at the edges, you’ll understand why this recipe gets requested again and again.
Recipe Quick Info
| Detail | Info |
|---|---|
| Prep Time | 20 minutes |
| Cook Time | 25 minutes |
| Total Time | 45 minutes |
| Servings | 6 enchiladas (serves 4) |
| Cuisine | Mexican-American |
| Course | Main Dish |
| Cooking Method | Baking |
| Calories | ~480 per serving |
| Difficulty | Standard |
Why You’ll Love This Recipe
- Golden, bubbly cheese in every bite — baking at the right temperature gives you that irresistible spotty-brown top with melted cheese pulling away in ribbons as you serve.
- Weeknight-friendly timing — 20 minutes of simple prep and 25 minutes in the oven keeps the total to 45 minutes flat, even on a busy evening.
- A creamy white sauce that’s genuinely easy — no roux nightmares here; the sauce comes together in one saucepan in under 10 minutes and tastes luxuriously rich.
- Uses rotisserie chicken — store-bought rotisserie chicken makes this approachable on any night without sacrificing an ounce of flavor or texture.
- Family-approved without being bland — garlic, cumin, green chiles, and cream cheese layer enough flavor depth to satisfy adults, while staying mild enough that kids reach for seconds.
- Make-ahead and freezer friendly — the assembled dish can be refrigerated overnight or frozen unbaked, making it a reliable meal-prep anchor for busy weeks.
- One baking dish, minimal cleanup — everything comes together in a single 9×13-inch dish, so the post-dinner kitchen reset is fast and painless.
Ingredients
For the Chicken Filling
- 3 cups shredded cooked chicken (from 1 rotisserie chicken)
- 4 oz cream cheese, softened to room temperature
- 1 can (4 oz) diced green chiles, drained
- ½ teaspoon garlic powder
- ½ teaspoon ground cumin
- ¼ teaspoon onion powder
- ¼ teaspoon black pepper
- ¼ teaspoon kosher salt
For the Creamy White Sauce
- 2 tablespoons unsalted butter
- 2 cloves garlic, minced
- 2 tablespoons all-purpose flour
- 1½ cups low-sodium chicken broth
- 1 cup sour cream
- 1 can (4 oz) diced green chiles, drained
- ½ teaspoon ground cumin
- ¼ teaspoon kosher salt
- Pinch of white pepper
For Assembly
- 6 medium flour tortillas (8-inch)
- 2 cups shredded Monterey Jack cheese, divided
- ½ cup shredded mozzarella cheese
- 2 tablespoons fresh flat-leaf parsley, finely chopped (for garnish, as shown)
Optional Add-Ins
- ¼ cup canned corn, drained
- ¼ cup black beans, rinsed and drained
- 1 tablespoon pickled jalapeño slices mixed into filling for gentle heat
Substitution Table
| Ingredient | Substitution | Notes |
|---|---|---|
| Rotisserie chicken | Poached or baked chicken breast | Shred finely for best texture |
| Flour tortillas | Corn tortillas | Warm in a damp towel first to prevent cracking |
| Sour cream | Full-fat Greek yogurt | Adds tang; stir in off heat only |
| Monterey Jack | Colby Jack or pepper jack | Pepper jack adds mild heat |
| Cream cheese | Neufchâtel cheese | Lower fat; nearly identical in baked dishes |
| All-purpose flour | Gluten-free 1:1 flour blend | Use in same quantity for the roux |
Kitchen Tools Needed
- 9×13-inch baking dish (ceramic or glass — as seen in the photo; both conduct heat evenly for baking)
- Oven — preheat to 375°F; this is the core equipment for this recipe
- Medium saucepan — for building the white sauce
- Whisk — for a smooth, lump-free sauce
- Large mixing bowl — for combining the chicken filling
- Rubber spatula — for spreading filling and sauce
- Aluminum foil — to tent the dish for the first phase of baking
- Instant-read thermometer — confirms the chicken filling reaches 165°F internally
- Cutting board and chef’s knife — for garlic and parsley prep
Step-by-Step Instructions
Step 1 — Preheat the Oven and Prep the Baking Dish
Preheat your oven to 375°F and position the rack in the center — this is the sweet spot for baking these enchiladas, where the heat circulates evenly around the dish rather than scorching the bottom or top. Lightly grease your 9×13-inch baking dish with nonstick cooking spray or a thin smear of butter. Set it aside while you build the filling and sauce.
Step 2 — Make the Chicken Filling
In a large mixing bowl, combine the shredded chicken, softened cream cheese, drained green chiles, garlic powder, cumin, onion powder, salt, and black pepper. Mix well with a rubber spatula until the cream cheese coats the chicken evenly — the mixture should look cohesive and slightly sticky, not dry and crumbly. Taste a small amount and adjust salt if needed. Embedded tip: If your cream cheese is cold, the mixture will be lumpy and difficult to roll neatly. Give it a full 30 minutes at room temperature, or soften it for 15 seconds in the microwave.
Step 3 — Build the White Sauce
Melt the butter in a medium saucepan over medium heat until foamy. Add the minced garlic and stir for about 30 seconds — it should smell fragrant but not brown. Sprinkle in the flour and whisk constantly for 1 minute to cook out the raw flour taste; the mixture will look like a pale paste. Slowly pour in the chicken broth in a thin stream, whisking continuously, and cook for 2–3 minutes until the sauce thickens enough to coat the back of a spoon. Remove the saucepan from the heat and stir in the sour cream, drained green chiles, cumin, salt, and white pepper. Do not return the sauce to the burner after adding the sour cream — high heat will cause it to break and turn grainy.
Step 4 — Assemble the Enchiladas
Spread about ¼ cup of the white sauce across the bottom of your prepared baking dish — this prevents the tortillas from sticking and drying out on the bottom. Lay a flour tortilla flat on your work surface and spoon a generous ⅓ cup of chicken filling down the center. Sprinkle about 2 tablespoons of Monterey Jack cheese over the filling, then roll the tortilla snugly and place it seam-side down in the baking dish. Repeat with the remaining 5 tortillas, nesting them snugly side by side.
Step 5 — Sauce and Cheese the Top
Pour the remaining white sauce evenly over the rolled enchiladas, using a spatula to nudge it into the gaps between rolls and along the edges — every tortilla should be covered so none dry out during baking. Scatter the remaining Monterey Jack and all of the mozzarella evenly across the top. The combination of these two cheeses is what creates that golden, spotty-brown finish visible in the photo: Monterey Jack melts smoothly, while mozzarella adds the stretch and the char.
Step 6 — Bake, Covered Then Uncovered
Tent the baking dish loosely with aluminum foil and bake at 375°F for 15 minutes — the foil traps steam that keeps the tortillas tender and prevents the top cheese layer from over-browning before the filling heats through. After 15 minutes, remove the foil and continue baking for another 10 minutes, or until the cheese is fully melted, bubbling at the edges, and the top shows golden-brown spots. If you want a deeper brown on the cheese (like the photo shows), you can slide the dish under the broiler on high for 1–2 minutes at the very end — but watch it closely; cheese goes from golden to burnt fast. Food safety check: Insert an instant-read thermometer into the center of a filled enchilada — the filling should read at least 165°F before serving. For USDA guidance on safe internal temperatures for poultry dishes, see https://www.fsis.usda.gov/food-safety/safe-food-handling-and-preparation/poultry.
Step 7 — Rest and Garnish
Let the dish rest for 5 minutes out of the oven before serving — the sauce will settle and thicken slightly, and you’ll get cleaner portions instead of a sliding, saucy mess. Scatter the fresh parsley over the top just before bringing the dish to the table, exactly as shown in the photo. Serve directly from the baking dish with a wide spatula.
Embedded tip: The 5-minute rest isn’t optional. Baked casserole-style dishes like these need a moment for the sauce to re-emulsify slightly as it cools from boiling-hot — skip it and the sauce runs everywhere when you cut in.
Pro Tips for Perfect Baked Creamy Cheesy Chicken Enchiladas
Preheat thoroughly — don’t rush the oven. An oven that hasn’t fully reached 375°F will bake the enchiladas unevenly: the cheese browns on top before the center filling is hot. Give your oven a full 15 minutes to stabilize after the preheat tone sounds.
Use room-temperature sour cream. Cold sour cream dropped into a hot sauce can cause it to separate. Pull it from the fridge at the same time as the cream cheese so both are ready to go.
Don’t overfill the tortillas. A generous ⅓ cup of filling per tortilla is the right amount. More than that and the tortillas split during rolling, creating gaps where sauce seeps under the tortilla and makes the bottom soggy.
The foil-on, foil-off method is the baking method’s key move. Covering first steams the dish to cook it through; uncovering second allows moisture to escape and the cheese to brown. Skipping either phase produces either rubbery tops or dried-out filling — both avoidable.
Grate your own cheese. Pre-shredded cheeses are coated in anti-caking starch that dulls meltability. A block of Monterey Jack hand-grated on a box grater melts into that silky, cohesive layer you see in the photo.
Common Mistakes to Avoid
1. Not coating the baking dish bottom with sauce first.
Skipping this step causes the bottom tortillas to stick and dry out against the pan. A thin layer of white sauce on the bottom keeps everything tender throughout baking.
2. Skipping the foil for the first phase of baking.
Baking uncovered the entire time is one of the most common mistakes with this method — the cheese over-browns and the tortillas toughen before the interior has cooked through. Cover for the first 15 minutes, always.
3. Using cold cream cheese in the filling.
Cold cream cheese won’t incorporate smoothly into the chicken and creates lumpy, uneven pockets in every bite. Softening it first takes 30 seconds in the microwave and makes a real difference in texture.
4. Overheating the sour cream sauce.
Returning the finished white sauce to the heat after stirring in the sour cream causes it to curdle and separate. Build it, stir in the sour cream off the heat, and done.
5. Overpacking the enchiladas.
Too much filling splits the tortillas and creates an unstable roll that falls apart when served. Stick to ⅓ cup per tortilla for a tight, neat roll.
6. Peeking and opening the oven door repeatedly during the covered phase.
Each time you open the oven door, the temperature can drop by 25–50°F, which extends cook time and leads to uneven baking. Set a timer and wait.
7. Not resting the dish before serving.
Cutting into these enchiladas straight from the oven means the sauce runs like water. Five minutes of rest allows the sauce to tighten up and makes every portion look as good as it tastes.
8. Using too-large tortillas.
10-inch tortillas may seem easier to roll, but they’re too big for a standard 9×13 dish and end up overlapping awkwardly. Eight-inch flour tortillas fit six per dish perfectly.
Variations
Healthy Lightened-Up Version
Swap the cream cheese for reduced-fat Neufchâtel, use low-fat sour cream, and reduce the Monterey Jack to 1½ cups total. The baking method stays identical — same dish, same temperatures, same timing. You’ll lose a little richness but retain all the structure and flavor.
Vegetarian Version
Replace the shredded chicken with a mixture of 1½ cups canned white beans (rinsed) and 1½ cups sautéed zucchini and corn. The cream cheese-based filling still binds beautifully, and the baking time stays the same since everything is already cooked. This is an easy swap that doesn’t compromise the creamy texture at all.
Spicy Version
Stir 1–2 teaspoons of hot sauce (such as Cholula) directly into the white sauce, and use pepper jack cheese in place of Monterey Jack. You can also fold 1 tablespoon of finely minced chipotle in adobo into the chicken filling for a smoky, deeper heat that pairs exceptionally well with the cool sour cream base.
Gluten-Free Version
Use a 1:1 gluten-free all-purpose flour blend (such as Bob’s Red Mill) in place of regular flour for the white sauce roux — it behaves nearly identically. Replace the flour tortillas with corn tortillas; warm them in a damp paper towel in the microwave for 30 seconds so they roll without cracking. Note that corn tortillas produce a slightly denser, chewier texture after baking.
Low-Carb / Keto Version
Substitute large, low-carb flour tortillas (such as Mission Carb Balance) and confirm your chicken broth is low in added sugars. The filling and sauce are naturally low-carb as written. This variation requires no changes to baking time or temperature — simply swap the tortillas and proceed.
What to Serve With This Recipe
- Mexican-style rice — the saffron-golden grains soak up extra white sauce beautifully.
- Refried beans — classic, creamy, and a natural partner to the richness of the enchiladas.
- Simple green salad with lime vinaigrette — the acidity cuts through the richness and refreshes the palate between bites.
- Guacamole and tortilla chips — serve as a starter to round out a full Mexican-American spread.
- Roasted corn salad with cotija and lime — bright, slightly smoky, and a great textural contrast to the soft baked enchiladas.
- Sliced jalapeños and sour cream on the side — lets heat-seekers and mild-preference eaters customize their own plate.
- A cold agua fresca or sparkling water with citrus — cuts the richness without competing with the savory flavors.
Looking for more weeknight Mexican-American dinners? Try High Protein Chicken Salad Meal Prep – Best 4 Ways or Cheesy Taco Beef Pasta: Best Easy 30-Minute Skillet Meal — both come together in under an hour.
Storage Instructions
Refrigerator
Let the enchiladas cool completely before covering the baking dish tightly with plastic wrap or foil. Store in the refrigerator for up to 4 days. The sauce will thicken as it chills — that’s completely normal and it returns to its creamy consistency when reheated.
Freezer
These creamy cheesy chicken enchiladas freeze exceptionally well either before or after baking. To freeze unbaked: assemble fully, cover tightly with two layers of foil, and freeze for up to 3 months. Bake from frozen at 375°F, covered with foil, for 45–50 minutes, then uncover for 10–15 minutes. To freeze after baking: portion into individual servings, wrap tightly, and freeze for up to 2 months.
Shelf Life Summary
| Storage Method | Duration |
|---|---|
| Refrigerator (covered) | Up to 4 days |
| Freezer (unbaked, assembled) | Up to 3 months |
| Freezer (baked, portioned) | Up to 2 months |
| Room temperature | Not recommended beyond 2 hours |
Reheating Instructions
Oven (Best Method)
Preheat your oven to 350°F. Place the enchiladas in an oven-safe dish, add a splash (2–3 tablespoons) of chicken broth over the top to restore moisture to the sauce, and cover loosely with foil. Bake for 15–20 minutes until heated through and the internal temperature reads 165°F. Remove the foil for the last 3–4 minutes if you want the cheese to re-crisp slightly on top.
Microwave
Place 1–2 enchiladas on a microwave-safe plate and cover with a damp paper towel — this traps steam and keeps the tortillas from turning rubbery. Microwave on medium power (70%) in 90-second intervals until steaming hot throughout. High power can cause the sauce to separate and the edges to dry out before the center is warm.
Stovetop
Slice the enchiladas into pieces and place in a nonstick skillet over medium-low heat with a splash of chicken broth. Cover with a lid and heat for 5–7 minutes, stirring gently once or twice, until everything is warmed through. This method works well for leftovers that have already been portioned.
For safe reheating temperature guidelines, visit https://www.foodsafety.gov/food-safety-charts/safe-minimum-cooking-temperature.
Nutrition Facts
(Per serving — based on 1 of 4 generous servings, using 6 enchiladas total)
| Nutrient | Amount |
|---|---|
| Calories | ~480 |
| Total Fat | 26g |
| Saturated Fat | 13g |
| Cholesterol | 115mg |
| Sodium | 740mg |
| Total Carbohydrates | 28g |
| Dietary Fiber | 1g |
| Total Sugars | 3g |
| Protein | 34g |
| Calcium | 320mg |
Nutrition Disclaimer: These values are estimates calculated using standard nutritional databases and may vary based on specific brands, ingredient substitutions, and portion sizes. For medically precise dietary planning, consult a registered dietitian or use a verified nutrition calculator with the exact products you purchase.
Frequently Asked Questions
Can I make creamy cheesy chicken enchiladas ahead of time?
Yes — assemble the enchiladas fully, cover the dish tightly with foil, and refrigerate for up to 24 hours before baking. Pull the dish out 20 minutes before baking so it’s not ice-cold going into the oven, and add 5 extra minutes to the covered baking phase to account for the chill.
Can I use corn tortillas instead of flour tortillas?
Absolutely. Warm corn tortillas in a damp paper towel for 30 seconds in the microwave before rolling — they’ll be pliable enough to work with. The texture after baking will be denser and slightly chewier, and the edges may crisp more than flour tortillas do.
Why did my white sauce turn grainy or lumpy?
The most common cause is adding cold sour cream to a very hot sauce while it’s still on the burner. Always remove the saucepan from the heat before stirring in the sour cream, and make sure the sour cream is at room temperature. If it does break, whisk briskly over low heat with a teaspoon of butter — it often rescues itself.
What kind of cheese melts best on top?
A combination of Monterey Jack and mozzarella, as used in this recipe, gives you the best result: Monterey Jack melts smoothly into that creamy layer, and mozzarella adds the stretch and the golden-brown browning spots you see in the photo. Avoid pre-shredded cheese blends — they contain anti-caking agents that reduce melt quality.
Can I use store-bought rotisserie chicken?
Yes, and it’s strongly recommended. One standard rotisserie chicken yields about 3–4 cups of shredded meat, which is exactly what this recipe needs. Shred it while it’s still slightly warm for the easiest texture.
How do I know when the enchiladas are fully baked?
The visual cues: the cheese is fully melted, bubbling actively at the edges of the dish, and showing golden-brown spots across the top — exactly as in the photo. The confirming cue: an instant-read thermometer inserted into the center of one enchilada reads at least 165°F.
Can I add vegetables to the filling?
Yes. Diced roasted bell peppers, sautéed spinach (squeezed very dry), or corn are all good additions. Keep the total filling volume to about ⅓ cup per tortilla — adding vegetables without reducing the chicken can cause overfilling and splitting.
What’s the best way to freeze these before baking?
Assemble the enchiladas fully in the dish, pour over all the sauce and cheese, and cover with two tight layers of heavy-duty foil. Freeze flat for up to 3 months. Bake directly from frozen at 375°F: 45–50 minutes covered, then 10–15 minutes uncovered until the cheese is browned and the center reads 165°F.
Can I make a smaller batch — just 2–3 enchiladas?
Yes. Use an 8×8-inch or similar smaller baking dish, halve all the ingredients, and reduce the covered baking time to 12 minutes, then uncovered to 8 minutes. The method is the same — just a smaller footprint.
Why do I need to cover the dish with foil for the first part of baking?
Baking these enchiladas covered first traps steam inside the dish, which keeps the tortillas soft and allows the filling to heat through before the cheese on top has a chance to overbrown. Removing the foil for the final 10 minutes then lets the cheese color and the sauce reduce slightly. It’s the foil-on, foil-off baking method that makes the difference between a perfect result and a dried-out one.
Can I substitute Greek yogurt for the sour cream in the sauce?
Yes, with one important rule: stir the Greek yogurt into the sauce off the heat, just as you would with sour cream, and don’t return the sauce to the burner afterward. Full-fat Greek yogurt behaves similarly to sour cream in a baked sauce and adds a pleasant tang. Low-fat versions are more prone to breaking under heat, so stick with full-fat if you’re making the swap.
What size baking dish should I use?
A standard 9×13-inch baking dish is ideal for 6 enchiladas and allows enough room for the sauce to pool around the sides without overflowing. A ceramic or glass dish (as seen in the photo) distributes heat evenly and is the right choice for this baking method.
Expert Chef Tips
Warm your tortillas before rolling. Even flour tortillas benefit from 20–30 seconds wrapped in a damp paper towel in the microwave. A pliable tortilla rolls cleanly and holds its shape during baking — a cold, stiff tortilla is more likely to crack at the seam.
Build flavor into your sauce with whole garlic. For a slightly deeper flavor, crush and mince the garlic very finely rather than using garlic powder in the sauce — sautéing real garlic in butter before adding flour is one of those small steps that makes a noticeable difference in the final depth of the white sauce.
Nest the enchiladas seam-side down immediately. The moment you finish rolling each tortilla, place it seam-down in the sauced baking dish. The sauce underneath acts like a seal — after a few minutes, it helps hold the seam closed even before baking sets it.
Let the dish tell you it’s done — not just the clock. Ovens vary in actual temperature by up to 25°F from their stated setting. Use the visual cues — actively bubbling edges, golden-spotted cheese top — and the thermometer reading together. If yours is running cool, the dish may need an extra 3–5 minutes uncovered.
Save a little white sauce on the side. Plate the enchiladas with a small pool of warm white sauce spooned alongside rather than only on top. It’s a simple restaurant move that makes plating look intentional, and it gives anyone who wants extra sauce a way to dress their plate without going back to the dish.
Recipe Summary
These creamy cheesy chicken enchiladas are a reliable, crowd-pleasing baked dinner built around a simple cream cheese chicken filling and a from-scratch sour cream white sauce. The foil-on, foil-off baking method at 375°F ensures tender tortillas and perfectly golden, bubbling cheese every time. Assemble them in 20 minutes, bake in 25, and rest for 5 — dinner is done in 45 minutes flat. Leftovers reheat beautifully and the assembled dish freezes well, making this a recipe worth repeating on a regular rotation.
Conclusion
If you’ve been searching for the kind of baked enchilada recipe that genuinely delivers on its promise — creamy filling, glossy white sauce, cheese that actually browns and bubbles — these creamy cheesy chicken enchiladas are exactly that. There’s nothing complicated about the method: good technique, properly layered flavors, and an oven that does most of the work for you. Make them once, and they’ll earn a permanent spot in your weeknight dinner lineup. Let us know in the comments how yours turned out — and if you tried any of the variations, we’d love to hear which one became your favorite.
Best Creamy Cheesy Chicken Enchiladas (Easy 45-Minute Recipe)
Description
There are weeknight dinners that get the job done, and then there are dinners that make everyone at the table go quiet for a moment — fork mid-air, eyes wide. These creamy cheesy chicken enchiladas are firmly in the second category. Flour tortillas stuffed with tender shredded chicken and a rich, garlicky cream cheese filling, then smothered in a velvety white sauce and blanketed in golden, bubbly melted cheese — baked until the edges crisp and the top turns gloriously spotty-brown. This is pure comfort food built for a real oven, and once you pull that white ceramic baking dish out and see the cheese still bubbling at the edges, you'll understand why this recipe gets requested again and again.
Ingredients
Instructions
-
Step-by-Step Instructions
-
Step 1 — Preheat the Oven and Prep the Baking Dish
-
Preheat your oven to 375°F and position the rack in the center — this is the sweet spot for baking these enchiladas, where the heat circulates evenly around the dish rather than scorching the bottom or top. Lightly grease your 9×13-inch baking dish with nonstick cooking spray or a thin smear of butter. Set it aside while you build the filling and sauce.
-
Step 2 — Make the Chicken Filling
-
In a large mixing bowl, combine the shredded chicken, softened cream cheese, drained green chiles, garlic powder, cumin, onion powder, salt, and black pepper. Mix well with a rubber spatula until the cream cheese coats the chicken evenly — the mixture should look cohesive and slightly sticky, not dry and crumbly. Taste a small amount and adjust salt if needed. Embedded tip: If your cream cheese is cold, the mixture will be lumpy and difficult to roll neatly. Give it a full 30 minutes at room temperature, or soften it for 15 seconds in the microwave.
-
Step 3 — Build the White Sauce
-
Melt the butter in a medium saucepan over medium heat until foamy. Add the minced garlic and stir for about 30 seconds — it should smell fragrant but not brown. Sprinkle in the flour and whisk constantly for 1 minute to cook out the raw flour taste; the mixture will look like a pale paste. Slowly pour in the chicken broth in a thin stream, whisking continuously, and cook for 2–3 minutes until the sauce thickens enough to coat the back of a spoon. Remove the saucepan from the heat and stir in the sour cream, drained green chiles, cumin, salt, and white pepper. Do not return the sauce to the burner after adding the sour cream — high heat will cause it to break and turn grainy.
-
Step 4 — Assemble the Enchiladas
-
Spread about ¼ cup of the white sauce across the bottom of your prepared baking dish — this prevents the tortillas from sticking and drying out on the bottom. Lay a flour tortilla flat on your work surface and spoon a generous ⅓ cup of chicken filling down the center. Sprinkle about 2 tablespoons of Monterey Jack cheese over the filling, then roll the tortilla snugly and place it seam-side down in the baking dish. Repeat with the remaining 5 tortillas, nesting them snugly side by side.
-
Step 5 — Sauce and Cheese the Top
-
Pour the remaining white sauce evenly over the rolled enchiladas, using a spatula to nudge it into the gaps between rolls and along the edges — every tortilla should be covered so none dry out during baking. Scatter the remaining Monterey Jack and all of the mozzarella evenly across the top. The combination of these two cheeses is what creates that golden, spotty-brown finish visible in the photo: Monterey Jack melts smoothly, while mozzarella adds the stretch and the char.
-
Step 6 — Bake, Covered Then Uncovered
-
Tent the baking dish loosely with aluminum foil and bake at 375°F for 15 minutes — the foil traps steam that keeps the tortillas tender and prevents the top cheese layer from over-browning before the filling heats through. After 15 minutes, remove the foil and continue baking for another 10 minutes, or until the cheese is fully melted, bubbling at the edges, and the top shows golden-brown spots. If you want a deeper brown on the cheese (like the photo shows), you can slide the dish under the broiler on high for 1–2 minutes at the very end — but watch it closely; cheese goes from golden to burnt fast. Food safety check: Insert an instant-read thermometer into the center of a filled enchilada — the filling should read at least 165°F before serving. For USDA guidance on safe internal temperatures for poultry dishes, see https://www.fsis.usda.gov/food-safety/safe-food-handling-and-preparation/poultry.
-
Step 7 — Rest and Garnish
-
Let the dish rest for 5 minutes out of the oven before serving — the sauce will settle and thicken slightly, and you'll get cleaner portions instead of a sliding, saucy mess. Scatter the fresh parsley over the top just before bringing the dish to the table, exactly as shown in the photo. Serve directly from the baking dish with a wide spatula.
-
Embedded tip: The 5-minute rest isn't optional. Baked casserole-style dishes like these need a moment for the sauce to re-emulsify slightly as it cools from boiling-hot — skip it and the sauce runs everywhere when you cut in.
Nutrition Facts
Servings 6
- Amount Per Serving
- Calories 480kcal
- % Daily Value *
- Total Fat 26g40%
- Saturated Fat 13g65%
- Protein 34g68%
* Percent Daily Values are based on a 2,000 calorie diet. Your daily value may be higher or lower depending on your calorie needs.

You may also like...