
Best 5-Layer Zucchini Chicken Parmesan Bake (Ultimate Low-Carb Casserole)
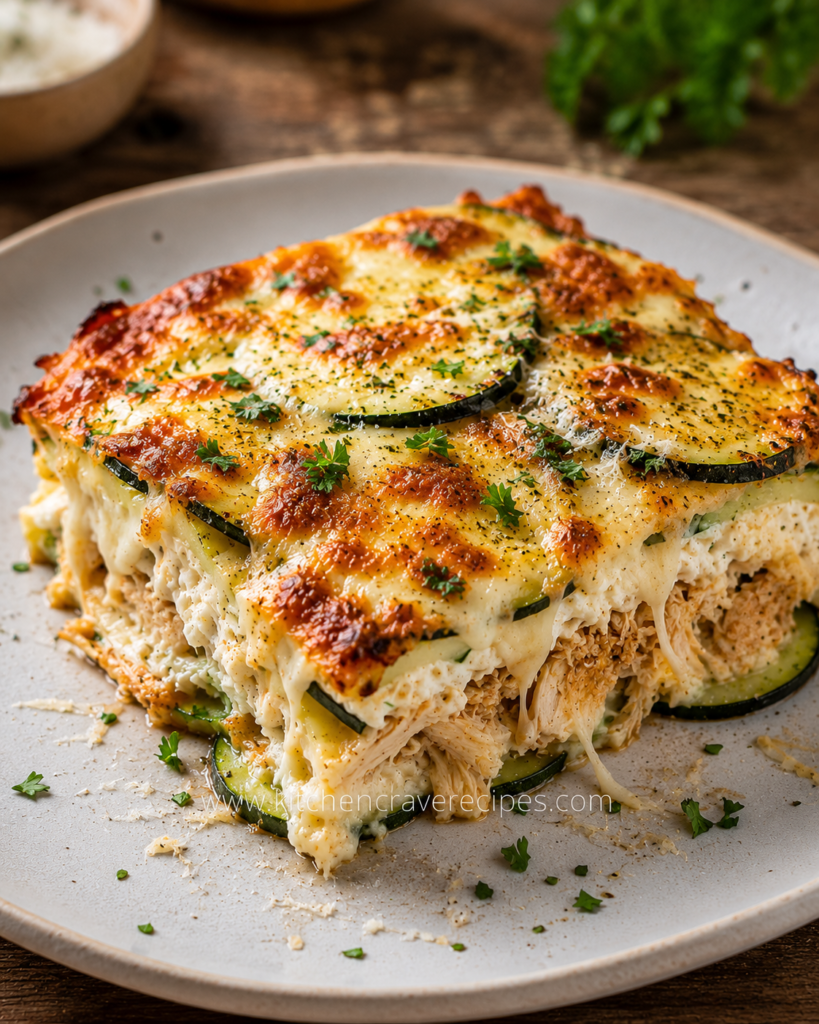
The photo says everything worth saying about this dish before a single word of explanation. A thick, golden-edged square of zucchini chicken parmesan bake is plated on a light speckled ceramic dish — the cross-section revealing alternating layers of tender shredded chicken, zucchini rounds, and molten mozzarella that pull in long, stretchy threads as the slice is lifted. The top is deeply caramelized: irregular golden-brown and amber patches across a cream-based cheese crust, finished with a scatter of fresh chopped parsley and a visible dusting of black pepper. This is not a pale, steamed casserole. This is structured, layered, and properly browned.
What makes this zucchini chicken parmesan bake genuinely worth making — beyond how it looks — is the cream-based filling that binds it all together. Shredded chicken sits in a garlicky parmesan cream sauce between zucchini layers that have been salted and pressed to prevent the wateriness that ruins most zucchini casseroles. The result is a high-protein, low-carb bake that slices cleanly, reheats beautifully, and delivers real comfort food satisfaction without a single pasta noodle in sight.
Recipe Quick Info
| Detail | Info |
|---|---|
| Prep Time | 20 minutes |
| Cook Time | 35 minutes |
| Total Time | 55 minutes |
| Servings | 6 servings |
| Cuisine | American / Italian-Inspired |
| Course | Main Course / Casserole |
| Calories | ~410 per serving |
| Difficulty | Standard |
Why You’ll Love This Recipe
- Structured, scoopable layers like a lasagna — no pasta required. Pressed zucchini rounds and a creamy chicken filling create the kind of layered architecture that holds together when sliced and plates beautifully every time.
- High protein, genuinely low carb. Shredded chicken breast and a parmesan cream sauce together deliver over 42 grams of protein per serving at under 10 grams of net carbs — a macro profile that’s hard to find in a casserole this satisfying.
- The golden crust is the whole point. Finishing uncovered at high heat creates that deeply caramelized mozzarella-parmesan top that’s visible in the photo — crunchy at the edges, melty through the center, and impossible to resist.
- One baking dish after the skillet work is done. The cream sauce comes together in a single pan; from there, it’s all assembly and oven time with no additional cleanup.
- Meal-prep built into the method. The full casserole stores for four days, slices even more cleanly on day two, and reheats without becoming watery when the zucchini has been properly prepped first.
- Endlessly adaptable base technique. The core method — cream sauce, pressed zucchini, layered protein, cheese crust — supports a wide range of protein swaps and spice variations without changing bake time or structure.
- Crowd-feeding without complexity. A full 9×13 dish feeds six comfortably, scales up without difficulty, and lands on the table looking significantly more involved than the actual effort required.
Ingredients
For the Zucchini Layers
- 3 medium zucchini (about 1½ lbs total), sliced into ¼-inch rounds
- 1 teaspoon fine sea salt (for drawing out moisture)
- 1 tablespoon olive oil (for brushing the dish and zucchini)
For the Creamy Chicken Filling
- 1½ lbs boneless, skinless chicken breast, cooked and shredded (about 3 cups shredded)
- 2 tablespoons unsalted butter
- 4 cloves garlic, minced
- 1 small yellow onion, finely diced
- 1 cup heavy cream
- 4 oz cream cheese, softened and cubed
- ½ cup freshly grated parmesan cheese
- 1 teaspoon Italian seasoning
- ½ teaspoon garlic powder
- ½ teaspoon black pepper
- ½ teaspoon fine sea salt
For the Cheese Topping
- 1½ cups shredded whole-milk mozzarella
- ¼ cup freshly grated parmesan cheese
- ¼ teaspoon black pepper
- ¼ teaspoon garlic powder
For Garnish
- 2 tablespoons fresh flat-leaf parsley, roughly chopped
- A pinch of coarse black pepper for finishing
Optional Add-Ins
- ½ teaspoon crushed red pepper flakes in the cream sauce for gentle heat
- A pinch of nutmeg in the cream sauce for warmth
- 2 tablespoons sun-dried tomatoes, chopped, folded into the chicken filling
Substitution Table
| Original Ingredient | Easy Substitution |
|---|---|
| Chicken breast (shredded) | Rotisserie chicken, turkey breast, or canned chicken (well-drained) |
| Heavy cream | Half-and-half (lighter) or full-fat coconut cream (dairy-free) |
| Cream cheese | Mascarpone or dairy-free cream cheese |
| Whole-milk mozzarella | Provolone or part-skim mozzarella |
| Parmesan cheese | Pecorino Romano or Grana Padano |
| Fresh parsley | Fresh basil or fresh chives |
Kitchen Tools Needed
- 9×13-inch baking dish (ceramic or glass preferred)
- Large skillet (for the cream sauce)
- Wire rack set over a rimmed baking sheet (for salting zucchini)
- Paper towels (essential for pressing)
- Sharp chef’s knife and cutting board
- Box grater or microplane (for parmesan)
- Wooden spoon or silicone spatula
- Measuring cups and spoons
- Aluminum foil (for the first covered bake phase)
- Instant-read thermometer
Step-by-Step Instructions
Step 1: Salt, Rest, and Press the Zucchini (15 minutes, mostly passive)
Slice the zucchini into even ¼-inch rounds and spread them across a wire rack set over a baking sheet, or directly into a colander. Sprinkle both sides generously with fine sea salt, then let them sit undisturbed for 12–15 minutes — you’ll see visible moisture beads forming across the surface, which is exactly what needs to happen before assembly. After resting, transfer the rounds in batches to a doubled layer of paper towels and press firmly until no further moisture transfers to the towels.
Embedded Tip: Press more firmly than feels necessary. Zucchini holds internal moisture that the salt draws toward the surface but doesn’t fully expel — physical pressing is what removes it before it can pool in the casserole during baking. Dry rounds are the single biggest factor separating a clean-slicing casserole from a watery one.
Step 2: Preheat the Oven and Cook the Chicken (10 minutes, if not using pre-cooked)
Preheat the oven to 400°F. If starting from raw chicken breast, poach the breasts in lightly salted water or chicken broth over medium heat for 15–18 minutes until cooked through. The USDA requires chicken to reach an internal temperature of 165°F — verify with an instant-read thermometer before shredding (USDA Poultry Safe Temperatures). Alternatively, use rotisserie chicken to skip this step entirely — it produces equally good results and shreds beautifully. Shred the cooked chicken into medium-fine pieces using two forks or your hands.
Step 3: Build the Creamy Parmesan Sauce (8 minutes)
Melt butter in a large skillet over medium heat. Add the diced onion and cook for 3 minutes until softened and just beginning to turn translucent. Add the minced garlic and cook for 60–90 seconds until fragrant. Pour in the heavy cream and add the cubed cream cheese, stirring constantly until the cream cheese melts completely into a smooth sauce — about 2–3 minutes. Remove the pan from heat and stir in the grated parmesan, Italian seasoning, garlic powder, salt, and pepper until fully incorporated.
Embedded Tip: Removing the pan from direct heat before adding the parmesan is important. Parmesan added over active heat can seize and turn grainy rather than melting smoothly into the cream. The residual warmth of the sauce off the heat is more than sufficient to melt the cheese into a silky, cohesive base.
Step 4: Fold the Chicken Into the Sauce (2 minutes)
Add the shredded chicken to the cream sauce and fold gently until every piece is fully coated and the mixture is cohesive. Taste the filling at this stage — it should be seasoned confidently, as the zucchini layers and mozzarella topping will absorb some of that intensity during baking. Adjust salt and pepper if needed before assembly.
Step 5: Assemble the Casserole (5 minutes)
Lightly brush the baking dish with olive oil. Arrange half the pressed zucchini rounds in an overlapping single layer across the bottom of the dish, covering the surface as evenly as possible. Spoon the entire creamy chicken filling over the bottom zucchini layer and spread it edge to edge. Arrange the remaining zucchini rounds in an overlapping layer across the top of the filling — this is the visible layer in the photo, slightly embedded in the cheese after baking.
Step 6: Add the Cheese Topping and Bake (35 minutes total)
Combine the shredded mozzarella, grated parmesan, black pepper, and garlic powder in a small bowl and toss briefly to mix. Scatter the cheese mixture evenly over the top zucchini layer, covering completely. Cover the dish tightly with aluminum foil and bake at 400°F for 20 minutes. Remove the foil and continue baking uncovered for 12–15 minutes until the cheese is deeply golden, caramelized in irregular patches, and pulling away slightly from the dish edges. For an even more pronounced crust, switch to broil on high for the final 2 minutes — watch it constantly.
Step 7: Rest, Garnish, and Serve
Remove the casserole from the oven and let it rest uncovered for a minimum of 8–10 minutes. This resting period allows the layers to set and the cheese to firm from molten to sliceable — a step that makes the difference between a clean, structured serving and a collapsed, sliding mess. Scatter fresh chopped parsley generously over the top and finish with a pinch of coarse black pepper. Use a sharp spatula to cut and serve, angling under each portion to capture all five layers.
Pro Tips
- Use rotisserie chicken to cut prep time by 15 minutes. The pre-cooked meat shreds into perfect, slightly larger pieces that hold their texture through the bake without drying out — and the mild roasted flavor integrates beautifully with the garlic parmesan cream.
- Shred the chicken while slightly warm. Cold chicken from the refrigerator shreds into smaller, drier strands that don’t absorb the cream sauce as evenly. Warm or room-temperature chicken pulls into clean, substantial pieces that coat more thoroughly.
- Don’t skip pressing the zucchini, even if time is short. If 15 minutes feels long, salt the zucchini first before starting any other prep — by the time the sauce is built, the zucchini has had its full rest and the steps run in parallel with no extra wait.
- Grate your own mozzarella and parmesan. Both block cheeses grated fresh melt dramatically better than pre-shredded — the anti-caking agents in bagged versions prevent the deep, uniform browning visible in the photo. The difference in the finished crust is significant.
- Rest the casserole fully before cutting. Ten minutes feels like a long wait when the kitchen smells like this, but it’s the difference between the clean-edged slice in the photo and a filling that oozes out sideways on the plate.
Common Mistakes to Avoid
1. Not pressing the zucchini firmly after salting.
Salting draws moisture to the surface, but pressing is what physically removes it from the rounds before assembly. Light blotting is not enough — press firmly with doubled paper towels until no more moisture visibly transfers. This step prevents the casserole from becoming watery during the bake, which is the most common failure point with zucchini bakes.
2. Adding parmesan to the cream sauce over direct heat.
Parmesan added while the pan is still on an active burner can seize and turn grainy rather than melting smoothly. Always pull the skillet off the heat first, then stir in the cheese. The cream and cream cheese retain enough heat to melt the parmesan completely without the risk of protein seizure from excessive temperature.
3. Using cold cream cheese straight from the refrigerator.
Cold cream cheese takes much longer to melt into the cream and leaves small lumps that don’t fully disappear even with prolonged stirring. Cut it into small cubes and let it sit at room temperature for 15–20 minutes before adding it to the sauce — it melts smoothly into the cream within 2 minutes.
4. Skipping the covered bake phase.
The foil cover during the first 20 minutes traps steam and ensures the zucchini layers cook through evenly — without it, the cheese top browns and hardens before the interior is fully cooked. Both phases of the bake serve distinct purposes; neither is optional.
5. Slicing the casserole immediately out of the oven.
The filling is essentially molten when the dish comes out of the oven. Cutting too early causes the cheese and cream layers to slide and pool rather than holding the structured layers visible in the photo. A full 8–10 minute rest is the minimum for a sliceable, plate-ready result.
6. Over-salting the zucchini and not rinsing.
Using too much salt during the moisture-drawing step — more than 1 teaspoon for the full batch — can leave the rounds noticeably salty after pressing. If you’ve been heavy-handed with the salt, give the rounds a quick rinse under cold water and pat thoroughly dry before assembly. The seasoning in the filling and cheese topping provides sufficient salt for the finished casserole.
7. Using pre-shredded bagged mozzarella for the topping.
Anti-caking agents in pre-shredded mozzarella prevent the uniform melting and browning that creates the golden, caramelized top visible in the photo. Block mozzarella grated fresh produces a dramatically better crust — the irregular golden and amber patches across the surface require clean-melting cheese that pre-shredded varieties simply can’t deliver.
Variations
Healthy / Lower-Calorie Version
Swap the heavy cream for half-and-half and reduce the cream cheese to 2 oz instead of 4 oz — the sauce will be slightly thinner but still cohesive enough to bind the layers. Use part-skim mozzarella for the topping and reduce it to 1 cup. These adjustments shave roughly 80 calories and 7 grams of fat per serving without meaningfully changing the flavor or the casserole’s ability to slice cleanly.
Vegetarian Version
Replace the shredded chicken with a combination of 1½ cups cooked cannellini beans (drained and roughly mashed) and 1½ cups finely diced cremini mushrooms sautéed in the butter at the start of the sauce step. The mushrooms contribute a deep umami quality that mirrors the savory depth of chicken, while the mashed beans provide body and protein to the filling. All other sauce ingredients, spices, and cheese quantities remain unchanged — the bake time stays identical.
Spicy Version
Add ½ teaspoon of crushed red pepper flakes and ¼ teaspoon of cayenne pepper to the cream sauce along with the other spices. Swap half the mozzarella topping for shredded pepper jack, which melts well and adds a creamy, medium heat that builds gradually through the layers. The richness of the cream sauce tempers the spice beautifully — this version reads as pleasantly warm rather than aggressively hot in the finished bake.
Gluten-Free Version
This recipe is naturally gluten-free as written. Every ingredient — from the spice blend to the cheeses to the cream sauce — contains no gluten-containing ingredients. If cooking for someone with celiac disease, verify that your parmesan and Italian seasoning are certified gluten-free, as some blends are processed on shared equipment. No technique or quantity adjustments are needed.
Low-Carb / Keto Version
The recipe is already well-suited to a ketogenic diet, producing approximately 9 grams of net carbs per serving. To push it further, increase the cream cheese to 6 oz for additional fat, add ¼ cup of sour cream to the sauce for tangy richness, and use a full 2 cups of mozzarella on top. These modifications increase fat content per serving while keeping net carbs under 10 grams — a clean fit for most ketogenic daily targets.
What to Serve With This Recipe
This zucchini chicken parmesan bake is a complete, self-contained meal, but these pairings work particularly well alongside it:
- Simple arugula salad with lemon and olive oil — the peppery bitterness and bright acidity cut through the richness of the cream sauce cleanly.
- Garlic roasted asparagus — a light, low-carb vegetable side that complements the Italian-inspired flavors without competing with them.
- Crusty bread or garlic focaccia — ideal for scooping up any cream sauce left in the dish, for those who aren’t keeping carbs low.
- Roasted cherry tomatoes with fresh basil — their sweetness and acidity balance the creamy, cheesy filling and add a vibrant color contrast to the plate.
- Cucumber and red onion salad with red wine vinegar — light, tangy, and refreshing alongside a rich, cream-based bake.
- Zucchini Beef Parmesan Bake (Ultimate)Best 5-Layer — a natural pairing for a full Italian-inspired, high-protein dinner spread that covers all dietary preferences at the table.
- A crisp Pinot Grigio or unoaked Chardonnay — both wines have the natural acidity to cut cleanly through cream-based casseroles without overwhelming the delicate garlic and parmesan flavors.
- Sparkling water with lemon slices — keeps the meal feeling fresh between bites of rich, layered casserole.
Storage Instructions
Refrigerator
Allow the casserole to cool fully to room temperature before covering. Store in the baking dish tightly covered with foil, or transfer individual portions to airtight containers. Keeps well for up to 4 days in the refrigerator. The layers set even more firmly overnight, making day-two slices noticeably cleaner and easier to plate than the first serving — an unexpected benefit of this recipe for meal prep.
Freezer
Cool the casserole completely, then cut into individual portions and wrap each tightly in plastic wrap followed by a layer of foil. Transfer to a zip-top freezer bag and freeze for up to 2 months. Thaw overnight in the refrigerator before reheating — reheating from fully frozen in the microwave causes the zucchini to turn mushy and the cream sauce to separate, both of which a proper overnight thaw avoids.
Shelf Life Summary
| Storage Method | Duration | Notes |
|---|---|---|
| Room temperature | Up to 2 hours | Safe to serve; refrigerate after |
| Refrigerator | Up to 4 days | Slices more cleanly after overnight rest |
| Freezer | Up to 2 months | Thaw overnight before reheating |
Reheating Instructions
Oven (best method): Preheat to 350°F. Place one or more portions in an oven-safe dish, cover tightly with foil, and reheat for 15–18 minutes until the filling is hot throughout and the cheese is melted and glossy. Remove the foil for the final 3–4 minutes to re-brown the cheese surface. This method restores the closest approximation to the original baked texture.
Microwave (quickest option): Place a portion on a microwave-safe plate and cover loosely with a damp paper towel. Microwave at 70% power in 90-second intervals until heated through — typically two cycles. Medium power prevents the cream sauce from separating and the chicken from turning rubbery under high, rapid heat.
Stovetop: Add a portion to a skillet over medium-low heat with a tablespoon of chicken broth or cream around the edges to prevent sticking. Cover and heat for 5–7 minutes, pressing gently with a spatula to warm the interior evenly. This method works well for portions that have been broken apart and doesn’t require preheating an oven. For general food reheating safety guidance, refer to the USDA’s leftovers and food safety page.
Nutrition Facts
Per serving (1/6 of the full casserole, approximately 410 calories):
| Nutrient | Amount Per Serving |
|---|---|
| Calories | ~410 kcal |
| Total Fat | 26g |
| Saturated Fat | 14g |
| Cholesterol | 130mg |
| Sodium | 590mg |
| Total Carbohydrates | 11g |
| Dietary Fiber | 2g |
| Net Carbs | 9g |
| Total Sugars | 4g |
| Protein | 42g |
| Potassium | 690mg |
| Calcium | 32% DV |
| Vitamin C | 22% DV |
| Vitamin A | 20% DV |
| Iron | 10% DV |
Nutrition Disclaimer: Nutritional values are estimates calculated using standard ingredient databases and will vary based on specific brands used, exact portion sizes, fat percentage of dairy ingredients, and any substitutions made. For precise dietary tracking, calculate using your actual ingredient labels and a verified nutrition tool. This information is provided as a general guide only and does not constitute medical or dietary advice.
Frequently Asked Questions
Can I use rotisserie chicken instead of poaching chicken breasts?
Rotisserie chicken is actually the preferred shortcut for this recipe — it shreds into perfectly textured pieces, integrates smoothly with the cream sauce, and cuts prep time by at least 15 minutes. Use about 3 cups of shredded rotisserie meat (white meat, dark meat, or a combination) in place of the poached chicken breast.
Why is my casserole watery after baking?
Insufficient pressing of the zucchini after salting is almost always the cause. Salting draws moisture to the surface but doesn’t remove it — firm physical pressing with doubled paper towels is required to expel it before assembly. If the zucchini was pressed thoroughly and the casserole is still watery, the baking dish may have been overcrowded, preventing proper moisture evaporation during the uncovered phase.
Can I assemble this casserole the night before and bake the next day?
Yes — assemble fully through the cheese topping step, cover tightly with foil, and refrigerate overnight. When baking from cold, add 5–7 extra minutes to the covered phase to account for the lower starting temperature. The flavors develop and meld further during the overnight rest, making this one of those recipes that assembles well ahead without compromising the result.
What’s the best way to cook chicken for this recipe if I’m not using rotisserie?
Poaching in lightly salted water or low-sodium chicken broth over medium heat for 15–18 minutes produces the most tender, shreddable chicken for this application. Baked chicken breast works but can dry out if overcooked, resulting in a filling that absorbs less cream sauce. Always verify 165°F internal temperature regardless of cooking method.
Can I make this in a smaller baking dish for fewer servings?
An 8×8-inch dish works well for half the recipe, producing approximately 3 servings. Reduce all ingredients by half and keep the bake time the same, but start checking the uncovered cheese at the 10-minute mark — smaller dish surface area can concentrate heat slightly differently. Check Zucchini Beef Parmesan Bake (Ultimate)Best 5-Layer for more portion-flexible options.
Is this recipe suitable for a keto diet?
Yes — at approximately 9 grams of net carbs per serving, this casserole fits comfortably within most ketogenic daily carbohydrate targets. The primary carb sources are the zucchini and small amounts of dairy sugars. For a stricter keto version, increase the cream cheese and mozzarella quantities as described in the Variations section to raise fat content further.
How do I get the cheese topping as brown as the photo shows?
Two things produce that deeply caramelized top: grating your own whole-milk mozzarella (pre-shredded versions won’t brown the same way), and finishing with 2 minutes under the broiler after the uncovered bake phase. Watch the broiler constantly — the difference between golden and burnt is under 90 seconds at full broil intensity.
Can I use yellow squash instead of zucchini?
Yes — yellow squash has virtually identical water content, texture, and flavor, and the same salting and pressing method applies. A combination of zucchini and yellow squash rounds adds color variety to the cross-section without changing any other aspect of the recipe.
How do I prevent the cream sauce from becoming grainy?
Two practices prevent graininess: removing the pan from direct heat before adding the parmesan, and using room-temperature cream cheese rather than cold. Both actions allow the dairy proteins to melt gradually rather than seizing from rapid temperature change — the result is a completely smooth, cohesive sauce that binds the filling beautifully.
Can I add spinach or other greens to the filling?
Baby spinach works particularly well — fold 2 cups of fresh baby spinach into the creamy chicken mixture just before assembly. It wilts into the filling during baking and adds color, nutrients, and a mild green flavor that complements the garlic and parmesan without competing. Avoid frozen spinach unless it has been thoroughly thawed and squeezed bone-dry — excess water from frozen spinach will make the casserole watery.
Does the casserole freeze well with the cream sauce?
It freezes adequately — not perfectly. Cream-based sauces can separate slightly after thawing, producing a slightly grainier texture than the freshly baked version. To minimize this, thaw completely in the refrigerator overnight before reheating gently in the oven rather than the microwave. The flavor remains excellent; only the texture of the sauce is mildly affected by the freeze-thaw cycle.
Expert Chef Tips
1. Salt the zucchini before doing anything else.
Start the zucchini salting step at the absolute beginning of your prep — before the chicken, before measuring spices, before anything else. By the time the cream sauce is built and the chicken is shredded, the zucchini has had its full 15 minutes and is ready to press. Running the steps in parallel eliminates all passive waiting time and gets the casserole in the oven faster than the recipe timeline might suggest.
2. Season the cream sauce before adding the chicken.
Taste the sauce at the skillet stage before folding in the shredded chicken. The chicken will dilute the seasoning slightly once added, so the sauce should taste confidently seasoned — almost aggressively so — at the pure sauce stage. A well-seasoned sauce produces a well-seasoned filling; a timid one produces a casserole that tastes flat under the cheese.
3. Layer the zucchini rounds in a tight, overlapping pattern.
Gaps between zucchini rounds create spots where the filling sinks through rather than sitting in distinct layers. Overlap each round by about a third for both the bottom and top layers — the structured cross-section visible in the photo is the direct result of tight, deliberate layering rather than a loose scatter of rounds.
4. Broil for exactly 2 minutes at the very end.
After the uncovered bake phase, switch the oven to broil on high for 2 minutes to create the intense, irregular golden-and-amber browning across the cheese surface. This step is optional but produces the specific crust appearance in the photo that makes the casserole look restaurant-caliber rather than home-baked. Set a timer and don’t walk away — 90 seconds separates perfect from burnt.
5. Let the casserole cool on a wire rack, not on a solid surface.
Setting the baking dish directly on a countertop or solid surface traps heat beneath the dish and continues cooking the bottom layer through the rest. A wire rack allows air circulation on all sides, which stops the carry-over cooking more quickly and produces a cleaner, less watery result after the full rest period.
Recipe Summary
This zucchini chicken parmesan bake layers pressed zucchini rounds with a garlicky parmesan cream sauce loaded with shredded chicken, then tops everything with a double-cheese mozzarella-parmesan crust baked to golden, caramelized perfection. With 20 minutes of prep and 35 minutes in the oven, the casserole produces six substantial servings at approximately 410 calories, 42 grams of protein, and 9 grams of net carbs each. The key techniques — salting and firmly pressing the zucchini, building the sauce off heat for the parmesan addition, and resting fully before cutting — are what separate a clean, layered result from the watery, collapsed versions of the same concept. It stores for four days and reheats beautifully, making it one of the most practical high-protein, low-carb casseroles in regular rotation.
Conclusion
A casserole that actually slices, actually layers, and actually tastes as good as it photographs is rarer than it should be — and this zucchini chicken parmesan bake genuinely delivers on all three. The pressed zucchini stays structured, the creamy garlic parmesan filling binds without turning soupy, and that golden mozzarella crust is the kind of top you want to photograph before you cut into it. Whether you’re feeding a family on a Tuesday, meal-prepping for the week, or bringing something to a gathering that needs to feed a crowd without a lot of last-minute work, this casserole earns its place at the table. Make it this week — and leave a comment below to let us know how yours turned out.
✅ Quick Tips: Read the recipe in its entirety before you start cooking. This will help you understand the ingredients, steps, and timing involved, and allow you to prepare any necessary equipment or ingredients beforehand.
Zucchini Chicken Parmesan Bake (Ultimate)Best 5-Layer
Description
The photo says everything worth saying about this dish before a single word of explanation. A thick, golden-edged square of zucchini chicken parmesan bake is plated on a light speckled ceramic dish — the cross-section revealing alternating layers of tender shredded chicken, zucchini rounds, and molten mozzarella that pull in long, stretchy threads as the slice is lifted. The top is deeply caramelized: irregular golden-brown and amber patches across a cream-based cheese crust, finished with a scatter of fresh chopped parsley and a visible dusting of black pepper. This is not a pale, steamed casserole. This is structured, layered, and properly browned.
Ingredients
Instructions
-
Step-by-Step Instructions
-
Step 1: Salt, Rest, and Press the Zucchini (15 minutes, mostly passive)
-
Slice the zucchini into even ¼-inch rounds and spread them across a wire rack set over a baking sheet, or directly into a colander. Sprinkle both sides generously with fine sea salt, then let them sit undisturbed for 12–15 minutes — you'll see visible moisture beads forming across the surface, which is exactly what needs to happen before assembly. After resting, transfer the rounds in batches to a doubled layer of paper towels and press firmly until no further moisture transfers to the towels.
-
Embedded Tip: Press more firmly than feels necessary. Zucchini holds internal moisture that the salt draws toward the surface but doesn't fully expel — physical pressing is what removes it before it can pool in the casserole during baking. Dry rounds are the single biggest factor separating a clean-slicing casserole from a watery one.
-
Step 2: Preheat the Oven and Cook the Chicken (10 minutes, if not using pre-cooked)
-
Preheat the oven to 400°F. If starting from raw chicken breast, poach the breasts in lightly salted water or chicken broth over medium heat for 15–18 minutes until cooked through. The USDA requires chicken to reach an internal temperature of 165°F — verify with an instant-read thermometer before shredding (USDA Poultry Safe Temperatures). Alternatively, use rotisserie chicken to skip this step entirely — it produces equally good results and shreds beautifully. Shred the cooked chicken into medium-fine pieces using two forks or your hands.
-
Step 3: Build the Creamy Parmesan Sauce (8 minutes)
-
Melt butter in a large skillet over medium heat. Add the diced onion and cook for 3 minutes until softened and just beginning to turn translucent. Add the minced garlic and cook for 60–90 seconds until fragrant. Pour in the heavy cream and add the cubed cream cheese, stirring constantly until the cream cheese melts completely into a smooth sauce — about 2–3 minutes. Remove the pan from heat and stir in the grated parmesan, Italian seasoning, garlic powder, salt, and pepper until fully incorporated.
-
Embedded Tip: Removing the pan from direct heat before adding the parmesan is important. Parmesan added over active heat can seize and turn grainy rather than melting smoothly into the cream. The residual warmth of the sauce off the heat is more than sufficient to melt the cheese into a silky, cohesive base.
-
Step 4: Fold the Chicken Into the Sauce (2 minutes)
-
Add the shredded chicken to the cream sauce and fold gently until every piece is fully coated and the mixture is cohesive. Taste the filling at this stage — it should be seasoned confidently, as the zucchini layers and mozzarella topping will absorb some of that intensity during baking. Adjust salt and pepper if needed before assembly.
-
Step 5: Assemble the Casserole (5 minutes)
-
Lightly brush the baking dish with olive oil. Arrange half the pressed zucchini rounds in an overlapping single layer across the bottom of the dish, covering the surface as evenly as possible. Spoon the entire creamy chicken filling over the bottom zucchini layer and spread it edge to edge. Arrange the remaining zucchini rounds in an overlapping layer across the top of the filling — this is the visible layer in the photo, slightly embedded in the cheese after baking.
-
Step 6: Add the Cheese Topping and Bake (35 minutes total)
-
Combine the shredded mozzarella, grated parmesan, black pepper, and garlic powder in a small bowl and toss briefly to mix. Scatter the cheese mixture evenly over the top zucchini layer, covering completely. Cover the dish tightly with aluminum foil and bake at 400°F for 20 minutes. Remove the foil and continue baking uncovered for 12–15 minutes until the cheese is deeply golden, caramelized in irregular patches, and pulling away slightly from the dish edges. For an even more pronounced crust, switch to broil on high for the final 2 minutes — watch it constantly.
-
Step 7: Rest, Garnish, and Serve
-
Remove the casserole from the oven and let it rest uncovered for a minimum of 8–10 minutes. This resting period allows the layers to set and the cheese to firm from molten to sliceable — a step that makes the difference between a clean, structured serving and a collapsed, sliding mess. Scatter fresh chopped parsley generously over the top and finish with a pinch of coarse black pepper. Use a sharp spatula to cut and serve, angling under each portion to capture all five layers.
Nutrition Facts
Servings 6
- Amount Per Serving
- Calories 410kcal
- % Daily Value *
- Total Fat 26g40%
- Saturated Fat 14g70%
- Cholesterol 130mg44%
- Total Carbohydrate 56.5g19%
- Sugars 4g
- Protein 42g84%
- Vitamin A 302 IU
- Vitamin C 12 mg
- Calcium 135 mg
- Iron 7 mg
* Percent Daily Values are based on a 2,000 calorie diet. Your daily value may be higher or lower depending on your calorie needs.