Best High-Protein Marbled Banana Chocolate Bread (5-Ingredient Swap)

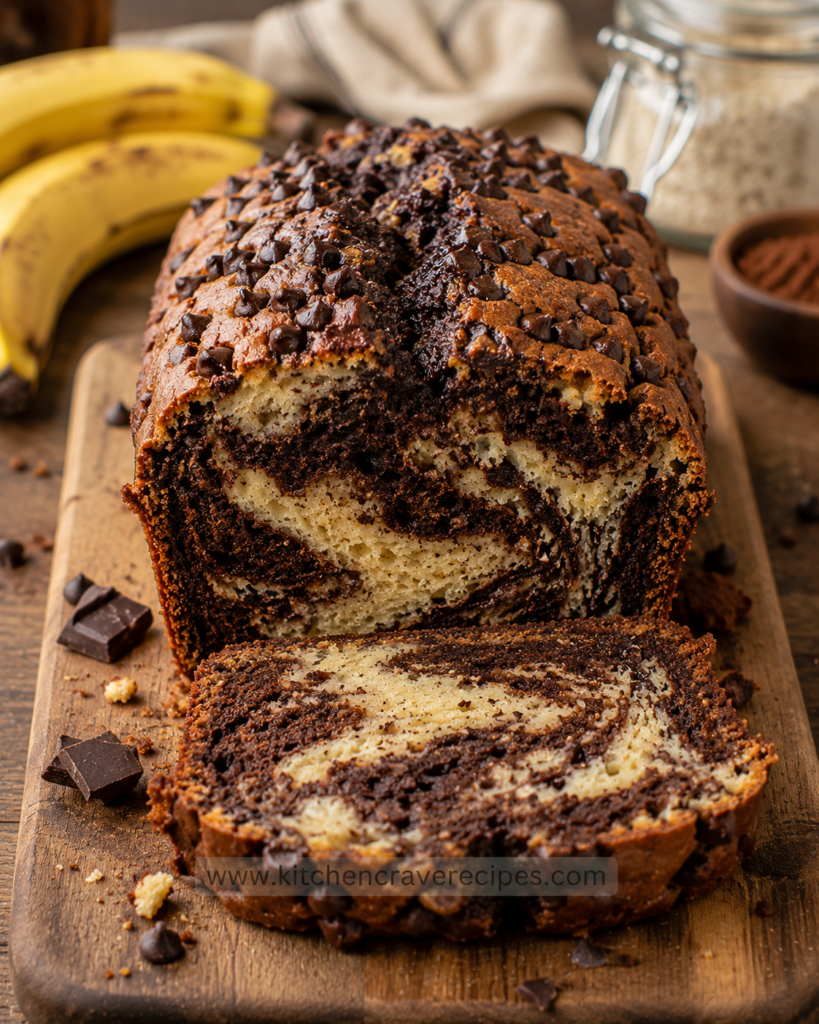

There are banana breads, and then there are banana breads that stop people mid-conversation the moment you set them on the counter. This high-protein marbled banana chocolate bread is firmly in that second category. The dramatic dark chocolate swirls ribbon through a golden banana crumb, and a generous scatter of mini chocolate chips crowns the top — you can see exactly that gorgeous contrast in the photo, with the loaf sliced to reveal two bold, distinct layers of flavor twisting through each other.
What sets this recipe apart from a standard loaf is the protein boost built directly into the batter — no chalky powder dumps, no weird texture. Greek yogurt and eggs do the heavy lifting, adding structure and moisture at the same time. Whether you bake it on a lazy Sunday or prep it for weekday breakfasts, every slice delivers real, satisfying nutrition without feeling like a compromise. This is the recipe you’ll come back to every time your bananas turn spotty.
Recipe Quick Info Table
| Detail | Info |
|---|---|
| Prep Time | 15 minutes |
| Cook Time | 55 minutes |
| Total Time | 1 hour 10 minutes |
| Servings | 10 slices |
| Cuisine | American |
| Course | Breakfast, Snack, Dessert |
| Calories | ~210 per slice |
| Difficulty | Easy |
Why You’ll Love This High-Protein Marbled Banana Chocolate Bread
- Stunning marble effect every time. A simple swirling technique with a butter knife creates those bold chocolate ribbons — no special tools, no guesswork.
- 12 grams of protein per slice. Greek yogurt and whole eggs naturally boost the protein count without any added powders or supplements.
- Uses up overripe bananas. The darker and spottier your bananas, the sweeter and more flavorful this loaf becomes.
- One bowl for the base batter. You split the batter after mixing — no separate bowls from the start, which keeps cleanup fast.
- Mini chocolate chips on top bake into a light, crackling crust. That chip-studded crown you see in the photo isn’t just for looks — it adds a slight textural crunch with every bite.
- Freezes beautifully, slice by slice. Wrap individual slices and freeze for up to three months for an instant high-protein grab-and-go breakfast.
- Naturally sweetened with ripe banana. The batter uses less added sugar than most banana bread recipes because the bananas carry most of the sweetness.
Ingredients
Base Batter
- 3 large overripe bananas (about 1 ½ cups mashed)
- 2 large eggs, room temperature
- ½ cup plain whole-milk Greek yogurt
- ¼ cup unsalted butter, melted and slightly cooled
- ⅓ cup light brown sugar, packed
- 1 teaspoon pure vanilla extract
- 1 ½ cups all-purpose flour
- 1 ½ teaspoons baking powder
- ½ teaspoon baking soda
- ¼ teaspoon fine sea salt
Chocolate Swirl Component
- 3 tablespoons unsweetened cocoa powder
- 2 tablespoons mini chocolate chips (stirred into swirl batter)
- 1 tablespoon whole milk (to loosen the chocolate portion)
Topping
- 3 tablespoons mini chocolate chips (scattered over the top before baking)
Optional Add-Ins (keep separate — don’t add to main batter)
- ¼ cup chopped walnuts or pecans
- 1 tablespoon peanut butter (swirl in alongside the chocolate)
- ½ teaspoon cinnamon (add to banana batter for a warmer flavor)
Ingredient Substitutions
| Original Ingredient | Substitution | Notes |
|---|---|---|
| All-purpose flour | Oat flour (1:1) | Adds fiber; texture is slightly denser |
| Whole-milk Greek yogurt | Sour cream or low-fat Greek yogurt | Works equally well; full-fat gives richer crumb |
| Unsalted butter | Coconut oil or light olive oil | Coconut oil adds mild sweetness |
| Light brown sugar | Coconut sugar or maple syrup (3 tbsp) | Maple syrup: reduce milk by 1 tbsp to compensate |
| All-purpose flour | 1:1 gluten-free baking blend | See Gluten-Free Variation below |
| Unsweetened cocoa powder | Dutch-process cocoa | Deeper, less acidic chocolate flavor |
Kitchen Tools Needed
- 9×5-inch loaf pan
- Large mixing bowl
- Medium mixing bowl (for the chocolate swirl portion)
- Whisk
- Rubber spatula
- Fork (for mashing bananas)
- Butter knife or thin skewer (for swirling)
- Kitchen scale (optional but recommended)
- Wire cooling rack
- Parchment paper
Step-by-Step Instructions
1. Preheat and prep your pan.
Set your oven to 350°F. Lightly grease a 9×5-inch loaf pan with butter or nonstick spray, then line it with a strip of parchment paper that overhangs both long sides — this creates handles that make lifting the finished loaf effortless. Set the pan aside while you prepare the batter.
2. Mash the bananas thoroughly.
Peel all three bananas and place them in your large mixing bowl. Use a fork to mash them until almost no large chunks remain — a few small lumps are fine, but the majority should be smooth. The more thoroughly mashed they are, the more evenly the banana flavor distributes through each bite.
Embedded Tip: Bananas with fully black skins contain the most natural sugar and the deepest banana flavor. If yours are only lightly spotted, microwave the unpeeled bananas for 30 seconds to soften them before mashing.
3. Mix the wet ingredients.
Add the eggs, Greek yogurt, melted butter, brown sugar, and vanilla extract to the mashed bananas. Whisk everything together until smooth and uniform, about 60 seconds. The mixture should look pale golden and slightly frothy from the eggs — that’s a good sign.
4. Add the dry ingredients.
Sprinkle the flour, baking powder, baking soda, and salt directly over the wet mixture. Using a rubber spatula, fold everything together with slow, deliberate strokes — stop the moment no dry streaks remain. Overmixing develops gluten and produces a tough, dense loaf, so resist the urge to keep going once the batter comes together.
5. Create the chocolate swirl batter.
Transfer approximately one-third of the batter (about 1 cup) into your medium bowl. Add the cocoa powder and 1 tablespoon of milk, then fold until the chocolate is fully incorporated and the portion is a deep, even brown color. Stir in the 2 tablespoons of mini chocolate chips. The chocolate batter will be slightly thicker than the plain banana batter — that’s correct.
6. Layer and swirl the batters.
Pour half of the plain banana batter into the prepared loaf pan and spread it to the edges. Spoon all of the chocolate batter over this layer in large dollops, then pour the remaining plain batter on top. To create the marble, drag a butter knife lengthwise down the center of the loaf two or three times, then make two or three perpendicular passes across the width. Less is more — too many passes will muddy the contrast rather than create defined swirls.
Embedded Tip: For the boldest marble pattern shown in the reference photo, do your final knife pass lengthwise through the very center of the loaf. This is what pulls that dramatic dark ribbon from one end of the loaf to the other.
7. Add the chip topping and bake.
Scatter the remaining 3 tablespoons of mini chocolate chips evenly across the top of the batter. Place the pan on the center rack of your preheated oven and bake for 52–58 minutes, until a toothpick inserted into the center comes out with moist crumbs (not wet batter). The top should be deep golden brown and the chips will have slightly melted into a crackling crust.
8. Cool completely before slicing.
Remove the pan from the oven and let the loaf rest in the pan for 10 minutes. Then use the parchment handles to lift it onto a wire cooling rack and cool for at least 30 more minutes before slicing. Cutting too early causes the interior to compress and turn gummy — patience here protects the texture you worked to build.
Pro Tips
- Use room-temperature eggs and yogurt. Cold dairy causes the melted butter to seize and clump in the batter. Set your eggs and yogurt on the counter for 20 minutes before you start.
- Measure flour by spooning into the cup, not scooping. Scooping directly from the bag packs the flour and can add up to 30% extra, which leads to a dry, dense loaf.
- Don’t skip the parchment paper. The loaf is moist from the Greek yogurt, and it can stick in spots even in a well-greased pan. Parchment insurance costs five seconds.
- Tent with foil at the 40-minute mark if the top is browning too fast. The chocolate chips on top can burn before the center sets — a loose foil tent solves this without trapping steam.
- Let it cool to room temperature before storing. Sealing a warm loaf traps steam, which softens the chip topping and can make the crumb gummy overnight.
Common Mistakes to Avoid
1. Using under-ripe bananas.
Yellow bananas with green tips are starchy, not sweet, and they mash poorly. Fix: Wait for bananas with brown spots covering at least 50% of the peel — or use the 30-second microwave trick from Step 2.
2. Overmixing the batter after adding flour.
Vigorous stirring activates gluten strands, producing a chewy, bready texture instead of a tender crumb. Fix: Switch from a whisk to a rubber spatula the moment you add the dry ingredients, and fold only until the last streak disappears.
3. Making too many swirl passes with the knife.
More swirls feel intuitive but actually blend the two batters into a muddy brown rather than a clean marble. Fix: Limit yourself to five total knife passes — two or three lengthwise, two crosswise.
4. Not testing doneness accurately.
Relying on color alone leads to under-baked centers, especially with a dark chocolate swirl that masks raw batter. Fix: Insert a toothpick into the center of the loaf specifically — not the edge — and look for moist crumbs, not wet batter.
5. Slicing the loaf while it’s still hot.
The interior is still setting during the first 20–30 minutes out of the oven. Fix: Wait the full 30 minutes on the cooling rack — the texture firms up considerably, and slices hold their shape cleanly.
6. Using fat-free Greek yogurt.
Fat-free versions have a higher water content that can make the crumb too wet and sticky. Fix: Use 2% or whole-milk Greek yogurt for the protein benefit with the right moisture balance.
7. Skipping the milk in the chocolate batter.
Without that tablespoon of milk, the cocoa makes the chocolate portion thick and stiff — it won’t swirl, it’ll clump. Fix: Always add the milk when mixing the chocolate component, even if it seems like a small amount.
8. Crowding the oven with another pan.
Airflow matters in a convection oven and in standard ovens alike. Fix: Bake the loaf alone on the center rack for even heat distribution and an evenly risen top.
Variations
Protein-Boosted Version
Add ¼ cup of unflavored or vanilla whey protein isolate to the base batter along with the dry ingredients, and reduce the flour by 2 tablespoons to compensate. Protein isolate integrates more smoothly than concentrate and won’t leave a chalky aftertaste. This brings each slice closer to 16 grams of protein. The texture stays tender as long as you don’t overbake — pull it out at 52 minutes and check.
Gluten-Free Version
Swap the all-purpose flour 1:1 with a quality gluten-free baking blend that contains xanthan gum (Bob’s Red Mill 1-to-1 is reliable). The rest of the recipe stays identical. Expect a slightly denser crumb, which is completely normal — the banana and Greek yogurt keep it moist rather than crumbly. This version is naturally suitable for celiac and gluten-sensitive eaters without sacrificing the marble effect.
Vegan Version
Replace each egg with a flax egg (1 tablespoon ground flaxseed + 3 tablespoons water, rested 5 minutes). Swap the Greek yogurt for a full-fat coconut yogurt, and use coconut oil in place of butter. The marble is slightly less dramatic because flax eggs don’t lift as much as whole eggs, but the flavor is still excellent. Use dairy-free mini chocolate chips for the swirl and topping.
Spicy Chocolate Version
Add ¼ teaspoon of cayenne pepper and ½ teaspoon of cinnamon directly to the chocolate swirl batter before layering. The heat is subtle — a gentle warmth at the back of the throat rather than a punch — and it plays beautifully against the sweetness of the ripe banana. This is a conversation-starter loaf for brunch.
Low-Sugar Version
Reduce the brown sugar from ⅓ cup to 3 tablespoons and rely on the natural sweetness of the bananas. Use unsweetened 70% dark chocolate chips in place of standard mini chips. The loaf will taste more distinctly of chocolate and banana with less candy-like sweetness — ideal if you prefer a breakfast-forward rather than dessert-forward bake.
What to Serve With This Recipe
- Plain cold brew coffee — the bitterness cuts the sweetness of the banana perfectly.
- A smear of almond butter — adds another protein layer and a nutty contrast to the chocolate swirl.
- Sliced fresh strawberries on the side — the acidity brightens each bite of the rich loaf.
- A small bowl of Greek yogurt with honey — doubles down on the protein and turns a slice into a full breakfast.
- Warm oat milk latte — the creaminess mirrors the tender crumb without competing with the chocolate.
- Our Garlic Parmesan Chicken Bake: Best Easy 45-Minute Recipe — pairs well for a complete high-protein morning spread.
- A light green salad with citrus vinaigrette — works surprisingly well as a brunch pairing when you’re serving a crowd.
Storage Instructions
Refrigerator: Wrap the fully cooled loaf tightly in plastic wrap or store slices in an airtight container. It keeps well in the refrigerator for up to 5 days. The crumb actually improves slightly on day two as the banana flavor deepens and the chocolate swirl settles.
Freezer: This loaf freezes exceptionally well. Wrap individual slices in plastic wrap, then place them in a zip-lock freezer bag with the air pressed out. Frozen slices keep their quality for up to 3 months. Label the bag with the date so you don’t lose track.
Counter/Room Temperature: If your kitchen is cool (under 70°F), the wrapped loaf can sit at room temperature for up to 2 days. In warmer or humid climates, refrigerate after day one to prevent the moist crumb from developing mold.
Shelf Life Summary
| Storage Method | Duration |
|---|---|
| Room temperature (cool kitchen) | Up to 2 days |
| Refrigerator (airtight) | Up to 5 days |
| Freezer (wrapped slices) | Up to 3 months |
Reheating Instructions
Microwave (fastest): Place a slice on a microwave-safe plate and heat on 50% power for 25–35 seconds. Using reduced power prevents the edges from drying out before the center warms through. The chocolate chips will be molten — let the slice rest 30 seconds before eating.
Oven (best texture): Preheat your oven to 300°F. Wrap the slice loosely in foil and heat for 8–10 minutes. This method restores the slightly crisp chip topping and keeps the crumb from drying out. It’s worth the extra few minutes if you’re not in a rush.
Stovetop (optional): Place a slice in a dry nonstick skillet over medium-low heat for about 2 minutes per side. The cut surfaces toast slightly, which adds a pleasant contrast to the soft interior — almost like a grilled banana bread situation.
For food safety guidelines on storing baked goods, the USDA Food Safety and Inspection Service provides clear guidance on safe refrigeration timelines for egg- and dairy-containing baked items.
Nutrition Facts
(Per 1 slice, based on 10 slices per loaf — calculated with whole-milk Greek yogurt and standard all-purpose flour)
| Nutrient | Amount |
|---|---|
| Calories | ~210 |
| Total Fat | 8g |
| Saturated Fat | 4g |
| Cholesterol | 50mg |
| Sodium | 180mg |
| Total Carbohydrates | 30g |
| Dietary Fiber | 2g |
| Total Sugars | 14g |
| Protein | 12g |
| Calcium | 80mg |
| Iron | 1.5mg |
Nutrition Disclaimer: These values are estimates calculated using standard nutrition databases and may vary based on specific ingredient brands, banana size, and any substitutions made. For precise dietary needs, use a verified nutrition calculator with your exact ingredients. This information is provided for general reference only — consult a registered dietitian for personalized guidance. The USDA FoodData Central database is a reliable resource for verifying individual ingredient nutrition values.
Frequently Asked Questions
Can I use frozen bananas for this high-protein marbled banana chocolate bread?
Absolutely. Thaw frozen bananas completely at room temperature or in the microwave, then drain any excess liquid before mashing. Frozen bananas are often sweeter than fresh ones because freezing breaks down the starch — they’re actually ideal for this recipe.
Why is Greek yogurt included instead of sour cream or buttermilk?
Greek yogurt contributes more protein per gram than sour cream or buttermilk while providing the same tenderizing acidity. It also has a thicker consistency that helps the batter hold the marble pattern cleanly without the two portions bleeding into each other too quickly.
How do I know when the loaf is fully baked?
Insert a toothpick straight into the center of the loaf — not the side or near the edge. You’re looking for moist crumbs that cling to the pick, not wet, shiny batter. The internal temperature should read around 200–205°F if you have an instant-read thermometer.
Can I make this into muffins instead of a loaf?
Yes. Divide the batter between 12 standard muffin cups (lined with paper liners) and bake at 350°F for 18–22 minutes. Use the same layering and swirling technique with a toothpick rather than a butter knife to swirl the smaller portions. Check doneness at the 18-minute mark.
Why did my marble swirl disappear into a muddy brown color?
This almost always happens from over-swirling. Each pass of the knife blends the two batters more completely. Stick to no more than five total knife passes — the restraint is counterintuitive but produces those clean, bold ribbons you see in the photo.
Can I add protein powder to this recipe without ruining the texture?
Yes, with one adjustment: use unflavored or vanilla whey protein isolate (not concentrate), add ¼ cup, and reduce the flour by 2 tablespoons. Protein powder absorbs liquid, so without reducing the flour you’ll end up with a dry, dense brick. See the Protein-Boosted Variation above for full details.
How ripe should my bananas actually be?
Bananas that are at least 70% brown-spotted are ideal. If the peel is entirely black, the fruit is still completely usable — it’s at peak sweetness and will mash into a smooth purée. Green-tipped bananas are not suitable for this recipe as they’re starchy and won’t deliver the natural sweetness that makes the bread work.
My loaf sank in the middle. What went wrong?
A sunken center is almost always caused by one of three things: underbaking, opening the oven door too early (before the 40-minute mark), or overmixing the batter. Pull the loaf only when the toothpick test passes, avoid opening the oven before 40 minutes, and fold the batter gently to prevent this.
Can I make this recipe dairy-free?
Yes. Substitute the Greek yogurt with full-fat coconut yogurt and the butter with melted coconut oil. Use dairy-free mini chocolate chips. The loaf will be slightly more tender with a mild coconut undertone, but the marble effect and protein structure hold up well with these swaps.
Does this recipe work at high altitude?
At elevations above 3,500 feet, reduce the baking powder to 1 teaspoon and increase the oven temperature to 365°F. High altitude causes leavening gases to expand faster, which can make the loaf rise too quickly and then collapse. These two small adjustments help stabilize the rise.
Can I make the batter ahead of time?
Mash and mix the wet ingredients up to 12 hours ahead and refrigerate. Add the dry ingredients only when you’re ready to bake — once the baking powder and soda are activated by moisture, the leavening starts and you lose rising power if you let it sit. Bake immediately after combining.
How should I slice this loaf for the cleanest cuts?
Use a sharp serrated bread knife and let the loaf cool completely — ideally for a full hour. Wipe the blade clean between each slice to prevent chocolate smearing onto the banana crumb. This gives you those clean, distinct swirl cross-sections visible in the reference photo.
Expert Chef Tips
Toast your cocoa powder lightly before using it.
Dry-toast the cocoa powder in a small skillet over low heat for 60–90 seconds, stirring constantly, until it smells fragrant. This “blooms” the cocoa and intensifies the chocolate flavor significantly without adding any extra ingredients. Let it cool before folding it into the batter.
Weigh your bananas, not just count them.
Three medium bananas can vary widely in yield — anywhere from 1 cup to nearly 2 cups of mashed fruit. For consistent results across every batch, aim for exactly 1 ½ cups (about 340 grams) of mashed banana. Too much banana adds excess moisture and can make the center underbake.
Brown the butter instead of just melting it.
Melt the butter in a light-colored saucepan and keep it over medium heat for an extra 2–3 minutes until the milk solids turn golden and nutty-smelling. Using browned butter adds a toffee-like depth to the banana batter that standard melted butter simply can’t replicate.
Use mini chocolate chips — not standard size — for the top.
Larger chips are heavier and tend to sink into the batter during baking. Mini chips sit on the surface long enough to form that crackling, chip-studded crust you can see clearly in the photo. If you only have standard chips, chop them roughly before scattering them on top.
Pull the loaf one minute before you think it’s done.
Carryover heat inside a well-insulated loaf pan continues cooking the interior for several minutes after you remove it from the oven. Pulling it at the 52-minute mark (rather than waiting for the full 58 minutes) and testing with a toothpick prevents the edges from drying out while the center finishes setting on the cooling rack.
Recipe Summary
This high-protein marbled banana chocolate bread delivers everything you’d want from a baked loaf — a dramatic chocolate swirl, a chip-crusted top, and 12 grams of protein per slice — without requiring any special technique or equipment. The Greek yogurt does double duty as both a protein source and a crumb tenderizer, and overripe bananas bring natural sweetness that keeps the added sugar low. Make it once and you’ll understand why this replaces standard banana bread permanently in your rotation.
Conclusion
Some recipes earn a permanent spot in your kitchen because they’re easy. Others earn it because they’re impressive. This high-protein marbled banana chocolate bread manages both at once — it looks like something from a bakery window, tastes like the best banana bread you’ve ever had, and quietly delivers real nutrition in every slice. Whether you’re baking for a weekend brunch, stocking the freezer for busy mornings, or simply looking for a smarter way to use up those spotted bananas on your counter, this loaf shows up every single time.
If you make it, slice it down the center first — there’s nothing quite like that first reveal of the marble. Share it, wrap it, freeze it, or eat the whole thing warm. You’ve earned it.
For more high-protein bakes and smart breakfast ideas, check out our Pepperoni Pizza Cottage Cheese Bowl: Best 10-Minute Recipe and our Garlic Parmesan Chicken Bake: Best Easy 45-Minute Recipe .
Best High-Protein Marbled Banana Chocolate Bread (5-Ingredient Swap)
Description
There are banana breads, and then there are banana breads that stop people mid-conversation the moment you set them on the counter. This high-protein marbled banana chocolate bread is firmly in that second category. The dramatic dark chocolate swirls ribbon through a golden banana crumb, and a generous scatter of mini chocolate chips crowns the top — you can see exactly that gorgeous contrast in the photo, with the loaf sliced to reveal two bold, distinct layers of flavor twisting through each other.
Ingredients
Instructions
-
Step-by-Step Instructions
-
1. Preheat and prep your pan.
-
Set your oven to 350°F. Lightly grease a 9×5-inch loaf pan with butter or nonstick spray, then line it with a strip of parchment paper that overhangs both long sides — this creates handles that make lifting the finished loaf effortless. Set the pan aside while you prepare the batter.
-
2. Mash the bananas thoroughly.
-
Peel all three bananas and place them in your large mixing bowl. Use a fork to mash them until almost no large chunks remain — a few small lumps are fine, but the majority should be smooth. The more thoroughly mashed they are, the more evenly the banana flavor distributes through each bite.
-
Embedded Tip: Bananas with fully black skins contain the most natural sugar and the deepest banana flavor. If yours are only lightly spotted, microwave the unpeeled bananas for 30 seconds to soften them before mashing.
-
3. Mix the wet ingredients.
-
Add the eggs, Greek yogurt, melted butter, brown sugar, and vanilla extract to the mashed bananas. Whisk everything together until smooth and uniform, about 60 seconds. The mixture should look pale golden and slightly frothy from the eggs — that's a good sign.
-
4. Add the dry ingredients.
-
Sprinkle the flour, baking powder, baking soda, and salt directly over the wet mixture. Using a rubber spatula, fold everything together with slow, deliberate strokes — stop the moment no dry streaks remain. Overmixing develops gluten and produces a tough, dense loaf, so resist the urge to keep going once the batter comes together.
-
5. Create the chocolate swirl batter.
-
Transfer approximately one-third of the batter (about 1 cup) into your medium bowl. Add the cocoa powder and 1 tablespoon of milk, then fold until the chocolate is fully incorporated and the portion is a deep, even brown color. Stir in the 2 tablespoons of mini chocolate chips. The chocolate batter will be slightly thicker than the plain banana batter — that's correct.
-
6. Layer and swirl the batters.
-
Pour half of the plain banana batter into the prepared loaf pan and spread it to the edges. Spoon all of the chocolate batter over this layer in large dollops, then pour the remaining plain batter on top. To create the marble, drag a butter knife lengthwise down the center of the loaf two or three times, then make two or three perpendicular passes across the width. Less is more — too many passes will muddy the contrast rather than create defined swirls.
-
Embedded Tip: For the boldest marble pattern shown in the reference photo, do your final knife pass lengthwise through the very center of the loaf. This is what pulls that dramatic dark ribbon from one end of the loaf to the other.
-
7. Add the chip topping and bake.
-
Scatter the remaining 3 tablespoons of mini chocolate chips evenly across the top of the batter. Place the pan on the center rack of your preheated oven and bake for 52–58 minutes, until a toothpick inserted into the center comes out with moist crumbs (not wet batter). The top should be deep golden brown and the chips will have slightly melted into a crackling crust.
-
8. Cool completely before slicing.
-
Remove the pan from the oven and let the loaf rest in the pan for 10 minutes. Then use the parchment handles to lift it onto a wire cooling rack and cool for at least 30 more minutes before slicing. Cutting too early causes the interior to compress and turn gummy — patience here protects the texture you worked to build.
Nutrition Facts
Servings 10
- Amount Per Serving
- Calories 210kcal
- % Daily Value *
- Total Fat 8g13%
- Saturated Fat 4g20%
- Protein 12g24%
* Percent Daily Values are based on a 2,000 calorie diet. Your daily value may be higher or lower depending on your calorie needs.