High Protein Creamy Tuscan Chicken — Best 40-Min Roast


High Protein Creamy Tuscan Chicken — Best 40-Min Roast
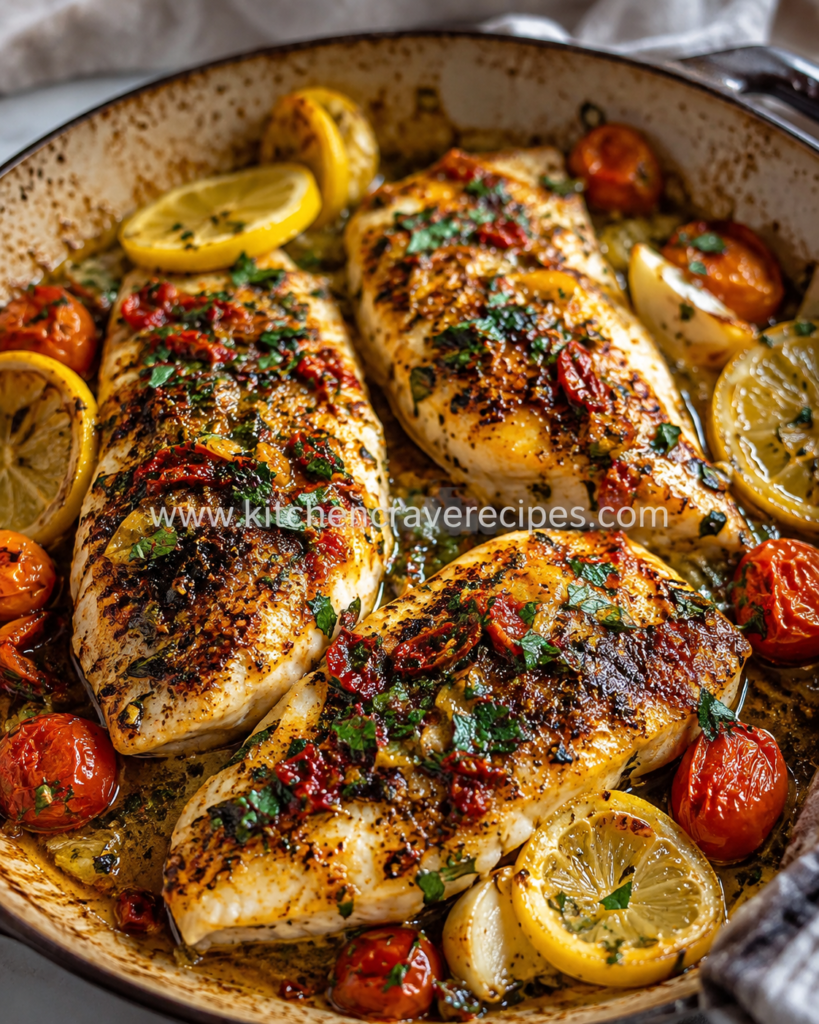
When a recipe looks like it took serious effort but actually comes together with one baking dish and about 10 minutes of active prep, you keep it. This high protein creamy Tuscan chicken is exactly that recipe. Whole boneless chicken breasts are seasoned generously, then roasted uncovered at high heat alongside blistered cherry tomatoes, oil-packed sun-dried tomatoes, and bright lemon halves until the tops are a deep, caramelized amber and the pan juices run rich and herb-flecked. The “creamy” here comes from the way those sun-dried tomato oils, roasted tomato juices, and fresh herbs meld together into a glossy, almost velvety pan sauce — no cream required. With nearly 48 grams of protein per serving, this dish earns its place on any high-protein dinner table without apology.
Recipe Quick Info
| Field | Details |
|---|---|
| Prep Time | 10 minutes |
| Cook Time | 30 minutes |
| Total Time | 40 minutes |
| Servings | 4 |
| Course | Main Course |
| Cuisine | Italian-American |
| Cooking Method | Roasting |
| Calories | ~390 per serving |
| Difficulty | Easy |
Why You’ll Love This Recipe
- Nearly 48 grams of protein per serving. Whole boneless chicken breasts roasted at high heat retain more moisture than you’d expect and deliver serious, trackable protein in every portion — no protein powder required.
- One baking dish, minimal cleanup. Everything roasts together — chicken, tomatoes, lemon, herbs — which means the pan does the flavor-building work and you do almost none of the washing up.
- That caramelized top crust is genuinely extraordinary. High-heat roasting creates a deep amber surface on the chicken that seals in juices and builds a savory, slightly charred crust that no stovetop method can replicate quite the same way.
- Visually stunning with very little effort. Blistered cherry tomatoes, glistening sun-dried tomato pieces, and bright green herbs on golden chicken — this dish photographs beautifully and arrives at the table looking intentional and impressive.
- Naturally gluten-free and dairy-free as written. No flour, no cream, no compromise — the richness comes entirely from the chicken’s own juices and the oil in the sun-dried tomatoes.
- Meal-prep gold. Roasted chicken breasts hold up well in the refrigerator for days and taste great cold, sliced over salads, or reheated with the pan juices spooned back over the top.
- Bold Tuscan flavor from pantry-staple ingredients. Sun-dried tomatoes, garlic, Italian herbs, cherry tomatoes, and lemon — the ingredient list is short, accessible, and produces a flavor profile that punches well above its weight.
Ingredients
For the Chicken
- 4 boneless, skinless chicken breasts (about 2¼ lbs total, similar in size for even roasting)
- 1½ teaspoons kosher salt
- ½ teaspoon freshly ground black pepper
- 1 teaspoon garlic powder
- 1 teaspoon smoked paprika
- 1 teaspoon dried Italian seasoning
- 2 tablespoons olive oil
For the Roasting Pan
- ½ cup sun-dried tomatoes in oil, drained and roughly chopped (reserve 1 tablespoon of the packing oil)
- 1 cup cherry tomatoes (mixed colors work beautifully)
- 1 lemon, halved crosswise (both halves go into the pan cut-side up)
- 5 cloves garlic, smashed and peeled
- 3 tablespoons olive oil
- ½ teaspoon kosher salt
- ¼ teaspoon black pepper
For Finishing
- 3 tablespoons fresh flat-leaf parsley, roughly chopped
- 1 tablespoon fresh thyme leaves (or ½ teaspoon dried)
- Optional: ¼ teaspoon crushed red pepper flakes
Ingredient Substitutions
| Original Ingredient | Substitution | Notes |
|---|---|---|
| Boneless, skinless chicken breasts | Boneless, skinless chicken thighs | Higher fat, more forgiving of roasting time; reduce cook time by 5 min and check 165°F |
| Sun-dried tomatoes in oil | Dry-packed sun-dried tomatoes | Rehydrate in warm water 10 min before using; add 1 extra tbsp olive oil to the pan |
| Cherry tomatoes | Grape tomatoes or halved Roma tomatoes | Grape tomatoes hold their shape longer; Roma halves release more liquid into the pan |
| Fresh parsley | Fresh basil or fresh oregano | Basil adds a sweeter note; oregano is more pungent — use half the amount if substituting oregano |
| Smoked paprika | Sweet paprika or regular paprika | Smoked paprika contributes the subtle char-forward depth visible on the crust; plain paprika is milder |
| Fresh lemon | 2 tablespoons lemon juice + 1 tsp zest | Squeeze into the pan at the end rather than roasting — the flavor is brighter but less caramelized |
Kitchen Tools Needed
- Large oven-safe baking dish or roasting pan (9×13-inch minimum) — essential for the roasting method; gives the chicken and tomatoes enough space to caramelize rather than steam
- Oven (preheated to 425°F) — high roasting temperature is what creates the caramelized, deeply colored crust visible on the chicken surface
- Wire rack set inside the baking dish (optional but recommended) — elevates the chicken so the bottom doesn’t sit in liquid and ensures airflow for even browning on all surfaces
- Instant-read meat thermometer — mandatory for confirming the chicken has reached 165°F internally; visual color alone is unreliable
- Pastry brush or spoon — for applying the seasoned olive oil mixture evenly over the chicken before roasting
- Sharp knife and cutting board — for chopping sun-dried tomatoes, smashing garlic, and slicing the finished chicken if desired
- Aluminum foil — to tent the chicken if the tops are browning faster than the internal temperature is rising
- Tongs or wide spatula — for safely removing hot chicken from the pan without tearing the crust
Step-by-Step Instructions
Step 1: Preheat the Oven and Prep the Pan
Set your oven to 425°F and allow it to fully preheat — this takes most ovens 15 to 20 minutes, and starting the chicken in an oven that hasn’t reached temperature will cost you the caramelized crust that defines this dish. While the oven heats, pour 3 tablespoons of olive oil and the reserved tablespoon of sun-dried tomato packing oil into your 9×13-inch baking dish. Add the smashed garlic cloves, cherry tomatoes, and roughly chopped sun-dried tomatoes. Season the vegetables with ½ teaspoon salt and ¼ teaspoon black pepper, then toss gently to coat. Nestle both lemon halves into the pan, cut-side up, at opposite ends.
Step 2: Season the Chicken
In a small bowl, combine the kosher salt, black pepper, garlic powder, smoked paprika, and Italian seasoning. Pat the chicken breasts completely dry with paper towels — this is essential for roasting, because surface moisture creates steam that prevents browning. Drizzle 2 tablespoons of olive oil over both sides of each breast, then rub the spice mixture evenly over all surfaces, pressing it firmly into the meat so it adheres. Every visible surface should have even, full coverage — pale spots will stay pale in the oven.
💡 Embedded Tip: Drying the chicken thoroughly before seasoning is the single most impactful step for achieving that deep caramelized crust. Even 30 seconds with paper towels makes a visible difference in the finished color.
Step 3: Arrange and Roast
Place the seasoned chicken breasts directly on top of the tomato-garlic bed in the baking dish, spacing them at least ½ inch apart. The tomatoes and garlic surround and partially support the chicken, keeping it slightly elevated above the raw pan juices while simultaneously roasting alongside it — flavoring both the chicken and the liquid below. Slide the pan onto the center rack of the fully preheated oven and roast uncovered at 425°F for 25 to 30 minutes, depending on the thickness of your breasts.
💡 Embedded Tip: Do not cover the pan with foil during the initial roast. Covering traps steam and turns the surface pale and soft — the opposite of the caramelized, golden crust this recipe is built around. Only tent with foil in the final 5 minutes if the tops are browning faster than your thermometer is catching up.
Step 4: Check Doneness
At the 25-minute mark, insert an instant-read thermometer into the thickest part of the largest breast. You’re looking for 165°F — the USDA-recommended safe minimum internal temperature for all poultry. According to USDA food safety guidelines for poultry, this is the only reliable indicator of doneness — color and firmness alone are insufficient. If the chicken reads 160°F, give it another 3 to 4 minutes and check again; carryover heat will carry it the remaining degrees as it rests.
Step 5: Add the Fresh Herb Finish
Remove the baking dish from the oven and immediately scatter the chopped fresh parsley and thyme leaves over the top of each chicken breast. The residual heat from the freshly roasted chicken blooms the herbs and releases their aroma without wilting them into mush — you want them bright green and fragrant, sitting visibly on top of the caramelized surface. Squeeze one of the roasted lemon halves gently over the chicken now; the juice mixes with the pan juices below and lifts the entire flavor profile with bright acidity.
Step 6: Rest, Plate, and Serve
Tent the pan loosely with foil and allow the chicken to rest for 5 minutes before serving or slicing. Resting allows the muscle fibers to reabsorb the juices that have been pushed toward the surface during roasting — cutting immediately causes those juices to run out onto the board rather than staying in the meat. Serve each breast whole or sliced thickly on a diagonal, with a generous spoonful of the pan’s tomato-herb juices drizzled over the top. Include several blistered cherry tomatoes alongside each portion.
For a complete, high-protein meal, pair these with Best 30-Minute Honey Garlic Chicken Thighs (Ultimate Recipe) — they absorb the Tuscan pan juices beautifully.
Pro Tips for Perfect High Protein Creamy Tuscan Chicken
1. Pull the chicken from the oven at 160°F, not 165°F — and trust carryover heat.
This is the most important roasting-specific technique for keeping chicken breasts juicy rather than dry. The temperature continues rising 3 to 5 degrees after the pan leaves the oven. Waiting until the thermometer reads 165°F inside the oven often means the chicken is closer to 170°F by the time it reaches the table — noticeably drier than it needs to be.
2. Use similarly sized chicken breasts for even roasting.
Size variation is the most common reason some pieces finish early while others need more time. If your breasts vary significantly in thickness, pound the thicker end of each breast gently with a flat mallet before seasoning — this brings them to a more uniform thickness without changing the overall shape.
3. Reserve the sun-dried tomato packing oil and use it.
That deeply flavored, herb-infused oil sitting in the jar is one of the most potent flavor shortcuts in this recipe. Using it as part of the pan’s oil base concentrates the Tuscan flavor profile from the very beginning of the roast — don’t drain it and reach for plain olive oil instead.
4. Don’t crowd the baking dish.
If the chicken breasts are touching or the pan feels full, the vegetables will steam rather than roast and the chicken surfaces won’t brown properly. Use your largest baking dish, or split the batch between two pans. Proper spacing allows hot oven air to circulate around every surface.
5. Roast the lemon halves cut-side up, not down.
Cut-side up means the interior of the lemon caramelizes and slightly chars as the oven’s dry heat evaporates its surface moisture — producing a deeper, more complex citrus flavor than raw lemon juice provides. Cut-side down into a wet pan produces steam instead.
Common Mistakes to Avoid
1. Not preheating the oven fully before the chicken goes in — the most critical roasting error.
A cold or partially heated oven means the chicken sits at a low temperature for the first several minutes, which creates steam rather than immediately beginning the caramelization process. Always give your oven the full 15 to 20 minutes it needs to reach 425°F before the pan goes on the center rack.
2. Using wet chicken breasts.
Moisture on the surface of the chicken immediately turns to steam in the oven, preventing the Maillard reaction — the chemical process responsible for browning and flavor development. Pat every surface completely dry before oiling and seasoning.
3. Covering the pan with foil for the full roast.
Foil creates a sealed, steamy environment that produces pale, soft chicken rather than caramelized, golden chicken. The only time to use foil is as a loose tent in the final few minutes if the tops are browning faster than the internal temperature allows — and even then, the tent should be loose, not sealed.
4. Roasting directly from the refrigerator.
Cold chicken straight from the fridge takes longer to reach a safe internal temperature, which often means the outside overcooks before the inside catches up. Pull the chicken out of the refrigerator 15 to 20 minutes before it goes in the oven to take the chill off — this promotes faster, more even roasting.
5. Skipping the resting step.
Slicing into the chicken immediately after roasting causes most of the accumulated juices to run out onto the cutting board rather than redistributing through the meat. The five-minute rest is short but makes a meaningful difference in perceived juiciness.
6. Using dried herbs instead of fresh for the finish.
Dried herbs added at the beginning of the roast contribute background flavor — but the fresh herbs scattered over the chicken at the end are what create the vivid green color and aromatic freshness visible on the finished dish. Dried herbs added at the end taste dusty and flat rather than bright and herbaceous.
7. Not scraping up the pan juices before serving.
The dark, caramelized bits and concentrated tomato-herb liquid at the bottom of the baking dish after roasting are the closest thing this recipe has to a built-in sauce. Spoon them generously over each portion before serving — discarding them is leaving the best part of the dish behind.
Variations
Healthy (Lower-Calorie)
Reduce the olive oil to 1 tablespoon total across the entire pan and use a light cooking spray to coat the chicken. Swap the sun-dried tomatoes in oil for dry-packed sun-dried tomatoes, rehydrated in warm water for 10 minutes before chopping. This version shaves approximately 80 calories per serving while keeping the full Tuscan herb and tomato flavor profile intact. The crust will be slightly less deep in color but still develops a proper roasted exterior at 425°F.
Vegetarian
Replace the chicken breasts with four thick portobello mushroom caps or two 14-oz blocks of extra-firm tofu, pressed and halved lengthwise into thick steaks. Reduce the roasting time significantly: portobellos roast in 18 to 20 minutes at 425°F; tofu takes 25 minutes and benefits from being flipped once at the halfway point. All seasonings, tomatoes, garlic, lemon, and herb finish remain identical — the pan juices from the mushrooms are especially rich and intensify well at high heat.
Spicy
Add ½ teaspoon of cayenne pepper to the chicken spice rub alongside the smoked paprika, and increase the crushed red pepper flakes to ½ teaspoon scattered over the pan vegetables before roasting. For deeper, more sustained heat, add 1 teaspoon of Calabrian chili paste mixed into the olive oil before coating the chicken. The acidity of the lemon and the sweetness of the roasted cherry tomatoes balance the heat well — this version has genuine warmth without becoming overwhelming.
Gluten-Free
This recipe is naturally 100% gluten-free as written. No flour, breadcrumbs, or thickeners are used at any point. Simply verify that your sun-dried tomatoes, Italian seasoning blend, and any optional condiments are labeled gluten-free — most are, but cross-contamination varies by brand. No technique or timing changes are required for this variation.
Low-Carb / Keto
The base recipe as written is already low-carb and keto-compatible. A 4-ounce serving of chicken breast contains zero carbohydrates, and the cherry tomatoes and sun-dried tomatoes contribute only about 4 to 5 grams of net carbs per serving — well within keto limits. Serve over cauliflower rice or zucchini noodles to keep the full plate keto-friendly. Avoid adding any starchy sides and the dish fits comfortably into a standard ketogenic macro split.
What to Serve With High Protein Creamy Tuscan Chicken
- Garlic butter pasta — thin linguine or spaghetti tossed in olive oil and garlic soaks up the herb-tomato pan juices like a dream.
- Steamed or roasted broccolini — its slight bitterness and tender-crisp texture are a natural counterpoint to the rich, savory chicken.
- Creamy polenta — soft, buttery polenta absorbs the roasted pan juices in a way that makes every bite taste more intentional.
- High-protein cottage cheese mashed potatoes — try Best 30-Minute Honey Garlic Chicken Thighs (Ultimate Recipe) for a side that keeps the macro profile strong and pairs beautifully with the Tuscan flavors.
- Arugula salad with lemon vinaigrette — the peppery bite of arugula and a sharp lemon dressing cut through the richness of the roasted chicken and tomatoes efficiently.
- Crusty sourdough bread — for scooping every last drop of those caramelized pan juices; thick slices work better than thin for this particular job.
- Roasted asparagus — roasts well alongside the chicken at the same temperature; add it to the outer edges of the pan in the final 12 minutes of cook time.
- Cauliflower rice — the low-carb base that absorbs pan juices better than most expect and keeps the full plate within high-protein, lower-carb macros.
Storage Instructions
Refrigerator
Allow the chicken to cool to room temperature — within 2 hours of coming out of the oven — before transferring to an airtight container. Store the pan juices and tomatoes separately or together with the chicken; both refrigerate well. The chicken keeps for up to 4 days in the refrigerator and slices beautifully cold over salads on day two or three.
Freezer
Roasted chicken breasts freeze well individually. Wrap each cooled breast tightly in plastic wrap, then in a layer of aluminum foil, and freeze for up to 3 months. The cherry tomatoes and pan juices can be frozen alongside in a separate container. Thaw overnight in the refrigerator before reheating. Freezing the herb garnish separately is not recommended — add fresh herbs after reheating.
Shelf Life Summary
| Storage Method | Duration |
|---|---|
| Refrigerator (airtight container) | Up to 4 days |
| Freezer (individually wrapped) | Up to 3 months |
| Room temperature (cooked) | 2 hours maximum |
Reheating Instructions
Oven (Best Method for Texture)
Preheat to 325°F. Place the chicken in an oven-safe dish with a splash of chicken broth or water, cover tightly with foil, and heat for 15 to 18 minutes until warmed through to 165°F. The lower temperature prevents the already-cooked breasts from drying out during the second pass through the oven.
Stovetop
Place the chicken in a covered skillet over medium-low heat with 2 tablespoons of broth or pan juices. Heat for 6 to 8 minutes, turning once, until steaming through. This method rehydrates the surface of the chicken slightly and keeps it from tightening up the way dry oven reheating can.
Microwave (Quickest Option)
Slice the chicken before microwaving — thinner pieces reheat more evenly than a whole breast. Place in a microwave-safe dish with a tablespoon of liquid, cover loosely with a damp paper towel, and microwave on medium power (70%) in 60-second intervals until heated through.
For USDA-recommended safe reheating temperatures for cooked poultry, visit FoodSafety.gov’s safe temperature chart.
Nutrition Facts
Per serving (1 chicken breast with pan vegetables, based on 4 servings)
| Nutrient | Amount |
|---|---|
| Calories | ~390 kcal |
| Total Fat | 16g |
| Saturated Fat | 2.5g |
| Cholesterol | 130mg |
| Sodium | 740mg |
| Total Carbohydrates | 9g |
| Sugars | 5g |
| Protein | 48g |
| Fiber | 2g |
| Iron | 2.1mg |
Nutrition Disclaimer: These values are estimates calculated using standard nutrition databases based on the ingredient quantities listed above. Actual values will vary depending on the exact size of the chicken breasts used, specific brands of sun-dried tomatoes, and any optional add-ins or substitutions. This information is provided as a general guide and does not constitute medical, dietary, or nutritional advice. For precise tracking, calculate using your exact ingredients and portions.
Frequently Asked Questions
Can I use chicken thighs instead of breasts for this high protein Tuscan chicken?
Yes — boneless, skinless thighs work well and are more forgiving if you slightly overshoot the cook time. Reduce the roasting time by about 5 minutes and begin checking at the 20-minute mark. Thighs contain more fat than breasts and will release more liquid into the pan, which actually enriches the tomato-herb pan juices.
Why does the recipe say “creamy” if there’s no cream in it?
The creaminess in this dish comes from the emulsification of the sun-dried tomato oil, the roasted cherry tomato juices, and the chicken’s natural drippings as they combine in the hot pan. The result is a glossy, slightly viscous pan sauce that reads as rich and creamy without any dairy — a texture created by the roasting process itself, not an added cream component.
Can I roast the chicken at a lower temperature for a longer time?
You can, but the result will be noticeably different. Roasting at 375°F for 40 to 45 minutes produces juicy chicken but a much paler, softer exterior — you lose the signature caramelized crust that makes this version visually and texturally distinct. If your oven runs hot, 400°F for 28 to 32 minutes is a reasonable middle ground.
How do I know the chicken is done without a thermometer?
The safest answer is: use a thermometer. Visual cues — clear juices, firm texture, opaque color — are less reliable indicators than an instant-read thermometer, particularly with thick chicken breasts. The USDA recommends 165°F as the safe minimum for all poultry, and checking takes under 5 seconds with a digital thermometer.
Can I add spinach or other vegetables to the pan?
Yes, with timing in mind. Dense vegetables like zucchini, bell pepper strips, or asparagus can go into the pan at the start. Leafy greens like spinach or baby kale should be stirred into the pan juices after the chicken is removed and the pan is off the heat — residual heat wilts them perfectly in about 60 seconds without overcooking them into a dark, watery mass.
What does smoked paprika do in this recipe — can I skip it?
Smoked paprika contributes two things: it gives the chicken its reddish-amber exterior color (visible in the roasted crust) and adds a subtle, wood-smoke depth that rounds out the Tuscan herb profile. Skipping it results in a paler surface and a slightly flatter spice flavor. Sweet or regular paprika can substitute in a 1:1 ratio — the color will be similar, but the smoky note will be absent.
Is this recipe good for meal prep?
It’s one of the better high-protein meal prep options available because the chicken holds its flavor and moisture well for 3 to 4 days in the refrigerator. Slice the breasts cold and use them over grain bowls, salads, or pasta throughout the week. The pan juices and roasted tomatoes make an excellent ready-made sauce — store them in a small separate container and spoon them over whatever you’re eating.
Can I make this recipe in a cast iron skillet instead of a baking dish?
Yes — a 12-inch oven-safe cast iron skillet works well. Cast iron retains and radiates heat particularly efficiently, which can produce even slightly more pronounced browning on the bottom of the chicken if you start it on the stovetop for 2 minutes before transferring to the oven. Reduce the roasting time by 3 to 4 minutes and monitor closely, as cast iron tends to run hotter than a standard ceramic baking dish.
Can I bake this at a lower temperature if I have a convection oven?
In a convection oven, reduce the temperature to 400°F and check for doneness at 22 to 25 minutes — convection circulates hot air actively and cooks food 15 to 25% faster than a conventional oven at the same set temperature. The browning on the chicken will often be more even and slightly more intense in a convection setting, which works beautifully for this recipe.
How do I get the herbs to stick to the chicken during roasting?
They don’t need to — the fresh herbs are a finishing garnish added after the chicken comes out of the oven, not a roasting ingredient. The oil and spice rub applied before roasting is what adheres to the surface and creates the crust. Adding fresh herbs before roasting causes them to burn and turn bitter at 425°F rather than staying bright and fragrant.
Expert Chef Tips
1. Oil the chicken, then season — in that order.
Drizzling olive oil onto the dry chicken and rubbing it in first creates a thin, even lipid layer that the dry spice rub then adheres to cleanly. Adding the oil after the spice rub can wash seasoning to the edges and leave the center under-seasoned. This small sequence change produces significantly more even, flavorful coverage across the entire surface.
2. Place the chicken at the center of the baking dish, not at the edges.
The center of a baking dish is where the heat distribution is most even. Pieces placed near the edges — particularly if the dish is in the back of the oven — often brown faster on one side and stay cooler on the other. Center placement produces the most uniform color and the most reliable cooking time.
3. Squeeze the roasted lemon halves after removing from the oven, not before.
Roasted lemon juice is fundamentally different from raw lemon juice — it’s sweeter, slightly more bitter, and more complex. Squeezing the pan’s roasted lemon over the chicken immediately after pulling it from the oven captures that transformation and integrates into the pan juices while everything is still steaming hot. Pre-squeezing raw lemon before roasting loses this character entirely.
4. Spoon the pan juices over the chicken (baste) twice during roasting.
At the 15-minute mark and again at the 22-minute mark, pull the pan out briefly, close the oven door, and spoon the accumulating tomato-herb juices over the surface of each breast. This active basting deepens the caramelized surface and continuously reintroduces flavor from the pan’s liquid back onto the chicken. It adds 30 seconds of effort and produces a noticeably more flavorful result.
5. Let the baking dish rest uncovered for 2 minutes before tenting.
Rather than covering the resting chicken immediately with foil, let it rest uncovered for 2 minutes first. This allows some of the steam that built up during roasting to escape from the surface — preventing condensation from dripping back onto the crust and softening it. After the 2-minute open rest, tent loosely for the remaining 3 minutes if needed.
Recipe Summary
This high protein creamy Tuscan chicken is a 40-minute, oven-roasted dinner built for people who want serious nutrition and even more serious flavor without spending an hour in the kitchen. Whole chicken breasts seasoned with smoked paprika, garlic, and Italian herbs roast at 425°F alongside sun-dried tomatoes, blistered cherry tomatoes, and caramelized lemon halves until the crust is deeply golden and the pan juices run rich and herb-flecked. Fresh parsley and thyme finish the dish the moment it comes out of the oven — bright, aromatic, and genuinely beautiful on the plate. Nearly 48 grams of protein per serving makes it as practical as it is delicious.
Conclusion
There are dinners you make because you have to, and then there are dinners you actively look forward to coming home to. This high protein creamy Tuscan chicken falls firmly in the second category — golden, herb-scattered, fragrant with roasted lemon and sun-dried tomatoes, and built to deliver real, trackable nutrition without feeling like a “healthy meal” in the apologetic sense. Make it once on a Sunday and you’ll have lunches and dinners sorted for most of the week. Make it for company and no one will believe it took 10 minutes to put together. Either way, don’t forget to scrape up every last bit of those pan juices — they’re the best part of the whole dish. For more high-protein dinner ideas that actually taste like food you chose rather than food you settled for, explore Garlic Butter Cheeseburger Toasties — Best 20-Minute Recipe.
High Protein Creamy Tuscan Chicken — Best 40-Min Roast
Description
When a recipe looks like it took serious effort but actually comes together with one baking dish and about 10 minutes of active prep, you keep it. This high protein creamy Tuscan chicken is exactly that recipe. Whole boneless chicken breasts are seasoned generously, then roasted uncovered at high heat alongside blistered cherry tomatoes, oil-packed sun-dried tomatoes, and bright lemon halves until the tops are a deep, caramelized amber and the pan juices run rich and herb-flecked. The "creamy" here comes from the way those sun-dried tomato oils, roasted tomato juices, and fresh herbs meld together into a glossy, almost velvety pan sauce — no cream required. With nearly 48 grams of protein per serving, this dish earns its place on any high-protein dinner table without apology.
Ingredients
Instructions
-
Step-by-Step Instructions
-
Step 1: Preheat the Oven and Prep the Pan
-
Set your oven to 425°F and allow it to fully preheat — this takes most ovens 15 to 20 minutes, and starting the chicken in an oven that hasn't reached temperature will cost you the caramelized crust that defines this dish. While the oven heats, pour 3 tablespoons of olive oil and the reserved tablespoon of sun-dried tomato packing oil into your 9×13-inch baking dish. Add the smashed garlic cloves, cherry tomatoes, and roughly chopped sun-dried tomatoes. Season the vegetables with ½ teaspoon salt and ¼ teaspoon black pepper, then toss gently to coat. Nestle both lemon halves into the pan, cut-side up, at opposite ends.
-
Step 2: Season the Chicken
-
In a small bowl, combine the kosher salt, black pepper, garlic powder, smoked paprika, and Italian seasoning. Pat the chicken breasts completely dry with paper towels — this is essential for roasting, because surface moisture creates steam that prevents browning. Drizzle 2 tablespoons of olive oil over both sides of each breast, then rub the spice mixture evenly over all surfaces, pressing it firmly into the meat so it adheres. Every visible surface should have even, full coverage — pale spots will stay pale in the oven.
-
💡 Embedded Tip: Drying the chicken thoroughly before seasoning is the single most impactful step for achieving that deep caramelized crust. Even 30 seconds with paper towels makes a visible difference in the finished color.
-
Step 3: Arrange and Roast
-
Place the seasoned chicken breasts directly on top of the tomato-garlic bed in the baking dish, spacing them at least ½ inch apart. The tomatoes and garlic surround and partially support the chicken, keeping it slightly elevated above the raw pan juices while simultaneously roasting alongside it — flavoring both the chicken and the liquid below. Slide the pan onto the center rack of the fully preheated oven and roast uncovered at 425°F for 25 to 30 minutes, depending on the thickness of your breasts.
-
💡 Embedded Tip: Do not cover the pan with foil during the initial roast. Covering traps steam and turns the surface pale and soft — the opposite of the caramelized, golden crust this recipe is built around. Only tent with foil in the final 5 minutes if the tops are browning faster than your thermometer is catching up.
-
Step 4: Check Doneness
-
At the 25-minute mark, insert an instant-read thermometer into the thickest part of the largest breast. You're looking for 165°F — the USDA-recommended safe minimum internal temperature for all poultry. According to USDA food safety guidelines for poultry, this is the only reliable indicator of doneness — color and firmness alone are insufficient. If the chicken reads 160°F, give it another 3 to 4 minutes and check again; carryover heat will carry it the remaining degrees as it rests.
-
Step 5: Add the Fresh Herb Finish
-
Remove the baking dish from the oven and immediately scatter the chopped fresh parsley and thyme leaves over the top of each chicken breast. The residual heat from the freshly roasted chicken blooms the herbs and releases their aroma without wilting them into mush — you want them bright green and fragrant, sitting visibly on top of the caramelized surface. Squeeze one of the roasted lemon halves gently over the chicken now; the juice mixes with the pan juices below and lifts the entire flavor profile with bright acidity.
-
Step 6: Rest, Plate, and Serve
-
Tent the pan loosely with foil and allow the chicken to rest for 5 minutes before serving or slicing. Resting allows the muscle fibers to reabsorb the juices that have been pushed toward the surface during roasting — cutting immediately causes those juices to run out onto the board rather than staying in the meat. Serve each breast whole or sliced thickly on a diagonal, with a generous spoonful of the pan's tomato-herb juices drizzled over the top. Include several blistered cherry tomatoes alongside each portion.
Nutrition Facts
Servings 4
- Amount Per Serving
- Calories 390kcal
- % Daily Value *
- Total Fat 16g25%
- Saturated Fat 3g15%
- Protein 48g96%
* Percent Daily Values are based on a 2,000 calorie diet. Your daily value may be higher or lower depending on your calorie needs.