Garlic Butter Cheeseburger Toasties — Best 20-Minute Recipe


Garlic Butter Cheeseburger Toasties — Best 20-Minute Recipe
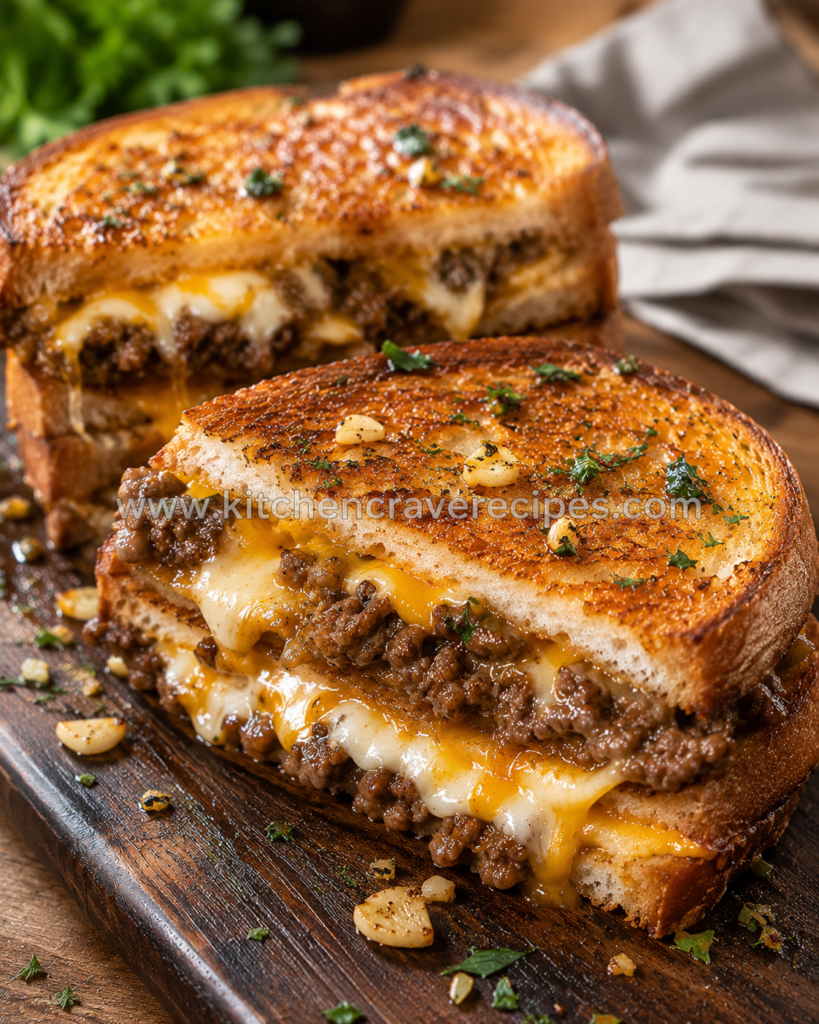
If a grilled cheese and a cheeseburger had a very delicious, very achievable weeknight collision, the result would be garlic butter cheeseburger toasties. These are thick-cut sandwich bread slices slicked with garlicky, herb-flecked butter, loaded with seasoned ground beef and melted cheese, then sautéed in a hot skillet until the outside is shatteringly golden and the inside is a molten, beefy situation that absolutely demands your full attention. The whole thing comes together in about 20 minutes from start to finish — no oven, no grill, just one pan and your stovetop at medium heat. This is the kind of recipe that earns a permanent place in your weeknight lineup, gets requested at game day, and disappears from the plate before you’ve even sat down.
Recipe Quick Info
| Field | Details |
|---|---|
| Prep Time | 8 minutes |
| Cook Time | 12 minutes |
| Total Time | 20 minutes |
| Servings | 4 toasties |
| Course | Main Course / Lunch |
| Cuisine | American |
| Cooking Method | Sautéing |
| Calories | ~610 per toastie |
| Difficulty | Easy |
Why You’ll Love This Recipe
- 20 minutes, one skillet, zero drama. Everything happens in a single pan on the stovetop — the beef cooks, the butter toasts, the cheese melts, and cleanup is minimal.
- That garlic butter exterior is genuinely life-changing. Spreading herb-garlic butter directly onto the bread before it hits the skillet creates a crisp, golden, deeply savory crust that plain butter sandwiches simply cannot match.
- Cheeseburger flavor in a handheld format. All the components you love — seasoned beef, melted cheese, a hit of mustard and pickle — packed into a format that’s easier to eat and faster to make than an actual burger.
- Infinitely customizable. The base recipe is a platform — add bacon, jalapeños, caramelized onions, or special sauce and it shifts into an entirely different register without changing the technique.
- Kid-friendly and adult-approved. The flavor profile is familiar and crowd-pleasing, which makes these garlic butter cheeseburger toasties a reliable answer to the eternal question: “What’s for dinner tonight?”
- Uses pantry staples. Ground beef, bread, cheese, butter, garlic — there’s a good chance you already have most of this in your kitchen right now, which makes this recipe genuinely convenient on a weeknight.
Ingredients
For the Garlic Butter
- 4 tablespoons unsalted butter, softened to room temperature
- 2 cloves garlic, finely minced or grated on a microplane
- 1 tablespoon finely chopped fresh flat-leaf parsley (or 1 teaspoon dried)
- ¼ teaspoon kosher salt
- Pinch of freshly ground black pepper
For the Cheeseburger Filling
- ¾ lb (12 oz) ground beef (80/20 blend recommended)
- ½ teaspoon kosher salt
- ¼ teaspoon freshly ground black pepper
- ½ teaspoon garlic powder
- ½ teaspoon onion powder
- 1 teaspoon Worcestershire sauce
- 1 teaspoon yellow mustard or Dijon mustard
- 4 slices American cheese or sharp cheddar (or 2 slices per toastie, if preferred)
For Assembly
- 8 slices thick-cut white sandwich bread or brioche (½-inch thick)
- 1 teaspoon neutral oil (canola or avocado) for the skillet
Optional Add-Ins / Toppings (added before closing the sandwich)
- 2 tablespoons dill pickle slices, roughly chopped
- 2 tablespoons ketchup or burger sauce
- 2 tablespoons finely diced white onion, raw or quickly sautéed
- 2 strips cooked bacon per toastie, crumbled
Ingredient Substitutions
| Original Ingredient | Substitution | Notes |
|---|---|---|
| 80/20 ground beef | Ground turkey or chicken | Leaner; add 1 extra tsp of oil to the pan to compensate for lower fat content |
| American cheese | Pepper Jack, provolone, or Swiss | Each melts well; pepper jack adds heat, Swiss adds nuttiness |
| Thick white sandwich bread | Brioche, sourdough, or Texas toast | Brioche is richer and slightly sweeter; sourdough adds tang and structure |
| Fresh garlic in butter | ½ tsp garlic powder mixed into butter | Milder flavor; works well when you need a shortcut |
| Unsalted butter | Salted butter | Reduce the added salt in the garlic butter by half |
| Worcestershire sauce | Soy sauce (½ tsp) | Similar umami depth; slightly saltier, so adjust overall seasoning |
Kitchen Tools Needed
- 12-inch cast iron or stainless steel skillet — the workhorse of this sauté-method recipe; provides even, sustained medium heat for both cooking the beef and toasting the buttered bread
- Flat spatula or burger press — for pressing the assembled toasties firmly against the skillet surface during cooking, ensuring full contact and an even golden crust
- Wooden spoon or spatula — for breaking up and stirring the ground beef as it cooks
- Small bowl and spoon — for mixing the garlic butter spread
- Butter knife or offset spatula — for spreading the garlic butter evenly to the edges of each bread slice
- Instant-read meat thermometer — to confirm the ground beef filling has reached a safe internal temperature of 160°F per USDA guidelines
- Cutting board and sharp knife — for slicing the finished toasties in half and prepping any optional add-ins
- Paper towels — for draining excess fat from the cooked beef before assembling
Step-by-Step Instructions
Step 1: Make the Garlic Butter
In a small bowl, combine the softened butter, minced garlic, parsley, salt, and pepper. Mix with a fork until completely smooth and the garlic and herbs are fully incorporated throughout. The butter should be soft enough to spread easily but not melted — spreadable peanut butter consistency is exactly right. Set aside at room temperature while you cook the filling.
💡 Embedded Tip: Grate the garlic on a microplane rather than mincing it with a knife. Grated garlic disperses more evenly into the butter and eliminates any sharp, uncooked garlic pieces that might burn against the hot skillet surface.
Step 2: Cook the Ground Beef Filling
Heat your 12-inch skillet over medium-high heat — no oil needed yet, as the beef provides its own fat. Add the ground beef and let it sit undisturbed for about 60 seconds before breaking it up, which allows a flavorful brown crust to develop on the first side. Use your wooden spoon to break the beef into small, fine crumbles as it cooks. Once no pink remains — about 5 to 6 minutes total — drain any excess fat using paper towels or by carefully tilting the pan and spooning it off, leaving about a teaspoon behind for flavor.
Step 3: Season the Beef and Add Cheese Trigger
With the beef still in the pan over low heat, stir in the Worcestershire sauce, mustard, garlic powder, onion powder, salt, and pepper. Cook for another 30 seconds, stirring, until the seasonings coat every crumble and the Worcestershire sauce evaporates into the meat rather than pooling. The mixture should smell deeply savory — beefy, slightly tangy, with a warm garlic note underneath. Remove from heat.
💡 Embedded Tip: Don’t skip the Worcestershire sauce. It adds a concentrated hit of umami that mimics the depth of a properly seasoned burger patty. A teaspoon is all it takes, and the difference between the filling with and without it is immediately noticeable.
According to the USDA’s safe minimum internal temperature guidelines, ground beef must reach 160°F internally before it is safe to eat — always verify with a thermometer, particularly when cooking loose ground meat that will be enclosed in a sandwich.
Step 4: Assemble the Toasties
Lay all 8 bread slices out on a clean surface. Spread the garlic butter generously and evenly on one side of each slice, making sure to reach all four corners — the edges are where uneven coverage shows up most clearly as pale, un-toasted strips on the finished sandwich. Flip 4 slices over (buttered side down) and divide the seasoned beef evenly among them, leaving a small border around the edges. Lay one or two slices of cheese over the beef. If using any optional add-ins — pickles, raw onion, burger sauce — add them on top of the cheese now, then close each toastie with the remaining bread slices, buttered side facing out on both sides.
Step 5: Sauté the Toasties to Golden Perfection
Wipe the skillet clean with a paper towel and return it to medium heat. Add ½ teaspoon of neutral oil and swirl to coat. Place two toasties in the skillet — don’t overcrowd the pan — and press down firmly with a flat spatula or burger press. Cook for 2 to 3 minutes, pressing occasionally, until the bottom is a deep, even golden-brown and releases cleanly from the pan. Flip carefully with the spatula, press again, and cook the second side for another 2 to 3 minutes until equally golden. The cheese should be fully melted and the bread should sound hollow when tapped lightly on top. Cook the remaining two toasties in the same manner, wiping the pan and adding a fresh half-teaspoon of oil between batches.
Step 6: Rest, Slice, and Serve
Transfer the finished garlic butter cheeseburger toasties to a cutting board and let them rest for 60 to 90 seconds before slicing. This brief rest allows the filling to settle and the cheese to firm up just enough so the toastie holds its shape when cut rather than collapsing. Slice diagonally — halves are easier to handle and expose the melted cheese interior for maximum visual appeal. Serve immediately while the crust is still crackling.
For a complete, satisfying plate, pair these with Creamy Garlic Parmesan Chicken — Easy 5-Star Recipe — the cool, creamy crunch is a natural contrast to the warm, cheesy filling.
Pro Tips for Perfect Garlic Butter Cheeseburger Toasties
1. Control skillet heat carefully throughout the sauté — this is the method’s most critical variable.
Medium heat is the sweet spot for toasting these sandwiches: high enough to create a golden, crackling crust in 2 to 3 minutes, but not so hot that the garlic butter burns before the bread is evenly colored. If you smell the garlic beginning to darken or notice rapid browning in under 90 seconds, drop the heat to medium-low immediately. An even, slow golden toast beats a fast, patchy one every time.
2. Press the sandwich firmly and consistently.
Pressing the toastie against the hot skillet surface ensures maximum contact between the bread and the pan — which translates directly to an even crust with no pale, soft spots. Apply firm, consistent downward pressure with your spatula for the first 60 seconds, then ease up and let the heat do the rest.
3. Drain the beef well before assembling.
Excess fat from the cooked beef will soak into the bread during assembly and while cooking, turning the interior soggy rather than crisp. Tilt the pan and spoon off most of the rendered fat after cooking, leaving just enough behind to keep the filling moist and flavorful.
4. Bring the butter fully to room temperature.
Cold butter tears bread rather than spreading cleanly, which leads to uneven coverage and thin spots that don’t toast properly. Give the butter at least 20 minutes at room temperature — or 10 seconds in the microwave at 30% power — before mixing in the garlic and herbs.
5. Use an 80/20 ground beef blend, not leaner.
The fat ratio matters here. An 80/20 blend produces a juicy, flavorful filling with enough rendered fat to keep the beef moist inside the sandwich. Leaner blends (90/10 or higher) tend to produce a drier, more crumbly filling that lacks the richness these toasties need.
Common Mistakes to Avoid
1. Cooking the toasties on heat that’s too high — the #1 sauté mistake with this recipe.
High heat browns the butter-coated exterior before the cheese has time to melt and the bread can heat through evenly. The fix is simple: keep the skillet at a true medium heat and be patient. Two to three minutes per side at the right temperature produces a vastly better result than 90 seconds at too-high heat.
2. Spreading butter too thin or missing the edges.
Thin or patchy butter coverage leads to pale, soft strips on the finished toastie — particularly at the corners and edges, which are the last places to make contact with the pan. Use a generous hand and spread all the way to the crust on every slice.
3. Overfilling the sandwich.
It’s tempting to pile in extra beef, but too much filling makes the toastie difficult to press flat and causes the cheese to slide and the bread to pull apart when flipped. A quarter of the beef mixture per sandwich — spread in a thin, even layer — is the right amount for structural integrity and even cooking.
4. Skipping the rest before slicing.
Cutting into the toastie immediately off the heat causes the melted cheese and filling to spill out in all directions rather than settling into a cohesive slice. Ninety seconds of resting is all it takes and makes a noticeable difference in how cleanly the sandwich cuts and holds its shape.
5. Not wiping the skillet between batches.
Burnt butter and beef residue from the first batch will smoke and impart a bitter flavor to the second batch. A quick wipe with a folded paper towel — carefully, the pan is hot — and a fresh addition of oil keeps every toastie tasting clean and properly golden.
6. Using bread that’s too thin.
Standard sandwich bread (the thin-sliced kind) doesn’t have the structural density to hold a warm beef filling without tearing or going limp under the pressure of the spatula. Use bread that’s at least ½ inch thick — Texas toast, thick brioche, or bakery-style sandwich loaves all work beautifully.
7. Adding wet toppings directly onto the beef without a cheese barrier.
If you’re adding ketchup, burger sauce, or pickle brine-heavy pickles, place them on top of the cheese rather than directly on the hot beef. The cheese acts as a moisture barrier and prevents the wet toppings from making the inside of the bread soggy during cooking.
Variations
Healthy (Lighter Version)
Swap the ground beef for 93/7 lean ground turkey and use one slice of reduced-fat sharp cheddar per toastie. Replace half the butter in the garlic spread with mashed avocado mixed with garlic powder — it spreads and toasts surprisingly well over medium heat and adds healthy fat without significantly compromising the golden exterior. Use whole grain bread for added fiber and a nuttier flavor that complements the turkey filling.
Vegetarian
Replace the ground beef with a plant-based ground meat substitute — Beyond Meat or Impossible Burger both sauté well in a skillet and produce a similar texture and browning pattern to real beef. Season exactly as the original recipe directs; the Worcestershire sauce should be swapped for a vegan alternative (Annie’s Organic Worcestershire or soy sauce). Everything else — the garlic butter, cheese, assembly, and sauté method — stays identical.
Spicy
Add ½ teaspoon of cayenne pepper to the beef seasoning in Step 3 and swap the regular cheese for pepper jack. For an extra layer of heat, spread a thin layer of sriracha mayo (1 tablespoon sriracha mixed with 2 tablespoons mayo) on the inside of the bread before adding the beef. The richness of the garlic butter and melted cheese keeps the heat in balance — this version has real fire but doesn’t overwhelm.
Gluten-Free
Use a sturdy gluten-free sandwich bread — Canyon Bakehouse or Udi’s thick-sliced varieties both hold up well to sautéing in a buttered skillet without crumbling. Confirm that your Worcestershire sauce is labeled gluten-free (many brands contain malt vinegar, which contains gluten). All other ingredients in the base recipe are naturally gluten-free. The technique and timing remain exactly the same.
Low-Carb / Keto
This variation requires a different bread format: use halved low-carb tortillas (folded rather than stacked) or a keto-friendly cloud bread as the exterior. The assembly becomes a folded quesadilla-style sandwich rather than a stacked toastie — press and sauté the same way for 2 to 3 minutes per side. The garlic butter still coats the outside; the beef and cheese filling remains unchanged. Net carbs drop significantly depending on the keto bread product used.
What to Serve With Garlic Butter Cheeseburger Toasties
- Classic dill pickle spears — the sharp brine cuts through the richness of the garlic butter and cheese immediately and perfectly.
- Shoestring french fries — thin, crispy fries are the natural companion; serve with a side of burger sauce for dipping.
- Homemade coleslaw — cool, creamy, and crunchy; try Creamy Garlic Parmesan Chicken — Easy 5-Star Recipe for a side that comes together in 10 minutes.
- Tomato soup — a warm, slightly acidic soup alongside a golden, cheesy toastie is one of the great comfort food pairings.
- Simple green salad — something light and lightly dressed (lemon vinaigrette works well) balances the richness of the sandwich without competing with it.
- Onion rings — battered and crispy onion rings mirror the burger-joint spirit of this dish and make the whole meal feel intentional rather than accidental.
- Corn on the cob — a summer-friendly side that adds sweetness and color to the plate alongside the savory toasties.
- Kettle chips with dipping sauce — the lowest-effort side that still feels right; a good burger sauce or ranch makes them irresistible alongside these sandwiches.
Storage Instructions
Refrigerator
Let cooked toasties cool completely before wrapping individually in aluminum foil or storing in an airtight container. They will keep in the refrigerator for up to 3 days. The bread will soften as it sits — expect the crust to lose most of its crispness by day two, though reheating restores a reasonable amount of it.
Freezer
Garlic butter cheeseburger toasties freeze better before the final sauté step than after. Assemble the sandwiches fully — including the garlic butter exterior — wrap tightly in plastic wrap and then in foil, and freeze for up to 1 month. Cook from frozen in a covered skillet over medium-low heat for 4 to 5 minutes per side. Cooked toasties can be frozen, but texture suffers more noticeably.
Shelf Life Summary
| Storage Method | Duration |
|---|---|
| Refrigerator (airtight, cooked) | Up to 3 days |
| Freezer (assembled, uncooked) | Up to 1 month |
| Freezer (cooked) | Up to 1 month (texture impact) |
| Room temperature (cooked) | 2 hours maximum |
Reheating Instructions
Stovetop (Best Method)
Return the toastie to a skillet over medium-low heat with no additional butter or oil needed. Cover the pan with a lid and heat for 3 to 4 minutes per side, until the bread has re-crisped and the filling is warmed through. The lid traps steam that warms the interior without making the exterior soggy.
Oven
Preheat to 375°F. Place the toastie directly on the oven rack or on a wire rack set over a baking sheet. Heat for 8 to 10 minutes, flipping once halfway through. This method re-crisps the crust well without drying out the filling as long as you don’t overshoot the time.
Microwave (Quickest, Softest Result)
Microwave on medium power (60%) for 45 to 60 seconds. The filling heats through quickly, but the bread will be soft rather than crisp — this method is acceptable for speed but won’t restore the crust. If appearance matters, follow with 30 seconds in a dry skillet over medium heat to re-crisp the outside.
For safe guidelines on reheating cooked ground beef dishes, see FoodSafety.gov’s food safety chart.
Nutrition Facts
Per serving (1 toastie, base recipe without optional add-ins)
| Nutrient | Amount |
|---|---|
| Calories | ~610 kcal |
| Total Fat | 36g |
| Saturated Fat | 17g |
| Cholesterol | 110mg |
| Sodium | 820mg |
| Total Carbohydrates | 38g |
| Sugars | 4g |
| Protein | 32g |
| Iron | 3.2mg |
Nutrition Disclaimer: These values are estimates calculated using standard nutrition databases and will vary based on bread thickness, cheese type, and any optional add-ins used. Optional toppings such as bacon, burger sauce, or additional cheese are not included in the figures above. This information is provided as a general guide only and does not constitute medical or dietary advice.
Frequently Asked Questions
Can I cook these in a panini press instead of a skillet?
Yes — a panini press works well and eliminates the need to flip manually. Preheat the press, place the assembled toastie inside, and press for 3 to 4 minutes until golden and the cheese is fully melted. The result is slightly more compressed than the skillet version, but the flavor is identical.
What bread works best for garlic butter cheeseburger toasties?
Thick-cut bread with a sturdy crumb holds up best. Texas toast, thick brioche, and bakery-style white sandwich loaves all perform well. Avoid thin-sliced standard sandwich bread — it tears under the weight of the filling and the pressure of the spatula, and it doesn’t provide enough structure for a satisfying bite.
Can I make the garlic butter filling ahead of time?
Absolutely. The garlic butter can be mixed up to 5 days ahead and stored covered in the refrigerator. Let it come back to room temperature for 15 to 20 minutes before using — cold garlic butter tears bread rather than spreading cleanly.
How do I keep the second batch of toasties warm while the first is resting?
Place a wire rack on a baking sheet and slide it into an oven set to 200°F (warm setting). Transfer the first batch to the rack while you cook the second — this keeps them warm and maintains the crust without continuing to cook them or making them soggy.
Can I bake these instead of sautéing them?
You can, though the result is noticeably different. To bake, assemble the toasties as directed, place them on a parchment-lined baking sheet, and bake at 400°F for 8 to 10 minutes, flipping once at the halfway mark. The baked version produces a crispier, drier exterior but less of the deeply golden, buttery surface that sautéing in direct contact with the pan creates.
Is American cheese or cheddar better for this recipe?
Both work, but they behave differently. American cheese melts completely into a smooth, creamy layer that binds to the beef — it’s the better choice if you want a classic cheeseburger texture. Sharp cheddar has more flavor complexity but melts slightly less uniformly. For the best of both, use one slice of each.
How do I stop the filling from falling out when I flip the toastie?
Two things help: don’t overfill (a thin, even beef layer is more structurally stable than a thick pile), and make sure your cheese is placed over the beef before closing the sandwich — it acts as a binder that holds the filling together once melted. A confident, decisive flip with a wide spatula also helps prevent the sandwich from opening mid-turn.
Can I use pre-cooked ground beef from meal prep?
Yes — pre-cooked, seasoned ground beef reheats quickly in the skillet before assembly. Add the Worcestershire and mustard to the beef while warming it over low heat, stir until heated through, then assemble and sauté as directed. The only difference is that the filling won’t be quite as juicy as freshly cooked beef.
What’s the right internal temperature for the beef filling?
Ground beef must reach a minimum internal temperature of 160°F to be safely consumed, per USDA guidelines. Since the beef is fully cooked in the skillet before assembly, this is typically met well before the sandwich is assembled. If you’re cooking from a meal-prep batch, re-check with a thermometer to confirm the filling is at or above 160°F before eating.
Expert Chef Tips
1. Season the beef in layers — not all at once.
Add half the salt while the beef is still raw and the other half after draining the fat. This builds seasoning into the meat itself rather than sitting on the surface. The Worcestershire and mustard go in last, over low heat, so they coat every crumble rather than getting lost in the rendered fat.
2. Toast one side of the bread in a dry pan before assembling.
Before spreading the garlic butter, briefly toast the inside-facing surfaces of each bread slice in a dry skillet for 30 seconds over medium heat. This creates a moisture barrier on the interior that prevents the beef filling from making the bread soggy — especially useful when adding juicy optional toppings like pickles or burger sauce.
3. Grate your own cheese rather than using pre-sliced.
While pre-sliced cheese is genuinely convenient here (and American cheese slices melt particularly well), if you’re using cheddar or provolone, buy a block and grate it yourself. Grated fresh cheese melts faster and more evenly than pre-sliced, which means the cheese is fully melted by the time the bread is golden — not still firm in the center.
4. Let the skillet fully preheat before the sandwich goes in.
A properly preheated pan is what creates an even, deep golden crust from the very first second of contact. Add the oil, let it shimmer, and then place the toastie. If the butter immediately sizzles and gently foams on contact, the pan is ready. If it just sits there, give it another 30 seconds.
5. Diagonal cuts make every bite better.
This isn’t just aesthetics — cutting diagonally creates two triangular halves with a longer interior edge, which means more of the melted cheese and beef filling is exposed in each bite compared to a straight cut down the middle. It’s a small thing that makes the eating experience noticeably more satisfying.
Recipe Summary
Garlic butter cheeseburger toasties are a 20-minute, one-skillet dinner that combines the bold, savory flavors of a cheeseburger with the crispy, golden simplicity of a sautéed sandwich. Seasoned ground beef, melted cheese, and a deeply garlicky butter crust come together in a format that’s faster, easier, and arguably more satisfying than building a burger from scratch. The sauté method is everything here — medium heat, firm pressing, and a little patience produce a crust that crackles when you bite through it and reveals a molten, beefy center. Make it once and it becomes a regular.
Conclusion
Some recipes solve the “what’s for dinner” problem so well that they stop being a decision and start being a reflex — that’s exactly where garlic butter cheeseburger toasties tend to land once you’ve made them the first time. Twenty minutes, one pan, a handful of ingredients you already have, and the kind of result that makes everyone at the table quietly impressed that dinner was this good on a random Tuesday. Make them for lunch, make them for game day, make them because you had half a pound of ground beef and some bread and needed something that would actually satisfy. Find your favorite pairing, slice them diagonally, and enjoy every crackling bite. For more quick and satisfying sandwich ideas, explore Creamy Garlic Parmesan Chicken — Easy 5-Star Recipe.
Garlic Butter Cheeseburger Toasties — Best 20-Minute Recipe
Description
If a grilled cheese and a cheeseburger had a very delicious, very achievable weeknight collision, the result would be garlic butter cheeseburger toasties. These are thick-cut sandwich bread slices slicked with garlicky, herb-flecked butter, loaded with seasoned ground beef and melted cheese, then sautéed in a hot skillet until the outside is shatteringly golden and the inside is a molten, beefy situation that absolutely demands your full attention. The whole thing comes together in about 20 minutes from start to finish — no oven, no grill, just one pan and your stovetop at medium heat. This is the kind of recipe that earns a permanent place in your weeknight lineup, gets requested at game day, and disappears from the plate before you've even sat down.
Ingredients
Instructions
-
Step-by-Step Instructions
-
Step 1: Make the Garlic Butter
-
In a small bowl, combine the softened butter, minced garlic, parsley, salt, and pepper. Mix with a fork until completely smooth and the garlic and herbs are fully incorporated throughout. The butter should be soft enough to spread easily but not melted — spreadable peanut butter consistency is exactly right. Set aside at room temperature while you cook the filling.
-
💡 Embedded Tip: Grate the garlic on a microplane rather than mincing it with a knife. Grated garlic disperses more evenly into the butter and eliminates any sharp, uncooked garlic pieces that might burn against the hot skillet surface.
-
Step 2: Cook the Ground Beef Filling
-
Heat your 12-inch skillet over medium-high heat — no oil needed yet, as the beef provides its own fat. Add the ground beef and let it sit undisturbed for about 60 seconds before breaking it up, which allows a flavorful brown crust to develop on the first side. Use your wooden spoon to break the beef into small, fine crumbles as it cooks. Once no pink remains — about 5 to 6 minutes total — drain any excess fat using paper towels or by carefully tilting the pan and spooning it off, leaving about a teaspoon behind for flavor.
-
Step 3: Season the Beef and Add Cheese Trigger
-
With the beef still in the pan over low heat, stir in the Worcestershire sauce, mustard, garlic powder, onion powder, salt, and pepper. Cook for another 30 seconds, stirring, until the seasonings coat every crumble and the Worcestershire sauce evaporates into the meat rather than pooling. The mixture should smell deeply savory — beefy, slightly tangy, with a warm garlic note underneath. Remove from heat.
-
💡 Embedded Tip: Don't skip the Worcestershire sauce. It adds a concentrated hit of umami that mimics the depth of a properly seasoned burger patty. A teaspoon is all it takes, and the difference between the filling with and without it is immediately noticeable.
-
According to the USDA's safe minimum internal temperature guidelines, ground beef must reach 160°F internally before it is safe to eat — always verify with a thermometer, particularly when cooking loose ground meat that will be enclosed in a sandwich.
-
Step 4: Assemble the Toasties
-
Lay all 8 bread slices out on a clean surface. Spread the garlic butter generously and evenly on one side of each slice, making sure to reach all four corners — the edges are where uneven coverage shows up most clearly as pale, un-toasted strips on the finished sandwich. Flip 4 slices over (buttered side down) and divide the seasoned beef evenly among them, leaving a small border around the edges. Lay one or two slices of cheese over the beef. If using any optional add-ins — pickles, raw onion, burger sauce — add them on top of the cheese now, then close each toastie with the remaining bread slices, buttered side facing out on both sides.
-
Step 5: Sauté the Toasties to Golden Perfection
-
Wipe the skillet clean with a paper towel and return it to medium heat. Add ½ teaspoon of neutral oil and swirl to coat. Place two toasties in the skillet — don't overcrowd the pan — and press down firmly with a flat spatula or burger press. Cook for 2 to 3 minutes, pressing occasionally, until the bottom is a deep, even golden-brown and releases cleanly from the pan. Flip carefully with the spatula, press again, and cook the second side for another 2 to 3 minutes until equally golden. The cheese should be fully melted and the bread should sound hollow when tapped lightly on top. Cook the remaining two toasties in the same manner, wiping the pan and adding a fresh half-teaspoon of oil between batches.
-
Step 6: Rest, Slice, and Serve
-
Transfer the finished garlic butter cheeseburger toasties to a cutting board and let them rest for 60 to 90 seconds before slicing. This brief rest allows the filling to settle and the cheese to firm up just enough so the toastie holds its shape when cut rather than collapsing. Slice diagonally — halves are easier to handle and expose the melted cheese interior for maximum visual appeal. Serve immediately while the crust is still crackling.
Nutrition Facts
Servings 4
- Amount Per Serving
- Calories 610kcal
- % Daily Value *
- Total Fat 36g56%
- Saturated Fat 17g85%
- Protein 32g64%
* Percent Daily Values are based on a 2,000 calorie diet. Your daily value may be higher or lower depending on your calorie needs.