
Creamy Garlic Parmesan Chicken — Easy 5-Star Recipe
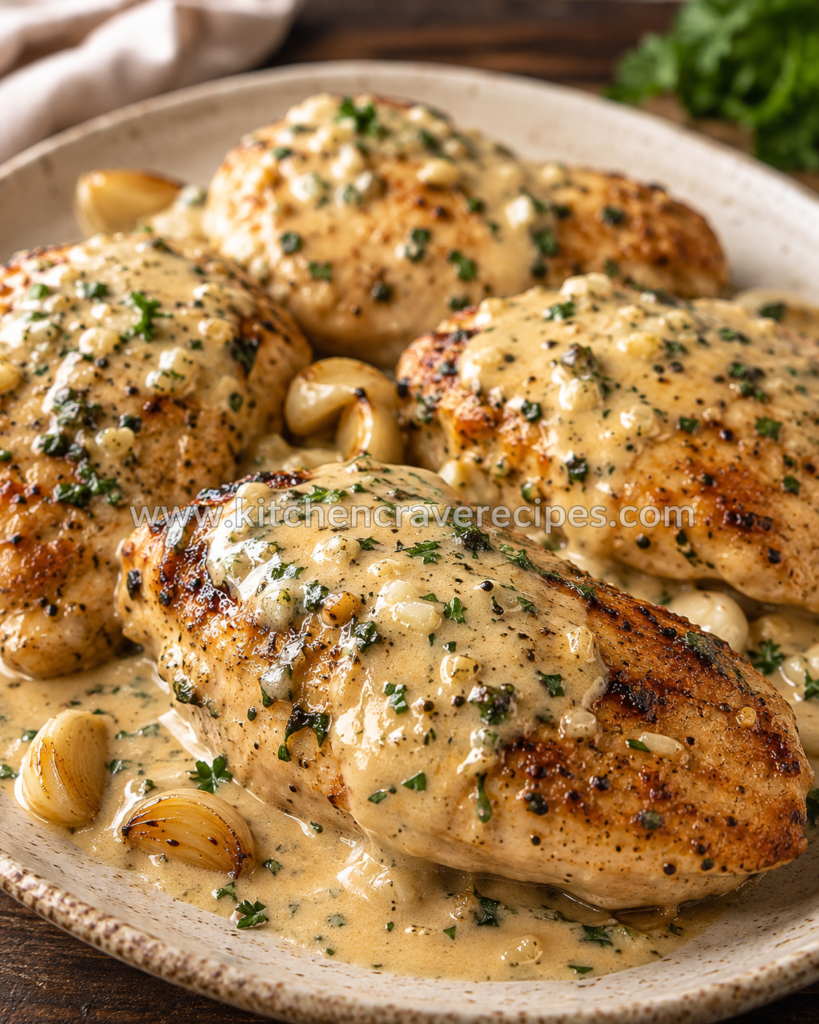
Some recipes earn a permanent place in your weekly rotation not because they’re trendy, but because they’re quietly, reliably extraordinary. Creamy garlic parmesan chicken is exactly that kind of dish. Simmered low and slow in a velvety, parmesan-laced sauce that builds layer by layer in a single pot, this recipe turns simple pantry staples into something that tastes genuinely restaurant-worthy. The sauce develops depth as it gently bubbles around the chicken — the garlic softens and sweetens, the parmesan melts into the cream, and the whole thing comes together in about 35 minutes with very little active effort. Whether you’re cooking for a quiet weeknight dinner or hosting friends and want something that looks far more impressive than the effort required, this dish delivers every single time.
Recipe Quick Info
| Field | Details |
|---|---|
| Prep Time | 10 minutes |
| Cook Time | 25 minutes |
| Total Time | 35 minutes |
| Servings | 4 |
| Course | Main Course |
| Cuisine | American-Italian |
| Cooking Method | Simmering |
| Calories | ~520 per serving |
| Difficulty | Easy |
Why You’ll Love This Recipe
- One skillet, minimal cleanup. The entire dish — seared chicken, sautéed aromatics, and velvety sauce — comes together in a single pan, which means less washing up and more flavor built on top of itself.
- The sauce is genuinely extraordinary. Slow-simmered garlic, heavy cream, and freshly grated parmesan create a sauce with real depth — silky, savory, and complex in a way that jarred sauces simply never achieve.
- Weeknight-fast, dinner-party impressive. Thirty-five minutes from pantry to table, yet it looks and tastes like something you’d order at a proper Italian-American restaurant — no one needs to know how easy it was.
- Endlessly adaptable. This base recipe is a launchpad — add mushrooms, sun-dried tomatoes, baby spinach, or a splash of white wine and it shifts effortlessly into a dozen different directions.
- Crowd-pleasing flavor profile. Creamy, garlicky, and deeply savory with zero heat — it’s the kind of dish that works for picky eaters and food lovers equally, making it a safe bet for feeding a group.
- Real ingredients, no shortcuts needed. Freshly grated parmesan and minced garlic cloves are non-negotiable here — and both are available at any grocery store. The quality of those two ingredients is what separates a great version from a mediocre one.
- Pairs beautifully with almost anything. Pasta, rice, crusty bread, roasted vegetables — this creamy garlic parmesan chicken is the main event that makes whatever is on the side taste better, too.
Ingredients
For the Chicken
- 4 boneless, skinless chicken breasts (about 2 lbs total)
- 1 teaspoon kosher salt
- ½ teaspoon freshly ground black pepper
- ½ teaspoon garlic powder
- ½ teaspoon Italian seasoning
- 2 tablespoons olive oil
For the Creamy Parmesan Sauce
- 6 cloves garlic, minced (about 2 tablespoons)
- 1 tablespoon unsalted butter
- 1 cup heavy cream
- ½ cup low-sodium chicken broth
- 1 cup freshly grated Parmesan cheese (about 3 oz — do not use pre-shredded)
- 1 teaspoon Dijon mustard
- ½ teaspoon dried Italian seasoning
- Salt and black pepper to taste
Optional Add-Ins
- ½ cup sun-dried tomatoes in oil, drained and sliced (adds sweetness and color)
- 1 cup fresh baby spinach, stirred in at the end (wilts in about 60 seconds)
- ½ cup sliced cremini mushrooms, sautéed before the garlic (adds earthiness)
Optional Garnish
- 2 tablespoons freshly chopped flat-leaf parsley
- Extra grated Parmesan for finishing
- Pinch of red pepper flakes
Ingredient Substitutions
| Original Ingredient | Substitution | Notes |
|---|---|---|
| Boneless chicken breasts | Boneless, skinless chicken thighs | Thighs are more forgiving of slight overcooking; add 3–4 min simmer time |
| Heavy cream | Half-and-half | Sauce will be thinner and less rich; reduce the broth by 2 tbsp to compensate |
| Freshly grated Parmesan | Freshly grated Pecorino Romano | Sharper, saltier flavor — reduce added salt accordingly |
| Chicken broth | Dry white wine (Pinot Grigio or Sauvignon Blanc) | Adds a bright, complex acidity that elevates the sauce noticeably |
| Unsalted butter | Vegan butter (e.g., Miyoko’s) | Works well for a dairy-reduced version alongside plant-based cream |
| Dijon mustard | Whole grain mustard | Adds subtle texture; flavor is slightly more rustic |
Kitchen Tools Needed
- Large, deep skillet or sauté pan (12-inch) — essential for simmering; the wide base allows the sauce to reduce evenly and the chicken to cook through gently
- Lid for the skillet — used during the simmering phase to trap steam and maintain a gentle, steady heat around the chicken
- Instant-read meat thermometer — non-negotiable for confirming chicken reaches a safe 165°F internal temperature
- Tongs — for turning the chicken safely without piercing the meat and losing juices
- Wooden spoon or silicone spatula — for stirring the sauce and scraping up the fond without scratching a stainless or nonstick surface
- Microplane or box grater — for freshly grating Parmesan directly into the sauce; pre-shredded cheese contains anti-caking agents that prevent smooth melting
- Knife and cutting board — for mincing garlic and prepping any optional add-ins
- Measuring cups and spoons — the sauce ratios matter; eyeballing cream and broth can throw the consistency off
Step-by-Step Instructions
Step 1: Pound and Season the Chicken
If any of your chicken breasts are significantly thicker than ¾ inch at their widest point, place them between two sheets of plastic wrap and pound them gently to an even thickness using a meat mallet or rolling pin. Even thickness is critical for simmering — it ensures the chicken cooks through at the same rate rather than leaving the thick end raw while the thin end dries out. Season both sides of each breast generously with salt, pepper, garlic powder, and Italian seasoning.
Step 2: Sear the Chicken First
Heat 2 tablespoons of olive oil in a large deep skillet over medium-high heat until shimmering. Add the seasoned chicken breasts and sear for 3 to 4 minutes per side until a golden-brown crust forms on each surface — you’re looking for a deep, even color and a crust that releases cleanly from the pan. This step is about building color and flavor, not cooking the chicken through. Transfer the seared chicken to a plate and set aside — it will finish cooking in the sauce during the simmer.
💡 Embedded Tip: Don’t skip the sear, even though the chicken finishes by simmering. Those browned bits left behind on the pan — the fond — dissolve into the sauce and are the single biggest reason this recipe tastes richer than its ingredient list suggests.
Step 3: Build the Aromatic Base
Reduce the heat to medium-low. Add the tablespoon of butter to the same skillet and let it melt, then add the minced garlic. Stir constantly for 45 to 60 seconds, just until the garlic turns pale golden and the aroma fills the kitchen — fragrant and nutty, not sharp or bitter. If the garlic starts to brown too quickly, pull the pan off the heat for 10 seconds, then return it. Burnt garlic cannot be fixed and will make the entire sauce taste acrid.
Step 4: Add the Cream and Broth
Pour in the heavy cream and chicken broth together, stirring as you add them to deglaze the pan and lift any remaining fond from the bottom. Add the Dijon mustard and dried Italian seasoning and stir to combine fully. Raise the heat to medium and bring the sauce to a gentle simmer — you’re looking for small, lazy bubbles breaking the surface around the edges of the pan, not a rolling boil.
💡 Embedded Tip: Watch the simmer carefully as the sauce heats up. The moment you see those small, steady bubbles forming (not aggressive bubbling), that’s your cue to add the cheese. A true simmer holds flavor in the sauce — a full boil can cause the cream to separate.
Step 5: Add the Parmesan
Reduce the heat to low, then add the freshly grated Parmesan in two or three additions, stirring between each to allow it to melt smoothly before the next goes in. Adding all the cheese at once can cause it to clump rather than incorporate. The sauce will thicken visibly as the cheese melts — it should coat the back of a spoon within about 2 minutes. Season with a small pinch of salt and black pepper and stir to combine.
For food-safe guidance on handling and storing dairy-based sauces like this one, the FDA’s safe food handling guidelines are a reliable reference.
Step 6: Simmer the Chicken Through
Nestle the seared chicken breasts back into the sauce, skin-side up if applicable, and spoon the sauce generously over the top of each piece. Reduce the heat to low, cover the skillet with a lid, and let the chicken simmer gently for 12 to 15 minutes, until an instant-read thermometer inserted into the thickest part of the largest breast reads 165°F. The sauce will continue to thicken slightly as the chicken finishes cooking, and the liquid the chicken releases will fold into the sauce, making it even more savory and layered.
According to USDA poultry safety guidelines, 165°F is the minimum safe internal temperature for all cuts of chicken — always verify with a thermometer rather than relying on color alone.
Step 7: Finish and Serve
Remove the lid and let the sauce simmer uncovered for 2 to 3 more minutes to reduce slightly and intensify. If you’re adding spinach or sun-dried tomatoes, stir them in now and cook just until the spinach has wilted, about 60 seconds. Taste the sauce one final time and adjust seasoning as needed. Garnish with freshly chopped parsley and an extra grating of Parmesan, and serve immediately directly from the skillet.
For a dish that soaks up every drop of this sauce, try Best 30-Minute Honey Garlic Chicken Thighs (Ultimate Recipe) alongside — it was practically designed for a sauce like this one.
Pro Tips for Perfect Creamy Garlic Parmesan Chicken
1. Maintain a true simmer — not a boil — for the entire sauce phase.
This is the most important simmering-specific technique in this recipe. A rolling boil will cause the heavy cream to break and turn the sauce grainy rather than silky. Keep the heat at low to medium-low after the chicken goes back in, and adjust frequently — every stovetop runs slightly differently, so small burner adjustments matter more here than they do with most recipes.
2. Grate the Parmesan fresh, directly into the pan.
Pre-shredded Parmesan is coated in cellulose or potato starch to prevent clumping in the bag — those same coatings prevent the cheese from melting smoothly into a sauce. A microplane or fine box grater takes about 90 seconds and produces a sauce that’s genuinely velvety rather than slightly grainy.
3. Use the Dijon mustard — don’t skip it.
You won’t taste mustard in the finished sauce. What you will taste is a subtle savory depth and a gentle emulsification that helps bind the cream and cheese into a more cohesive, stable texture. It’s a background player, not a featured flavor.
4. Let the chicken rest for 3 minutes before slicing.
Even after gentle simmering, the muscle fibers in the chicken need a brief rest to reabsorb their juices. Slice immediately and those juices run out onto the plate rather than staying in the meat where they belong.
5. Deglaze thoroughly after the sear.
When you add the cream and broth in Step 4, take an extra moment to really scrape the bottom of the pan with a wooden spoon. Every browned bit that comes up off the pan floor is flavor — dissolving the fond into the sauce is what gives this dish its depth beyond what the ingredient list alone would suggest.
Common Mistakes to Avoid
1. Letting the sauce reach a full boil during simmering.
This is the most common simmering mistake with cream-based sauces. Boiling causes the fat in the cream to separate from the liquid, turning a silky sauce grainy and oily. Keep the heat steady at a gentle simmer — small bubbles only — and reduce the heat immediately if you see larger, more aggressive bubbling.
2. Using pre-shredded Parmesan from a bag.
The anti-caking agents in pre-shredded cheese prevent clean melting and leave the sauce with a slightly grainy texture that no amount of stirring will fix. Buy a wedge and grate it yourself — it takes two minutes and the difference is immediately obvious.
3. Overcrowding the pan during the initial sear.
If the chicken breasts are touching during the sear, they trap steam between them and braise rather than develop a crust. Sear in two batches if your pan can’t fit all four breasts with at least an inch of clearance between each.
4. Adding the Parmesan to a boiling-hot sauce.
High heat causes cheese proteins to seize and clump. Always reduce to low before adding the Parmesan, and add it in stages rather than all at once — this ensures smooth, even melting throughout the sauce.
5. Skipping the thermometer and judging doneness by color.
Chicken breasts that look fully cooked on the outside — particularly after simmering in a golden sauce — can still be undercooked at the center. An instant-read thermometer is the only reliable way to confirm 165°F. Cutting into the chicken to check color releases the juices and dries the meat.
6. Not adjusting seasoning at the end.
The Parmesan adds considerable salt to the sauce, and how much salt lands in the final dish depends on your specific brand and the sodium level of your broth. Always taste the finished sauce before serving and adjust — the difference between a well-seasoned and a flat-tasting sauce is often a small pinch of salt added at the end.
7. Using cold cream straight from the refrigerator.
Cold cream added to a hot pan can lower the temperature enough to temporarily stall the simmer and can shock the sauce. Take the cream out of the refrigerator while you prep the other ingredients — even 10 minutes at room temperature makes the transition smoother.
Variations
Healthy (Lighter Version)
Replace the heavy cream with evaporated skim milk (not sweetened condensed milk) and reduce the Parmesan to ¾ cup. Evaporated skim milk holds up to gentle simmering reasonably well and provides a creamy texture at significantly lower fat content. The sauce will be thinner and less rich — add an extra teaspoon of cornstarch dissolved in a tablespoon of cold water to compensate for the reduced body. The flavor profile stays true to the original.
Vegetarian
Swap the chicken for two 14-oz blocks of extra-firm tofu, pressed and sliced into thick cutlets, or use 4 large portobello mushroom caps. Sear the tofu or mushrooms in olive oil over medium-high heat for 3 to 4 minutes per side until golden, then proceed with the sauce exactly as written using vegetable broth in place of chicken broth. Portobello mushrooms release liquid as they simmer, which naturally enriches and deepens the sauce in a way that works beautifully with the Parmesan.
Spicy
Add ½ to 1 teaspoon of crushed red pepper flakes to the garlic in Step 3, letting them bloom in the butter for 30 seconds before the cream goes in. For more sustained, deeper heat, stir 1 teaspoon of calabrian chili paste into the sauce with the Dijon mustard. The creaminess of the sauce balances the heat well — this version has a pleasant, lingering warmth rather than sharp spiciness.
Gluten-Free
This recipe is naturally gluten-free as written — no flour, breading, or thickeners are used. The sauce achieves its consistency through the reduction of cream and the binding properties of the Parmesan. Simply verify that your chicken broth and Dijon mustard are certified gluten-free (both readily available at most supermarkets), and you’re set. No modifications to technique or timing are required.
Low-Carb / Keto
The base recipe is already low-carb — heavy cream, Parmesan, garlic, and chicken are all keto-friendly. To reduce carbohydrates further, skip the Dijon mustard (it contains a small amount of sugar in some brands) and use a stone-ground or keto-labeled mustard instead. Serve over cauliflower rice or zucchini noodles rather than pasta to keep the full meal within keto macros. This variation requires no changes to the cooking method or timing.
What to Serve With Creamy Garlic Parmesan Chicken
- Fettuccine or linguine — the classic pairing; wide, flat noodles hold the creamy sauce in every fold and turn this into a full pasta dinner.
- Garlic mashed potatoes — the buttery, fluffy texture soaks up every last drop of sauce in the most satisfying way possible.
- Steamed or roasted asparagus — the slight bitterness and crunch of asparagus cuts through the richness of the cream sauce beautifully.
- Crusty sourdough bread — non-negotiable for sauce-mopping; a thick slice works better than a thin one for this particular job.
- Caesar salad — the crisp romaine and sharp dressing provide a cool, acidic contrast to the warm, creamy main.
- Roasted cherry tomatoes — their acidity and sweetness balance the fat in the sauce and add a pop of color to the plate.
- Cauliflower rice — a low-carb base that actually absorbs the sauce well and keeps the whole plate light enough for a weeknight.
- Our creamy polenta recipe — for something a little different, try Best 30-Minute Honey Garlic Chicken Thighs (Ultimate Recipe) underneath — the sauce soaks into the polenta in the most comforting way imaginable.
Storage Instructions
Refrigerator
Allow the chicken and sauce to cool to room temperature — within 2 hours of cooking — before transferring to an airtight container. Store in the refrigerator for up to 4 days. The sauce will thicken considerably as it chills due to the cream and cheese — this is normal and not a sign that anything has gone wrong.
Freezer
Cream-based sauces can separate upon freezing and thawing, so freezing is possible but comes with caveats. If freezing, let everything cool fully, then transfer to a freezer-safe container. Freeze for up to 2 months. Thaw overnight in the refrigerator and reheat gently over low heat, whisking the sauce back together as it warms — adding a splash of cream or broth helps restore a smooth texture.
Shelf Life Summary
| Storage Method | Duration |
|---|---|
| Refrigerator (airtight container) | Up to 4 days |
| Freezer (with noted texture caveat) | Up to 2 months |
| Room temperature (cooked) | 2 hours maximum |
Reheating Instructions
Stovetop (Best Method)
Add the chicken and sauce to a skillet over low heat. Add 2 to 3 tablespoons of heavy cream or chicken broth to the pan and stir gently as everything warms. Heat for 6 to 8 minutes, stirring occasionally, until the sauce has re-emulsified and the chicken is heated through to 165°F. This method restores the sauce’s creamy texture most reliably.
Oven
Place the chicken and sauce in an oven-safe dish, add a small splash of cream or broth, and cover tightly with foil. Reheat at 325°F for 15 to 18 minutes, until warmed through. The lower oven temperature is intentional — higher heat risks breaking the cream sauce and drying the chicken.
Microwave (Quickest Option)
Transfer a portion to a microwave-safe bowl, add a tablespoon of cream or broth, and cover loosely with a damp paper towel. Microwave on medium power (60–70%) in 60-second intervals, stirring between each, until steaming throughout. Avoid full power, which can cause the cream sauce to separate and the chicken to toughen.
For safe reheating temperatures and guidance on leftover poultry, refer to FoodSafety.gov’s storage and reheating chart.
Nutrition Facts
Per serving (1 chicken breast with sauce, based on 4 servings)
| Nutrient | Amount |
|---|---|
| Calories | ~520 kcal |
| Total Fat | 34g |
| Saturated Fat | 18g |
| Cholesterol | 175mg |
| Sodium | 710mg |
| Total Carbohydrates | 5g |
| Sugars | 1g |
| Protein | 46g |
| Calcium | 280mg |
Nutrition Disclaimer: All values are estimates calculated using standard nutrition databases and will vary based on the specific brands, portion sizes, and ingredient variations you use. Optional add-ins are not included in these figures. This information is provided as a general reference only and does not substitute for advice from a registered dietitian or healthcare provider.
Frequently Asked Questions
Can I use chicken thighs instead of chicken breasts?
Yes — boneless, skinless chicken thighs are an excellent substitution here. They’re more forgiving during simmering because the higher fat content makes them harder to overcook. Add 3 to 4 extra minutes to the simmer time in Step 6 and verify 165°F with a thermometer before serving.
Why did my sauce turn grainy or separate?
Two likely culprits: the heat was too high during simmering (causing the cream to break), or the Parmesan was added too quickly or to a sauce that was still at a full bubble. Fix by reducing heat to the lowest setting, adding a splash of cream, and whisking steadily until the sauce comes back together — it usually does.
Can I make this recipe ahead of time?
Yes, with a small adjustment. Cook the chicken through and make the sauce, but stop before the final reduction in Step 7. Refrigerate the chicken and sauce separately. When ready to serve, combine them in the skillet over low heat, add a splash of cream, and gently bring the sauce back to a simmer. The sauce may need a light whisking to re-emulsify.
Can I bake this instead of simmering it?
You can adapt it for the oven, but the method changes substantially. Sear the chicken first as directed, make the sauce on the stovetop through Step 5, then transfer everything to a baking dish and bake covered at 375°F for 22 to 25 minutes until the chicken reaches 165°F. The sauce texture will be slightly different — less reduced and silky — since it doesn’t reduce as actively in the oven as it does on the stovetop.
What’s the best pasta to serve with this dish?
Wide, flat pasta — fettuccine, pappardelle, or tagliatelle — works best. The flat surface area gives the thick, creamy sauce something to cling to. Thin pasta like angel hair tends to get overwhelmed by this sauce, and short pasta like penne works but loses the elegance of the presentation.
How do I prevent the garlic from burning in Step 3?
Keep the heat at medium-low when sautéing the garlic in butter, and stir it constantly — don’t walk away. Garlic goes from fragrant and golden to burnt and bitter in under 30 seconds at the wrong temperature. If your burner runs hot, pull the pan off the heat entirely for 10 seconds, then return it and continue stirring.
Can I add wine to the sauce?
Absolutely — and it’s a great addition. After sautéing the garlic in Step 3, pour in ¼ cup of dry white wine (Pinot Grigio or Sauvignon Blanc work well) and let it simmer for about 90 seconds until the sharp alcohol smell cooks off. Then proceed with the cream and broth as written. The wine adds a bright, acidic dimension that cuts through the richness of the cream beautifully.
Is this recipe suitable for meal prep?
It works reasonably well for meal prep. Store the chicken and sauce together in portioned airtight containers in the refrigerator for up to 4 days. The sauce will thicken in the fridge — this is fine. Reheat gently with a splash of cream or broth and stir before serving. It pairs easily with pre-cooked rice, pasta, or roasted vegetables portioned separately.
Why does the recipe use both olive oil and butter?
Olive oil is used for the sear because it has a higher smoke point than butter and can withstand medium-high heat without burning. Butter goes in for the garlic-sauté phase because it contributes a richer, deeper flavor to the sauce base at the lower temperature. Using both at their respective right moments gets the best of each fat.
What if I don’t have heavy cream?
Half-and-half is the closest substitution — it will produce a lighter, thinner sauce. To compensate, reduce the chicken broth by 2 tablespoons and simmer the sauce a minute or two longer to allow it to reduce. Full-fat coconut cream is an option for a dairy-free version, though it adds a subtle coconut flavor that shifts the dish noticeably.
Can I double this recipe for a crowd?
Yes, with one caveat: use the largest skillet you have, or work in two pans. Overcrowding during the sear will prevent the chicken from browning properly, and too much liquid in one pan during simmering will take much longer to reduce to the right consistency. Two pans working simultaneously is more efficient than one very overfull pan.
Expert Chef Tips
1. Butterfly thick chicken breasts for faster, more even simmering.
Thick chicken breasts — especially those over 1 inch at the thickest point — take much longer to simmer through and risk drying out on the outside before the center is safe. Butterflying (slicing horizontally almost all the way through and opening like a book) creates two thinner halves that cook evenly and quickly, producing a juicier finished result in the same simmer time.
2. Finish with a small knob of cold butter for restaurant-level gloss.
This technique, called monter au beurre in classical French cooking, involves whisking a tablespoon of cold butter into the finished sauce just before serving. The cold fat emulsifies into the warm liquid and creates an unmistakable glossy sheen and silky mouthfeel that separates a home-cooked sauce from a professional one.
3. Reserve a small ladle of sauce before adding the chicken back in.
Spoon two or three tablespoons of the finished sauce into a small bowl before returning the chicken to the skillet. When you plate the dish, drizzle that reserved sauce over the top — it’s slightly thicker and more concentrated, and it makes the dish look and taste like you spent considerably more time on it than you did.
4. Season the sauce in layers, not all at once.
Add a small pinch of salt at each stage — when searing the chicken, when building the sauce, and again at the final taste. This builds seasoning into every component rather than trying to salt-correct at the end. A well-layered dish tastes balanced and full; a dish seasoned only at the end often tastes like it has salt sitting on top of it rather than woven through it.
5. Let the sauce tell you when it’s ready — not the timer.
The right consistency for this sauce is when it coats the back of a spoon and a line drawn through it with your finger holds its shape for a second or two. If the sauce is still very thin and watery at the 12-minute mark, remove the lid, raise the heat slightly to medium-low, and simmer uncovered for 2 to 3 more minutes. If it thickens too much, a splash of warm broth brings it right back.
Recipe Summary
This creamy garlic parmesan chicken is a 35-minute, one-skillet dinner built around the simmering method — where the sauce develops real depth and the chicken cooks gently in the cream until it’s tender, juicy, and infused with the flavors around it. A quick initial sear builds the flavor foundation, and everything after that happens at a gentle, low bubble that produces a velvety Parmesan sauce no jarred product can match. Serve it over pasta, polenta, or mashed potatoes and make sure there’s bread nearby for the sauce.
Conclusion
There’s something quietly satisfying about a dish that looks complicated but comes together in one pan in under 40 minutes. This creamy garlic parmesan chicken is exactly that recipe — the kind you pull out when you want dinner to feel like an occasion without actually working for one. The simmering method does the heavy lifting, the sauce practically makes itself, and the result is consistently, reliably delicious. Give it a try tonight, and don’t forget to save the recipe for next week — because you will definitely want to make it again. For more easy weeknight chicken ideas your family will love, explore Best Cheesy Tater Tot Casserole — Easy 5-Ingredient Bake.
Creamy Garlic Parmesan Chicken — Easy 5-Star Recipe
Description
Some recipes earn a permanent place in your weekly rotation not because they're trendy, but because they're quietly, reliably extraordinary. Creamy garlic parmesan chicken is exactly that kind of dish. Simmered low and slow in a velvety, parmesan-laced sauce that builds layer by layer in a single pot, this recipe turns simple pantry staples into something that tastes genuinely restaurant-worthy. The sauce develops depth as it gently bubbles around the chicken — the garlic softens and sweetens, the parmesan melts into the cream, and the whole thing comes together in about 35 minutes with very little active effort. Whether you're cooking for a quiet weeknight dinner or hosting friends and want something that looks far more impressive than the effort required, this dish delivers every single time.
Ingredients
Instructions
-
Step-by-Step Instructions
-
Step 1: Pound and Season the Chicken
-
If any of your chicken breasts are significantly thicker than ¾ inch at their widest point, place them between two sheets of plastic wrap and pound them gently to an even thickness using a meat mallet or rolling pin. Even thickness is critical for simmering — it ensures the chicken cooks through at the same rate rather than leaving the thick end raw while the thin end dries out. Season both sides of each breast generously with salt, pepper, garlic powder, and Italian seasoning.
-
Step 2: Sear the Chicken First
-
Heat 2 tablespoons of olive oil in a large deep skillet over medium-high heat until shimmering. Add the seasoned chicken breasts and sear for 3 to 4 minutes per side until a golden-brown crust forms on each surface — you're looking for a deep, even color and a crust that releases cleanly from the pan. This step is about building color and flavor, not cooking the chicken through. Transfer the seared chicken to a plate and set aside — it will finish cooking in the sauce during the simmer.
-
💡 Embedded Tip: Don't skip the sear, even though the chicken finishes by simmering. Those browned bits left behind on the pan — the fond — dissolve into the sauce and are the single biggest reason this recipe tastes richer than its ingredient list suggests.
-
Step 3: Build the Aromatic Base
-
Reduce the heat to medium-low. Add the tablespoon of butter to the same skillet and let it melt, then add the minced garlic. Stir constantly for 45 to 60 seconds, just until the garlic turns pale golden and the aroma fills the kitchen — fragrant and nutty, not sharp or bitter. If the garlic starts to brown too quickly, pull the pan off the heat for 10 seconds, then return it. Burnt garlic cannot be fixed and will make the entire sauce taste acrid.
-
Step 4: Add the Cream and Broth
-
Pour in the heavy cream and chicken broth together, stirring as you add them to deglaze the pan and lift any remaining fond from the bottom. Add the Dijon mustard and dried Italian seasoning and stir to combine fully. Raise the heat to medium and bring the sauce to a gentle simmer — you're looking for small, lazy bubbles breaking the surface around the edges of the pan, not a rolling boil.
-
💡 Embedded Tip: Watch the simmer carefully as the sauce heats up. The moment you see those small, steady bubbles forming (not aggressive bubbling), that's your cue to add the cheese. A true simmer holds flavor in the sauce — a full boil can cause the cream to separate.
-
Step 5: Add the Parmesan
-
Reduce the heat to low, then add the freshly grated Parmesan in two or three additions, stirring between each to allow it to melt smoothly before the next goes in. Adding all the cheese at once can cause it to clump rather than incorporate. The sauce will thicken visibly as the cheese melts — it should coat the back of a spoon within about 2 minutes. Season with a small pinch of salt and black pepper and stir to combine.
-
For food-safe guidance on handling and storing dairy-based sauces like this one, the FDA's safe food handling guidelines are a reliable reference.
-
Step 6: Simmer the Chicken Through
-
Nestle the seared chicken breasts back into the sauce, skin-side up if applicable, and spoon the sauce generously over the top of each piece. Reduce the heat to low, cover the skillet with a lid, and let the chicken simmer gently for 12 to 15 minutes, until an instant-read thermometer inserted into the thickest part of the largest breast reads 165°F. The sauce will continue to thicken slightly as the chicken finishes cooking, and the liquid the chicken releases will fold into the sauce, making it even more savory and layered.
Nutrition Facts
Servings 4
- Amount Per Serving
- Calories 520kcal
- % Daily Value *
- Total Fat 34g53%
- Saturated Fat 18g90%
- Protein 46g92%
* Percent Daily Values are based on a 2,000 calorie diet. Your daily value may be higher or lower depending on your calorie needs.