Crispy Garlic Parmesan Fish Bites – Best 30-Min Recipe

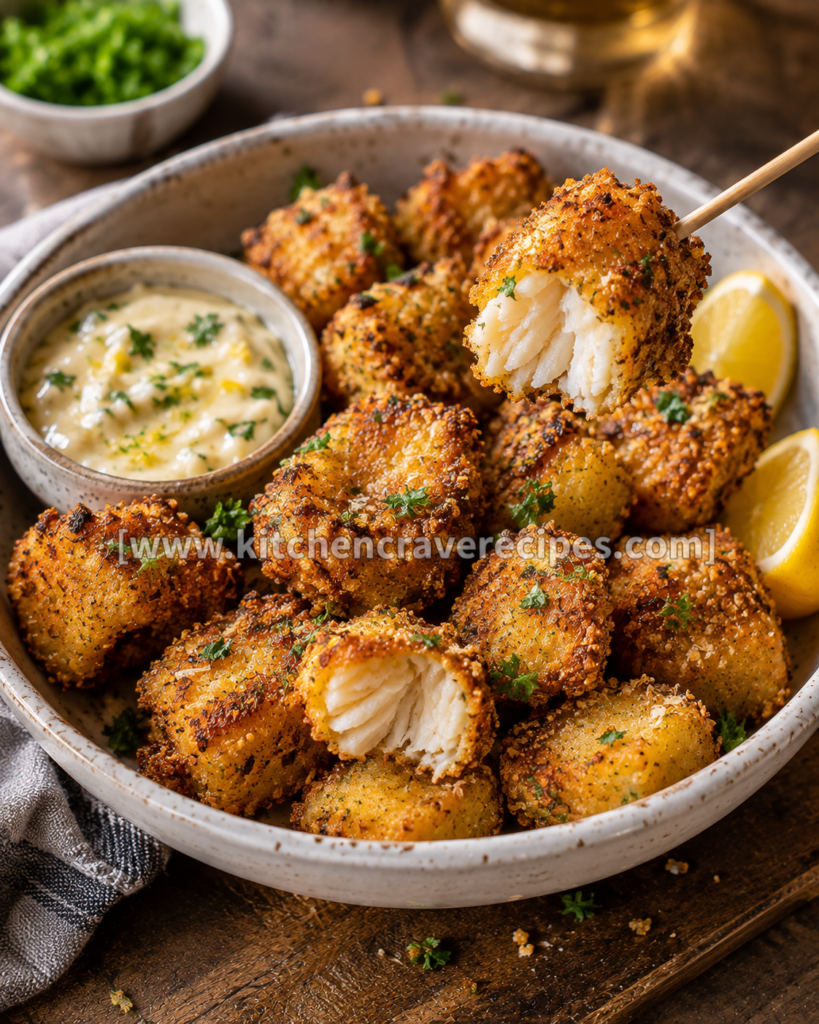

If you’ve been searching for a fish dish that even the most reluctant seafood eaters will demolish, these crispy garlic parmesan fish bites are your answer. Chunks of flaky white fish get coated in a golden, deeply seasoned panko and Parmesan crust — baked at high heat until shatteringly crisp on the outside and perfectly tender inside. The photo says it all: that orange-gold crust, the flaky white interior visible where one bite has been broken open, and a small ramekin of creamy herb dipping sauce waiting alongside. This is the kind of appetizer that looks like serious effort but clocks in at just 30 minutes from start to finish. Whether you’re feeding kids who normally refuse fish, hosting a casual get-together, or just craving something satisfying on a weeknight, this recipe covers every angle without asking much of you at all.
Recipe Quick Info
| Detail | Info |
|---|---|
| Prep Time | 15 minutes |
| Cook Time | 15 minutes |
| Total Time | 30 minutes |
| Servings | 4 |
| Cuisine | American |
| Course | Appetizer / Snack |
| Cooking Method | Baking |
| Calories | ~310 kcal per serving |
| Difficulty | Easy |
Why You’ll Love This Recipe
- That crust is genuinely spectacular — panko breadcrumbs mixed with Parmesan and garlic bake into a shatteringly crisp, deeply golden coating that holds up even after sitting on the plate for a few minutes.
- Ready in 30 minutes start to finish — prepped, baked, and on the table faster than most takeout orders would arrive at your door.
- Kid-approved and adult-worthy at the same time — the mild, flaky fish interior and the savory-cheesy crust appeal to almost every palate, even hesitant seafood eaters.
- Baked, not deep-fried — all the crunch without the mess, the oil splatter, or the extra calories that come with a deep fryer.
- Creamy herb dipping sauce included — served alongside in a small ramekin exactly as shown, the cool, tangy dip is the perfect foil for the hot, crispy bites.
- Endlessly flexible — swap the fish variety, adjust the seasoning, or change up the dipping sauce and this recipe adapts without complaint.
- Minimal cleanup — one bowl for the coating, one baking sheet, done. The whole operation is straightforward from setup to serving.
Ingredients
For the Fish Bites
- 1½ lbs firm white fish fillets (cod or haddock work best), cut into 1½-inch chunks
- 1 cup panko breadcrumbs
- ½ cup finely grated Parmesan cheese
- 3 cloves garlic, minced (about 1 tablespoon)
- ½ teaspoon garlic powder
- ½ teaspoon smoked paprika
- ½ teaspoon kosher salt
- ¼ teaspoon freshly ground black pepper
- 2 tablespoons fresh flat-leaf parsley, finely chopped (plus extra for garnish)
- 2 tablespoons unsalted butter, melted
- 2 tablespoons olive oil
- 2 large eggs, lightly beaten
- ¼ cup all-purpose flour (for dredging)
For the Creamy Herb Dipping Sauce
- ½ cup sour cream
- 2 tablespoons mayonnaise
- 1 tablespoon fresh lemon juice
- 1 tablespoon fresh chives or parsley, finely chopped
- 1 small clove garlic, minced
- Salt and pepper to taste
Optional Add-Ins
- Zest of 1 lemon (adds brightness to the panko coating)
- ¼ teaspoon cayenne pepper (for gentle background heat)
- 2 tablespoons finely grated Pecorino Romano (adds sharpness alongside the Parmesan)
Substitution Table
| Original Ingredient | Substitution | Notes |
|---|---|---|
| Cod or haddock | Tilapia, pollock, or halibut | Any firm white fish works; avoid thin, flaky fish like sole |
| Panko breadcrumbs | Regular breadcrumbs | Less crunchy result; panko is strongly preferred for texture |
| Parmesan cheese | Pecorino Romano | Saltier and sharper — reduce added salt by half |
| All-purpose flour | Gluten-free 1:1 baking flour | Identical behavior for dredging |
| Sour cream (dip) | Full-fat Greek yogurt | Same tang; slightly higher protein, slightly thinner consistency |
| Fresh parsley | Fresh dill | Pairs exceptionally well with fish — a natural swap |
| Unsalted butter | Vegan butter | Same browning behavior; keeps it dairy-free alongside a dairy-free Parmesan |
Kitchen Tools Needed
- Oven — preheated to 425°F; the high baking temperature is what drives the panko to a deep golden-brown
- Rimmed baking sheet — essential for baking; the rim prevents drips and supports even air circulation around each piece
- Wire cooling rack — placed inside the rimmed baking sheet, elevates the fish bites so heat circulates underneath for an all-around crispy crust
- Parchment paper — lines the baking sheet under the rack for easy cleanup
- 3 shallow bowls or plates — for the three-stage dredging setup (flour → egg → panko coating)
- Tongs or a fork — for moving fish pieces through the dredging stages without breaking them
- Pastry brush — for applying melted butter and olive oil to the coated bites before baking
- Instant-read thermometer — for confirming the fish has reached the safe internal temperature
- Small mixing bowl — for whisking together the dipping sauce
- Chef’s knife and cutting board — for portioning the fish into uniform chunks
How to Bake Crispy Garlic Parmesan Fish Bites Perfectly Every Time
Step 1: Preheat the Oven and Prep the Baking Setup
Preheat your oven to 425°F and position the rack in the upper-middle slot — not the top rack (that’s for broiling), but high enough to encourage rapid surface browning. Set a wire rack inside a rimmed parchment-lined baking sheet. This elevated setup is the single most important baking technique for this dish: hot air circulates fully around each piece, crisping the bottom just as effectively as the top and sides so no side ends up pale and soft.
Step 2: Make the Dipping Sauce
In a small bowl, whisk together the sour cream, mayonnaise, lemon juice, minced garlic, and fresh chives or parsley. Season with salt and pepper to taste. Cover and refrigerate until serving — the sauce actually improves after 10–15 minutes as the garlic mellows slightly into the cream base. This can be made up to 24 hours ahead with no quality loss.
Step 3: Set Up the Dredging Station
Arrange three shallow bowls in a line. Fill the first with the all-purpose flour seasoned with a pinch of salt and pepper. Crack the eggs into the second bowl and beat lightly. In the third bowl, combine the panko, grated Parmesan, minced garlic, garlic powder, smoked paprika, salt, pepper, and chopped parsley — stir well to distribute the Parmesan evenly throughout the panko. Whisk the melted butter and olive oil together in a small cup and set it nearby with a pastry brush.
Step 4: Pat the Fish Dry and Cut into Chunks
Remove the fish fillets from the refrigerator and pat every surface completely dry with paper towels. Cut into 1½-inch chunks, keeping them as uniform as possible for even baking. Dry fish is critical here — any surface moisture creates steam in the hot oven, which softens the crust from the inside and prevents that shatteringly crispy texture visible in the photo.
Embedded Tip: If your fish is particularly wet or previously frozen, salt it lightly 10 minutes before patting dry. The salt draws moisture to the surface, which you then remove with the paper towel — it’s a small extra step that makes a real difference in crust adhesion.
Step 5: Dredge Each Fish Piece Through All Three Stages
Working one piece at a time, dredge the fish in flour and shake off the excess — a thin, even coat is all you need. Dip in the beaten egg, letting excess drip off. Press firmly into the panko-Parmesan mixture on all sides, making sure the crust adheres completely. Set on the wire rack. Repeat with all pieces, keeping them spaced at least ½ inch apart so hot air can reach every surface.
Embedded Tip: Press the panko coating onto the fish with gentle but firm pressure rather than just rolling it through. Active pressing increases how much of the crumb mixture bonds to the surface — which directly determines how thick and crunchy the finished crust is.
Step 6: Brush with Butter-Oil Mixture and Bake
Using the pastry brush, coat the top and visible sides of each dredged bite with the melted butter and olive oil mixture. This fat layer is what transforms the panko from pale and chalky to deeply golden and crisp in the oven — it’s the shortcut to a genuinely fried-looking crust without any frying. Slide the baking sheet into the preheated 425°F oven and bake for 12–15 minutes until the coating is a deep amber-gold, the fish feels firm when pressed gently with tongs, and an instant-read thermometer inserted into the thickest piece reads 145°F.
According to the FDA Fish and Shellfish Safety guidelines, fish should reach an internal temperature of 145°F to be considered safe to eat.
Step 7: Rest Briefly, Garnish, and Serve
Remove the baking sheet from the oven and let the bites rest on the rack for 2 minutes — this brief pause lets the crust firm up slightly after the intense oven heat, so it doesn’t soften immediately when plated. Scatter fresh parsley over the top. Transfer to a white serving plate, arrange the small ramekin of creamy herb dipping sauce alongside, and serve immediately while the bites are at their crunchiest.
Pro Tips for Perfect Crispy Garlic Parmesan Fish Bites
1. Use a wire rack inside the baking sheet — always.
Without the rack, the bottoms of the bites sit directly on the hot pan surface and steam in their own moisture. The rack allows dry oven air to reach all sides equally, which is the entire difference between a crispy bottom and a soggy one.
2. Mix Parmesan directly into the panko, not in a separate step.
Parmesan dispersed through the breadcrumbs melts during baking and acts as a natural binder, helping the coating hold together as a unified crust rather than shedding individual crumbs when bitten.
3. Baking-method Pro Tip — toast the panko before coating.
Spread the panko on a dry baking sheet and toast it at 375°F for 4–5 minutes until light golden before mixing in the Parmesan and seasonings. Pre-toasted panko goes into the oven already partially crisped, which means it reaches that deep amber color faster and with less risk of the fish overcooking before the crust is done.
4. Use a combination of butter and olive oil — not one alone.
Butter alone can burn at 425°F before the crust has fully set. Olive oil alone doesn’t provide the same richness or color. The combination of the two gives you the best of both: golden color, good flavor, and enough smoke-point buffer to bake at high heat safely.
5. Don’t skip the flour dredge, even if it seems minor.
The flour layer is what helps the egg adhere to the fish surface. Without it, the egg rolls off slick fish skin rather than coating it, and the panko has nothing to bond to — the crust falls off in the oven.
Common Mistakes to Avoid
1. Skipping the wire rack and baking directly on the pan. (Method-specific mistake)
Baking fish bites directly on a flat pan traps steam beneath each piece, making the bottoms pale and soft no matter how hot the oven is. Always elevate on a rack — this is non-negotiable for genuinely crispy results in the oven.
2. Not patting the fish dry before dredging.
Surface moisture is the enemy of crust adhesion. Wet fish prevents the flour from sticking evenly, which causes the entire coating to slide off in patches during baking. Paper towels and 30 seconds of careful drying change everything.
3. Using thin or delicate fish varieties.
Sole, flounder, or other very thin, delicate fillets fall apart during cutting and dredging. Stick to firm white fish — cod, haddock, halibut, or pollock — that holds its shape through three stages of coating and 15 minutes of high-heat baking.
4. Crowding the baking rack.
Pieces placed too close together trap humidity between them, which steams rather than bakes the crust. Each bite needs at least ½ inch of clearance on all sides — bake in two batches on two racks if needed.
5. Applying too much coating too thickly.
A thick uneven crust bakes unevenly: the outer layer scorches while the layer closest to the fish stays pale and soft. A firm, even press of panko — not a packed clump — is what bakes uniformly golden all the way through.
6. Over-baking past 145°F internal temperature.
Fish continues to cook from residual heat for about 1–2 minutes after leaving the oven. Pulling the bites at exactly 145°F and resting them briefly produces moist, flaky interiors. At 155°F and beyond, white fish dries out and becomes chalky — no amount of dipping sauce fully compensates for it.
7. Making the dipping sauce immediately before serving.
A freshly made garlic-cream sauce tastes sharp and raw. Giving it even 15 minutes in the refrigerator allows the garlic to mellow and the flavors to meld into something genuinely smooth and balanced — it’s a small timing adjustment with a noticeable payoff.
Variations
Healthier Version
Reduce the butter to 1 tablespoon and increase the olive oil to 2½ tablespoons — you keep the fat-application step that crisps the coating but lower the saturated fat slightly. Swap the sour cream in the dipping sauce for nonfat Greek yogurt. The bites will bake to the same golden color with negligibly lighter macros.
Vegetarian Version
Replace the fish with 1½-inch cubes of extra-firm tofu (pressed for at least 30 minutes) or thick-cut cauliflower florets. Both take the dredge and panko-Parmesan coating beautifully and bake at the same 425°F temperature. Note that this is a genuinely different texture from the flaky fish interior — the crust, however, will be equally crisp and golden.
Spicy Version
Add ½ teaspoon of cayenne pepper and ½ teaspoon of hot smoked paprika to the panko mixture. Stir 1 teaspoon of sriracha into the dipping sauce. The heat level is moderate — present enough to notice on every bite but not overwhelming alongside the creamy dip.
Gluten-Free Version
Replace the all-purpose flour with a certified gluten-free 1:1 baking flour, and swap the panko for certified gluten-free panko breadcrumbs (widely available in major grocery stores). The behavior at every dredging stage is identical. Confirm your Parmesan is processed in a gluten-free facility if serving someone with celiac disease.
Low-Carb / Keto Version
Replace the panko with a mixture of ½ cup finely crushed pork rinds and ¼ cup almond flour. The pork rind coating bakes up remarkably crispy — arguably crunchier than standard panko — and adds zero net carbs. Skip the flour dredge stage entirely and go directly from egg wash to the pork rind coating, since the almond flour in the crust mixture acts as the binding layer.
What to Serve With Crispy Garlic Parmesan Fish Bites
- Creamy herb dipping sauce — included in the recipe, cool and tangy, essential as shown in the photo.
- Classic coleslaw — the crisp, lightly acidic slaw cuts through the richness of the Parmesan crust perfectly.
- Lemon wedges — a squeeze of fresh lemon over the hot bites right before eating lifts the whole plate.
- Seasoned French fries or sweet potato fries — the obvious and completely correct pairing for a full snack spread.
- Simple arugula salad with lemon vinaigrette — peppery and bright, it balances the heavy, savory coating without competing with it.
- Tartar sauce — for a more traditional fish-and-sauce pairing alongside or instead of the herb cream dip.
- Steamed jasmine rice and stir-fried vegetables — turns the bites into a complete dinner rather than a standalone appetizer. Try pairing with Easy 30-Minute Sticky Honey Garlic Glazed Chicken.
- Cold sparkling water with lemon or a crisp lager — both complement the salty, garlicky crust without overwhelming the delicate fish flavor. For more easy weeknight seafood ideas, browse Best Cheesy Garlic Potato Bites – Easy 6-Step Recipe.
Storage Instructions
Refrigerator
Let the bites cool fully before storing — sealing them warm traps steam and immediately softens the crust. Transfer to an airtight container lined with paper towels (the paper towel absorbs any residual moisture and helps maintain some crispness). Refrigerate for up to 3 days.
Freezer
These freeze well both before and after baking. To freeze unbaked: dredge and coat the bites, freeze on a parchment-lined sheet until solid, then transfer to a zip-top bag and freeze up to 1 month — bake directly from frozen at 425°F, adding 5–7 extra minutes. To freeze baked: cool completely, freeze individually on a sheet first, then bag. Use within 1 month for best texture.
Shelf Life Summary
| Storage Method | Duration |
|---|---|
| Room temperature | Up to 2 hours (discard after) |
| Refrigerator (airtight) | Up to 3 days |
| Freezer (unbaked) | Up to 1 month |
| Freezer (baked) | Up to 1 month |
Reheating Instructions
Oven (Best Method — Restores the Crust)
Preheat oven to 400°F. Place bites on a wire rack set over a baking sheet. Bake for 8–10 minutes until the coating is hot and re-crisped and the fish is warmed through to 145°F. This method comes closest to the original texture.
Microwave (Fastest — Softer Result)
Place bites on a microwave-safe plate without covering them. Microwave on 70% power in 30-second intervals until heated through. Expect a softer crust — microwaving reintroduces moisture into the coating and there is no way to fully avoid this.
Stovetop (Good for Small Batches)
Heat a non-stick or stainless skillet over medium heat with a thin drizzle of olive oil. Add the bites in a single layer and cover with a lid. Cook for 2–3 minutes per side until heated through, then uncover for the final 60 seconds to re-crisp the exterior. Per the USDA Food Safety and Inspection Service guidelines, all reheated fish should reach an internal temperature of 145°F before consuming.
Nutrition Facts
Per serving (approximately 5–6 bites with 2 tablespoons dipping sauce, based on 4 servings)
| Nutrient | Amount |
|---|---|
| Calories | ~310 kcal |
| Total Fat | 15g |
| Saturated Fat | 5g |
| Cholesterol | 130mg |
| Sodium | 540mg |
| Total Carbohydrates | 18g |
| Dietary Fiber | 1g |
| Sugars | 1g |
| Protein | 28g |
Nutrition Disclaimer: These values are estimates calculated using standard nutritional databases and will vary based on the specific fish variety, brand of breadcrumbs and cheese, portion size, and any ingredient substitutions made. This information is intended for general reference only and should not replace advice from a registered dietitian or qualified healthcare provider.
Frequently Asked Questions
1. What’s the best fish to use for crispy garlic parmesan fish bites?
Cod is the top choice — it’s firm enough to cut into clean chunks, mild enough that the garlic-Parmesan coating shines through, and readily available year-round. Haddock and halibut are excellent alternatives. Avoid very thin or delicate fillets that fall apart during dredging.
2. Can I use an air fryer instead of baking?
Yes, but the method changes. Air fry at 400°F for 8–10 minutes, flipping once at the halfway point. The air fryer circulates hot air more aggressively than a conventional oven, so the crust crisps slightly faster — watch closely after the 7-minute mark to avoid over-browning the Parmesan.
3. Do I have to use a wire rack inside the baking sheet?
You don’t have to, but results will be noticeably different without it. Baking directly on the pan means the bottom surfaces steam rather than crisp. If you don’t have a rack, flip the bites once at the 8-minute mark to expose the bottom surface directly to the pan heat and brown it manually.
4. Can I make the coating ahead of time?
The panko-Parmesan mixture can be mixed and stored in an airtight container at room temperature for up to 2 days. The dipping sauce can be made up to 24 hours ahead and refrigerated. However, don’t dredge the fish until immediately before baking — pre-dredged fish sitting in the refrigerator absorbs moisture into the coating, which produces a soggy result.
5. Why does my crust fall off during baking?
Almost always caused by skipping or rushing the flour dredge stage. The flour creates a dry, slightly tacky layer the egg can grip. Without it, the egg doesn’t adhere to the fish surface evenly, so the panko has no stable base and peels away in the oven.
6. Can I use frozen fish?
Yes — thaw completely in the refrigerator overnight and then pat very thoroughly dry before cutting and dredging. Previously frozen fish releases significantly more water than fresh, so the drying step is even more critical. Salting lightly and waiting 10 minutes before patting dry (as noted in the embedded tip) is especially helpful with previously frozen fish.
7. Is baking really as crispy as frying?
With the right technique — wire rack, preheated oven at 425°F, pre-toasted panko, and a butter-oil brush — baked crispy garlic parmesan fish bites get genuinely close to fried in terms of crust texture. They won’t be quite as uniformly crisp on every surface, but most people eating them can’t tell the difference, and the cleanup is dramatically simpler.
8. How do I keep the bites crispy if serving at a party?
Keep them on the wire rack on the baking sheet and place in a 200°F oven to hold for up to 20 minutes after baking. Any longer and the fish will begin to dry out. For large groups, bake in two batches timed 15–20 minutes apart rather than trying to hold the first batch for an extended period.
9. What’s the right internal temperature for cooked fish?
The FDA recommends 145°F as the safe internal temperature for all fish. At this temperature, white fish like cod will be opaque throughout, will flake easily when pressed gently, and will show no translucency in the thickest part.
10. Can I make these with salmon instead of white fish?
You can, though the flavor profile changes significantly — salmon is oilier and richer than cod, and the garlic-Parmesan coating takes on a slightly different character against it. Cut the salmon into 1½-inch chunks, proceed with the same dredge, and reduce baking time by 1–2 minutes since salmon cooks slightly faster than thick-cut cod.
11. My Parmesan burned before the panko was golden — how do I prevent this?
This happens when the oven runs hot or the bites are placed too close to the top heating element. Move the rack down one position and confirm your oven temperature with an inexpensive oven thermometer — many ovens run 25–50°F hotter than indicated. Pre-toasting the panko (as noted in Pro Tip #3) also helps because the crust requires less total baking time to reach color.
Expert Chef Tips
1. Buy a block of Parmesan and grate it yourself.
Pre-shredded Parmesan sold in bags contains anti-caking agents (usually cellulose) that prevent it from melting cleanly into the panko. A freshly grated block — even 2 minutes of work with a box grater — produces a coating that binds, melts, and browns dramatically better.
2. Size consistency matters more than you think.
Uniform 1½-inch chunks don’t just look better on the plate — they all reach 145°F internal temperature at exactly the same time. Irregular chunks mean some are overcooked and dry while others are still underdone when you pull the sheet from the oven.
3. Let the coated bites rest on the rack for 5 minutes before baking.
After dredging, setting the bites aside for 5 minutes allows the moisture from the egg wash to slightly hydrate the outer panko layer, which helps it grip the surface more firmly before heat sets it. It’s a minor step with a noticeable impact on how well the crust stays intact.
4. Taste the panko mixture before coating.
Mix a pinch between your fingers and taste it — this is your only real opportunity to assess whether the seasoning level is right before it’s locked onto 24 pieces of fish. Adjust salt and garlic at this stage rather than trying to fix it at the table.
5. Serve on a warm plate.
A cold plate immediately begins pulling heat out of the bites and softening the crust from the bottom up. Run the serving plate under hot water and dry it thoroughly before plating — it’s a simple restaurant habit that keeps the crust crispier for significantly longer at the table.
Recipe Summary
These crispy garlic parmesan fish bites come together in four key moves: dry the fish thoroughly, set up a proper three-stage dredge, elevate on a wire rack for all-around airflow, and bake at 425°F until deep amber-gold. The combination of panko, real Parmesan, and a butter-olive oil brush produces a crust that genuinely rivals fried results — without a drop of frying oil. Served with a cool, garlicky cream dip, they’re ready in 30 minutes and disappear faster than almost anything else you’ll put on the table.
Conclusion
Some recipes earn a permanent place in the rotation because they solve a real problem: they’re fast enough for weeknights, impressive enough for guests, and crowd-pleasing enough that nobody at the table complains. These crispy garlic parmesan fish bites do exactly that. The crust is real, the fish is tender, and the dipping sauce ties the whole plate together in a way that feels complete. Make them once and you’ll already be thinking about when to make them again before the plate is even cleared.
Crispy Garlic Parmesan Fish Bites – Best 30-Min Recipe
Description
If you've been searching for a fish dish that even the most reluctant seafood eaters will demolish, these crispy garlic parmesan fish bites are your answer. Chunks of flaky white fish get coated in a golden, deeply seasoned panko and Parmesan crust — baked at high heat until shatteringly crisp on the outside and perfectly tender inside. The photo says it all: that orange-gold crust, the flaky white interior visible where one bite has been broken open, and a small ramekin of creamy herb dipping sauce waiting alongside. This is the kind of appetizer that looks like serious effort but clocks in at just 30 minutes from start to finish. Whether you're feeding kids who normally refuse fish, hosting a casual get-together, or just craving something satisfying on a weeknight, this recipe covers every angle without asking much of you at all.
Ingredients
Instructions
-
How to Bake Crispy Garlic Parmesan Fish Bites Perfectly Every Time
-
Step 1: Preheat the Oven and Prep the Baking Setup
-
Preheat your oven to 425°F and position the rack in the upper-middle slot — not the top rack (that's for broiling), but high enough to encourage rapid surface browning. Set a wire rack inside a rimmed parchment-lined baking sheet. This elevated setup is the single most important baking technique for this dish: hot air circulates fully around each piece, crisping the bottom just as effectively as the top and sides so no side ends up pale and soft.
-
Step 2: Make the Dipping Sauce
-
In a small bowl, whisk together the sour cream, mayonnaise, lemon juice, minced garlic, and fresh chives or parsley. Season with salt and pepper to taste. Cover and refrigerate until serving — the sauce actually improves after 10–15 minutes as the garlic mellows slightly into the cream base. This can be made up to 24 hours ahead with no quality loss.
-
Step 3: Set Up the Dredging Station
-
Arrange three shallow bowls in a line. Fill the first with the all-purpose flour seasoned with a pinch of salt and pepper. Crack the eggs into the second bowl and beat lightly. In the third bowl, combine the panko, grated Parmesan, minced garlic, garlic powder, smoked paprika, salt, pepper, and chopped parsley — stir well to distribute the Parmesan evenly throughout the panko. Whisk the melted butter and olive oil together in a small cup and set it nearby with a pastry brush.
-
Step 4: Pat the Fish Dry and Cut into Chunks
-
Remove the fish fillets from the refrigerator and pat every surface completely dry with paper towels. Cut into 1½-inch chunks, keeping them as uniform as possible for even baking. Dry fish is critical here — any surface moisture creates steam in the hot oven, which softens the crust from the inside and prevents that shatteringly crispy texture visible in the photo.
-
Embedded Tip: If your fish is particularly wet or previously frozen, salt it lightly 10 minutes before patting dry. The salt draws moisture to the surface, which you then remove with the paper towel — it's a small extra step that makes a real difference in crust adhesion.
-
Step 5: Dredge Each Fish Piece Through All Three Stages
-
Working one piece at a time, dredge the fish in flour and shake off the excess — a thin, even coat is all you need. Dip in the beaten egg, letting excess drip off. Press firmly into the panko-Parmesan mixture on all sides, making sure the crust adheres completely. Set on the wire rack. Repeat with all pieces, keeping them spaced at least ½ inch apart so hot air can reach every surface.
-
Embedded Tip: Press the panko coating onto the fish with gentle but firm pressure rather than just rolling it through. Active pressing increases how much of the crumb mixture bonds to the surface — which directly determines how thick and crunchy the finished crust is.
-
Step 6: Brush with Butter-Oil Mixture and Bake
-
Using the pastry brush, coat the top and visible sides of each dredged bite with the melted butter and olive oil mixture. This fat layer is what transforms the panko from pale and chalky to deeply golden and crisp in the oven — it's the shortcut to a genuinely fried-looking crust without any frying. Slide the baking sheet into the preheated 425°F oven and bake for 12–15 minutes until the coating is a deep amber-gold, the fish feels firm when pressed gently with tongs, and an instant-read thermometer inserted into the thickest piece reads 145°F.
-
According to the FDA Fish and Shellfish Safety guidelines, fish should reach an internal temperature of 145°F to be considered safe to eat.
-
Step 7: Rest Briefly, Garnish, and Serve
-
Remove the baking sheet from the oven and let the bites rest on the rack for 2 minutes — this brief pause lets the crust firm up slightly after the intense oven heat, so it doesn't soften immediately when plated. Scatter fresh parsley over the top. Transfer to a white serving plate, arrange the small ramekin of creamy herb dipping sauce alongside, and serve immediately while the bites are at their crunchiest.
Nutrition Facts
Servings 4
- Amount Per Serving
- Calories 310kcal
- % Daily Value *
- Total Fat 15g24%
- Saturated Fat 5g25%
- Protein 28g57%
* Percent Daily Values are based on a 2,000 calorie diet. Your daily value may be higher or lower depending on your calorie needs.

You may also like...