
High Protein Crispy Chicken That’s Actually Baked, Not Fried
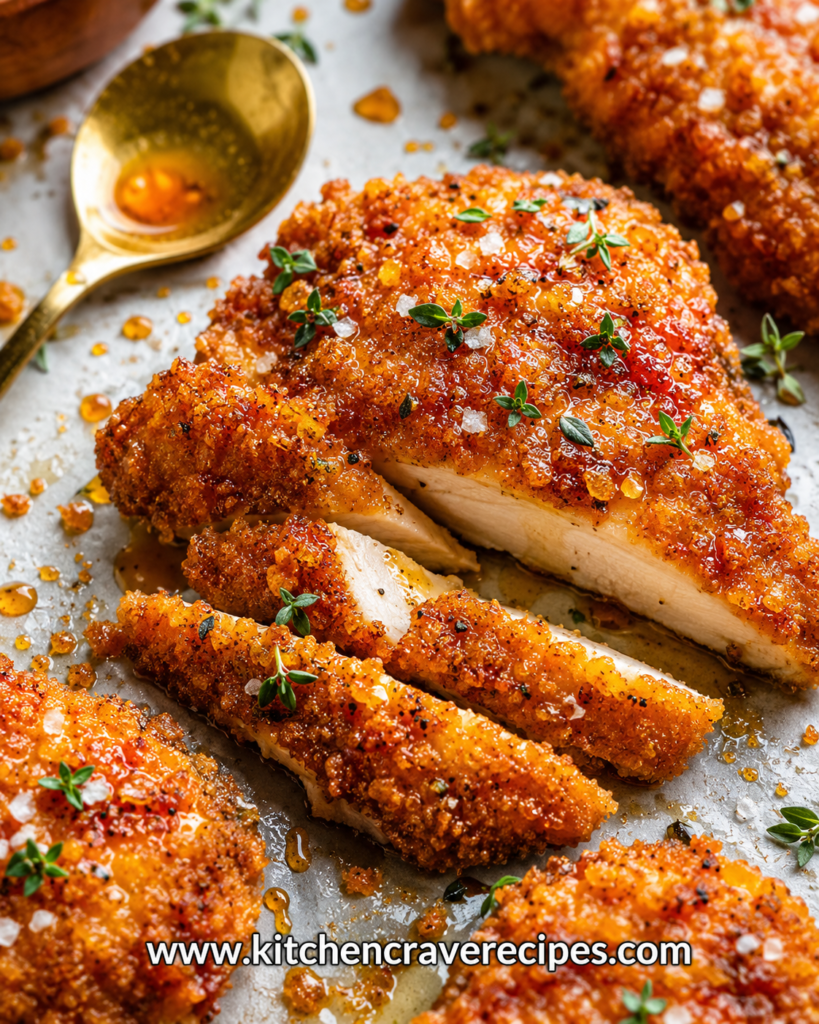
Crispy chicken that delivers serious protein without the deep fryer — that’s exactly what this recipe is built to do. This high protein crispy chicken features bone-in or thick-cut boneless chicken breasts coated in a seasoned panko crust, baked at high heat until shatteringly crunchy on the outside and perfectly juicy within. The photo shows exactly what you’re after: a deep amber, crackly crust glistening with a light honey drizzle, finished with fresh thyme sprigs and flaky sea salt scattered across a parchment-lined baking sheet.
Every component earns its place. The panko breadcrumb crust toasts directly in the oven’s dry heat, developing the color and crunch typically associated with pan-frying — no oil bath required. A touch of honey drizzled on in the final minutes caramelizes against the hot crust, creating those dark, lacquered spots visible in the photo. At 40 grams of protein per serving, this is comfort food that works as hard as you do.
Recipe Quick Info
| Detail | Info |
|---|---|
| Prep Time | 15 minutes |
| Cook Time | 25 minutes |
| Total Time | 40 minutes |
| Servings | 4 |
| Cuisine | American |
| Course | Main Dish / Dinner |
| Cooking Method | Baking |
| Estimated Calories | ~480 per serving |
| Difficulty | Easy |
Why You’ll Love This High Protein Crispy Baked Chicken
- 40 grams of protein per serving — no compromise. Thick-cut chicken breast is one of the leanest, highest-protein proteins available, and this recipe keeps all of it while adding zero heavy frying oil.
- The crust is genuinely crunchy, not just pale and soft. Toasting the panko before coating and baking at 425°F creates the audible crunch you expect from fried chicken — delivered entirely by the oven.
- That honey drizzle is not optional. The light honey finish caramelizes against the hot baked crust in the final minutes, producing those amber-lacquered, slightly sticky spots you see in the photo.
- One sheet pan, almost no cleanup. Everything happens on a parchment-lined baking sheet — no deep skillet of oil, no splatter guard, no lingering frying smell in the kitchen.
- Fresh thyme and flaky sea salt complete the picture. These two garnishes aren’t decorative — the thyme adds an herbal, slightly floral note and the sea salt amplifies every flavor in the crust.
- Meal-prep friendly and freezer approved. Baked crispy chicken holds its structure better than fried chicken when stored and reheated correctly — it comes back crispy in the oven, not soggy.
- Works equally well for cutting or bulking. The macros are naturally lean. Adjust serving size or pair with different sides to fit your calorie target without changing the recipe itself.
Ingredients
For the Chicken
- 4 boneless, skinless chicken breasts (6–8 oz each), pounded to even thickness
- 1 teaspoon kosher salt
- ½ teaspoon black pepper
- ½ teaspoon garlic powder
- ½ teaspoon smoked paprika
- ¼ teaspoon cayenne pepper
For the Crispy Panko Crust
- 1½ cups panko breadcrumbs
- ½ cup freshly grated Parmesan
- 1 teaspoon garlic powder
- 1 teaspoon smoked paprika
- ½ teaspoon onion powder
- ½ teaspoon kosher salt
- ¼ teaspoon black pepper
- 2 tablespoons olive oil (for toasting the panko)
For the Egg Wash
- 2 large eggs
- 2 tablespoons Dijon mustard
- 1 tablespoon whole milk or water
For the Honey Finish and Garnish
- 2 tablespoons honey
- 1 tablespoon fresh thyme sprigs
- 1 teaspoon flaky sea salt (such as Maldon)
Optional Add-Ins
- ½ teaspoon dried oregano (add to the panko mixture for an Italian-leaning profile)
- 1 tablespoon hot sauce (mix into the egg wash for background heat)
- ¼ teaspoon lemon zest (add to the Parmesan-panko mixture for brightness)
Substitution Table
| Original Ingredient | Substitution | Notes |
|---|---|---|
| Panko breadcrumbs | Crushed rice crackers | Makes the dish gluten-free; similar crunch |
| Parmesan | Pecorino Romano | Saltier — reduce added salt in the panko mix by ¼ tsp |
| Chicken breast | Chicken thighs (boneless, skinless) | Fattier and more forgiving; adjust bake time to 28–30 min |
| Dijon mustard | Whole-grain mustard | Adds texture and a milder tang in the egg wash |
| Honey | Maple syrup | Caramelizes at the same temperature; slightly earthier finish |
| Smoked paprika | Regular paprika | Less smoky but same color and mild pepper flavor |
Kitchen Tools Needed
- Rimmed baking sheet (half-sheet pan)
- Wire cooling rack (fits inside the baking sheet)
- Parchment paper
- Large skillet (for toasting panko on the stovetop)
- Three shallow dishes or wide bowls (for the breading station)
- Meat mallet or rolling pin (for pounding chicken to even thickness)
- Instant-read thermometer
- Pastry brush (for the honey drizzle)
- Tongs
- Measuring cups and spoons
How to Bake High Protein Crispy Chicken Perfectly Every Time
Step 1: Preheat the Oven and Prep the Pan (5 minutes)
Preheat your oven to 425°F and position the rack in the upper-middle position. Line a rimmed baking sheet with parchment paper and set a wire rack on top — this is not optional for baking. Elevating the chicken on a rack allows hot air to circulate under the crust, so the bottom doesn’t steam and go soft against the pan. Lightly spray the rack with non-stick spray.
Step 2: Pound and Season the Chicken (5 minutes)
Place each chicken breast between two sheets of plastic wrap and pound to an even thickness of about ¾ inch using a meat mallet. Uniform thickness is the most important prep step for baking — uneven pieces cook at different rates, and the thin end dries out long before the thick end reaches 165°F. Season both sides of each breast with the salt, pepper, garlic powder, smoked paprika, and cayenne.
Embedded Tip: Don’t pound the chicken too thin. You want ¾ inch — just enough to even out the naturally thicker center without creating a cutlet so thin that it dries out in the high-heat oven before the crust has time to brown properly.
Step 3: Toast the Panko (4 minutes)
Heat a large dry skillet over medium heat. Add the panko breadcrumbs and stir constantly for 3–4 minutes until they turn a light golden-brown and smell nutty and toasted. Remove from heat immediately — they continue toasting from residual heat if you leave them. Transfer to a shallow bowl and stir in the Parmesan, garlic powder, smoked paprika, onion powder, salt, and pepper.
Embedded Tip: Pre-toasting the panko before baking is the single technique that separates genuinely crispy baked chicken from pale, soft baked chicken. Raw panko doesn’t get enough heat contact on a baking sheet to color deeply — toasting it first guarantees crunch regardless of everything else.
Step 4: Set Up the Breading Station (2 minutes)
Arrange three shallow dishes in a row: the first with the seasoned flour (or skip to egg wash directly if you prefer), the second with the egg wash (eggs, Dijon, and milk whisked together until smooth), and the third with the toasted panko mixture. Having everything in order before you start means no sticky-hand scrambling mid-bread.
Step 5: Bread the Chicken (5 minutes)
Working one piece at a time, dip each seasoned chicken breast into the egg wash, letting the excess drip off for a full 2 seconds — too much egg wash makes the crust gummy. Press it firmly into the panko mixture, coating all surfaces completely and pressing gently so the crumbs adhere. Place each coated breast on the prepared wire rack without overlapping.
Step 6: Bake the Chicken (20–22 minutes)
Slide the pan into the preheated 425°F oven on the upper-middle rack. Bake for 18 minutes undisturbed — opening the oven door repeatedly drops the temperature and can cause the crust to soften before it sets. At the 18-minute mark, check the internal temperature with an instant-read thermometer.
Food Safety Note: Chicken is safe to eat when the thickest point reaches 165°F, per USDA guidelines for safe poultry temperatures. Pull it at 160°F if you plan to add the honey drizzle and return it to the oven — carryover cooking will bring it the remaining 5 degrees.
Step 7: Add the Honey Drizzle and Finish Baking (3 minutes)
Once the chicken reaches 160°F internally and the crust is deep amber and crackly, use a pastry brush to lightly coat the top of each breast with honey. Return to the oven for 2–3 more minutes until the honey caramelizes against the crust, producing the sticky, lacquered amber color shown in the photo. Watch closely during this step — honey moves from caramelized to burned quickly at 425°F.
Step 8: Rest, Garnish, and Serve
Remove the baking sheet from the oven and let the chicken rest on the wire rack for 5 minutes. Resting allows the juices to redistribute so each slice stays moist rather than running out onto the cutting board. Scatter fresh thyme sprigs and flaky sea salt over the top, then slice and serve immediately.
Pro Tips for Perfect Baked Crispy Chicken
- Use a wire rack inside the baking sheet — every single time. Direct contact with the pan surface traps steam under the crust and turns it soggy on the bottom. The rack keeps the entire exterior exposed to circulating dry heat.
- Toast the panko on the stovetop before breading. This is the method-specific tip that changes everything about baked crispy chicken — pre-toasted panko enters the oven already golden, so it only needs to deepen in color rather than starting from pale and raw.
- Don’t bake from cold. Pull the chicken from the refrigerator 10 minutes before baking. Cold chicken in a hot oven means the exterior can overcook before the center comes up to temperature, which leads to a dry result.
- Apply the honey only in the final 2–3 minutes. Honey contains natural sugars that burn fast at 425°F. Adding it early means a bitter, dark crust rather than the glossy, caramelized finish visible in the photo.
- Rest before slicing — always. Five minutes off the heat lets the internal juices stabilize. Cut into it immediately and you lose that moisture to the cutting board before the first bite.
Common Mistakes to Avoid
1. Skipping the wire rack during baking.
Fix: This is the most common reason baked chicken has a soft, pale bottom. Always elevate on a rack so hot air circulates fully around every surface of the crust — top, sides, and bottom.
2. Not pre-toasting the panko.
Fix: Raw panko needs more heat contact than a baking sheet provides to turn golden. Toast it in a dry skillet first so it enters the oven already colored and only needs a few more minutes to crisp fully.
3. Opening the oven door repeatedly during baking.
Fix: Every time the door opens, the oven temperature drops significantly — potentially by 25–50°F — and the crust absorbs that moisture before it can set. Set a timer and leave the oven closed until the 18-minute mark. This is the method-specific baking mistake that ruins more crusts than anything else.
4. Pounding the chicken unevenly.
Fix: Uneven thickness means uneven cooking. The thin end dries out and toughens while the thick center is still underdone. Take 2 extra minutes to pound each breast to a consistent ¾-inch thickness before breading.
5. Using too much egg wash.
Fix: Excess egg makes the coating gummy rather than crispy. After dipping, hold each breast over the bowl and let it drip for a full 2 seconds before pressing into the panko. The coating should be thin and even, not thick and wet.
6. Applying honey too early in the bake.
Fix: Honey burns at oven temperatures above 375°F if left exposed for too long. Always apply it in the final 2–3 minutes only — just long enough to caramelize, not long enough to char bitter.
7. Skipping the resting period after baking.
Fix: Cutting the chicken immediately after pulling it from the oven releases all the internal moisture onto the board. Five minutes of rest produces a noticeably juicier result with no change to effort.
8. Using pre-shredded Parmesan in the crust.
Fix: Pre-shredded Parmesan contains anti-caking agents that prevent it from melting and adhering cleanly to the panko. Freshly grated Parmesan fuses into the crust and adds far more flavor and binding.
Variations
Healthy / Lower-Calorie Version
Reduce the Parmesan to 3 tablespoons and replace the full olive oil toss with a light olive oil spray directly on the panko-coated chicken before baking. This cuts approximately 60 calories per serving while maintaining the crunch. Skip the honey drizzle entirely and substitute a squeeze of fresh lemon over the crust after baking for brightness without added sugar.
Vegetarian Version
Substitute thick-cut extra-firm tofu slabs (pressed for 30 minutes and patted dry) for the chicken breast. The same pre-toasted panko crust, egg wash, and baking technique applies at 425°F, though tofu needs only 18 minutes total without the honey finish step. The protein content per serving drops but can be supplemented by pairing with a high-protein side like edamame or lentil salad.
Spicy Version
Add 1 teaspoon of chipotle powder and an extra ½ teaspoon of cayenne to the panko mixture. Mix 1 tablespoon of hot sauce directly into the egg wash. Swap the honey finish for a honey-sriracha blend (equal parts, brushed on in the final 2 minutes) for a sweet-heat lacquer that builds on the base recipe without requiring any technique changes.
Gluten-Free Version
Replace the panko breadcrumbs with an equal amount of finely crushed gluten-free rice crackers or certified GF panko (now widely available). All other ingredients in this high protein crispy chicken recipe are naturally gluten-free. The crunch and color are nearly identical — rice cracker-based crusts are sometimes even crispier than wheat panko because of the lower moisture content.
Low-Carb / Keto Version
Replace the panko entirely with a mixture of ½ cup finely ground almond flour and ½ cup freshly grated Parmesan. This crust is lower in carbs and bakes to a golden, slightly denser exterior than panko. Omit the honey drizzle and finish instead with a drizzle of garlic-infused olive oil and extra flaky sea salt. Pair with Honey Garlic Chicken Avocado Rice — Best 30-Min Bowl for a fully low-carb plate.
What to Serve With This High Protein Crispy Chicken
- Garlic mashed potatoes — creamy and rich, they complement the crunchy crust and honey finish without competing with the seasoning.
- Roasted asparagus with lemon zest — light, quick to make in the same oven window at 425°F, and nutritionally balanced alongside a high-protein main.
- Simple arugula salad with shaved Parmesan — the peppery, slightly bitter greens cut through the richness of the panko crust and honey glaze beautifully.
- Steamed jasmine rice or brown rice — neutral enough to let the chicken’s seasoning lead, and practical for meal-prep portioning.
- Honey mustard dipping sauce — two tablespoons of Dijon mixed with one tablespoon of honey echoes the flavors already in the recipe and requires zero extra cooking.
- Roasted sweet potato wedges — the natural sweetness pairs with the smoked paprika in the crust and makes the honey drizzle feel cohesive rather than out of place.
For a fresh, crunchy side that takes 10 minutes, check out Honey Garlic Chicken Avocado Rice — Best 30-Min Bowl— it’s bright, cool, and a natural partner for hot crispy baked chicken.
Storage Instructions
Refrigerator
Allow the chicken to cool completely on the wire rack before storing — sealing it while hot traps steam and softens the crust. Transfer to an airtight container with a paper towel placed underneath each piece to absorb condensation. Stored this way, the high protein crispy chicken keeps well for up to 4 days in the refrigerator.
Freezer
Baked panko chicken freezes well for up to 2 months. Cool completely, wrap each breast individually in plastic wrap, then place in a freezer-safe zip-lock bag, pressing out excess air. Freeze flat. Thaw overnight in the refrigerator before reheating — don’t microwave from frozen, as this destroys the crust texture irreversibly.
Shelf Life Summary
| Storage Method | Duration |
|---|---|
| Room temperature | No more than 2 hours |
| Refrigerator (airtight, paper towel) | Up to 4 days |
| Freezer (individually wrapped) | Up to 2 months |
Reheating Instructions
Oven (Best Method — Restores the Crust)
Preheat to 375°F. Place the chicken on a wire rack over a baking sheet and heat uncovered for 12–15 minutes until the crust re-crisps and the center reaches 165°F. Do not cover with foil — it traps steam and softens the crust you worked to create.
Air Fryer (Fastest Method for Crunch)
Set the air fryer to 375°F and heat for 6–8 minutes, flipping once at the halfway point. The circulating heat brings the crust back to near-original crispiness in less time than the oven and is the preferred reheating method when speed matters.
Microwave (Last Resort)
Place a single piece on a microwave-safe plate lined with a paper towel. Heat on medium power (70%) for 90 seconds. The crust will soften significantly — this method is for convenience only, not for texture. For all reheating scenarios, the FDA’s safe minimum temperature guidelines recommend reaching 165°F at the center of any previously cooked poultry.
Nutrition Facts (Per Serving — Based on 4 Servings)
| Nutrient | Amount |
|---|---|
| Calories | ~480 |
| Total Fat | 14g |
| Saturated Fat | 4g |
| Cholesterol | 160mg |
| Sodium | 740mg |
| Total Carbohydrates | 24g |
| Dietary Fiber | 1g |
| Total Sugars | 7g |
| Protein | 40g |
| Calcium | 140mg |
| Iron | 2mg |
Nutrition Disclaimer: These values are estimated using standard nutrition software based on the recipe as written with 4 servings. Actual values will vary based on the specific brands, chicken breast size, and any ingredient substitutions used. For precise dietary tracking, input your exact ingredients into a verified nutrition calculator or consult a registered dietitian.
Frequently Asked Questions
How does baking produce a truly crispy crust without frying?
Pre-toasting the panko on the stovetop is what makes baking work — the crumbs are already golden and dry when they go into the oven, so the high heat at 425°F deepens the color and sets the crunch rather than starting from raw. The wire rack keeps the bottom crust off the pan so steam can’t soften it.
Can I use chicken thighs instead of chicken breasts?
Yes. Boneless, skinless chicken thighs work well and are more forgiving of slight overcooking than breasts. Use the same breading technique and bake at 425°F, but extend the bake time to 28–30 minutes and confirm the internal temperature reaches 165°F before adding the honey drizzle.
Does the honey make the chicken sweet rather than savory?
No — the amount used (2 tablespoons across 4 pieces) is light enough to caramelize into a subtle, slightly sticky finish rather than making the chicken taste sweet. The smoked paprika and garlic in the crust keep the overall flavor profile firmly savory, with the honey adding depth rather than sweetness.
Can I make this high protein crispy chicken ahead of time?
Yes. Bread the chicken and refrigerate on the wire rack, uncovered, for up to 4 hours before baking. The refrigerator air actually helps the panko crust adhere and dry out slightly, which improves crunch. Don’t apply the honey drizzle until the final minutes of baking, never before.
What internal temperature should I pull the chicken at?
Pull it at 160°F if you’re adding the honey drizzle and returning it to the oven — carryover cooking brings it to the safe 165°F minimum during those final 2–3 minutes. If you’re skipping the honey finish, pull it at 165°F directly.
Why does my crust fall off during baking?
The two most common causes are excess egg wash and insufficient pressing during breading. Let the egg wash drip for 2 full seconds before coating, and press the panko mixture firmly into all surfaces with clean hands. Properly adhered panko shouldn’t shift during baking.
Can I make this recipe dairy-free?
Yes — replace the Parmesan with 3 tablespoons of nutritional yeast and substitute water for the milk in the egg wash. Nutritional yeast adds a savory, slightly cheesy flavor and helps the crust brown. The texture will be slightly less rich but still produces a well-seasoned, crunchy crust.
Is there a way to make this without eggs for the wash?
Yes. Whisk together 3 tablespoons of Dijon mustard and 2 tablespoons of olive oil as an egg-free binder. The mustard provides adhesion and contributes a tangy, savory flavor that actually works very well with the smoked paprika in the panko crust.
Can I bake this at a lower temperature if my oven runs hot?
Yes — reduce to 400°F and extend the bake time by 5–7 minutes. You’ll still get a crispy crust with pre-toasted panko, though the color will be slightly lighter. Use an instant-read thermometer rather than relying on visual cues alone when adjusting the baking temperature.
How do I keep the chicken from drying out at 425°F?
Pounding to an even ¾-inch thickness is the key — it ensures the interior cooks through before the exterior over-bakes. Pulling at 160°F (before the honey drizzle step) also prevents the brief extra oven time from pushing it past done. Don’t skip the 5-minute rest either.
Expert Chef Tips
Get the oven fully preheated before the chicken goes in. Most home ovens take 15–20 minutes to reach a true 425°F, not just the time it takes the preheat indicator to beep. Give it an extra 5 minutes after the alert goes off, especially for recipes where crust formation in the first few minutes of baking is critical.
Bread with one dry hand and one wet hand. Designate one hand exclusively for egg wash dipping and one for pressing into the panko. This prevents the sticky, clumped coating that happens when both hands get covered in egg and panko simultaneously — and it keeps the breading process much faster and cleaner.
Season in layers, not all at once. The chicken gets seasoned directly before breading, the panko mixture gets its own seasoning, and the flaky sea salt goes on at the very end. Seasoning at each stage means flavor is built into every component rather than sitting entirely on the surface.
Toast a slightly larger batch of panko than you need. It stores at room temperature for up to a week in an airtight container, and having pre-toasted, seasoned panko on hand means you can make this high protein crispy chicken on any weeknight without the stovetop toasting step adding time to your routine.
Recipe Summary
This high protein crispy chicken delivers 40 grams of protein per serving using boneless chicken breasts coated in a pre-toasted seasoned panko and Parmesan crust, baked at 425°F on a wire rack for 22–25 minutes. A light honey drizzle in the final 2–3 minutes caramelizes into the amber-lacquered finish shown in the photo, finished with fresh thyme and flaky sea salt. The recipe takes 40 minutes from start to table, works equally well for weeknight dinner and five-day meal prep, and reheats with its crust largely intact in a 375°F oven.
The Only Baked Crispy Chicken Recipe You’ll Need
Once you’ve made this high protein crispy chicken using pre-toasted panko on a wire rack, you’ll have a hard time going back to any other method. The crust is genuinely crunchy. The chicken stays juicy. The honey-thyme finish elevates it past everyday weeknight territory without adding time or effort. Make it Sunday for a week of high-protein meals, or make it fresh on a Tuesday when you need something satisfying on the table fast. Either way, it delivers every single time.
High Protein Crispy Chicken — Best Baked 40g Recipe
Description
Crispy chicken that delivers serious protein without the deep fryer — that's exactly what this recipe is built to do. This high protein crispy chicken features bone-in or thick-cut boneless chicken breasts coated in a seasoned panko crust, baked at high heat until shatteringly crunchy on the outside and perfectly juicy within. The photo shows exactly what you're after: a deep amber, crackly crust glistening with a light honey drizzle, finished with fresh thyme sprigs and flaky sea salt scattered across a parchment-lined baking sheet.
Ingredients
Instructions
-
Step 1: Preheat the Oven and Prep the Pan (5 minutes)
-
Preheat your oven to 425°F and position the rack in the upper-middle position. Line a rimmed baking sheet with parchment paper and set a wire rack on top — this is not optional for baking. Elevating the chicken on a rack allows hot air to circulate under the crust, so the bottom doesn't steam and go soft against the pan. Lightly spray the rack with non-stick spray.
-
Step 2: Pound and Season the Chicken (5 minutes)
-
Place each chicken breast between two sheets of plastic wrap and pound to an even thickness of about ¾ inch using a meat mallet. Uniform thickness is the most important prep step for baking — uneven pieces cook at different rates, and the thin end dries out long before the thick end reaches 165°F. Season both sides of each breast with the salt, pepper, garlic powder, smoked paprika, and cayenne.
-
Embedded Tip: Don't pound the chicken too thin. You want ¾ inch — just enough to even out the naturally thicker center without creating a cutlet so thin that it dries out in the high-heat oven before the crust has time to brown properly.
-
Step 3: Toast the Panko (4 minutes)
-
Heat a large dry skillet over medium heat. Add the panko breadcrumbs and stir constantly for 3–4 minutes until they turn a light golden-brown and smell nutty and toasted. Remove from heat immediately — they continue toasting from residual heat if you leave them. Transfer to a shallow bowl and stir in the Parmesan, garlic powder, smoked paprika, onion powder, salt, and pepper.
-
Embedded Tip: Pre-toasting the panko before baking is the single technique that separates genuinely crispy baked chicken from pale, soft baked chicken. Raw panko doesn't get enough heat contact on a baking sheet to color deeply — toasting it first guarantees crunch regardless of everything else.
-
Step 4: Set Up the Breading Station (2 minutes)
-
Arrange three shallow dishes in a row: the first with the seasoned flour (or skip to egg wash directly if you prefer), the second with the egg wash (eggs, Dijon, and milk whisked together until smooth), and the third with the toasted panko mixture. Having everything in order before you start means no sticky-hand scrambling mid-bread.
-
Step 5: Bread the Chicken (5 minutes)
-
Working one piece at a time, dip each seasoned chicken breast into the egg wash, letting the excess drip off for a full 2 seconds — too much egg wash makes the crust gummy. Press it firmly into the panko mixture, coating all surfaces completely and pressing gently so the crumbs adhere. Place each coated breast on the prepared wire rack without overlapping.
-
Step 6: Bake the Chicken (20–22 minutes)
-
Slide the pan into the preheated 425°F oven on the upper-middle rack. Bake for 18 minutes undisturbed — opening the oven door repeatedly drops the temperature and can cause the crust to soften before it sets. At the 18-minute mark, check the internal temperature with an instant-read thermometer.
-
Food Safety Note: Chicken is safe to eat when the thickest point reaches 165°F, per USDA guidelines for safe poultry temperatures. Pull it at 160°F if you plan to add the honey drizzle and return it to the oven — carryover cooking will bring it the remaining 5 degrees.
-
Step 7: Add the Honey Drizzle and Finish Baking (3 minutes)
-
Once the chicken reaches 160°F internally and the crust is deep amber and crackly, use a pastry brush to lightly coat the top of each breast with honey. Return to the oven for 2–3 more minutes until the honey caramelizes against the crust, producing the sticky, lacquered amber color shown in the photo. Watch closely during this step — honey moves from caramelized to burned quickly at 425°F.
-
Step 8: Rest, Garnish, and Serve
-
Remove the baking sheet from the oven and let the chicken rest on the wire rack for 5 minutes. Resting allows the juices to redistribute so each slice stays moist rather than running out onto the cutting board. Scatter fresh thyme sprigs and flaky sea salt over the top, then slice and serve immediately.
Nutrition Facts
Servings 4
- Amount Per Serving
- Calories 480kcal
- % Daily Value *
- Total Fat 14g22%
- Saturated Fat 4g20%
- Protein 40g80%
* Percent Daily Values are based on a 2,000 calorie diet. Your daily value may be higher or lower depending on your calorie needs.