Best Slow Cooker Beef Roast – 5-Ingredient Recipe


Best Slow Cooker Beef Roast – 5-Ingredient Foolproof Recipe
When you need a no-fuss beef roast on a busy weeknight, this 5-ingredient version has you covered — simple pantry staples, minimal prep, and ready in under an hour of active time.
Recipe Quick Info
| Detail | Info |
|---|---|
| Prep Time | 15 minutes |
| Cook Time | 8 hours (low) or 4–5 hours (high) |
| Total Time | 8 hours 15 minutes |
| Servings | 6 |
| Cuisine | American |
| Course | Main Course / Dinner |
| Cooking Method | Simmering (Slow Cooker) |
| Calories | ~420 per serving |
| Difficulty | Easy |
Why You’ll Love This Recipe
- It’s genuinely hands-off. After a quick sear and a few minutes of layering ingredients, the slow cooker takes over completely — no stirring, no babysitting, no stress.
- The meat becomes fork-shredding tender. Long, gentle simmering breaks down the collagen in chuck roast into silky gelatin, which bastes the meat from the inside out as it cooks.
- Big flavor from simple ingredients. A handful of pantry staples — beef broth, Worcestershire, garlic, and dried herbs — build a braising liquid that tastes like it took all day (because it did).
- One-pot cleanup. Everything cooks in the slow cooker insert, which means fewer dishes and a much happier end to dinner.
- Feeds a crowd without the fuss. Six generous portions come out of a single 3–4 lb chuck roast — perfect for family dinners, meal prep, or leftovers the next day.
- Naturally gluten-free adaptable. With one easy swap on the broth, this recipe fits a gluten-free household without any structural changes.
- The leftovers are even better. Like most braises, this slow cooker beef roast tastes richer and more cohesive the next day as the flavors continue to meld overnight.
Ingredients
For the Beef Roast
- 3–4 lbs boneless beef chuck roast
- 2 teaspoons kosher salt
- 1 teaspoon freshly ground black pepper
- 1 teaspoon garlic powder
- 1 teaspoon onion powder
- 1 teaspoon smoked paprika
- 2 tablespoons olive oil (for searing)
For the Slow Cooker
- 1½ lbs baby potatoes, halved (or 3 medium Yukon Golds, cut into 1½-inch chunks)
- 2 large yellow onions, cut into thick wedges
- 6 garlic cloves, smashed
- 1½ cups low-sodium beef broth
- 2 tablespoons Worcestershire sauce
- 1 tablespoon tomato paste
- 1 teaspoon dried thyme
- 1 teaspoon dried rosemary
Garnish
- 2 tablespoons fresh flat-leaf parsley, roughly chopped (as shown in the photo)
Optional Add-Ins
- 3–4 medium carrots, cut into 2-inch pieces
- 1 tablespoon balsamic vinegar (adds subtle depth to the braising liquid)
- ½ teaspoon crushed red pepper flakes (for gentle heat)
Substitution Guide
| Original Ingredient | Substitution | Notes |
|---|---|---|
| Chuck roast | Bottom round or brisket | Brisket needs the full 8 hours on low |
| Baby potatoes | Russet potatoes, cubed | Cut slightly larger — they soften faster |
| Beef broth | Vegetable broth | Lighter color and flavor |
| Worcestershire sauce | Coconut aminos | Use for gluten-free or soy-free version |
| Fresh parsley garnish | Fresh thyme or chives | Both complement beef beautifully |
| Olive oil | Avocado oil or vegetable oil | Any neutral high-heat oil works |
Kitchen Tools Needed
- 6-quart slow cooker (or larger for a 4 lb roast) — the essential tool for this simmering method
- Large cast-iron skillet or heavy-bottomed skillet (for searing)
- Tongs
- Sharp chef’s knife and cutting board
- Measuring cups and spoons
- Ladle (for serving the braising jus)
- Two forks (for shredding the finished roast)
- Meat thermometer (to verify safe internal temperature)
Step-by-Step Instructions
Step 1: Season the Chuck Roast
Pat the chuck roast completely dry with paper towels — this is critical for getting a proper sear. In a small bowl, combine the salt, pepper, garlic powder, onion powder, and smoked paprika. Rub the spice blend all over the roast, pressing it firmly into every surface. Don’t rush this step; an evenly seasoned crust becomes the flavor foundation for the entire dish.
Step 2: Sear for Deep, Meaty Flavor
Heat 2 tablespoons of olive oil in a large cast-iron skillet over medium-high heat until the oil shimmers and just begins to smoke lightly. Place the roast in the pan and sear undisturbed for 3–4 minutes per side until a deep mahogany-brown crust forms. You’re looking for real color — not a pale gray, but a genuine dark sear that smells nutty and savory. Sear the edges briefly too, about 1 minute each. Transfer the seared roast to a plate.
💡 Embedded Tip: Don’t skip the sear. While the slow cooker’s simmering process tenderizes the meat beautifully, it can’t create browning on its own — and that browned crust is where a huge portion of the finished flavor comes from. This step adds only 10 minutes but pays off enormously.
Step 3: Build the Slow Cooker Base
Add the halved baby potatoes and onion wedges to the bottom of the slow cooker insert in an even layer. Scatter the smashed garlic cloves over the top. In a small measuring cup, whisk together the beef broth, Worcestershire sauce, tomato paste, thyme, and rosemary until the tomato paste is fully incorporated. Pour this braising liquid over the vegetables.
Step 4: Add the Roast and Start Simmering
Nestle the seared chuck roast on top of the vegetable layer — not submerged, just resting on the bed of onions and potatoes. The liquid should come about halfway up the sides of the roast, not cover it. This positioning lets the bottom of the roast braise while the top steams, and the simmering liquid below infuses everything with flavor as small, steady bubbles circulate gently throughout the cook time.
Step 5: Slow Cook Low and Slow
Place the lid firmly on the slow cooker. Set it to LOW for 8 hours or HIGH for 4–5 hours. Low and slow is strongly preferred here — the extended simmering time at around 190–200°F gives the collagen in the chuck roast time to fully break down into gelatin, which is what makes the meat genuinely fall-apart tender rather than just cooked through.
💡 Embedded Tip: Resist the urge to lift the lid during cooking. Every time you remove the lid, the slow cooker loses 20–30 minutes of accumulated heat and disrupts the gentle simmering environment inside. Trust the process and let the cooker work.
Step 6: Check for Doneness
At the 8-hour mark on low (or 4–5 hours on high), check the roast with a meat thermometer — the internal temperature should read at least 195–205°F for shredding-level tenderness. At this temp, the connective tissue has fully converted. You can also simply probe the meat with a fork; if it slides in with almost no resistance and the beef pulls apart easily, it’s ready. Per the USDA safe minimum internal temperature guidelines, beef roasts should reach a minimum of 145°F — but for this cut to become truly tender, you want to push well beyond that.
Step 7: Shred, Sauce, and Serve
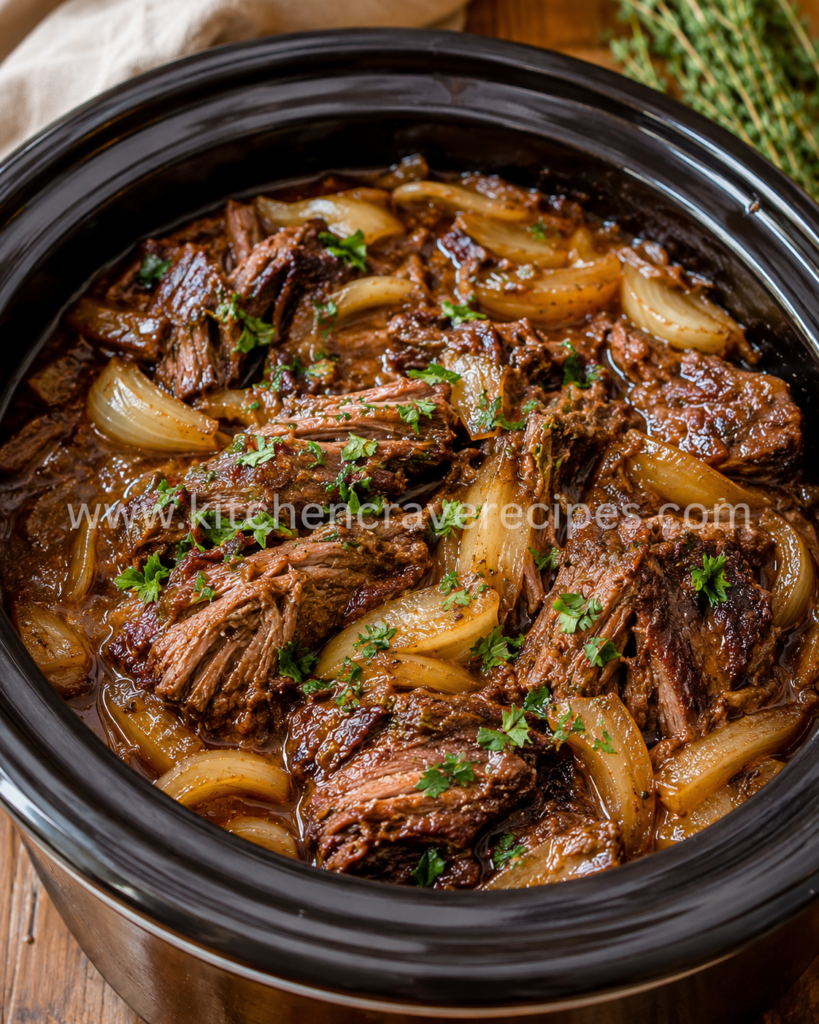
Using two forks or tongs, pull the roast apart directly in the slow cooker insert into thick, irregular shreds — not fine shreds, but substantial chunks that hold up to serving. As you can see in the photo, the meat naturally separates along its grain lines into beautiful layered pieces. Spoon the glossy braising jus over everything, scatter the fresh parsley generously across the top, and serve directly from the insert.
Pro Tips for the Perfect Slow Cooker Beef Roast
- Choose chuck roast specifically. It has the right fat-to-muscle ratio and enough connective tissue to become genuinely silky when simmered low and slow. A leaner cut like eye of round will turn dry and stringy under the same conditions.
- Layer vegetables on the bottom, not the top. Potatoes and onions on the bottom of the insert cook in the braising liquid and become perfectly tender. If placed on top, they steam without softening properly.
- Use low-sodium broth so you control salt. Worcestershire and the seasoning rub already add significant salt — full-sodium broth can push the finished dish into oversalted territory.
- Method-specific tip — keep the simmer gentle, not aggressive. A slow cooker on the HIGH setting can sometimes tip close to a rolling boil near the heating element, which toughens protein fibers rather than gently releasing them. If your slow cooker runs hot (the liquid is visibly boiling rather than showing small, lazy bubbles), switch to LOW for the remainder of the cook time.
- Let it rest before shredding. After turning off the cooker, let the roast sit in the liquid with the lid on for 10–15 minutes. This resting period lets the juices redistribute into the muscle fibers before you pull them apart.
Common Mistakes to Avoid
1. Using the wrong cut of beef.
Lean cuts like sirloin or eye of round have almost no collagen to break down, so they turn dry and mealy after 8 hours of cooking. Stick to chuck roast, brisket, or another well-marbled braising cut for this recipe.
2. Not searing the meat first.
Skipping the sear is the single biggest missed opportunity in slow cooker cooking. That Maillard reaction creates hundreds of flavor compounds that the simmering process simply cannot replicate on its own.
3. Adding too much liquid.
A common instinct is to fully submerge the roast, but this dilutes the flavor and prevents the top of the meat from developing any depth. The liquid should come halfway up the sides — no higher.
4. Letting the slow cooker boil instead of simmer. (Method-specific)
This is the critical mistake unique to simmering-method cooking. A rolling boil seizes and toughens muscle fibers instead of gently relaxing them. If your liquid is bubbling aggressively, your cooker’s HIGH setting is too hot — drop it to LOW immediately.
5. Lifting the lid repeatedly during cooking.
Every lid lift adds significant time to the overall cook. The slow cooker builds a sealed, steamy simmering environment — breaking that seal repeatedly means longer cook times and uneven results.
6. Shredding the meat too early.
If the roast still feels firm when you poke it with a fork, it genuinely needs more time. Give it another 30–45 minutes before shredding; the tenderness comes from collagen conversion, which has a clear finish line.
7. Skipping the fresh herb garnish.
Fresh parsley added at the end (not during cooking) brightens the entire dish visually and cuts through the richness of the braising jus. It’s not optional if you want the finished presentation you see in the photo.
8. Forgetting to taste the jus before serving.
The braising liquid is your built-in sauce. Taste it before serving and adjust salt, pepper, or a splash of Worcestershire if it needs a little more punch.
Variations
Healthy
Replace half the baby potatoes with cauliflower florets and swap in unsalted broth to reduce sodium. The cauliflower absorbs the braising liquid beautifully and adds fiber without the same carb load. All other steps remain identical.
Vegetarian
This variation requires a genuinely different protein — swap the beef roast for two 15-oz cans of drained jackfruit plus 1 lb of large portobello mushroom caps. Use vegetable broth in place of beef broth, keep all the aromatics and spices, and cook on LOW for 6 hours. The texture won’t mimic beef exactly, but the braised flavor profile is deeply satisfying.
Spicy
Add 1–2 teaspoons of crushed red pepper flakes and 1 chipotle pepper in adobo sauce (finely chopped) to the braising liquid before cooking. The chipotle adds smoky heat that layers beautifully with the Worcestershire. Increase the smoked paprika to 1½ teaspoons for extra depth.
Gluten-Free
This recipe is nearly gluten-free as written — simply verify that your Worcestershire sauce is certified gluten-free (some brands add barley malt vinegar). Swap to a certified GF brand or use coconut aminos in equal measure. All other ingredients are naturally gluten-free.
Low-Carb / Keto
Replace the potatoes entirely with large-cut turnips or radish halves, which soften and absorb the braising liquid in a similar way. Turnips in particular lose much of their bitter edge after 8 hours of gentle simmering and take on a mildly savory, slightly sweet flavor. The carb count drops significantly while the satisfying, hearty quality of the dish stays intact.
What to Serve With This Slow Cooker Beef Roast
- Crusty sourdough bread — essential for mopping up that glossy braising jus from the bowl.
- Creamy mashed potatoes — if you skipped the potatoes in the cooker, this is your pairing. Check out Creamy Garlic Chicken Meatballs — Best 40-Min Ultimate for the perfect side.
- Steamed or roasted green beans — the bright, snappy texture contrasts the fall-apart meat beautifully.
- Simple butter-tossed egg noodles — a classic American pairing that turns this into a heartier plate.
- Roasted Brussels sprouts — their slight bitterness balances the richness of the braising liquid.
- A simple green salad with red wine vinaigrette — lightens the meal and adds freshness alongside the deep, savory main.
- Dinner rolls — soft, pillowy, and perfect for the table. Try Creamy Garlic Chicken Meatballs — Best 40-Min Ultimate alongside this roast.
Storage Instructions
Refrigerator
Transfer the shredded beef and any remaining braising liquid into an airtight container together — storing them separately causes the meat to dry out. Refrigerate for up to 4 days. The jus will gel when cold, which is completely normal (it’s the gelatin from the collagen doing its job).
Freezer
This slow cooker beef roast freezes exceptionally well. Portion the shredded meat and liquid into freezer-safe bags or containers, removing as much air as possible before sealing. Freeze for up to 3 months. Thaw overnight in the refrigerator before reheating — never thaw at room temperature.
Shelf Life Summary
| Storage Method | Duration |
|---|---|
| Refrigerator (airtight) | Up to 4 days |
| Freezer (portioned) | Up to 3 months |
| Room temperature | 2 hours maximum |
Reheating Instructions
Oven
Preheat your oven to 325°F. Place the shredded beef and braising liquid in an oven-safe dish, cover tightly with foil, and heat for 20–25 minutes until warmed through. The covered foil traps steam and keeps the meat from drying out.
Microwave
Transfer a single portion plus a spoonful of jus to a microwave-safe bowl. Cover loosely with a damp paper towel and heat on medium power (70%) in 60-second intervals, stirring between each, until the internal temperature reaches 165°F. Medium power prevents the edges from overcooking before the center is warm.
Stovetop
Add the shredded beef and liquid to a small saucepan over medium-low heat. Stir occasionally and heat for 8–10 minutes until gently simmering and warmed through — watch for small, lazy bubbles rather than a hard boil, which can tighten the meat fibers. Add a splash of broth if the liquid has thickened too much during storage.
For food safety guidelines on reheating cooked beef, refer to the USDA’s safe food handling resource.
Nutrition Facts
| Nutrient | Per Serving (approx.) |
|---|---|
| Calories | ~420 |
| Total Fat | 22g |
| Saturated Fat | 8g |
| Protein | 38g |
| Total Carbohydrates | 18g |
| Dietary Fiber | 2g |
| Sugars | 3g |
| Sodium | 580mg |
Nutrition Disclaimer: Nutrition values are estimates calculated using standard ingredient databases and will vary based on specific brands, exact weights, and any substitutions made. These figures are provided for general informational purposes and should not be used as a substitute for professional dietary guidance. Consult a registered dietitian for personalized nutrition advice.
Frequently Asked Questions
Can I make this slow cooker beef roast without searing the meat first?
Technically yes, but you’ll lose significant flavor. The Maillard reaction from searing creates deep, savory complexity that simmering alone cannot produce. If you truly can’t sear, at minimum increase the Worcestershire and smoked paprika by half to compensate slightly.
What’s the best cut of beef for this recipe?
Boneless chuck roast is the ideal choice. It has the right balance of fat and connective tissue that breaks down during the long simmering process into gelatin, making the meat tender and the liquid rich. Bottom round and brisket are acceptable alternatives with minor adjustments to cook time.
Can I cook this on HIGH instead of LOW?
Yes — HIGH for 4–5 hours works. However, LOW for 8 hours produces noticeably more tender, flavorful results because the gentler, slower simmering better breaks down collagen. Use HIGH only if time is a constraint, not as a preferred method.
How do I know when the roast is done?
The clearest sign is resistance when you probe with a fork — if it slides in without effort and the meat begins pulling apart on its own, it’s ready. A meat thermometer reading of 195–205°F confirms shredding-level doneness. At lower temps, the meat is safe but not yet tender enough to shred properly.
Can I add carrots to this recipe?
Absolutely. Add 3–4 medium carrots, cut into 2-inch pieces, alongside the potatoes and onions at the bottom of the slow cooker. They’ll become tender and sweet after 8 hours of simmering and absorb the braising liquid beautifully.
Why does my braising liquid look thin when the lid comes off?
Slow cooker lids trap moisture, so the liquid level stays relatively consistent throughout cooking. If you want a thicker sauce, transfer the liquid to a small saucepan after cooking and simmer uncovered over medium heat for 8–10 minutes until reduced and slightly thickened. Alternatively, whisk in 1 tablespoon of cornstarch mixed with 2 tablespoons of cold water to thicken quickly.
Can I prep this the night before?
Yes — season and sear the roast, layer everything in the slow cooker insert, add the braising liquid, then cover and refrigerate the entire insert overnight. In the morning, remove it from the refrigerator, set it in the cooker base, and start cooking. Add 30 minutes to the cook time since the insert will be cold.
Is this recipe freezer-meal friendly?
Very much so. You can freeze the raw, seasoned (but not yet cooked) roast along with the aromatics in a zip-top bag for up to 2 months. Thaw completely overnight in the refrigerator, then cook as directed. Alternatively, freeze the finished cooked and shredded beef as described in the Storage section above.
Can I use a smaller slow cooker?
A 6-quart slow cooker is recommended for a 3–4 lb roast with vegetables. A 4-quart cooker can work if you use a smaller 2.5–3 lb roast and reduce the potato quantity slightly — the insert should not be more than two-thirds full for safe, even cooking.
What can I do with the leftover braising liquid?
Don’t discard it — it’s an intensely flavored beef jus. Use it as a base for soup, spoon it over mashed potatoes, reduce it further into a pan sauce, or freeze it in ice cube trays to add depth to future braises and gravies.
Does the cooking method change if I want to use an Instant Pot instead of a slow cooker?
Yes — using a pressure cooker is a fundamentally different cooking method. For an Instant Pot, sear using the Sauté function, add all the same ingredients, then cook on HIGH pressure for 60–70 minutes with a 15-minute natural release. The flavor is good but slightly different from 8-hour slow simmering, which has more time to develop layered complexity.
Can I make this slow cooker beef roast with potatoes and onions for a crowd?
Yes. Simply scale up to a 5–6 lb roast (you’ll need a 7–8 quart slow cooker), increase the broth to 2 cups, and extend the cook time by 1–1.5 hours on LOW. All other ingredients scale proportionally.
Expert Chef Tips
- Buy chuck roast with visible marbling. When selecting your roast at the butcher counter, look for consistent white streaks of fat running through the muscle — the more marbling, the richer and more tender your finished slow cooker beef roast will be after hours of simmering. A lean-looking roast is a warning sign.
- Deglaze the skillet after searing. After removing the seared roast, pour ¼ cup of the measured beef broth into the still-hot skillet and scrape up all the browned bits with a wooden spoon. Add this deglazing liquid to the slow cooker along with the rest of the broth — those fond-scraped bits are pure concentrated flavor.
- Cut onions into thick wedges, not thin slices. Thin onion slices will fully dissolve into the braising liquid after 8 hours of simmering. Thick wedges (each onion cut into 6–8 pieces) hold their shape better, giving you recognizable golden onion pieces in the finished dish — exactly as shown in the photo.
- Salt the roast at least 20 minutes before searing, ideally the night before. If time allows, season the roast and leave it uncovered in the refrigerator overnight. The dry brine draws out a small amount of surface moisture, which then reabsorbs, carrying the seasoning deeper into the meat and producing a better crust when seared.
- Use the braising liquid as your finishing sauce — taste and adjust it. Before serving, ladle some of the jus into a small bowl and taste it critically. If it’s flat, a tiny squeeze of lemon juice or a splash of balsamic vinegar brightens it immediately. If it’s too rich, a pinch of fresh thyme stirred in helps. The jus is the soul of this dish — treat it with the same attention you’d give a proper pan sauce.
Recipe Summary
This slow cooker beef roast with potatoes and onions is the definition of set-it-and-forget-it comfort food at its best. A brief sear, a few pantry staples, and 8 hours of gentle simmering turn a humble chuck roast into a glossy, fall-apart centerpiece rich with braised flavor. Serve it straight from the insert with fresh parsley scattered over the top and every drop of that golden jus spooned over each serving.
Conclusion
Once you’ve pulled your first fork-tender slow cooker beef roast from the cooker and watched those shreds of deeply braised beef fall apart in the jus, you’ll understand why this style of cooking has such devoted fans. It rewards patience with extraordinary results — the kind of meal that makes everyone at the table ask for seconds without quite knowing how something this good required so little effort from you. Keep this recipe bookmarked, make it your own with whatever vegetables or variations fit your household, and trust the slow simmer to do what it does best. Your dinner table will thank you.
Best Slow Cooker Beef Roast – 5-Ingredient Recipe
Description
There's something deeply satisfying about lifting the lid off a slow cooker and seeing that slow cooker beef roast — dark, glossy, and already falling apart into thick, juicy shreds before you've even touched it. The onions have softened into silky golden wedges, the braising liquid has reduced into a rich, meaty jus, and the whole kitchen smells like Sunday dinner at its absolute best.
Ingredients
Instructions
-
Step-by-Step Instructions
-
Step 1: Season the Chuck Roast
-
Pat the chuck roast completely dry with paper towels — this is critical for getting a proper sear. In a small bowl, combine the salt, pepper, garlic powder, onion powder, and smoked paprika. Rub the spice blend all over the roast, pressing it firmly into every surface. Don't rush this step; an evenly seasoned crust becomes the flavor foundation for the entire dish.
-
Step 2: Sear for Deep, Meaty Flavor
-
Heat 2 tablespoons of olive oil in a large cast-iron skillet over medium-high heat until the oil shimmers and just begins to smoke lightly. Place the roast in the pan and sear undisturbed for 3–4 minutes per side until a deep mahogany-brown crust forms. You're looking for real color — not a pale gray, but a genuine dark sear that smells nutty and savory. Sear the edges briefly too, about 1 minute each. Transfer the seared roast to a plate.
-
💡 Embedded Tip: Don't skip the sear. While the slow cooker's simmering process tenderizes the meat beautifully, it can't create browning on its own — and that browned crust is where a huge portion of the finished flavor comes from. This step adds only 10 minutes but pays off enormously.
-
Step 3: Build the Slow Cooker Base
-
Add the halved baby potatoes and onion wedges to the bottom of the slow cooker insert in an even layer. Scatter the smashed garlic cloves over the top. In a small measuring cup, whisk together the beef broth, Worcestershire sauce, tomato paste, thyme, and rosemary until the tomato paste is fully incorporated. Pour this braising liquid over the vegetables.
-
Step 4: Add the Roast and Start Simmering
-
Nestle the seared chuck roast on top of the vegetable layer — not submerged, just resting on the bed of onions and potatoes. The liquid should come about halfway up the sides of the roast, not cover it. This positioning lets the bottom of the roast braise while the top steams, and the simmering liquid below infuses everything with flavor as small, steady bubbles circulate gently throughout the cook time.
-
Step 5: Slow Cook Low and Slow
-
Place the lid firmly on the slow cooker. Set it to LOW for 8 hours or HIGH for 4–5 hours. Low and slow is strongly preferred here — the extended simmering time at around 190–200°F gives the collagen in the chuck roast time to fully break down into gelatin, which is what makes the meat genuinely fall-apart tender rather than just cooked through.
-
💡 Embedded Tip: Resist the urge to lift the lid during cooking. Every time you remove the lid, the slow cooker loses 20–30 minutes of accumulated heat and disrupts the gentle simmering environment inside. Trust the process and let the cooker work.
-
Step 6: Check for Doneness
-
At the 8-hour mark on low (or 4–5 hours on high), check the roast with a meat thermometer — the internal temperature should read at least 195–205°F for shredding-level tenderness. At this temp, the connective tissue has fully converted. You can also simply probe the meat with a fork; if it slides in with almost no resistance and the beef pulls apart easily, it's ready. Per the USDA safe minimum internal temperature guidelines, beef roasts should reach a minimum of 145°F — but for this cut to become truly tender, you want to push well beyond that.
-
Step 7: Shred, Sauce, and Serve
-
Using two forks or tongs, pull the roast apart directly in the slow cooker insert into thick, irregular shreds — not fine shreds, but substantial chunks that hold up to serving. As you can see in the photo, the meat naturally separates along its grain lines into beautiful layered pieces. Spoon the glossy braising jus over everything, scatter the fresh parsley generously across the top, and serve directly from the insert.
Nutrition Facts
Servings 6
- Amount Per Serving
- Calories 420kcal
- % Daily Value *
- Total Fat 22g34%
- Saturated Fat 8g40%
- Protein 38g76%
* Percent Daily Values are based on a 2,000 calorie diet. Your daily value may be higher or lower depending on your calorie needs.