Best High-Protein Loaded Cheesy Baked Potato (5-Star Ultimate Recipe)


The High-Protein Loaded Cheesy Baked Potato You’ll Make on Repeat
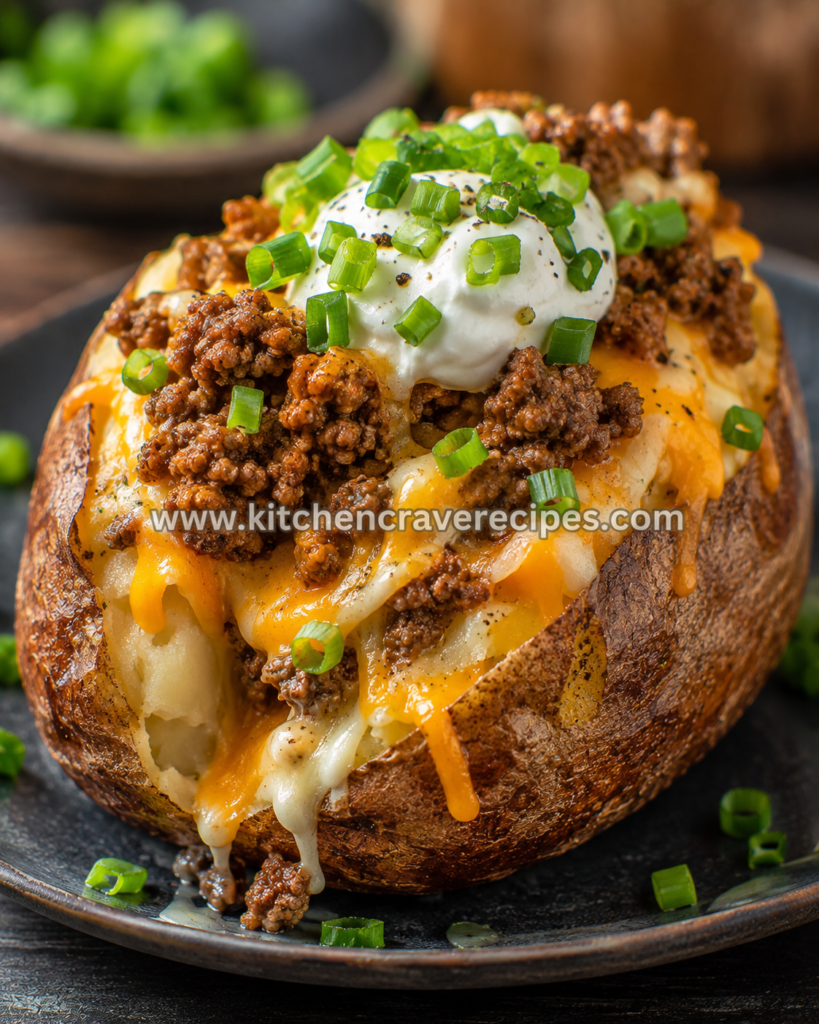
There are baked potatoes, and then there is a high-protein loaded cheesy baked potato — the kind that turns a humble russet into a full, satisfying meal you’ll look forward to all day. This version is stacked with boldly seasoned ground beef, two melted cheeses that cascade down the sides of a crackling-skin potato, a generous dollop of cool sour cream, and a bright shower of freshly sliced scallions. It is hearty, rich, and completely unapologetic about it.
What makes this recipe worth bookmarking is the balance it strikes. The potato is baked low-and-slow until the interior is pillowy-soft and the skin turns deep golden-brown and crisp. The beef is browned separately with a layer of savory spice before it crowns the split potato alongside rivers of molten cheddar and Monterey Jack. Every bite delivers protein, complex carbs, and real flavor without requiring more than one sheet pan and one skillet.
Recipe Quick Info
| Detail | Info |
|---|---|
| Prep Time | 10 minutes |
| Cook Time | 65 minutes |
| Total Time | 75 minutes |
| Servings | 4 |
| Cuisine | American |
| Course | Main Dish / Dinner |
| Cooking Method | Baking |
| Calories | ~620 per serving |
| Difficulty | Standard |
Why You’ll Love This Recipe
- A true one-potato meal. Each high-protein loaded cheesy baked potato delivers ground beef, melted cheese, and toppings — dinner is completely covered without any side dish stress.
- Big protein without supplements. Lean ground beef plus full-fat cheese clears 38+ grams of protein per serving naturally, using real whole ingredients.
- Foolproof baking technique. Rubbing the skin with oil and salt, then baking on a rack at 400°F, reliably produces a crisp exterior and fluffy interior every single time.
- Built-in meal-prep potential. Bake the potatoes and cook the beef ahead; assemble and reheat in minutes on busy weeknights without sacrificing quality.
- Endlessly customizable toppings. The base recipe is a framework — swap the beef for turkey, add jalapeños, or pile on roasted broccoli, and the whole dish shifts to match your mood.
- Crowd-pleasing at any table. Kids love the melted cheese and hearty beef; adults appreciate the satisfying macros — it is one of those rare recipes that genuinely pleases everyone.
- No fancy equipment required. A baking rack, a sheet pan, and a skillet are all you need — no special appliances, no hard-to-find tools, just straightforward home cooking.
Ingredients
For the Baked Potatoes
- 4 large russet potatoes (about 10–12 oz each), scrubbed and dried
- 2 tablespoons olive oil
- 1 teaspoon kosher salt
- ½ teaspoon freshly cracked black pepper
For the Seasoned Ground Beef
- 1 lb lean ground beef (90/10)
- 1 teaspoon garlic powder
- 1 teaspoon onion powder
- 1 teaspoon smoked paprika
- ½ teaspoon cumin
- ½ teaspoon kosher salt
- ¼ teaspoon black pepper
- ¼ teaspoon crushed red pepper flakes (optional, for mild heat)
For the Cheese Layer
- 1 cup sharp cheddar cheese, freshly shredded
- ½ cup Monterey Jack cheese, freshly shredded
For the Toppings
- ½ cup full-fat sour cream
- 4 scallions (green onions), thinly sliced
- Freshly cracked black pepper, to finish
Optional Add-Ins
- 2 tablespoons pickled jalapeños
- 2 strips crispy bacon, crumbled
- 1 tablespoon fresh chives, minced
- Hot sauce, to taste
Ingredient Substitutions
| Original Ingredient | Substitution | Notes |
|---|---|---|
| Ground beef (90/10) | Ground turkey or ground bison | Turkey is leaner; bison adds a slightly richer flavor |
| Sharp cheddar | Pepper Jack or Colby Jack | Pepper Jack adds a pleasant heat throughout |
| Monterey Jack | Mozzarella | Mozzarella melts beautifully and keeps it mild |
| Sour cream | Plain full-fat Greek yogurt | Adds extra protein with the same creamy tang |
| Russet potatoes | Large Yukon Gold potatoes | Yukon Golds bake slightly faster; skin is thinner and equally delicious |
| Olive oil (skin rub) | Avocado oil or melted butter | Butter produces a richer, nuttier skin |
Kitchen Tools Needed
- Oven — preheated to 400°F; this is the core tool for the baking method
- Wire baking rack set inside a rimmed sheet pan — elevating the potatoes allows hot air to circulate on all sides for an evenly crisp skin
- 12-inch skillet (cast iron or stainless) — for browning the ground beef
- Aluminum foil — for tenting during the cheese-melting stage if needed
- Fork — for piercing potatoes before baking and testing doneness
- Sharp chef’s knife and cutting board — for slicing scallions and splitting potatoes
- Box grater — for freshly shredding cheese; pre-shredded bags contain anti-caking agents that prevent smooth melting
- Tongs — for handling hot potatoes safely
Step-by-Step Baking Instructions
Step 1: Preheat the Oven and Prep the Potatoes (5 minutes)
Position a wire rack in the center of your oven and preheat to 400°F. While the oven heats, scrub the russet potatoes thoroughly under cold running water, then pat them completely dry — any residual moisture steams the skin instead of crisping it. Pierce each potato 8–10 times all over with a fork, going about ½ inch deep. This allows steam to escape during baking and prevents the skin from splitting unexpectedly.
Rub each potato all over with olive oil, then season generously with kosher salt and black pepper. The salt draws a small amount of moisture to the surface, which then evaporates in the oven heat and leaves behind a deeply seasoned, crackling crust.
Step 2: Bake the Potatoes (55–60 minutes)
Place the potatoes directly on the wire rack set over the sheet pan. Slide them into the preheated 400°F oven and bake for 55 to 60 minutes, flipping them once at the halfway point. You’ll know they are done when the skin looks dry, taut, and deep golden-brown — almost like parchment pulled tight over a pillow. Pierce the thickest part with a fork; it should slide in and out with zero resistance.
Embedded Tip: Do not wrap the potatoes in foil at any point during the primary bake. Foil traps steam and turns the skin soft and leathery instead of crisp. Reserve foil only for the brief cheese-melting step at the end.
For food safety, the internal temperature of a fully cooked baked potato should reach at least 210°F, which ensures the starch granules have fully gelatinized and the interior is fluffy rather than dense. Use an instant-read thermometer inserted into the center to confirm.
Step 3: Brown the Seasoned Ground Beef (10 minutes)
About 15 minutes before the potatoes are due out of the oven, heat your skillet over medium-high heat until it is hot enough that a drop of water skitters and evaporates immediately. Add the ground beef in a single layer without stirring — let it sear undisturbed for 2 minutes so the bottom develops a deeply browned crust. Break it apart and continue cooking, stirring occasionally, for another 5–6 minutes until no pink remains and the beef has a rich mahogany color.
Drain any excess fat, then return the pan to medium heat. Add the garlic powder, onion powder, smoked paprika, cumin, salt, black pepper, and red pepper flakes. Stir to coat every crumble evenly and cook for 1 more minute — the spices will bloom in the residual heat of the pan, releasing a nutty, fragrant aroma that signals they’re fully incorporated.
Embedded Tip: Browning in a dry, hot pan before adding spices is the key to beef that tastes deeply savory rather than steamed. If the skillet is not hot enough before the beef goes in, the meat will release liquid and stew in it, resulting in gray, rubbery crumbles.
Step 4: Load and Melt the Cheese (5 minutes)
Remove the potatoes from the oven once they pass the fork test. Using a sharp knife, cut a deep cross into the top of each potato and press the ends inward firmly to pop the interior open — the fluffy white flesh should billow up like a cloud. Fluff the interior gently with a fork to create pockets for the toppings to nestle into.
Divide the seasoned beef evenly among the four potatoes, mounding it generously over the open centers. Immediately sprinkle the shredded cheddar and Monterey Jack over each loaded potato. Return the sheet pan to the oven for 3–5 minutes, just until the cheeses are visibly melted and beginning to drip down the sides in golden rivulets. Watch closely — you want fully melted, not browned.
Step 5: Add the Toppings and Serve
Pull the potatoes from the oven and let them rest for 2 minutes — the filling will be extremely hot and this brief pause lets the cheese set slightly so it doesn’t slide off. Add a generous dollop of sour cream to the center of each potato, then shower with sliced scallions and a few extra cracks of black pepper. Serve immediately while the cheese is still warm and fluid.
For recipe inspiration on how to use leftover seasoned beef the next morning, check out Broccoli Cheese Bites — Best Baked 25-Min Easy Snack.
Pro Tips for the Perfect High-Protein Loaded Cheesy Baked Potato
1. Always shred your own cheese. Pre-shredded cheese contains cellulose or potato starch as an anti-caking agent, which makes it resist melting smoothly. Freshly grated cheddar and Monterey Jack melt into glossy, fluid ribbons rather than stiff, clumpy patches.
2. Use the wire rack — it is non-negotiable for baking. Setting the potato directly on the oven rack or a flat sheet pan causes the underside to steam against the hot surface. The rack lifts it up so convection heat wraps around the entire potato, crisping all sides equally and shaving 5–10 minutes off cook time.
3. Don’t skip the flip. Turning the potatoes at the 30-minute mark ensures both sides of the skin receive equal direct oven heat. It takes 10 seconds and makes a visible difference in how evenly the skin crisps.
4. Season the beef while it’s still warm in the pan. Cold or room-temperature spices added to cooled meat just sit on the surface. Adding them to a warm skillet right after draining the fat allows the spices to bloom briefly, intensifying their flavor before the beef is piled onto the potato.
5. Pull the potatoes while the cheese still has some movement. The residual heat from the beef and potato interior will continue melting the cheese for another minute after you pull the pan. Slightly under-melting in the oven and letting carry-over heat finish the job means you get flowing cheese instead of rubbery, overcooked cheese.
Common Baking Mistakes to Avoid
1. Wrapping potatoes in foil while baking.
Foil is steam — it traps moisture against the skin and turns it soft and pale. If you want crispy skin on a high-protein loaded cheesy baked potato, the potatoes must bake uncovered on a rack for the full cook time. Use foil only after loading if needed to prevent over-browning.
2. Skipping the fork-piercing step.
Steam builds pressure inside an unvented potato. An unforked potato can burst in a hot oven, creating a messy cleanup and unevenly cooked flesh. Eight to ten deep fork holes are all it takes to prevent this.
3. Opening the oven door too frequently during baking.
Each time the oven door swings open, the internal temperature drops by 25–50°F and the recovery time adds several minutes to your cook. Check the potatoes at the 30-minute flip and again near the end — not more often. Trust your timer.
4. Using pre-shredded cheese.
Anti-caking agents in bagged shredded cheese prevent it from melting smoothly. Block cheese, freshly grated on a box grater just before use, melts into that glossy, cascading layer you see in the photo.
5. Cooking the beef on too-low heat.
Medium-low heat causes ground beef to release water and simmer in its own juices rather than sear. The result is gray, wet crumbles with little flavor. Crank the skillet to medium-high and let the beef develop real color before breaking it apart.
6. Not fluffing the potato interior before loading.
A split but un-fluffed potato has a dense, compact surface that doesn’t hold toppings well. Pressing in the ends and fluffing with a fork creates a cradle that locks the beef and cheese in place and makes every bite more evenly loaded.
7. Under-seasoning the skin.
The skin is the vessel for everything — and it is completely edible and delicious when properly seasoned. A thorough rub of oil, kosher salt, and black pepper before baking transforms it from an afterthought into one of the best parts of the meal.
Variations
Healthy Swap: Ground Turkey Version
Replace the ground beef with 93/7 lean ground turkey and season it identically. Turkey’s lighter flavor lets the smoked paprika and cumin shine even more clearly. Swap full-fat sour cream for plain 2% Greek yogurt to add protein and trim calories by roughly 80 per serving. The baking process for the potato stays exactly the same.
Vegetarian Version
Skip the meat entirely and substitute one 15-oz can of black beans, drained, rinsed, and warmed in the skillet with the same spice blend. Black beans bring about 15 grams of plant-based protein per cup. Add a tablespoon of olive oil to the pan when blooming the spices since there is no rendered beef fat. The potato bakes exactly as written — same temperature, same time.
Spicy Version
Stir 1–2 teaspoons of your favorite hot sauce (Cholula or Tabasco work well) into the beef during the last minute of cooking. Swap Monterey Jack for Pepper Jack cheese and add a generous layer of pickled jalapeños over the beef before the cheese goes on. Finish with a drizzle of sriracha over the sour cream for a slow, building heat that doesn’t overwhelm the richness of the potato.
Gluten-Free Version
This recipe is naturally gluten-free as written — all core ingredients (russet potatoes, ground beef, cheese, sour cream, spices) contain no gluten. Confirm your individual spice labels to rule out cross-contamination if cooking for someone with celiac disease. The USDA’s database at FoodData Central is a reliable resource for verifying individual ingredient composition.
Low-Carb / Keto Variation
This variation requires a different primary vessel. Replace the russet potato with large roasted portobello mushroom caps (roast at 400°F for 15 minutes, gill-side up, with a drizzle of olive oil) and pile them with the same seasoned beef and cheese mixture. Portobello caps cut the net carbs from roughly 55g down to about 6g per serving. The beef cooking method on the stovetop remains unchanged.
What to Serve With This Recipe
A high-protein loaded cheesy baked potato is a complete meal on its own, but these sides round out the table beautifully:
- Simple green salad with apple cider vinaigrette — the acidity cuts through the richness of the cheese and beef.
- Steamed or roasted broccoli — a classic pairing that adds fiber and a pop of color.
- Corn on the cob — sweet and summery against the savory, smoky beef.
- Coleslaw — the cool crunch contrasts the soft, hot potato interior perfectly.
- Roasted asparagus with lemon zest — light, elegant, and ready in under 15 minutes.
- A simple tomato cucumber salad — fresh and hydrating, no cooking required.
- Cup of chili — for those nights when you want the ultimate comfort-food double. Try Pepperoni Pizza Pull Apart Ring — Best Baked 45-Min as the perfect companion.
Storage Instructions
Refrigerator
Store fully loaded and assembled potatoes in an airtight container or tightly wrapped in foil for up to 3 days. Store the sour cream and raw scallion topping separately — they don’t hold up to heat during reheating and are best added fresh each time. Refrigerated potatoes can be reheated in the oven or microwave (see Reheating section below).
Freezer
Freeze the seasoned ground beef separately in a zip-top freezer bag for up to 3 months — it reheats beautifully from frozen. Fully assembled baked potatoes with cheese can be frozen, wrapped individually in foil then placed in a freezer bag, for up to 1 month, though the potato texture will be slightly denser after thawing. Do not freeze with sour cream.
Shelf Life Summary
| Component | Refrigerator | Freezer |
|---|---|---|
| Assembled loaded potato | Up to 3 days | Up to 1 month |
| Seasoned beef (separate) | Up to 4 days | Up to 3 months |
| Plain baked potato | Up to 5 days | Up to 1 month |
| Sour cream (separate) | Use by date on container | Not recommended |
Reheating Instructions
Proper reheating preserves the texture of both the potato skin and the beef. According to USDA food safety guidelines, reheated leftovers should reach an internal temperature of 165°F before eating.
Oven (Best Method): Preheat to 375°F. Place the potato on a rack over a sheet pan and heat for 15–20 minutes uncovered until the skin re-crisps and the cheese is bubbly. Add fresh sour cream and scallions after reheating.
Microwave (Fastest Method): Place on a microwave-safe plate, cover loosely with a damp paper towel, and heat on medium power for 2–3 minutes, checking and rotating at the 1-minute mark. The skin will soften but the filling will be hot throughout.
Stovetop (Beef Only): Reheat the beef in a dry skillet over medium heat for 3–4 minutes, stirring occasionally, until warmed through and beginning to sizzle again. Pile onto a freshly baked or microwaved potato for best results.
Nutrition Facts (Per Serving)
| Nutrient | Amount |
|---|---|
| Calories | ~620 |
| Total Fat | 28g |
| Saturated Fat | 13g |
| Cholesterol | 105mg |
| Sodium | 680mg |
| Total Carbohydrates | 54g |
| Dietary Fiber | 4g |
| Sugars | 3g |
| Protein | 38g |
Nutrition Disclaimer: Nutritional values are estimates calculated using standard ingredient databases and will vary based on specific brands, portion sizes, and any substitutions made. For precise dietary tracking, use a verified nutrition calculator with your exact ingredients. These figures do not constitute medical nutrition advice.
Frequently Asked Questions
1. Can I bake the potatoes at a higher temperature to save time?
Yes — 425°F shortens the bake to about 45–50 minutes. The trade-off is a slightly thicker, darker outer skin. Check doneness at the 45-minute mark with a fork. The interior should still be completely fluffy if the potato is large enough, but watch carefully to avoid over-darkening the skin.
2. Why is my baked potato skin soft instead of crispy?
This almost always comes down to one of two causes: foil wrapping during baking, or residual moisture on the skin before it went into the oven. Pat the potatoes completely dry after washing, apply the oil-and-salt rub, and bake uncovered on a wire rack. That combination reliably produces a dry, crackling skin.
3. Can I make the high-protein loaded cheesy baked potato ahead of time?
Absolutely. Bake the potatoes and cook the beef up to 3 days ahead and refrigerate separately. When ready to eat, reheat the potato in a 375°F oven for 15 minutes, warm the beef in a skillet, load and cheese, then return to the oven for 3–5 minutes to melt. Add the sour cream and scallions right before serving.
4. What is the best potato for baking?
Russet potatoes are the definitive choice for baking. Their high starch content and low moisture create the fluffy, almost mealy interior that absorbs toppings beautifully. Yukon Golds are a fine substitute but have a creamier, denser texture — still delicious, just different. Avoid waxy varieties like red potatoes, which don’t soften the same way under oven heat.
5. How do I know when the potato is fully baked without a thermometer?
The fork test is your most reliable tool: insert a fork or skewer into the center of the potato. If it slides in with no resistance, the potato is done. If you feel any firmness or drag, give it another 5–10 minutes. The skin should also look visibly dry and taut, not moist or shiny.
6. Can I use ground turkey instead of beef?
Yes — ground turkey works very well here. Use 93/7 lean turkey and cook it identically to the beef: hot pan, let it sear before breaking it apart, then season with the same spice blend. Turkey has a lighter color when cooked (pale golden rather than mahogany), but the spices deepen the color and flavor significantly.
7. Why do you use two types of cheese?
Sharp cheddar brings bold, tangy flavor and that familiar golden color you see melting down the sides of the potato. Monterey Jack is milder and melts more smoothly, contributing to the glossy, fluid texture of the cheese layer. Together they balance flavor intensity and melt quality — one cheese alone gives you less of both.
8. Is this recipe kid-friendly?
Very much so. The spice level as written (garlic, paprika, cumin) is savory but mild — not spicy. If cooking for young children, omit the red pepper flakes entirely. Kids tend to love the customization element: set out toppings separately and let them build their own loaded potato.
9. Can I cook the beef directly on the potato instead of in a skillet?
Not with this baking method — raw ground beef needs to reach an internal temperature of 160°F to be safe, and piling raw beef on a partially baked potato and returning it to the oven introduces food safety risks and uneven cooking. Always cook the beef through on the stovetop first before loading.
10. What is the difference between baking and roasting for potatoes?
Both use dry oven heat, but roasting typically implies higher temperatures (425–450°F) and often involves cut pieces to maximize surface browning. Baking refers to cooking a whole item, like a whole potato, at moderate heat (375–425°F) to cook the interior gently and completely. This recipe uses a whole-potato bake at 400°F, which is why the method is classified as Baking.
11. Can I make this recipe dairy-free?
Yes. Substitute your preferred dairy-free shredded cheese (brands like Violife or Daiya work reasonably well for melting) and use a cashew-based sour cream or plain unsweetened coconut yogurt in place of dairy sour cream. The flavor profile will be slightly different but the structure of the dish holds up well.
12. How do I prevent the cheese from sliding off before I can eat it?
Two tricks help: fluff the potato interior well so the beef has something to grip, and add the cheese while the beef is still hot from the skillet. Hot beef helps the cheese begin melting from below while the oven finishes it from above. Letting the assembled potato rest for 1–2 minutes before topping with sour cream also gives the cheese time to set into place.
Expert Chef Tips
1. Treat the potato skin like a seasoned crust. The oil-salt-pepper rub is not optional or purely aesthetic — it is the difference between a skin that’s worth eating and one that gets pushed aside. Apply it thoroughly to every surface and even into any crevices. A well-seasoned skin adds a savory, slightly crunchy contrast to the soft interior that no amount of topping can replicate.
2. Let the skillet fully preheat before the beef touches it. Place your palm 2–3 inches over the pan surface — you should feel significant radiating heat before adding the meat. Cold meat in a cold or warm pan releases liquid immediately and stews. A properly heated skillet sears the surface of the beef in the first 60 seconds, locking in moisture and building the flavor compounds that make the filling taste complex rather than flat.
3. Season in layers, not just at the end. Salt the potato skin before baking, season the beef during cooking, and add a final crack of black pepper over the finished dish. Each layer of seasoning serves a different function — building foundation flavor, developing the protein, and brightening the finish. One seasoning step cannot do the job of three.
4. The sour cream-to-scallion ratio matters. A single teaspoon of sour cream on a piled-high potato disappears — go with 2 full tablespoons per potato for a cool, tangy counterpoint that you can actually taste against the richness of the beef and cheese. Slice scallions thin and scatter them generously; their mild sharpness cuts through fat in a way that makes the whole dish taste cleaner.
5. Rest the potato for 2 minutes before serving. The interior temperature just after pulling from the oven can exceed 200°F. Two minutes of resting lets the steam settle, the cheese firm slightly from liquid to cohesive, and the toppings cool just enough to eat without burning your mouth — while everything is still deliciously warm.
Recipe Summary
This high-protein loaded cheesy baked potato brings together a crackling-skin russet baked at 400°F until perfectly fluffy inside, boldly spiced browned ground beef, two melted cheeses, cool sour cream, and fresh scallions in a recipe that is as satisfying to build as it is to eat. The baking method is deliberate — low-and-slow heat develops both a crisp skin and a soft, starchy interior that no faster method can replicate. It comes together in 75 minutes with minimal cleanup and serves four people a complete, high-protein dinner that holds up equally well as a weeknight staple or weekend indulgence.
Ready to Build the Ultimate Loaded Potato?
Once you’ve had a high-protein loaded cheesy baked potato done this way — crackling skin, seasoned beef, two-cheese melt, cold sour cream, and a fresh snap of scallions — the standard baked potato starts to feel like an unfinished sentence. This is the version you’ll keep coming back to, the one that turns a simple weeknight into something genuinely worth sitting down for.
If you make it, load it your way and don’t hold back on the cheese. Hungry for more high-protein dinner ideas built around real ingredients and straightforward technique? Browse Pepperoni Pizza Pull Apart Ring — Best Baked 45-Min for your next weeknight favorite.
Best High-Protein Loaded Cheesy Baked Potato (5-Star Ultimate Recipe)
Description
There are baked potatoes, and then there is a high-protein loaded cheesy baked potato — the kind that turns a humble russet into a full, satisfying meal you'll look forward to all day. This version is stacked with boldly seasoned ground beef, two melted cheeses that cascade down the sides of a crackling-skin potato, a generous dollop of cool sour cream, and a bright shower of freshly sliced scallions. It is hearty, rich, and completely unapologetic about it.
Ingredients
Instructions
-
Step-by-Step Baking Instructions
-
Step 1: Preheat the Oven and Prep the Potatoes (5 minutes)
-
Position a wire rack in the center of your oven and preheat to 400°F. While the oven heats, scrub the russet potatoes thoroughly under cold running water, then pat them completely dry — any residual moisture steams the skin instead of crisping it. Pierce each potato 8–10 times all over with a fork, going about ½ inch deep. This allows steam to escape during baking and prevents the skin from splitting unexpectedly.
-
Rub each potato all over with olive oil, then season generously with kosher salt and black pepper. The salt draws a small amount of moisture to the surface, which then evaporates in the oven heat and leaves behind a deeply seasoned, crackling crust.
-
Step 2: Bake the Potatoes (55–60 minutes)
-
Place the potatoes directly on the wire rack set over the sheet pan. Slide them into the preheated 400°F oven and bake for 55 to 60 minutes, flipping them once at the halfway point. You'll know they are done when the skin looks dry, taut, and deep golden-brown — almost like parchment pulled tight over a pillow. Pierce the thickest part with a fork; it should slide in and out with zero resistance.
-
Embedded Tip: Do not wrap the potatoes in foil at any point during the primary bake. Foil traps steam and turns the skin soft and leathery instead of crisp. Reserve foil only for the brief cheese-melting step at the end.
-
For food safety, the internal temperature of a fully cooked baked potato should reach at least 210°F, which ensures the starch granules have fully gelatinized and the interior is fluffy rather than dense. Use an instant-read thermometer inserted into the center to confirm.
-
Step 3: Brown the Seasoned Ground Beef (10 minutes)
-
About 15 minutes before the potatoes are due out of the oven, heat your skillet over medium-high heat until it is hot enough that a drop of water skitters and evaporates immediately. Add the ground beef in a single layer without stirring — let it sear undisturbed for 2 minutes so the bottom develops a deeply browned crust. Break it apart and continue cooking, stirring occasionally, for another 5–6 minutes until no pink remains and the beef has a rich mahogany color.
-
Drain any excess fat, then return the pan to medium heat. Add the garlic powder, onion powder, smoked paprika, cumin, salt, black pepper, and red pepper flakes. Stir to coat every crumble evenly and cook for 1 more minute — the spices will bloom in the residual heat of the pan, releasing a nutty, fragrant aroma that signals they're fully incorporated.
-
Embedded Tip: Browning in a dry, hot pan before adding spices is the key to beef that tastes deeply savory rather than steamed. If the skillet is not hot enough before the beef goes in, the meat will release liquid and stew in it, resulting in gray, rubbery crumbles.
-
Step 4: Load and Melt the Cheese (5 minutes)
-
Remove the potatoes from the oven once they pass the fork test. Using a sharp knife, cut a deep cross into the top of each potato and press the ends inward firmly to pop the interior open — the fluffy white flesh should billow up like a cloud. Fluff the interior gently with a fork to create pockets for the toppings to nestle into.
-
Divide the seasoned beef evenly among the four potatoes, mounding it generously over the open centers. Immediately sprinkle the shredded cheddar and Monterey Jack over each loaded potato. Return the sheet pan to the oven for 3–5 minutes, just until the cheeses are visibly melted and beginning to drip down the sides in golden rivulets. Watch closely — you want fully melted, not browned.
-
Step 5: Add the Toppings and Serve
-
Pull the potatoes from the oven and let them rest for 2 minutes — the filling will be extremely hot and this brief pause lets the cheese set slightly so it doesn't slide off. Add a generous dollop of sour cream to the center of each potato, then shower with sliced scallions and a few extra cracks of black pepper. Serve immediately while the cheese is still warm and fluid.
-
For recipe inspiration on how to use leftover seasoned beef the next morning, check out our high-protein breakfast skillet recipe.
-
Pro Tips for the Perfect High-Protein Loaded Cheesy Baked Potato
-
1. Always shred your own cheese. Pre-shredded cheese contains cellulose or potato starch as an anti-caking agent, which makes it resist melting smoothly. Freshly grated cheddar and Monterey Jack melt into glossy, fluid ribbons rather than stiff, clumpy patches.
-
2. Use the wire rack — it is non-negotiable for baking. Setting the potato directly on the oven rack or a flat sheet pan causes the underside to steam against the hot surface. The rack lifts it up so convection heat wraps around the entire potato, crisping all sides equally and shaving 5–10 minutes off cook time.
-
3. Don't skip the flip. Turning the potatoes at the 30-minute mark ensures both sides of the skin receive equal direct oven heat. It takes 10 seconds and makes a visible difference in how evenly the skin crisps.
-
4. Season the beef while it's still warm in the pan. Cold or room-temperature spices added to cooled meat just sit on the surface. Adding them to a warm skillet right after draining the fat allows the spices to bloom briefly, intensifying their flavor before the beef is piled onto the potato.
-
5. Pull the potatoes while the cheese still has some movement. The residual heat from the beef and potato interior will continue melting the cheese for another minute after you pull the pan. Slightly under-melting in the oven and letting carry-over heat finish the job means you get flowing cheese instead of rubbery, overcooked cheese.
Nutrition Facts
Servings 4
- Amount Per Serving
- Calories 620kcal
- % Daily Value *
- Total Fat 28g44%
- Saturated Fat 13g65%
- Protein 38g76%
* Percent Daily Values are based on a 2,000 calorie diet. Your daily value may be higher or lower depending on your calorie needs.