Easy Cheesy Chicken Enchilada Bake (5-Star Ultimate Dinner)


The Cheesy Chicken Enchilada Bake That Feeds a Crowd Without the Fuss
Some dinners earn their place at the weekly table not because they’re trendy but because they genuinely work — every time, for everyone. This cheesy chicken enchilada bake is exactly that kind of recipe. Large flour tortillas are stuffed with seasoned shredded chicken, rolled tight, laid seam-side down in a glass baking dish, blanketed in red enchilada sauce, and buried under a thick layer of Mexican blend cheese that melts into a golden, bubbly crust in the oven. Fresh cilantro scattered on top is the only finishing touch needed.
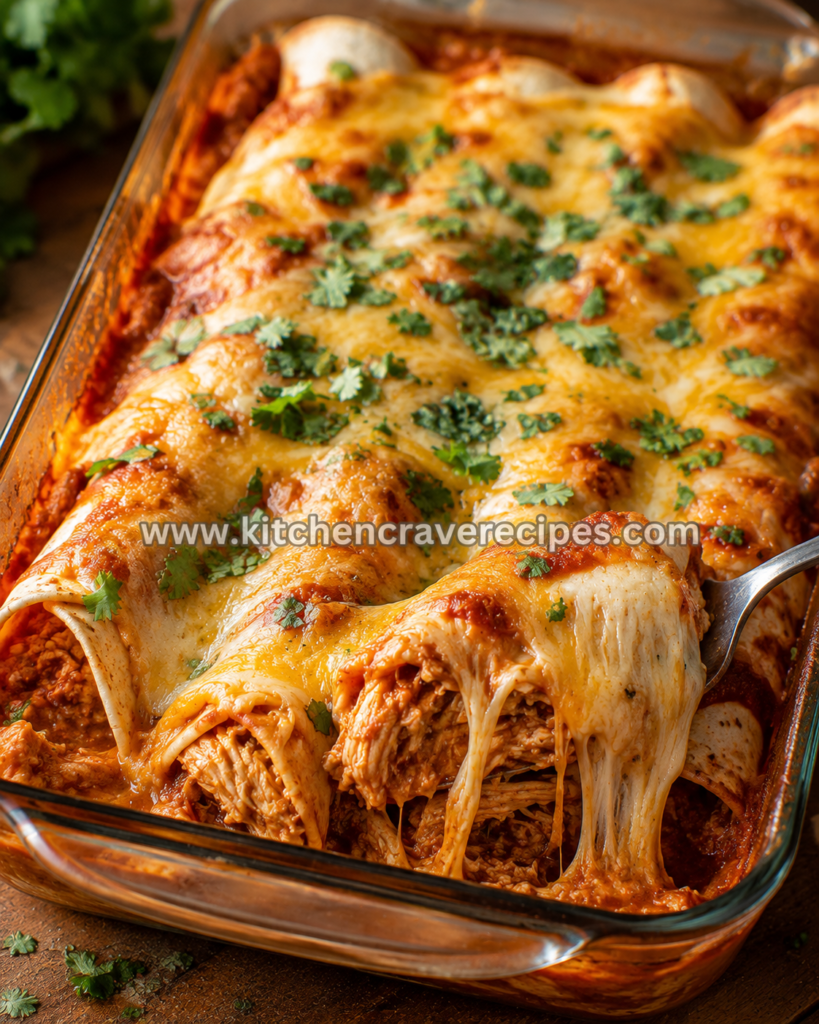
The photo shows the dish exactly as it comes out of a 9×13 glass pan — plump enchilada rolls soaked in deep-red sauce, topped with a fully melted cheddar-Monterey Jack blend and bright green cilantro leaves. This is weeknight comfort food built for real hunger, and at 40+ grams of protein per serving, it earns its place in any high-protein dinner lineup.
Recipe Quick Info
| Detail | Info |
|---|---|
| Prep Time | 20 minutes |
| Cook Time | 25 minutes |
| Total Time | 45 minutes |
| Servings | 4–6 |
| Cuisine | Tex-Mex / American |
| Course | Main Dish / Dinner |
| Cooking Method | Baking |
| Calories | ~520 per serving |
| Difficulty | Standard |
Why You’ll Love This Cheesy Chicken Enchilada Bake
- Genuinely high in protein. Shredded chicken plus a double layer of cheese delivers 40+ grams of protein per serving without any complicated tracking or specialty ingredients.
- One dish, almost no cleanup. Everything bakes in a single 9×13 glass pan — no sheet pans, no extra skillets after the chicken is prepped, no mess to manage.
- The oven does the hard work. Once the dish is assembled and in, you have 25 uninterrupted minutes — no stirring, no turning, no hovering required while dinner bakes itself.
- Crowd-pleasing every single time. Rolled flour tortillas, red enchilada sauce, and melted cheese speak a universal language that works for picky eaters, athletes, and everyone in between.
- Ready in 45 minutes start to finish. Twenty minutes of hands-on prep plus 25 minutes of baking — faster than most delivery windows and dramatically more satisfying.
- Scales up effortlessly. The recipe feeds four to six from one pan; add a second identical dish to the oven at the same time and you have dinner for twelve with zero extra effort.
- Built for meal prep. Assemble the enchiladas up to 24 hours ahead, refrigerate unbaked, and slide the dish straight into the oven when you’re ready — dinner waits on your schedule.
Ingredients
For the Chicken Filling
- 2 lbs boneless, skinless chicken breasts (or rotisserie chicken, shredded — about 4 cups)
- 1 teaspoon garlic powder
- 1 teaspoon onion powder
- 1 teaspoon ground cumin
- 1 teaspoon smoked paprika
- ½ teaspoon chili powder
- ½ teaspoon kosher salt
- ¼ teaspoon black pepper
- 1 tablespoon olive oil (if poaching or pan-cooking raw chicken)
For the Enchiladas
- 6 large flour tortillas (10-inch)
- 2 cups red enchilada sauce (store-bought or homemade), divided
- 2 cups Mexican blend shredded cheese (cheddar and Monterey Jack), divided
- ½ cup sour cream (optional, stirred into filling for creamier texture)
For the Topping
- ½ cup fresh cilantro leaves, roughly chopped
- Optional: sliced jalapeños, diced red onion, hot sauce
Optional Add-Ins (stir into filling before rolling)
- 1 can (15 oz) black beans, drained and rinsed
- 1 cup frozen corn, thawed
- 4 oz cream cheese, softened (for a richer filling)
Ingredient Substitutions
| Original Ingredient | Substitution | Notes |
|---|---|---|
| Flour tortillas (10-inch) | Corn tortillas (6-inch) | Use 2 per enchilada; warm them first or they’ll crack when rolling |
| Red enchilada sauce | Green enchilada sauce (salsa verde) | Completely different flavor profile — brighter and tangier |
| Mexican blend cheese | Pepper Jack + sharp cheddar | Adds more heat; shred fresh from a block for best melt |
| Chicken breast | Rotisserie chicken thighs | Thigh meat is richer and stays more moist through baking |
| Sour cream (in filling) | Plain full-fat Greek yogurt | Adds extra protein; nearly identical tangy flavor |
| Smoked paprika | Regular paprika | Loses the smoky depth but keeps the color and mild sweetness |
Kitchen Tools Needed
- Oven — preheated to 375°F; essential for this baking method
- 9×13 inch glass baking dish — large enough to hold 6 rolled enchiladas seam-side down without squeezing; glass allows you to monitor browning on the bottom
- Large pot or deep skillet — for poaching or cooking chicken before shredding
- Two forks — for shredding cooked chicken quickly and cleanly
- Large mixing bowl — for combining the seasoned shredded chicken filling
- Ladle or large spoon — for spreading enchilada sauce evenly over the top
- Aluminum foil — for covering the dish during the first phase of baking
- Instant-read thermometer — to confirm the chicken filling reaches 165°F if using raw cooked chicken
- Cutting board and sharp knife — for trimming chicken and chopping cilantro
How to Bake a Cheesy Chicken Enchilada Bake Perfectly Every Time
Step 1: Preheat the Oven and Prepare the Chicken (15 minutes)
Position a rack in the center of your oven and preheat to 375°F. If starting with raw chicken breasts, season them with the garlic powder, onion powder, cumin, smoked paprika, chili powder, salt, and pepper, then poach in lightly simmering water (or low-sodium chicken broth for more flavor) for 15–18 minutes until fully cooked through. According to USDA food safety guidelines, chicken must reach an internal temperature of 165°F before it is safe to eat.
Transfer the cooked chicken to a cutting board or large bowl and shred it immediately using two forks — chicken shreds most easily while still hot, pulling along the grain into long, tender strands. If using rotisserie chicken, simply shred it and toss with the dry spice blend in a bowl. Add sour cream now if using, stirring until every strand of chicken is evenly coated.
Embedded Tip: Using rotisserie chicken cuts your prep time nearly in half. Pull the meat while the chicken is still warm from the store — it shreds in under 3 minutes with two forks and takes the seasoning blend beautifully.
Step 2: Build the Enchilada Sauce Base in the Dish (3 minutes)
Pour ½ cup of the enchilada sauce into the bottom of the 9×13 glass baking dish and spread it in a thin, even layer with the back of a spoon. This base layer serves two functions: it prevents the bottom of the tortillas from drying out or sticking, and it begins infusing the rolled enchiladas with sauce from below as they bake. Don’t skip this step — enchiladas assembled on a dry dish surface turn stiff and leathery on the underside.
Step 3: Fill, Roll, and Arrange the Enchiladas (7 minutes)
Lay one flour tortilla flat on your work surface. Spoon a generous ½ cup of seasoned shredded chicken across the lower third of the tortilla, leaving about 1 inch of border on the sides. Fold the sides inward slightly, then roll the tortilla firmly from the bottom up, keeping it snug enough to hold its shape but not so tight that the tortilla tears. Place it seam-side down in the sauce-lined dish.
Repeat with the remaining five tortillas. Nestle them side by side in the dish — they should fit snugly without being crammed, which helps them hold their shape during baking. Fitting them tight also means the sauce floods up between the rolls rather than pooling only on top.
Embedded Tip: Warm your flour tortillas for 20 seconds in the microwave under a damp paper towel before rolling. A cold, stiff tortilla cracks at the edges when rolled; a warm one is pliable and rolls without splitting, keeping the filling sealed inside through the entire bake.
Step 4: Add the Sauce and Cheese, Then Bake (25 minutes)
Pour the remaining 1½ cups of enchilada sauce evenly over the top of all six rolls, making sure to cover the ends and any exposed tortilla edges — exposed tortilla dries out and turns papery in the oven. Sprinkle 1½ cups of the Mexican blend cheese in an even layer over the top, reserving ½ cup.
Cover the dish tightly with aluminum foil and bake at 375°F for 15 minutes. The foil traps steam, which heats the filling through and softens the tortillas so they absorb the sauce fully. After 15 minutes, remove the foil carefully (steam will escape — pull it back from the far edge first), sprinkle the reserved ½ cup of cheese over the top, and return the dish to the oven uncovered for another 10 minutes.
You’re looking for two visual cues that signal the dish is done: the cheese on top should be fully melted, beginning to bubble at the edges of the dish, and showing faint golden spots across its surface. The enchilada sauce should be visibly bubbling up through the cheese and around the sides of the pan — this means the entire dish has come up to temperature.
Step 5: Rest and Garnish Before Serving (3 minutes)
Remove the baking dish from the oven and rest it on a heat-safe surface for 3 minutes before serving. The filling and sauce will be at near-boiling temperature directly out of the oven; resting allows the cheese to set slightly so it stays on top of each enchilada when served rather than sliding off. Scatter fresh cilantro leaves generously over the top — their brightness cuts through the richness of the cheese and sauce in a way that makes the whole dish taste cleaner and more vibrant.
Serve directly from the glass dish, using a wide spatula to lift each enchilada cleanly. For a complementary high-protein side, pair this with Easy Creamy Garlic Salmon Pasta Bake (5-Star Ultimate Dinner).
Pro Tips for an Outstanding Cheesy Chicken Enchilada Bake
1. Cover with foil for the first phase, then uncover to finish. This two-stage baking method is the key to the dish. The foil stage heats the filling through and softens the tortillas; the uncovered stage melts and lightly browns the cheese into the bubbling, golden layer that defines a properly baked enchilada dish. Skipping either stage produces inferior results.
2. Don’t overfill the tortillas. It is tempting to pack in as much chicken as possible, but overstuffed tortillas split open during baking and the filling spills into the sauce. A generous ½ cup per tortilla rolls cleanly and stays intact through the full 25 minutes in the oven.
3. Season the chicken assertively before rolling. The filling is the only seasoned element in this dish — the enchilada sauce and cheese are relatively simple. Under-seasoned chicken results in a bake that tastes flat despite all the sauce and cheese layered on top. Taste the filling before rolling and adjust salt and cumin if needed.
4. Use freshly shredded cheese, not pre-shredded. Block cheese grated just before use melts into a smooth, glossy, cohesive layer. Pre-shredded bags contain cellulose anti-caking agents that resist even heat and produce a patchy, slightly gritty melt — visible in the final dish even if the flavor is similar.
5. Place the baking dish on a center rack, not the top third. A top-rack position in a 375°F oven will over-brown the cheese before the filling is heated through. The center rack provides consistent all-around heat that cooks the filling and melts the cheese at exactly the same rate.
Common Baking Mistakes to Avoid
1. Skipping the sauce base on the bottom of the dish.
A dry dish means the bottom of the tortillas dries out and stiffens during baking instead of absorbing sauce and staying tender. Spread ½ cup of enchilada sauce across the bottom before the enchiladas go in — it takes 30 seconds and makes a fundamental difference in texture.
2. Opening the oven door during the foil stage.
The first 15 minutes of covered baking relies on trapped steam to heat the filling evenly and soften the tortillas. Opening the door releases that steam and the recovery time extends the bake. Set your timer and resist checking until the foil comes off.
3. Leaving too much tortilla exposed without sauce coverage.
Any portion of the tortilla that bakes without sauce on top will turn dry and papery. Pour the sauce all the way to the ends and edges of each roll, not just over the tops. A single pass with a ladle is enough — just make sure nothing is left bare.
4. Using cold, rigid tortillas straight from the refrigerator.
Cold flour tortillas crack along the edges when rolled, allowing the filling to escape during baking. A quick 20-second microwave warm-up under a damp paper towel makes them fully pliable with almost no effort.
5. Undershooting the cheese quantity on the final uncover.
The reserved ½ cup of cheese added after removing the foil is what creates the golden, bubbly top layer visible in the finished dish. Sprinkling too little leaves the surface patchy and pale. Use the full ½ cup and distribute it evenly across all six rolls.
6. Serving immediately out of the oven without resting.
Near-boiling filling and sauce will slide right off the enchiladas if they’re served the moment the dish comes out. Three minutes of resting is all it takes for the cheese to set into a cohesive layer and the filling to stop shifting when the spatula goes in.
7. Using thin or small tortillas that can’t hold the filling.
Six-inch corn tortillas or thin 8-inch flour tortillas don’t have the structural capacity to hold a full ½ cup of filling through a 25-minute bake without splitting. Stick with 10-inch flour tortillas — they’re the right size for this quantity of filling and hold up through the full cook time.
Variations
Healthy Swap: Lighter Filling
Replace the Mexican blend cheese with a reduced-fat version and swap the sour cream in the filling for plain nonfat Greek yogurt. Use low-sodium enchilada sauce to bring the sodium down noticeably. The baking method, temperature, and time stay exactly the same. Reduced-fat cheese melts slightly differently — it may look less glossy — but the flavor and structure hold up well through baking.
Vegetarian Version
Omit the chicken entirely and replace with a filling of 1½ cups canned black beans (drained), 1 cup thawed frozen corn, ½ cup diced roasted red peppers, and 4 oz softened cream cheese for binding. The same spice blend applies. Use the same rolling and baking method at 375°F — reduce the covered bake time to 12 minutes since there is no meat to heat through, then uncover and add the reserved cheese for the final 10 minutes as written.
Spicy Version
Add 2 teaspoons of chipotle in adobo sauce (minced) directly into the chicken filling and swap the red enchilada sauce for a hot variety. Layer sliced fresh jalapeños between the cheese layers before the dish goes uncovered for the last 10 minutes — the jalapeños char slightly at the edges and add a roasted heat that’s different from the raw version. Finish with a drizzle of hot sauce over the cilantro.
Gluten-Free Version
This recipe is straightforward to convert: use certified gluten-free corn tortillas (warm them in a dry skillet for 20–30 seconds per side before rolling so they’re pliable) and confirm that your enchilada sauce and spice blends are labeled gluten-free. Everything else in the recipe — the chicken, cheese, cilantro, sour cream — is naturally gluten-free. Corn tortillas are narrower, so use 2 per enchilada and arrange them end-to-end before rolling.
Low-Carb / Keto Variation
This variation requires a genuinely different vessel. Skip the tortillas entirely and layer the seasoned shredded chicken directly into the baking dish — think of it as a deconstructed enchilada casserole. Spread the chicken filling, top with enchilada sauce (check the label for carb count; some red sauces are lower than others), and cover with the full 2 cups of cheese. Bake at 375°F uncovered for 18–20 minutes until the cheese is fully melted and bubbling. Net carbs drop from roughly 35g to under 8g per serving.
What to Serve With This Cheesy Chicken Enchilada Bake
This dish is complete on its own but these sides make it a full spread:
- Cilantro-lime rice — the brightness of lime and herbs balances the richness of the enchilada sauce and cheese.
- Refried beans or whole pinto beans — a classic Tex-Mex pairing that adds fiber and additional plant-based protein.
- Simple guacamole — cool, creamy avocado cuts directly through the richness of the baked cheese layer.
- Shredded iceberg or romaine salad with lime vinaigrette — the cold crunch is a welcome textural contrast to the hot, soft enchiladas.
- Sliced pickled jalapeños and pico de gallo — quick, fresh condiments that add acid and heat without any cooking.
- Mexican street corn (elotes-style) — charred corn with mayo, cotija, and chili powder rounds out the Tex-Mex table beautifully.
- A cold agua fresca or sparkling water with lime — the light sweetness and acidity balance the savory, rich bake. Pair this meal with Easy Creamy Garlic Salmon Pasta Bake (5-Star Ultimate Dinner)for a complete game-night spread.
Storage Instructions
Refrigerator
Store leftover cheesy chicken enchilada bake tightly covered with plastic wrap or transferred to an airtight container for up to 4 days. The tortillas will continue to absorb sauce as they sit, becoming softer and more integrated over time — many people find the leftovers even more flavorful on day two. Store any fresh cilantro separately and add it after reheating.
Freezer
This dish freezes well either baked or unbaked. For baked leftovers, wrap individual portions tightly in plastic wrap, then foil, and freeze for up to 2 months. For the unbaked version, assemble fully (sauce, cheese, everything except cilantro), wrap the dish tightly in two layers of foil, and freeze for up to 3 months. Bake from frozen at 375°F, covered with foil, for 45–50 minutes, then uncover for the final 10 minutes.
Shelf Life Summary
| Component | Refrigerator | Freezer |
|---|---|---|
| Fully baked enchiladas | Up to 4 days | Up to 2 months |
| Unbaked assembled dish | Up to 24 hours | Up to 3 months |
| Shredded seasoned chicken (alone) | Up to 4 days | Up to 3 months |
| Enchilada sauce (opened) | Up to 5 days | Up to 3 months |
Reheating Instructions
Proper reheating keeps the cheese melty and the tortillas from drying out. As noted in USDA food safety guidance, all reheated leftovers must reach an internal temperature of 165°F before eating.
Oven (Best Method): Preheat to 350°F. Place the enchiladas in an oven-safe dish, add 2 tablespoons of water or additional enchilada sauce to prevent drying, cover tightly with foil, and heat for 18–20 minutes until warmed through. Remove foil for the final 3 minutes to re-melt the cheese surface.
Microwave (Fastest Option): Transfer one or two enchiladas to a microwave-safe plate. Add a spoonful of enchilada sauce over the top, cover loosely with a damp paper towel, and heat on medium power for 90-second intervals until the filling is hot throughout. Check and rotate after each interval. Total time is typically 3–4 minutes.
Stovetop (Filling Only): If the tortillas have softened too much to reheat intact, scoop the filling and sauce into a small skillet over medium heat and warm for 4–5 minutes, stirring gently until heated through. Serve over rice or with fresh tortillas for a quick second meal.
Nutrition Facts (Per Serving, based on 5 servings)
| Nutrient | Amount |
|---|---|
| Calories | ~520 |
| Total Fat | 22g |
| Saturated Fat | 10g |
| Cholesterol | 115mg |
| Sodium | 810mg |
| Total Carbohydrates | 36g |
| Dietary Fiber | 2g |
| Sugars | 4g |
| Protein | 42g |
Nutrition Disclaimer: All nutritional values are estimates based on standard ingredient databases and will vary depending on specific brands used, portion sizes, and any substitutions. These figures are provided as general guidance and do not constitute medical or dietary advice. For precise tracking, enter your exact ingredients into a verified nutrition calculator.
Frequently Asked Questions
1. Can I use corn tortillas instead of flour tortillas for this bake?
Yes, but they require preparation. Corn tortillas crack when rolled cold — warm each one in a dry skillet for 20–30 seconds per side until pliable before filling. Use two overlapping corn tortillas per enchilada to match the size of a 10-inch flour tortilla. The texture after baking will be slightly softer and the flavor more traditional.
2. Do I have to cook the chicken before assembling, or can I use raw chicken?
The chicken must be fully cooked before rolling into the enchiladas. Raw chicken inside a rolled tortilla will not reach a safe internal temperature in 25 minutes of baking at 375°F. Cook the chicken first by poaching, baking, or using rotisserie, then shred and season before assembling.
3. Why cover the dish with foil during the first part of baking?
Foil trapping steam during the first 15 minutes of the bake is what heats the filling evenly and softens the tortillas so they fully absorb the enchilada sauce. Without the foil stage, the cheese on top browns before the center of the dish is heated through, and the tortillas stay firm and dry rather than tender and sauce-soaked.
4. Can I make the cheesy chicken enchilada bake the night before?
Absolutely — this is one of the best make-ahead dinner recipes in the Tex-Mex category. Assemble the dish completely (sauce, cheese, everything except the cilantro garnish), cover tightly with plastic wrap, and refrigerate for up to 24 hours. Bake directly from the refrigerator, adding 5–8 extra minutes to the covered baking time to account for the cold dish.
5. What is the best enchilada sauce for this recipe?
Any good-quality red enchilada sauce works. Store-bought options like Old El Paso, Las Palmas, or a local brand you trust are all reliable. If you prefer homemade, a simple red sauce of blended dried chiles, tomatoes, garlic, and cumin delivers noticeably deeper flavor. Green enchilada sauce (salsa verde) is an equally valid swap and produces a brighter, tangier dish.
6. How do I keep the tortillas from getting soggy in the bake?
Some softening of the tortillas is desirable and intentional in an enchilada bake. To prevent them from becoming completely soggy, don’t over-sauce the bottom layer (½ cup is the right amount), use large flour tortillas rather than corn, and don’t extend the covered bake beyond 15 minutes. The two-stage baking method in this recipe is specifically calibrated to produce tortillas that are tender but still structurally intact.
7. Can I add vegetables directly to the chicken filling?
Yes — black beans, corn, and diced roasted red peppers are all listed as optional add-ins and work very well. Avoid high-moisture vegetables like raw zucchini or mushrooms, which release water during baking and thin the filling considerably. If you want mushrooms, sauté them until completely dry before adding them to the chicken.
8. What cheese melts best for this dish?
The Mexican blend of cheddar and Monterey Jack — shredded fresh from a block — melts most evenly and produces the glossy, bubbly top layer you see in the photo. Pepper Jack is a great swap for heat lovers. Avoid mozzarella alone, which goes stringy and slightly rubbery rather than creating the fluid, melted cheese layer this dish is known for.
9. Can I double this recipe for a larger group?
Yes — simply prepare two identical 9×13 dishes and bake them on separate center racks simultaneously. The baking time does not need to change. Swap the positions of the two dishes (top to bottom, front to back) at the halfway point to ensure even browning, since most home ovens have minor hot spots.
10. Is this recipe freezer-friendly if I assemble it unbaked?
It is — and this is one of the most practical things about a baked enchilada dish. Assemble it completely, wrap the dish in two layers of foil, label it, and freeze for up to 3 months. To bake from frozen: bake covered at 375°F for 45–50 minutes until the internal temperature reads 165°F, then uncover for the final 10 minutes to melt and set the cheese. No thawing required.
11. What makes this a high-protein dinner compared to a standard enchilada?
The protein comes from two main sources: the 2 pounds of chicken breast (roughly 55–60g of protein in the raw weight across the dish) and the 2 cups of shredded cheese (approximately 28g across the dish). Together, those two ingredients alone account for the majority of the protein per serving. Adding black beans or using Greek yogurt instead of sour cream pushes the number even higher.
12. Can I use green enchilada sauce instead of red?
Completely interchangeable from a technique standpoint — the baking method, temperature, and timing are identical. Green enchilada sauce (salsa verde, made from tomatillos) produces a brighter, more acidic, slightly tangier dish compared to the deeper, earthier red version. Both work well with the seasoned chicken filling.
Expert Chef Tips
1. Season your chicken in two stages for the deepest flavor. Season the raw chicken with half the spice blend before cooking, then toss the shredded meat with the remaining spices after shredding. The first round seasons the interior as it cooks; the second coats every strand on the surface. The difference in flavor depth is significant and requires no extra ingredients.
2. Rest the shredded chicken in the enchilada sauce for 5 minutes before rolling. Toss the seasoned shredded chicken with 2–3 tablespoons of enchilada sauce and let it sit while you warm your tortillas. The chicken absorbs the sauce and won’t taste dry even after 25 minutes of baking. This is the step that separates a moist, saucy filling from one that’s compact and dense.
3. Finish with a squeeze of fresh lime over the cilantro. The dish comes out of the oven rich, savory, and deeply seasoned — all of which are good things. A quick squeeze of fresh lime juice over the cilantro garnish right before serving adds the acid that makes the whole dish taste more vibrant and less heavy. It costs nothing and takes 5 seconds.
4. Let the cheese go slightly past fully melted. Those faint golden spots on the surface of the cheese that appear in the final few minutes of uncovered baking are not burning — they are the Maillard reaction producing deeper, nuttier flavor in the cheese itself. Pull the dish when the spots are golden but not dark. That extra couple of minutes is the difference between melted cheese and genuinely great melted cheese.
5. Use a glass baking dish, not a dark metal one. Glass allows you to check the color of the sauce and the bottom of the enchiladas from outside the dish as they bake. Dark metal pans absorb more heat and can over-brown the bottom before the top is done. Glass also holds heat more evenly after it comes out of the oven, which supports the 3-minute resting step.
Recipe Summary
This cheesy chicken enchilada bake is a complete, high-protein dinner assembled in 20 minutes and baked in a single glass dish at 375°F for 25 minutes until the cheese is golden and the sauce is bubbling through every seam. Seasoned shredded chicken is rolled into large flour tortillas, covered in red enchilada sauce, and finished under a full layer of melted Mexican blend cheese — then scattered with fresh cilantro before serving. It feeds four to six, stores beautifully, and reheats almost as well as it comes out of the oven the first time.
Make It Tonight — This Bake Speaks for Itself
There’s something about pulling a bubbling, cheese-covered dish out of a hot oven that makes dinner feel like an event, even on a Tuesday. This cheesy chicken enchilada bake delivers that moment every single time — the golden cheese, the red sauce bubbling at the edges, the fresh cilantro on top — and it does it in under an hour with ingredients most kitchens already have. Make it once this week and it will very quickly find a permanent spot in your rotation. Looking for more high-protein baked dinners with the same no-fuss approach? Browse Easy Creamy Garlic Salmon Pasta Bake (5-Star Ultimate Dinner) for your next weeknight win.
Easy Cheesy Chicken Enchilada Bake (5-Star Ultimate Dinner)
Description
Some dinners earn their place at the weekly table not because they're trendy but because they genuinely work — every time, for everyone. This cheesy chicken enchilada bake is exactly that kind of recipe. Large flour tortillas are stuffed with seasoned shredded chicken, rolled tight, laid seam-side down in a glass baking dish, blanketed in red enchilada sauce, and buried under a thick layer of Mexican blend cheese that melts into a golden, bubbly crust in the oven. Fresh cilantro scattered on top is the only finishing touch needed.
Ingredients
Instructions
-
Step 1: Preheat the Oven and Prepare the Chicken (15 minutes)
-
Position a rack in the center of your oven and preheat to 375°F. If starting with raw chicken breasts, season them with the garlic powder, onion powder, cumin, smoked paprika, chili powder, salt, and pepper, then poach in lightly simmering water (or low-sodium chicken broth for more flavor) for 15–18 minutes until fully cooked through. According to USDA food safety guidelines, chicken must reach an internal temperature of 165°F before it is safe to eat.
-
Transfer the cooked chicken to a cutting board or large bowl and shred it immediately using two forks — chicken shreds most easily while still hot, pulling along the grain into long, tender strands. If using rotisserie chicken, simply shred it and toss with the dry spice blend in a bowl. Add sour cream now if using, stirring until every strand of chicken is evenly coated.
-
Embedded Tip: Using rotisserie chicken cuts your prep time nearly in half. Pull the meat while the chicken is still warm from the store — it shreds in under 3 minutes with two forks and takes the seasoning blend beautifully.
-
Step 2: Build the Enchilada Sauce Base in the Dish (3 minutes)
-
Pour ½ cup of the enchilada sauce into the bottom of the 9×13 glass baking dish and spread it in a thin, even layer with the back of a spoon. This base layer serves two functions: it prevents the bottom of the tortillas from drying out or sticking, and it begins infusing the rolled enchiladas with sauce from below as they bake. Don't skip this step — enchiladas assembled on a dry dish surface turn stiff and leathery on the underside.
-
Step 3: Fill, Roll, and Arrange the Enchiladas (7 minutes)
-
Lay one flour tortilla flat on your work surface. Spoon a generous ½ cup of seasoned shredded chicken across the lower third of the tortilla, leaving about 1 inch of border on the sides. Fold the sides inward slightly, then roll the tortilla firmly from the bottom up, keeping it snug enough to hold its shape but not so tight that the tortilla tears. Place it seam-side down in the sauce-lined dish.
-
Repeat with the remaining five tortillas. Nestle them side by side in the dish — they should fit snugly without being crammed, which helps them hold their shape during baking. Fitting them tight also means the sauce floods up between the rolls rather than pooling only on top.
-
Embedded Tip: Warm your flour tortillas for 20 seconds in the microwave under a damp paper towel before rolling. A cold, stiff tortilla cracks at the edges when rolled; a warm one is pliable and rolls without splitting, keeping the filling sealed inside through the entire bake.
-
Step 4: Add the Sauce and Cheese, Then Bake (25 minutes)
-
Pour the remaining 1½ cups of enchilada sauce evenly over the top of all six rolls, making sure to cover the ends and any exposed tortilla edges — exposed tortilla dries out and turns papery in the oven. Sprinkle 1½ cups of the Mexican blend cheese in an even layer over the top, reserving ½ cup.
-
Cover the dish tightly with aluminum foil and bake at 375°F for 15 minutes. The foil traps steam, which heats the filling through and softens the tortillas so they absorb the sauce fully. After 15 minutes, remove the foil carefully (steam will escape — pull it back from the far edge first), sprinkle the reserved ½ cup of cheese over the top, and return the dish to the oven uncovered for another 10 minutes.
-
You're looking for two visual cues that signal the dish is done: the cheese on top should be fully melted, beginning to bubble at the edges of the dish, and showing faint golden spots across its surface. The enchilada sauce should be visibly bubbling up through the cheese and around the sides of the pan — this means the entire dish has come up to temperature.
-
Step 5: Rest and Garnish Before Serving (3 minutes)
-
Remove the baking dish from the oven and rest it on a heat-safe surface for 3 minutes before serving. The filling and sauce will be at near-boiling temperature directly out of the oven; resting allows the cheese to set slightly so it stays on top of each enchilada when served rather than sliding off. Scatter fresh cilantro leaves generously over the top — their brightness cuts through the richness of the cheese and sauce in a way that makes the whole dish taste cleaner and more vibrant.
-
Serve directly from the glass dish, using a wide spatula to lift each enchilada cleanly. For a complementary high-protein side, pair this with our Mexican-style black bean rice recipe.
Nutrition Facts
Servings 4
- Amount Per Serving
- Calories 520kcal
- % Daily Value *
- Total Fat 22g34%
- Saturated Fat 10g50%
- Protein 42g84%
* Percent Daily Values are based on a 2,000 calorie diet. Your daily value may be higher or lower depending on your calorie needs.