Easy Cheesy Chili Cornbread Casserole (Best 1-Pan Bake)

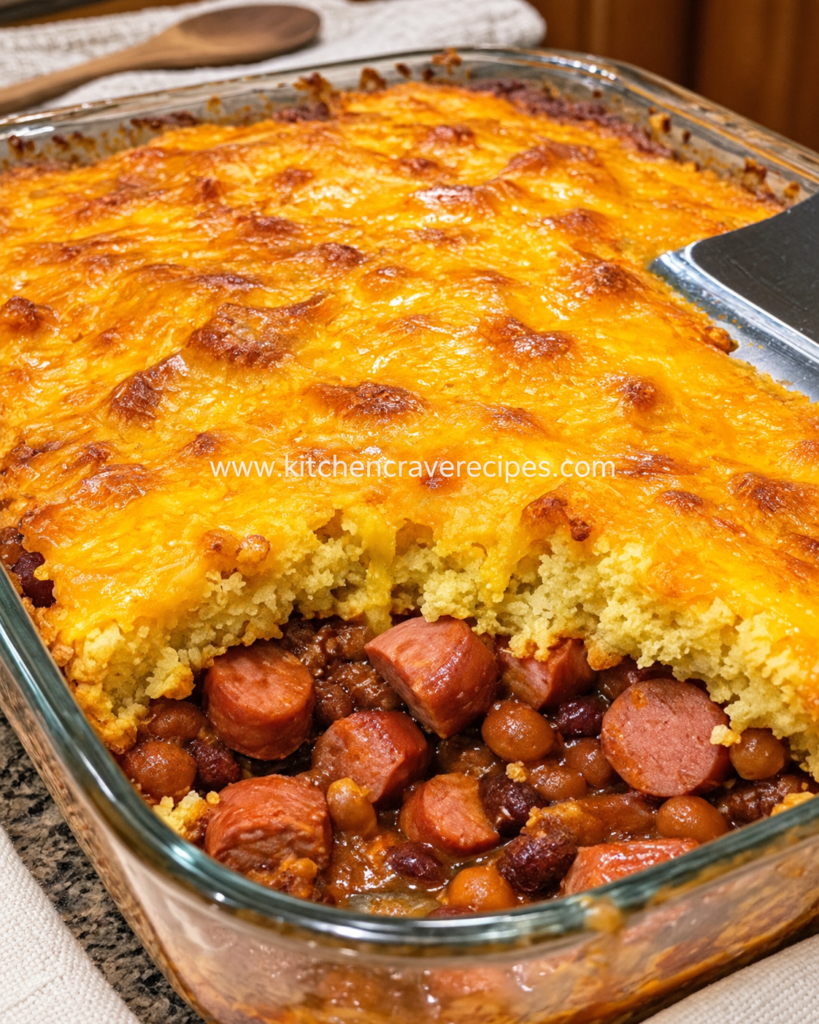

There are weeknight dinners, and then there are weeknight dinners that make everyone at the table stop talking. This cheesy chili cornbread casserole is firmly in that second category. It layers a thick, savory chili base — ground beef, smoky sliced hot dogs, and dark red kidney beans — under a fluffy baked cornbread topping, all finished with a blanket of bubbling, golden-brown cheddar that stretches with every scoop.
I’ve made this dish more times than I can count, and it never fails. The oven does all the heavy lifting: preheat, assemble, bake, and done. If your family loves chili and cornbread, this baked casserole simply combines both into one impossibly satisfying pan. It’s the kind of recipe you’ll bookmark and come back to every single week.
Recipe Quick Info
| Detail | Info |
|---|---|
| Prep Time | 15 minutes |
| Cook Time | 35 minutes |
| Total Time | 50 minutes |
| Servings | 8 |
| Cuisine | American |
| Course | Main Dish |
| Cooking Method | Baking |
| Calories | ~480 per serving |
| Difficulty | Easy |
Why You’ll Love This Recipe
- One pan, zero fuss. Everything bakes together in a single 9×13-inch dish — fewer dishes, more time at the table.
- Kid-approved every single time. The sliced hot dogs mixed into the chili layer make this an instant hit with picky eaters of all ages.
- That golden cheddar crust is everything. A full layer of shredded sharp cheddar melts directly over the cornbread, turning deeply golden and slightly crisp at the edges during the final minutes in the oven.
- Pantry-friendly ingredients. Ground beef, a box of cornbread mix, canned beans, and a handful of spices — you likely have most of this on hand right now.
- Scales easily for a crowd. Doubling this cheesy chili cornbread casserole requires only a second baking dish and about 5 extra minutes of bake time.
- Meal-prep superstar. It reheats beautifully from the fridge and holds its structure, making it an ideal make-ahead dinner for busy weeks.
- Deeply satisfying comfort food. The contrast between the moist, tender cornbread and the thick, spiced chili underneath makes every bite feel complete.
Ingredients
For the Chili Layer
- 1 lb ground beef (80/20 recommended for flavor)
- 4 beef hot dogs, sliced into ½-inch coins
- 1 can (15 oz) dark red kidney beans, drained and rinsed
- 1 can (15 oz) black beans, drained and rinsed
- 1 can (14.5 oz) diced tomatoes, undrained
- 1 can (8 oz) tomato sauce
- 1 small yellow onion, diced
- 2 cloves garlic, minced
- 1½ tsp chili powder
- 1 tsp ground cumin
- ½ tsp smoked paprika
- ½ tsp salt
- ¼ tsp black pepper
For the Cornbread Topping
- 1 box (8.5 oz) Jiffy corn muffin mix
- 1 large egg
- ⅓ cup whole milk
- 2 tbsp unsalted butter, melted
For the Cheese Layer
- 2 cups shredded sharp cheddar cheese, divided (1 cup mixed into batter, 1 cup on top)
Optional Add-Ins
- 1 jalapeño, finely diced (stir into chili for heat)
- ½ cup frozen corn kernels (stir into cornbread batter)
- 1 tsp hot sauce (mix into chili layer)
Ingredient Substitutions
| Original Ingredient | Substitution | Notes |
|---|---|---|
| Ground beef | Ground turkey or ground chicken | Reduce chili powder slightly; turkey is leaner and cooks faster |
| Beef hot dogs | Smoked sausage, kielbasa, or vegetarian dogs | Slice to the same ½-inch thickness |
| Jiffy corn muffin mix | Homemade cornbread batter | Use your favorite from-scratch recipe at equivalent volume |
| Sharp cheddar | Colby-Jack or Pepper Jack | Pepper Jack adds a nice subtle kick to the finished casserole |
| Whole milk | 2% milk or unsweetened oat milk | Either works without changing the cornbread texture noticeably |
| Dark red kidney beans | Pinto beans or navy beans | Both hold their shape well through baking |
Kitchen Tools Needed
Because this is a baked casserole, you’ll need oven-safe equipment that can hold up to 375°F for the full bake time.
- 9×13-inch glass or ceramic baking dish (as shown in the reference photo — the glass dish allows you to watch the chili layer bubble at the sides, which is a great visual doneness cue)
- Large skillet (12-inch, for browning the beef and hot dogs on the stovetop before assembling)
- Large mixing bowl (for the cornbread batter)
- Wooden spoon or silicone spatula (for spreading the batter evenly over the chili)
- Whisk (for mixing the cornbread batter)
- Oven mitts (the baking dish gets very hot — always use two hands)
- Instant-read thermometer (optional but useful — the ground beef should have reached 160°F before the chili goes into the dish)
- Box grater or pre-shredded cheese (freshly grated cheddar melts more smoothly than pre-shredded)
Step-by-Step Instructions
Step 1: Preheat the Oven and Prep Your Dish
Preheat your oven to 375°F. Lightly grease a 9×13-inch baking dish with cooking spray or a thin layer of butter. Setting the oven temperature accurately before you start cooking is important — a properly preheated oven ensures the cornbread topping bakes up tender and set rather than dense in the center.
Step 2: Brown the Ground Beef
Heat a large skillet over medium-high heat. Add the ground beef and break it apart with a wooden spoon, cooking for 6–8 minutes until no pink remains. You’re looking for a deep brown color on the meat — that sear is where the flavor lives. Drain excess fat, leaving just a thin film in the pan. If you want to confirm food safety, the USDA recommends ground beef reach an internal temperature of 160°F — see USDA safe minimum internal temperatures for full guidance.
Step 3: Build the Chili Layer
Reduce the heat to medium. Add the diced onion to the skillet with the browned beef and cook for 3 minutes until softened and translucent. Stir in the garlic and cook 30 seconds more — you’ll smell the garlic immediately turn fragrant, which is your cue to move quickly. Add the hot dog slices, kidney beans, black beans, diced tomatoes, tomato sauce, chili powder, cumin, smoked paprika, salt, and pepper.
Stir everything together and let the mixture simmer on the stovetop for about 5 minutes, stirring occasionally, so the flavors meld and the sauce thickens slightly. The chili layer should look saucy but not watery — if it seems too thin, let it bubble for another 2 minutes. Pour the finished chili into your prepared baking dish and spread it into an even layer.
Embedded Tip: Don’t skip the stovetop simmer step — it concentrates the tomato flavor and prevents the chili from releasing excess moisture into the cornbread during baking, which would make the bottom of the crust gummy.
Step 4: Make the Cornbread Batter
In a large bowl, whisk together the Jiffy corn muffin mix, egg, milk, and melted butter until just combined — about 20 strokes. A few lumps are completely fine and actually ideal; overmixing activates the gluten in the mix and makes the topping tough. Fold in 1 cup of the shredded cheddar cheese. The batter will be thick, which is exactly what you want so it sits on top of the chili without sinking.
Step 5: Spread the Cornbread Topping
Drop large spoonfuls of the cornbread batter over the chili layer, then use the back of a spatula to gently spread it into an even layer, reaching close to the edges of the baking dish. Don’t press down hard — just nudge it across the surface. Some chili showing at the edges is normal and actually looks beautiful once baked. This is the same layered construction visible in the finished photo, with cornbread sitting as a distinct, separate stratum above the chili.
Embedded Tip: If your batter is sticking to the spatula and tearing the top, lightly dampen the spatula with water. The batter will glide instead of drag.
Step 6: Bake the Casserole
Slide the assembled dish into your preheated 375°F oven and bake for 22–25 minutes, until the cornbread layer looks set and pale golden on top. The edges should be pulling away slightly from the sides of the dish, and a toothpick inserted in the center of the cornbread should come out clean (not wet with batter). Baking in a glass dish, as shown in the reference photo, lets you watch the chili bubbling around the perimeter — that bubble is a reliable visual cue that the casserole is fully heated through.
Step 7: Add the Cheese and Finish Baking
Remove the dish from the oven and evenly scatter the remaining 1 cup of shredded sharp cheddar across the entire top surface. Return the dish to the oven and bake for an additional 8–10 minutes, until the cheese is fully melted, bubbly, and developing those irresistible golden-brown patches across the top — just like in the reference photo. The cheese near the edges will be slightly more caramelized, which is the best part.
Step 8: Rest and Serve
Let the cheesy chili cornbread casserole rest in the baking dish for at least 5 minutes before scooping. This rest time lets the chili layer firm up just enough so each serving holds its layers. Use a large spatula to scoop clean portions — the chili, cornbread, and cheese layer will come out together beautifully.
Pro Tips for Baking This Casserole Perfectly
- Preheat fully before the dish goes in. A partially preheated oven leads to uneven baking — the bottom of the cornbread will be doughy while the top over-browns. Give your oven a full 10–15 minutes to reach 375°F. An oven thermometer is the only way to know for certain. (Method-specific tip for Baking.)
- Don’t open the oven door during the first 20 minutes. Opening the door drops the internal temperature by 25–50°F instantly, which disrupts the rise and set of the cornbread topping. If you need to check, use the oven light.
- Grate your own cheese. Pre-shredded cheese is coated in anti-caking starch that resists smooth melting. Freshly grated sharp cheddar turns into that gorgeous, uninterrupted golden sheet you see in the photo.
- Let the chili cool slightly before adding the batter. Pouring cornbread batter directly over a violently hot chili layer can partially cook the bottom of the batter on contact, creating an uneven texture. A brief 3–5 minute rest off the heat is all you need.
- Use the full 2 cups of cheese. It sounds like a lot, but this casserole has a generous surface area. Spreading the cheese thin means you’ll get bare spots rather than that wall-to-wall golden crust.
Common Mistakes to Avoid
1. Skipping the stovetop step and adding raw beef to the dish.
Raw ground beef doesn’t reach 160°F reliably in the center of a casserole at 375°F within the cornbread’s bake window. Always brown the beef fully on the stovetop first. Fix: Complete Steps 2 and 3 as written — don’t try to shortcut by layering raw meat into the baking dish.
2. Opening the oven door too often while baking. (Method-specific mistake for Baking)
Every time the door opens during the first two-thirds of baking, heat escapes and the cornbread’s leavening is disrupted, resulting in a sunken or dense topping. Fix: Trust the timer, use your oven light to peek, and only open the door when adding the final cheese layer.
3. Spreading the cornbread batter too thin or pressing it down.
Pressing the batter compresses it and encourages it to sink into the chili rather than rest on top. Fix: Use gentle, sweeping strokes with a lightly dampened spatula to guide the batter without forcing it.
4. Using watery chili in the base layer.
Excess moisture from undrained tomatoes or beans steams up into the cornbread as it bakes, leaving the bottom of the crust wet and undercooked. Fix: Drain beans thoroughly and let the chili simmer until slightly thickened before transferring it to the baking dish.
5. Underbaking the casserole after adding the cheese.
A shorter bake means pale, partially melted cheese that slides off rather than fusing with the cornbread top. Fix: Let the cheese bake the full 8–10 minutes at 375°F until it’s golden-spotted and visibly bubbling across the entire surface.
6. Skipping the resting period before scooping.
Cutting into the casserole immediately causes the chili layer to run, making servings loose and messy. Fix: Cover loosely with foil and rest for a minimum of 5 minutes — 10 is even better.
7. Overmixing the cornbread batter.
Overmixed batter develops excess gluten and bakes up rubbery and dense instead of tender and slightly crumbly. Fix: Mix just until the dry ingredients are incorporated, no more than 20–25 strokes, and ignore any small lumps.
Variations
Healthy Version
Swap the 80/20 ground beef for 93% lean ground turkey and use reduced-fat sharp cheddar in both the batter and the topping. Replace the hot dogs with sliced turkey kielbasa for a smoky flavor with less saturated fat. The baking time and temperature remain exactly the same.
Vegetarian Version
Skip the ground beef and hot dogs entirely and replace both with 1 additional can of black beans and 1 can (15 oz) of fire-roasted corn, drained. The chili layer will still be thick, satisfying, and protein-rich from the beans. Note that the stovetop simmer step is still important to cook out the canned flavors and thicken the sauce before baking.
Spicy Version
Add 1 finely diced jalapeño and 1 tsp chipotle chili powder (in addition to, not replacing, the regular chili powder) to the chili layer. Use Pepper Jack cheese in place of cheddar for the full cheese layer, and add a teaspoon of hot sauce to the cornbread batter itself. The heat levels up at every single component.
Gluten-Free Version
Replace the Jiffy corn muffin mix with a certified gluten-free cornbread mix (Bob’s Red Mill makes a widely available option). Verify that your canned tomato sauce and hot dog brands are also labeled gluten-free, as some contain fillers. All other ingredients in this recipe are naturally gluten-free. The baking method and timing remain unchanged.
Low-Carb / Keto Version
This is the one variation that requires a meaningful adjustment to the cooking method. Replace the cornbread topping with a keto-friendly topping made from 2 cups shredded cheddar, 2 oz cream cheese (softened), 2 eggs, and 2 tbsp almond flour — mix and spread as you would the standard batter. Omit the beans from the chili layer and replace with diced green bell pepper and zucchini. Bake at the same temperature (375°F) but check the topping at the 18-minute mark, as this version may set slightly faster.
What to Serve With This Recipe
This cheesy chili cornbread casserole is a full meal on its own, but these sides round it out beautifully:
- Simple green salad with a tangy vinaigrette to cut through the richness of the chili and cheese
- Sour cream and sliced jalapeños served tableside for topping — a classic pairing with any chili-based dish
- Pickled red onions — their bright acidity balances the deep, savory chili layer perfectly
- Coleslaw — creamy or vinegar-based both work; the crunch contrasts the soft casserole texture
- Sliced avocado or guacamole — a cool, creamy counterpoint to the spiced chili
- Homemade dinner rolls — if you want to double down on comfort, serve warm rolls alongside for scooping up extra chili — try Best Cheesy Ground Beef Stuffed Cabbage (5-Star Bake)
- A cold Mexican lager or sparkling water with lime — the effervescence lifts every bite
Storage Instructions
Refrigerator
Let the casserole cool completely before covering. Store leftovers tightly covered in the baking dish or in an airtight container in the refrigerator for up to 4 days. The cornbread topping will soften slightly as it absorbs moisture from the chili — this is normal and doesn’t affect flavor.
Freezer
This casserole freezes well. Portion it into individual servings or freeze the entire dish (well-wrapped in a double layer of plastic wrap plus aluminum foil) for up to 3 months. Thaw overnight in the refrigerator before reheating. Do not refreeze after thawing.
Shelf Life Summary
| Storage Method | Duration |
|---|---|
| Room temperature | 2 hours maximum |
| Refrigerator (covered) | Up to 4 days |
| Freezer (tightly wrapped) | Up to 3 months |
Reheating Instructions
For food safety, always reheat casserole portions to an internal temperature of 165°F before serving. See FDA guidance on safe food reheating temperatures for full reference.
Oven (Best Method)
Preheat your oven to 350°F. Place the desired portion (or the whole dish) in an oven-safe dish, cover loosely with aluminum foil, and heat for 20–25 minutes until warmed through and the cheese is re-melted. Remove foil for the last 5 minutes to re-crisp the cheese surface.
Microwave (Fastest Method)
Place a single serving on a microwave-safe plate. Cover loosely with a damp paper towel to prevent the cornbread from drying out. Microwave on medium power (70%) for 2–3 minutes, pausing at the halfway point to stir the chili portion gently and rotate the plate.
Stovetop
For the chili layer only (if you’ve separated it from the cornbread), reheat in a small saucepan over low-medium heat with a splash of water or broth, stirring frequently, for about 5 minutes. Reheat the cornbread portion separately in a 300°F oven for 8–10 minutes.
Nutrition Facts
| Nutrient | Per Serving (approx.) |
|---|---|
| Calories | ~480 |
| Total Fat | 24g |
| Saturated Fat | 11g |
| Cholesterol | 95mg |
| Sodium | 970mg |
| Total Carbohydrates | 42g |
| Dietary Fiber | 6g |
| Total Sugars | 8g |
| Protein | 26g |
Nutrition Disclaimer: Nutrition values are estimates calculated using standard ingredient databases and will vary based on specific brands used, portion sizes, and any ingredient substitutions made. This information is provided as a general guide only and should not replace advice from a registered dietitian or healthcare provider.
Frequently Asked Questions
Can I make the cheesy chili cornbread casserole ahead of time?
Yes — you have two good options. You can fully assemble and refrigerate the unbaked casserole (chili layer + cornbread batter spread on top, cheese held back) up to 24 hours in advance, then bake as directed adding 5 extra minutes. Alternatively, bake it fully, refrigerate, and reheat per the instructions above.
Can I use homemade chili instead of making it from scratch in this recipe?
Absolutely. If you have leftover on hand, it works perfectly as the base layer — just make sure it isn’t too thin or watery. A thick, hearty chili will give the cornbread topping a stable foundation to bake on.
Do I have to include hot dogs?
No, they’re optional — but based on the photo reference for this dish, they’re clearly part of the original build and add a smoky, satisfying bite throughout the chili layer. If you prefer to skip them, add an extra half-pound of ground beef to compensate for the volume.
What baking dish size works best?
A standard 9×13-inch baking dish is ideal and produces the thick, layered look shown in the photo. A smaller dish (like 8×8) would work but the layers would be thicker, requiring an additional 8–10 minutes of bake time — tent with foil if the cheese begins over-browning.
Can I use fresh cornbread batter instead of Jiffy mix?
Yes. Any standard from-scratch cornbread batter at roughly the same volume (about 1¾ cups of mixed batter) will work. Just make sure the batter isn’t too thin — it needs enough body to sit on top of the chili without sinking in during baking.
How do I know when the baking is done without cutting into it?
Look for three visual cues: the cheese on top should be fully melted and golden-spotted, the edges of the cornbread should be pulling away from the sides of the baking dish, and you should be able to see the chili bubbling around the perimeter (especially clear in a glass dish). A toothpick in the cornbread center should come out clean.
Can I bake this casserole in a cast iron skillet instead?
Yes, and it’s a great option. A 12-inch cast iron skillet works well and gives the bottom of the chili layer a slightly crispier texture. Preheat the skillet in the oven for 5 minutes before adding the chili, reduce the total bake time by about 3–5 minutes, and watch the edges closely.
Why is my cornbread topping sinking into the chili layer?
This usually happens when the batter is too thin, the chili is too hot when the batter is spread, or the batter was pressed down rather than spread gently. Follow the tip in Step 5 and let the chili cool for 3–5 minutes before topping.
What’s the best cheese to use for maximum meltability?
Sharp cheddar (freshly grated) delivers the classic look and flavor in this dish. If you want even better melt, mix equal parts sharp cheddar and Colby-Jack — Colby’s higher moisture content makes it flow more smoothly, while cheddar gives the color and sharpness.
Can I add vegetables to the chili layer?
Definitely. Diced green bell pepper, frozen corn, diced poblano, or even shredded zucchini all integrate well. Dice them small so they cook through during the stovetop simmering step and don’t create watery pockets in the baked casserole.
How many servings does this recipe make?
The recipe yields 8 generous servings from a 9×13-inch dish. For smaller households, you can halve the recipe and bake it in an 8×8-inch dish — reduce the bake time to about 20 minutes before adding cheese, then 6–8 more minutes for the cheese.
Is this recipe kid-friendly?
Very much so. The hot dog coins are a natural crowd-pleaser, the mild spice level is approachable, and the cornbread-plus-cheese topping looks fun. If you’re serving especially young kids, skip the jalapeño add-in and use mild chili powder.
Expert Chef Tips
1. Season the chili aggressively before it goes into the dish. The cornbread layer absorbs some of that seasoning from below, which means the finished casserole will taste more balanced and less flat. Taste the chili before layering and don’t be shy with an extra pinch of cumin or salt.
2. Add half the cheese directly into the cornbread batter. This creates two distinct melted cheese moments in every bite — once from within the cornbread itself, and again from the golden crust on top. It’s what gives this cheesy chili cornbread casserole its layered, restaurant-style richness rather than a flat, one-note topping.
3. Let the baking dish sit on a rimmed baking sheet in the oven. The chili layer can occasionally bubble over the edge of a full baking dish, especially near the end of baking. A sheet pan underneath catches any drips and saves your oven floor from a smoky mess.
4. Rest covered for the best scoopable portions. Loosely tenting with aluminum foil during the rest period traps steam and keeps the cornbread from drying out on the surface while the interior of the casserole firms up. This is the difference between a casserole that holds its shape and one that collapses into the bowl. Also check out Best Easy Cheesy Crockpot Chicken Sausage Potatoes (5-Ingredient) for more layering strategies.
5. Customize the cheese blend for depth. A mixture of sharp white cheddar and a small amount of smoked Gouda on top adds a subtle smokiness that echoes the hot dog coins in the chili below. It reads as more complex without adding any extra steps.
Recipe Summary
This cheesy chili cornbread casserole is a straightforward, crowd-feeding baked dinner that requires just 15 minutes of prep and one 9×13-inch dish. A savory chili base of ground beef, sliced hot dogs, two types of beans, and tomatoes goes in first, followed by a cheesy cornbread batter that bakes into a fluffy, golden topping. A final layer of melted sharp cheddar finishes the casserole with that bubbling, deeply golden crust that makes it impossible to resist. At roughly 50 minutes from start to table, this is comfort food that earns its place in your permanent weeknight rotation.
Make It Tonight and Make It Yours
There’s something deeply satisfying about pulling a bubbly, golden-topped cheesy chili cornbread casserole out of the oven and setting it right in the center of the table. No fancy plating, no last-minute garnishes — just a dish that smells like comfort and delivers every single time. Whether you follow the original recipe down to the letter or riff on it with your favorite chili add-ins and cheese blends, the baking method does all the work for you. Give this one a try tonight, and I’m willing to bet it won’t be your last time making it.
Easy Cheesy Chili Cornbread Casserole (Best 1-Pan Bake)
Description
There are weeknight dinners, and then there are weeknight dinners that make everyone at the table stop talking. This cheesy chili cornbread casserole is firmly in that second category. It layers a thick, savory chili base — ground beef, smoky sliced hot dogs, and dark red kidney beans — under a fluffy baked cornbread topping, all finished with a blanket of bubbling, golden-brown cheddar that stretches with every scoop.
Ingredients
Instructions
-
Step 1: Preheat the Oven and Prep Your Dish
-
Preheat your oven to 375°F. Lightly grease a 9×13-inch baking dish with cooking spray or a thin layer of butter. Setting the oven temperature accurately before you start cooking is important — a properly preheated oven ensures the cornbread topping bakes up tender and set rather than dense in the center.
-
Step 2: Brown the Ground Beef
-
Heat a large skillet over medium-high heat. Add the ground beef and break it apart with a wooden spoon, cooking for 6–8 minutes until no pink remains. You're looking for a deep brown color on the meat — that sear is where the flavor lives. Drain excess fat, leaving just a thin film in the pan. If you want to confirm food safety, the USDA recommends ground beef reach an internal temperature of 160°F — see USDA safe minimum internal temperatures for full guidance.
-
Step 3: Build the Chili Layer
-
Reduce the heat to medium. Add the diced onion to the skillet with the browned beef and cook for 3 minutes until softened and translucent. Stir in the garlic and cook 30 seconds more — you'll smell the garlic immediately turn fragrant, which is your cue to move quickly. Add the hot dog slices, kidney beans, black beans, diced tomatoes, tomato sauce, chili powder, cumin, smoked paprika, salt, and pepper.
-
Stir everything together and let the mixture simmer on the stovetop for about 5 minutes, stirring occasionally, so the flavors meld and the sauce thickens slightly. The chili layer should look saucy but not watery — if it seems too thin, let it bubble for another 2 minutes. Pour the finished chili into your prepared baking dish and spread it into an even layer.
-
Embedded Tip: Don't skip the stovetop simmer step — it concentrates the tomato flavor and prevents the chili from releasing excess moisture into the cornbread during baking, which would make the bottom of the crust gummy.
-
Step 4: Make the Cornbread Batter
-
In a large bowl, whisk together the Jiffy corn muffin mix, egg, milk, and melted butter until just combined — about 20 strokes. A few lumps are completely fine and actually ideal; overmixing activates the gluten in the mix and makes the topping tough. Fold in 1 cup of the shredded cheddar cheese. The batter will be thick, which is exactly what you want so it sits on top of the chili without sinking.
-
Step 5: Spread the Cornbread Topping
-
Drop large spoonfuls of the cornbread batter over the chili layer, then use the back of a spatula to gently spread it into an even layer, reaching close to the edges of the baking dish. Don't press down hard — just nudge it across the surface. Some chili showing at the edges is normal and actually looks beautiful once baked. This is the same layered construction visible in the finished photo, with cornbread sitting as a distinct, separate stratum above the chili.
-
Embedded Tip: If your batter is sticking to the spatula and tearing the top, lightly dampen the spatula with water. The batter will glide instead of drag.
-
Step 6: Bake the Casserole
-
Slide the assembled dish into your preheated 375°F oven and bake for 22–25 minutes, until the cornbread layer looks set and pale golden on top. The edges should be pulling away slightly from the sides of the dish, and a toothpick inserted in the center of the cornbread should come out clean (not wet with batter). Baking in a glass dish, as shown in the reference photo, lets you watch the chili bubbling around the perimeter — that bubble is a reliable visual cue that the casserole is fully heated through.
-
Step 7: Add the Cheese and Finish Baking
-
Remove the dish from the oven and evenly scatter the remaining 1 cup of shredded sharp cheddar across the entire top surface. Return the dish to the oven and bake for an additional 8–10 minutes, until the cheese is fully melted, bubbly, and developing those irresistible golden-brown patches across the top — just like in the reference photo. The cheese near the edges will be slightly more caramelized, which is the best part.
-
Step 8: Rest and Serve
-
Let the cheesy chili cornbread casserole rest in the baking dish for at least 5 minutes before scooping. This rest time lets the chili layer firm up just enough so each serving holds its layers. Use a large spatula to scoop clean portions — the chili, cornbread, and cheese layer will come out together beautifully.
Nutrition Facts
Servings 8
- Amount Per Serving
- Calories 480kcal
- % Daily Value *
- Total Fat 24g37%
- Saturated Fat 11g56%
- Protein 26g52%
* Percent Daily Values are based on a 2,000 calorie diet. Your daily value may be higher or lower depending on your calorie needs.