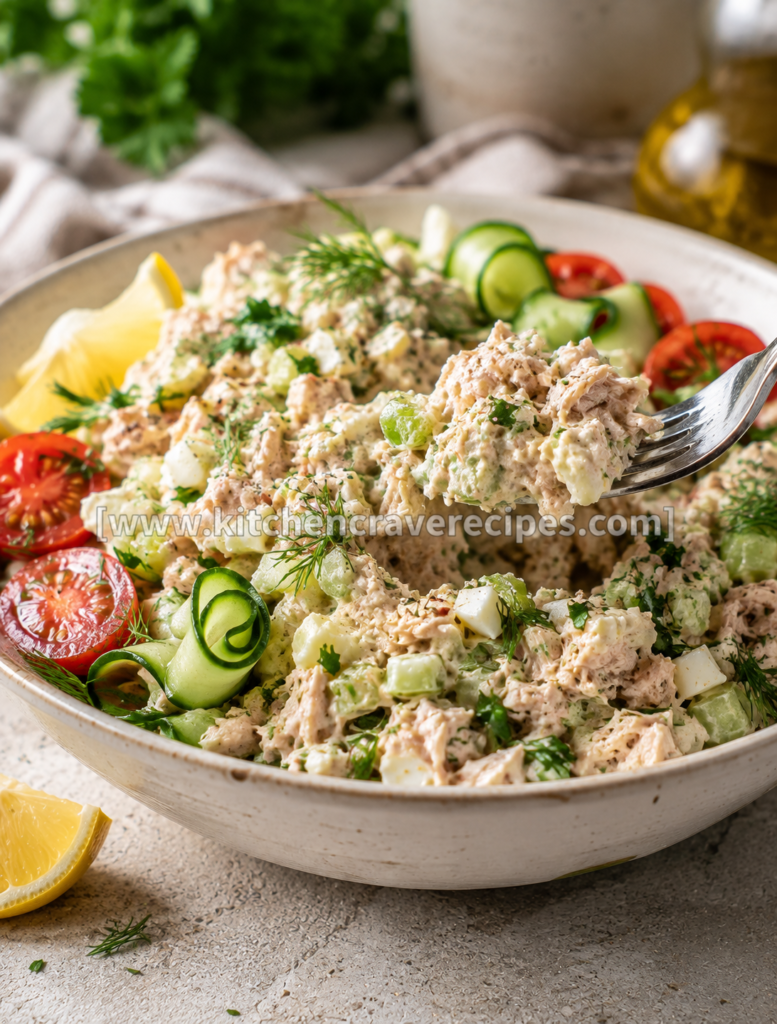

If there’s a meal prep lunch that genuinely earns its reputation, this high protein tuna salad is it. Canned tuna mixed with creamy mayo, diced hard-boiled egg, crunchy celery, and a finishing dusting of black pepper and paprika — exactly as shown in the photo — portioned straight into a clear meal prep container and ready to grab all week. There’s no cooking beyond simmering the eggs to hard-boiled perfection, no elaborate technique, and no ingredient you’re unlikely to have on hand. What you do get is a salad that delivers roughly 35 grams of protein per serving, stays fresh in the refrigerator for four days, and tastes better than most things that take five times as long to prepare. Whether you’re fueling up between workouts, packing lunches for the office, or just trying to eat more protein without overthinking it, this recipe handles all of it without asking much of you in return.
Recipe Quick Info
| Detail | Info |
|---|---|
| Prep Time | 5 minutes |
| Cook Time | 12 minutes (simmering eggs) |
| Total Time | 17 minutes (plus cooling time) |
| Servings | 2 |
| Cuisine | American |
| Course | Lunch / Snack / Meal Prep |
| Cooking Method | Simmering (for hard-boiled eggs) |
| Calories | ~310 kcal per serving |
| Difficulty | Easy |
Why You’ll Love This Recipe
- 35 grams of protein per serving — the combination of protein-dense canned tuna and hard-boiled egg produces one of the highest-protein-per-calorie ratios of any quick lunch you can assemble.
- Meal-prep ready from the start — as shown in the photo, this salad goes directly into a meal prep container and holds perfectly in the refrigerator for up to 4 days without losing texture or flavor.
- Ready in under 20 minutes — including the time it takes to simmer the eggs; the assembly itself takes under 5 minutes once everything is prepped.
- Pantry and fridge staples only — canned tuna, eggs, celery, mayo, and a few spices; nothing requires a specialty grocery run.
- Naturally low-carb and gluten-free — no crackers, bread, or binders in the salad itself, making it compatible with a wide range of dietary approaches right out of the box.
- Genuinely satisfying without being heavy — the creamy texture from the mayo and egg yolk coats the tuna without making the salad feel rich or overly caloric.
Ingredients
For the High Protein Tuna Salad
- 2 cans (5 oz each) chunk light or solid white albacore tuna in water, well drained
- 2 large hard-boiled eggs, peeled and diced (visible in photo)
- 2 stalks celery, finely diced (about ½ cup — visible as green pieces throughout the photo)
- 3 tablespoons mayonnaise (regular or light)
- 1 teaspoon Dijon mustard
- 1 tablespoon fresh lemon juice
- ½ teaspoon kosher salt
- ¼ teaspoon freshly ground black pepper (visible as a dusting on top in the photo)
- ¼ teaspoon smoked paprika (visible as the orange-red dusting on top in the photo)
Optional Add-Ins
- 1 tablespoon sweet pickle relish (adds brightness and a classic diner-style flavor)
- 1 teaspoon capers, chopped (for a briny, sharp note)
- 1 small shallot, minced (adds mild onion flavor without sharpness)
- ¼ teaspoon garlic powder (deepens the savory base)
Substitution Table
| Original Ingredient | Substitution | Notes |
|---|---|---|
| Canned tuna in water | Canned salmon | Similar protein content; slightly richer, earthier flavor |
| Mayonnaise | Plain Greek yogurt | Lower fat, higher protein; slightly tangier result |
| Mayonnaise | Avocado, mashed | Dairy-free and creamy; adds healthy fat without eggs |
| Dijon mustard | Yellow mustard | Milder flavor; less complex but still works |
| Fresh lemon juice | White wine vinegar | Same brightness; slightly less citrus-forward |
| Hard-boiled eggs | Chickpeas, roughly mashed | Vegetarian; adds fiber and plant protein |
| Smoked paprika | Sweet paprika or cayenne | Sweet paprika loses smokiness; cayenne adds heat |
Kitchen Tools Needed
- Small saucepan — for simmering the eggs; a tight-fitting lid is helpful for the steam-off method of hard-boiling
- Slotted spoon — for lowering eggs gently into simmering water without cracking the shells
- Bowl of ice water — for stopping the cooking process immediately when the eggs come out of the simmering water; this is what prevents the gray ring around the yolk
- Large mixing bowl — for combining the tuna salad components
- Fork — for breaking up and flaking the drained tuna before mixing
- Can opener — for opening the tuna cans cleanly
- Fine-mesh strainer or colander — for draining the tuna thoroughly; excess moisture from the can dilutes the dressing
- Instant-read thermometer — optional but useful for confirming the water temperature during the egg simmer
- Meal prep container — as shown in the photo, a clear rectangular plastic container works perfectly for portioning and refrigerating
How to Make High Protein Tuna Salad Step by Step
Step 1: Simmer the Hard-Boiled Eggs
Fill a small saucepan with enough cold water to cover 2 eggs by at least 1 inch. Bring to a gentle simmer over medium heat — you’re looking for small, steady bubbles rising to the surface, not a rolling boil. Lower the eggs into the simmering water carefully using a slotted spoon to prevent cracking. Maintain the simmer (not a boil) for exactly 12 minutes for firm, fully set yolks with no gray ring.
According to the FDA’s safe food handling guidelines for eggs, hard-boiled eggs should be fully cooked until both the white and yolk are firm, which corresponds to the 12-minute simmer time used here.
Embedded Tip: Use older eggs for hard-boiling — eggs that are 7–10 days old peel far more cleanly than very fresh eggs. The slightly higher pH of older eggs loosens the membrane between the shell and white, making peeling a 20-second task instead of a frustrating one.
Step 2: Transfer to Ice Water and Peel
As soon as the 12-minute simmer is complete, use the slotted spoon to immediately transfer the eggs to a bowl of ice water. Let them sit in the ice bath for at least 5 minutes — this stops the carryover cooking instantly, which is what prevents that greenish-gray ring from forming around the yolk. Peel the eggs under a thin stream of cool running water, starting from the wider end where the air pocket makes the shell easiest to separate. Dice the peeled eggs into roughly ¼-inch pieces.
Step 3: Drain the Tuna Thoroughly
Open both cans of tuna and press the lid firmly against the contents while tilting the can over the sink to drain as much liquid as possible. Transfer the drained tuna to a large mixing bowl and break it up with a fork into small, irregular flakes — not a paste. Good texture in a high protein tuna salad comes from flakes, not mush; press gently with the fork rather than mashing aggressively.
Embedded Tip: For the driest possible tuna — which produces the creamiest (not watery) finished salad — wrap the drained tuna in a clean paper towel and press firmly for 10–15 seconds. The paper towel pulls residual moisture that the lid press can’t reach.
Step 4: Mix the Salad
Add the mayonnaise, Dijon mustard, fresh lemon juice, salt, and black pepper to the bowl with the flaked tuna. Stir gently with a fork to coat the tuna evenly — you should see every flake turn from dry and beige to creamy and cohesive. Add the diced celery and fold it in, then add the diced hard-boiled egg last and fold gently to keep the pieces intact rather than breaking them into smaller fragments.
Step 5: Season, Garnish, and Portion
Taste the salad and adjust salt, pepper, or lemon juice as needed before portioning. Spoon into meal prep containers or a serving bowl. Dust the top with smoked paprika and an additional pinch of black pepper exactly as shown in the photo — both add color and a mild warming note. Seal the containers and refrigerate, or serve immediately over crackers, greens, or bread.
Pro Tips for the Best High Protein Tuna Salad
1. Choose solid white albacore for texture, chunk light for flavor.
Solid white albacore holds its flake structure after mixing, giving you defined chunks throughout the salad. Chunk light tuna breaks down more finely and produces a slightly stronger-flavored, more uniform result. Both work — the choice depends on whether you prefer distinct bites or a more cohesive texture.
2. Simmering-method Pro Tip — never let the water boil aggressively.
A hard boil agitates the eggs and can crack the shells, letting water seep in and making them rubbery. The correct technique is a gentle simmer: small, steady bubbles from the bottom of the pan, not a vigorous rolling boil. If your water is boiling too hard, reduce the heat immediately to medium-low and maintain that steady simmer for the full 12 minutes.
3. Let the salad chill for 20–30 minutes before serving.
Mixing the salad and eating it immediately is fine, but giving it 20–30 minutes in the refrigerator allows the Dijon, lemon, and mayo to fully meld with the tuna. The flavor becomes noticeably more cohesive and rounded after a brief chill — this is why meal-prepped tuna salad often tastes better on day two than day one.
4. Fold, don’t stir, when adding the egg.
Stirring aggressively after adding the diced egg breaks the pieces into crumbles that distribute invisibly through the salad. Folding with a large spoon in slow, deliberate passes keeps the egg in visible, distinct chunks — which improves both the texture and the visual appearance of the finished salad.
Common Mistakes to Avoid
1. Letting the eggs boil instead of simmer. (Method-specific mistake)
A hard boil is the most common reason hard-boiled eggs develop a greenish-gray ring around the yolk. The ring is iron sulfide — a harmless but visually unappealing compound that forms when the egg is overheated. Keep the water at a steady gentle simmer (small bubbles, not a rolling boil) and transfer immediately to ice water when done.
2. Not draining the tuna well enough.
Under-drained tuna releases water into the salad as it sits, turning a creamy, cohesive mixture into a watery, diluted one by lunchtime. Press with the lid, then press with a paper towel — both steps together produce a genuinely dry starting point that holds up through the full 4-day refrigerator life.
3. Overmixing the tuna.
Aggressive stirring with a spoon or spatula breaks the tuna down into a paste with no textural variation. Use a fork, mix with a light hand, and stop as soon as the ingredients are evenly combined. The goal is creamy, flaky tuna — not a smooth spread.
4. Skipping the ice bath for the eggs.
Without the ice bath, carryover heat from the simmering water continues cooking the eggs for several minutes after they come off the stove. Skipping this step increases the chance of overdone, crumbly yolks with a gray ring — even if the timing during simmering was correct.
5. Using too much mayo.
More mayo doesn’t mean more flavor — it means a greasier, heavier salad that masks the tuna rather than complementing it. Three tablespoons for two cans of tuna is the right ratio. Taste before adding more; you can always add, but you can’t take away.
6. Adding the celery too early.
If you combine all ingredients in advance and refrigerate for several hours, the celery will soften and lose its crunch. For the best texture, fold the celery in right before portioning rather than at the very beginning of mixing — especially for meal prep that will sit for more than one day.
7. Seasoning only at the end.
Adding all the salt after mixing means it sits on the surface of the mayo rather than penetrating the tuna. Season the tuna lightly before the mayo goes in, then adjust after mixing. The salt has a chance to pull into the fish itself, producing more evenly flavored bites throughout.
Variations
Healthier Version
Replace the mayonnaise entirely with ¼ cup of plain nonfat Greek yogurt — it delivers a tangy, creamy texture with significantly less fat and more protein. The lemon juice in the recipe already complements the slight tartness of the yogurt, so no other adjustments are needed. Total calories drop to approximately 230 per serving with this swap.
Vegetarian Version
Replace both cans of tuna with 1 can (15 oz) of chickpeas, drained and roughly mashed with a fork until the texture resembles chunked tuna. The Dijon mustard, celery, lemon, and paprika all translate naturally to a plant-based base. Note that the protein content drops to approximately 15 grams per serving without the tuna — add 2 tablespoons of hemp seeds to close the gap.
Spicy Version
Add ½ teaspoon of sriracha or hot sauce to the mayo before mixing. Swap the smoked paprika for cayenne and increase to ½ teaspoon. The heat builds gradually through the creamy mayo base and is balanced by the lemon juice — present on every bite without overpowering the tuna.
Gluten-Free Version
This recipe is naturally gluten-free as written — no breadcrumbs, crackers, or binders are included in the salad itself. Confirm your Dijon mustard is certified gluten-free (some brands add small amounts of flour or process on shared equipment). Serve over lettuce cups, gluten-free crackers, or rice cakes.
Low-Carb / Keto Version
The salad as written is already low-carb and keto-compatible. To lean further into keto macros, increase the mayo to 4 tablespoons and add ½ an avocado, diced and folded in gently at the end. The avocado adds healthy monounsaturated fat without additional net carbs and gives the salad an even creamier, more substantial texture.
What to Serve With This Recipe
- Whole grain crackers — the most natural pairing; the crunch of the cracker against the creamy salad is hard to beat.
- Romaine or butter lettuce cups — low-carb, crisp, and sturdy enough to hold a generous scoop.
- Sliced sourdough toast — for a classic open-faced tuna melt or a simple tuna toast situation.
- Sliced cucumber rounds — thin cucumber discs work as edible scoops and add extra crunch without adding calories.
- A simple green salad with lemon vinaigrette — serve the tuna salad alongside for a complete, balanced lunch plate.
- Hard-boiled egg halves — if you want to push the protein content of the meal even higher, serve alongside extra eggs. Try pairing with Garlic Herb Roasted Chicken & Potatoes – Best 1-Pan Dinner for a full high-protein lunch spread.
- Stuffed avocado halves — scoop the tuna salad into avocado halves for a keto-friendly, visually impressive presentation.
- Pita bread or lavash wraps — roll the tuna salad with a handful of arugula for a fast, portable lunch. For more high-protein meal prep ideas, browse Garlic Herb Roasted Chicken & Potatoes – Best 1-Pan Dinner.
Storage Instructions
Refrigerator
Transfer the tuna salad to a sealed airtight container immediately after mixing — exposure to air dries the surface and accelerates spoilage. Store in the refrigerator for up to 4 days. If the salad releases a small amount of liquid after sitting (common with celery), stir briefly before serving to redistribute.
Freezer
Tuna salad with mayonnaise does not freeze well — the mayo separates completely upon thawing and produces a watery, broken texture that cannot be recovered. Freeze the drained tuna only (without any other ingredients) for up to 1 month in a freezer-safe bag if you need to prep in advance.
Shelf Life Summary
| Storage Method | Duration |
|---|---|
| Room temperature | Up to 2 hours (discard after) |
| Refrigerator (airtight container) | Up to 4 days |
| Freezer (tuna only, no mayo) | Up to 1 month |
Reheating Instructions
Oven
Tuna salad is not designed to be reheated — it’s a cold dish and should be served chilled or at room temperature. If you want a warm tuna application, spread the salad on bread and place it under the broiler for 2–3 minutes to make an open-faced tuna melt rather than reheating the salad itself.
Microwave
Not recommended for this salad — microwaving mayo-based tuna salad separates the emulsion and produces an unpleasant texture. If you need to take the chill off (e.g., if it’s been in a cold refrigerator), remove from the refrigerator 10 minutes before eating and let it come to a cool room temperature naturally.
Stovetop
Not applicable for this recipe as written. Per the FDA safe food handling guidelines, any tuna salad left at room temperature for more than 2 hours should be discarded rather than refrigerated and reused. Always keep it chilled until the moment of serving.
Nutrition Facts
Per serving (half the full recipe, based on 2 servings — approximately 1 heaped cup)
| Nutrient | Amount |
|---|---|
| Calories | ~310 kcal |
| Total Fat | 16g |
| Saturated Fat | 3g |
| Cholesterol | 225mg |
| Sodium | 620mg |
| Total Carbohydrates | 2g |
| Dietary Fiber | 0g |
| Sugars | 1g |
| Protein | 35g |
| Omega-3 Fatty Acids | ~0.5g |
Nutrition Disclaimer: These values are estimates based on standard nutritional databases and will vary depending on the specific tuna brand, mayo brand and type (regular vs. light), egg size, and any optional add-ins used. This information is for general reference only and is not a substitute for guidance from a registered dietitian or qualified healthcare professional.
Frequently Asked Questions
1. What’s the best canned tuna to use for high protein tuna salad?
Solid white albacore tuna packed in water has the highest protein content and the cleanest, mildest flavor — roughly 22 grams of protein per 5-oz can. Chunk light tuna is slightly lower in protein but has a stronger, more traditional tuna flavor. Either works; the choice is primarily about personal preference for flavor intensity and texture.
2. How long does tuna salad last in the refrigerator?
Up to 4 days in a sealed airtight container. The celery may soften slightly after day 2, and a small amount of liquid can accumulate at the bottom — stir to redistribute before eating. Discard if it smells off or has been left at room temperature for more than 2 hours.
3. Can I use fresh tuna instead of canned?
Yes — sear a 6-oz tuna steak to medium-rare, let it cool completely, then flake it into the salad. Fresh tuna produces a more delicate, less assertive flavor than canned and a looser texture that some people prefer. However, the protein and convenience advantages of canned make it the practical choice for meal prep.
4. Why does my tuna salad turn watery after a day?
Almost always caused by insufficiently drained tuna or celery that continues releasing moisture as it sits. Drain the tuna with both the lid-press and paper towel methods described in the instructions, and fold in the celery as close to serving time as possible if you’re prepping in advance.
5. Is the simmering method for eggs really better than starting them in cold water?
Starting eggs in already-simmering water produces more consistent results than the cold-water start method because the timing begins from a known, constant temperature. Cold water start timing varies based on your stove’s heat output and the size of the pot. The simmer-start method is more reliable for the fully firm yolk this recipe requires.
6. Can I make this dairy-free?
The recipe as written contains no dairy — mayonnaise is made from eggs and oil, not dairy. The only potential dairy concern is if you swap the mayo for sour cream or cream cheese. Using regular mayo, Greek yogurt (if dairy is acceptable), or avocado keeps the salad dairy-free by default.
7. How do I increase the protein content even further?
Add one additional hard-boiled egg or stir in 2 tablespoons of hemp seeds (about 6 additional grams of protein with minimal flavor impact). Swapping regular mayo for plain nonfat Greek yogurt also adds a small amount of additional protein while reducing fat.
8. Can I serve this warm as a hot dish?
The tuna salad as written is specifically designed for cold or room-temperature serving. If you want a warm tuna dish using these same ingredients, spread the salad on bread and broil it open-faced for 2–3 minutes until the top is bubbling and lightly golden — this converts it into a quick tuna melt without any additional prep.
9. What makes this version higher in protein than standard tuna salad?
Standard tuna salad recipes often include just one can of tuna. This recipe uses two 5-oz cans alongside two hard-boiled eggs, which together contribute the full 35 grams of protein per serving. Most standard single-can tuna salads deliver 18–22 grams per serving — the double tuna and added egg nearly double that figure.
10. Is canned tuna safe to eat multiple times per week?
Light canned tuna (skipjack) is low in mercury and is generally considered safe to eat up to 2–3 times per week for most adults, according to FDA guidance. Albacore tuna contains higher mercury levels and the FDA recommends limiting it to once per week for adults. For personalized guidance, consult a healthcare provider.
Expert Chef Tips
1. Season the celery separately before adding it.
Toss the diced celery with a very small pinch of salt in a separate bowl and let it sit for 3 minutes before adding it to the salad. The salt draws out a tiny amount of surface moisture from the celery and seasons it from the inside, so the pieces taste seasoned rather than raw and flat against the creamy tuna base.
2. Use a fork, not a spoon, for mixing.
A fork’s tines flake the tuna gently rather than smashing it. The resulting salad has visible texture — distinct pieces of tuna, egg, and celery — rather than the uniform paste that aggressive spoon-mixing produces. Better texture makes the salad more satisfying to eat and visually more appealing in the container.
3. Taste the salad cold, not right after mixing.
The flavor of mayo, mustard, and lemon all mellow and integrate slightly when chilled. Taste the salad immediately after making it, then refrigerate for 15 minutes and taste again before finalizing your seasoning — the second taste is a more accurate representation of what it will actually be like when eaten for lunch.
4. Label your meal prep containers with the date.
This sounds obvious but saves real confusion during a busy week. A piece of masking tape and a marker on the lid tells you immediately whether a container is on day 1 or day 4, which is the difference between a safe, high-quality lunch and one that should go straight to the trash.
5. Keep a can of tuna in your desk drawer.
Two cans of tuna, a small jar of mayo, and a packet of salt and pepper stored at the office means you can make a basic version of this high protein tuna salad anywhere with just a fork and a bowl. Having the ingredients close ensures you never have an excuse to skip lunch or resort to a less nutritious option.
Recipe Summary
This high protein tuna salad comes together in four steps: simmer two eggs for 12 minutes at a steady gentle bubble, transfer to an ice bath and dice; drain two cans of tuna thoroughly with a lid press and paper towel; mix with mayo, Dijon, lemon, celery, and seasoning using a light hand; and fold in the diced egg last. Dust with paprika and black pepper, portion into containers, and refrigerate. At 35 grams of protein per serving and a 4-day refrigerator life, it’s one of the most efficient meal prep recipes you can make.
Conclusion
Meal prep doesn’t have to be complicated to be effective, and this high protein tuna salad is proof of that. Two cans of tuna, two eggs, a handful of pantry staples, and 17 minutes of mostly hands-off time produce a lunch that keeps you full, tastes genuinely good, and holds up all week without losing its character. Make a batch on Sunday, divide it into containers, and watch it quietly become the most reliable thing in your refrigerator. Sometimes the simplest recipes are the ones that earn a permanent spot in your weekly routine — and this one absolutely earns it.
High Protein Tuna Salad – Best Easy 10-Min Recipe
Description
If there's a meal prep lunch that genuinely earns its reputation, this high protein tuna salad is it. Canned tuna mixed with creamy mayo, diced hard-boiled egg, crunchy celery, and a finishing dusting of black pepper and paprika — exactly as shown in the photo — portioned straight into a clear meal prep container and ready to grab all week. There's no cooking beyond simmering the eggs to hard-boiled perfection, no elaborate technique, and no ingredient you're unlikely to have on hand. What you do get is a salad that delivers roughly 35 grams of protein per serving, stays fresh in the refrigerator for four days, and tastes better than most things that take five times as long to prepare. Whether you're fueling up between workouts, packing lunches for the office, or just trying to eat more protein without overthinking it, this recipe handles all of it without asking much of you in return.
Ingredients
Instructions
-
How to Make High Protein Tuna Salad Step by Step
-
Step 1: Simmer the Hard-Boiled Eggs
-
Fill a small saucepan with enough cold water to cover 2 eggs by at least 1 inch. Bring to a gentle simmer over medium heat — you're looking for small, steady bubbles rising to the surface, not a rolling boil. Lower the eggs into the simmering water carefully using a slotted spoon to prevent cracking. Maintain the simmer (not a boil) for exactly 12 minutes for firm, fully set yolks with no gray ring.
-
According to the FDA's safe food handling guidelines for eggs, hard-boiled eggs should be fully cooked until both the white and yolk are firm, which corresponds to the 12-minute simmer time used here.
-
Embedded Tip: Use older eggs for hard-boiling — eggs that are 7–10 days old peel far more cleanly than very fresh eggs. The slightly higher pH of older eggs loosens the membrane between the shell and white, making peeling a 20-second task instead of a frustrating one.
-
Step 2: Transfer to Ice Water and Peel
-
As soon as the 12-minute simmer is complete, use the slotted spoon to immediately transfer the eggs to a bowl of ice water. Let them sit in the ice bath for at least 5 minutes — this stops the carryover cooking instantly, which is what prevents that greenish-gray ring from forming around the yolk. Peel the eggs under a thin stream of cool running water, starting from the wider end where the air pocket makes the shell easiest to separate. Dice the peeled eggs into roughly ¼-inch pieces.
-
Step 3: Drain the Tuna Thoroughly
-
Open both cans of tuna and press the lid firmly against the contents while tilting the can over the sink to drain as much liquid as possible. Transfer the drained tuna to a large mixing bowl and break it up with a fork into small, irregular flakes — not a paste. Good texture in a high protein tuna salad comes from flakes, not mush; press gently with the fork rather than mashing aggressively.
-
Embedded Tip: For the driest possible tuna — which produces the creamiest (not watery) finished salad — wrap the drained tuna in a clean paper towel and press firmly for 10–15 seconds. The paper towel pulls residual moisture that the lid press can't reach.
-
Step 4: Mix the Salad
-
Add the mayonnaise, Dijon mustard, fresh lemon juice, salt, and black pepper to the bowl with the flaked tuna. Stir gently with a fork to coat the tuna evenly — you should see every flake turn from dry and beige to creamy and cohesive. Add the diced celery and fold it in, then add the diced hard-boiled egg last and fold gently to keep the pieces intact rather than breaking them into smaller fragments.
-
Step 5: Season, Garnish, and Portion
-
Taste the salad and adjust salt, pepper, or lemon juice as needed before portioning. Spoon into meal prep containers or a serving bowl. Dust the top with smoked paprika and an additional pinch of black pepper exactly as shown in the photo — both add color and a mild warming note. Seal the containers and refrigerate, or serve immediately over crackers, greens, or bread.
Nutrition Facts
Servings 2
- Amount Per Serving
- Calories 310kcal
- % Daily Value *
- Total Fat 16g25%
- Saturated Fat 3g15%
- Protein 35g70%
* Percent Daily Values are based on a 2,000 calorie diet. Your daily value may be higher or lower depending on your calorie needs.