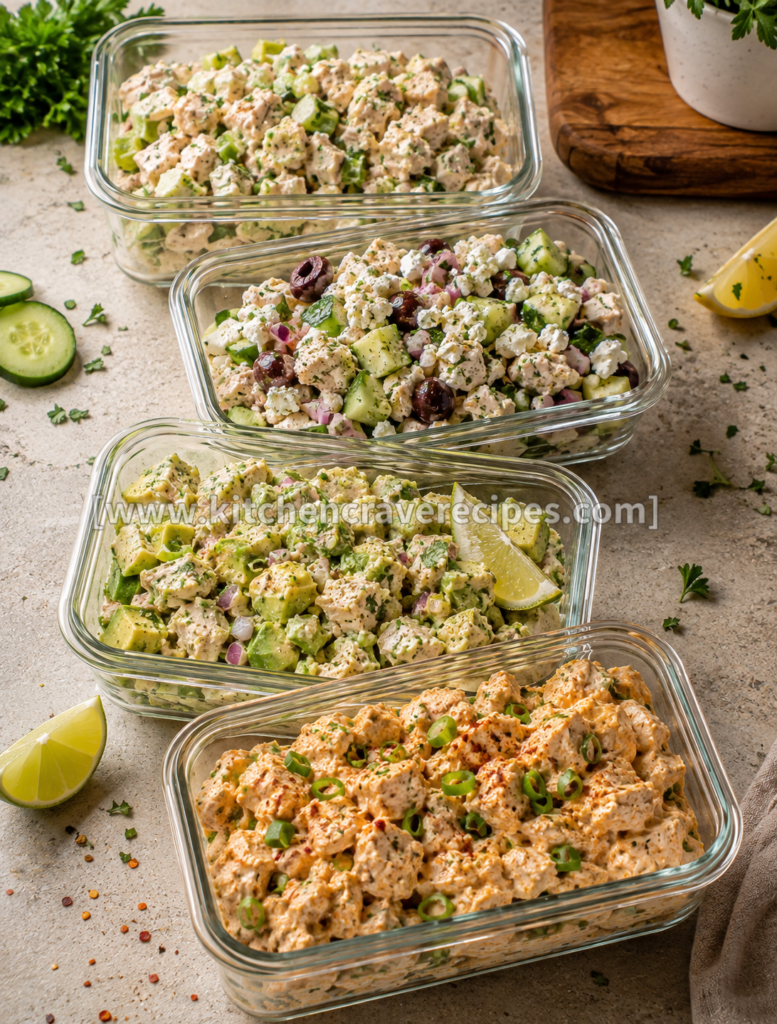

There’s a version of meal prep that actually works all week — not the kind that turns sad and soggy by Tuesday, but the kind you genuinely look forward to pulling out of the refrigerator. This high protein chicken salad meal prep is exactly that. Four glass containers, four completely distinct flavor profiles, all built on the same base of gently simmered, tender shredded chicken: a classic with celery and cucumber, a Mediterranean with Kalamata olives and feta, an avocado-lime with fresh herbs and cucumber, and a spicy version with jalapeño and red pepper flakes. Each one delivers approximately 38 grams of protein per serving, holds beautifully in the refrigerator for up to four days, and takes less than 45 minutes to prepare in one focused session. Whether you’re fueling workouts, managing your macros, or just tired of figuring out lunch at noon, this is the meal prep that solves the problem for the entire week.
Recipe Quick Info
| Detail | Info |
|---|---|
| Prep Time | 20 minutes |
| Cook Time | 25 minutes |
| Total Time | 45 minutes |
| Servings | 4 containers (1 serving each) |
| Cuisine | American / Multi-Style |
| Course | Lunch / Meal Prep |
| Cooking Method | Simmering |
| Calories | ~360 kcal per container (average across all 4 variants) |
| Difficulty | Easy |
Why You’ll Love This Recipe
- 4 completely different lunches from 1 cooking session — the same simmered chicken base gets four distinct flavor treatments so you’re never eating the same thing twice in the same week.
- Genuinely high-protein at ~38 grams per container — simmered chicken breast combined with Greek yogurt or cottage cheese in each variation makes this one of the most efficient high-protein lunches you can meal prep.
- Glass containers keep everything fresher longer — as shown in the photo, using glass rather than plastic prevents flavor transfer between containers and maintains better texture for the full 4-day refrigerator life.
- The simmering method produces perfectly tender chicken every time — gently poaching in seasoned broth rather than baking keeps the chicken moist and easy to shred, which is exactly the texture you want for a creamy salad base.
- Each variation is genuinely distinct — Mediterranean feta and olives, creamy avocado-lime, spicy jalapeño, and classic celery-cucumber each have their own flavor identity, not just minor seasoning tweaks.
- Zero complicated techniques — if you can simmer water and use a fork, you can make all four versions in a single Sunday session.
- Customizable for nearly any dietary approach — low-carb, keto, dairy-free, gluten-free — each variant can be adapted without changing the core method.
Ingredients
For the Simmered Chicken Base (Makes All 4 Variants)
- 2 lbs boneless, skinless chicken breasts (about 4 medium breasts)
- 4 cups low-sodium chicken broth (for simmering)
- 2 cups water
- 1 teaspoon kosher salt
- ½ teaspoon black pepper
- 2 garlic cloves, lightly smashed
- 1 bay leaf
- 3 tablespoons plain nonfat Greek yogurt (as the creamy base — used across all 4 variants)
- 3 tablespoons light mayonnaise (used across all 4 variants)
- 1 tablespoon fresh lemon juice
- ½ teaspoon garlic powder
- ½ teaspoon onion powder
- Salt and pepper to taste
Variant 1 — Classic (Celery & Cucumber)
- ½ cup celery, finely diced
- ½ cup English cucumber, diced
- 1 tablespoon fresh parsley, chopped
Variant 2 — Mediterranean (Feta, Olive & Cucumber)
- ¼ cup Kalamata olives, halved
- ¼ cup crumbled feta cheese
- ½ cup English cucumber, diced
- 1 tablespoon fresh parsley, chopped
- 1 tablespoon red onion, finely diced
Variant 3 — Avocado-Lime
- 1 medium avocado, diced
- ½ cup English cucumber, diced
- 1 tablespoon fresh cilantro, chopped
- 1 tablespoon fresh lime juice (plus a lime wedge for the container, as shown)
- 1 tablespoon red onion, finely diced
Variant 4 — Spicy Jalapeño
- 2 tablespoons jalapeño, thinly sliced (visible as green rings in the photo)
- ½ teaspoon smoked paprika
- ½ teaspoon cayenne pepper
- ½ teaspoon red pepper flakes (visible scattered in the photo)
- 1 tablespoon sriracha (stirred into the base dressing)
Optional Add-Ins (Any Variant)
- 2 tablespoons hemp seeds (adds 6 grams of protein per tablespoon with almost no flavor impact)
- 1 tablespoon Dijon mustard (sharpens the dressing across any variant)
- 1 tablespoon capers (briny contrast, especially good in the Mediterranean version)
Substitution Table
| Original Ingredient | Substitution | Notes |
|---|---|---|
| Chicken breasts | Rotisserie chicken, shredded | Skip the simmering step; saves 25 minutes |
| Greek yogurt | Sour cream or cottage cheese | Cottage cheese adds extra protein; sour cream is richer |
| Light mayonnaise | Avocado oil mayo | Whole-food fat; same creamy behavior |
| Kalamata olives | Green olives or sun-dried tomatoes | Both work in the Mediterranean variant |
| Feta cheese | Goat cheese or ricotta salata | Goat cheese is creamier; ricotta salata is firmer and saltier |
| Fresh avocado | No direct substitute | Omit or replace with extra cucumber for the avocado variant |
| Jalapeño | Serrano pepper | Hotter than jalapeño — use half the quantity |
Kitchen Tools Needed
- Large saucepan or medium pot — for simmering the chicken; must be large enough to hold 2 lbs of chicken breasts submerged in broth
- Tongs or slotted spoon — for lowering chicken into simmering liquid and removing it safely
- Instant-read thermometer — to confirm the chicken has reached the safe internal temperature of 165°F before shredding
- Two forks — for shredding the poached chicken; the pull-apart method works best with two forks moving in opposite directions
- Large mixing bowl — for combining the shredded chicken with the base dressing before splitting into four portions
- 4 glass meal prep containers — as shown in the photo; glass is preferred over plastic for flavor preservation and longevity
- Cutting board and sharp chef’s knife — for dicing all vegetables for each variant
- Measuring cups and spoons — for the dressing ingredients and each variant’s add-ins
- Ladle or large spoon — for portioning the base chicken salad evenly into four containers before adding each variant’s ingredients
How to Make High Protein Chicken Salad Meal Prep Step by Step
Step 1: Simmer the Chicken
Place the chicken breasts in a large saucepan and pour in the chicken broth and water — the liquid should cover the chicken by at least 1 inch. Add the smashed garlic cloves, bay leaf, salt, and black pepper. Bring to a gentle simmer over medium heat; you’re looking for small, steady bubbles rising from the bottom of the pot, not a rolling boil. A hard boil agitates and toughens chicken — the gentle simmer is what produces the tender, pull-apart texture visible across all four containers in the photo.
Once the liquid reaches a simmer, reduce heat to medium-low and cook for 18–22 minutes depending on the thickness of the breasts. The chicken is done when an instant-read thermometer inserted into the thickest part reads 165°F. According to the USDA poultry food safety guidelines, 165°F is the minimum safe internal temperature for all chicken — confirm this before removing from the liquid.
Embedded Tip: Don’t discard the poaching broth. Strain it and refrigerate for up to 5 days — it’s a flavorful, homemade chicken stock that works beautifully for soups, rice, or sauces throughout the week.
Step 2: Cool and Shred the Chicken
Transfer the simmered chicken to a cutting board and let it rest for 5 minutes before shredding — the brief rest allows the interior juices to redistribute through the meat. Using two forks, shred the chicken by pulling in opposite directions along the grain of the muscle fibers. The result should be long, moist strands rather than dry, short pieces. If the chicken is resisting, it may need another minute of simmer time; properly poached chicken pulls apart with almost no effort.
Embedded Tip: For the fastest shredding method, place all the cooked chicken in a stand mixer bowl fitted with the paddle attachment. Run on low for 15–20 seconds — the paddle shreds the entire batch in the time it would take to fork-shred a single breast.
Step 3: Make the Base Dressing and Combine
In a large mixing bowl, whisk together the Greek yogurt, light mayonnaise, fresh lemon juice, garlic powder, onion powder, salt, and pepper. Add all of the shredded chicken to the bowl and toss to coat thoroughly — every strand should be lightly covered in the creamy base. The mixture should look cohesive and creamy, not dry or soupy. Taste at this stage and adjust salt and lemon before dividing into variants, since the flavor intensity of each variant will build on this base.
Step 4: Divide and Build the 4 Variants
Using a ladle or large spoon, divide the dressed chicken base evenly into four portions — approximately 1 to 1¼ cups per container. Then build each variant directly in its glass container:
Classic: Fold in diced celery, cucumber, and fresh parsley. Season with a pinch of additional salt and pepper.
Mediterranean: Fold in Kalamata olives, crumbled feta, cucumber, parsley, and red onion. The salty feta and olives season the chicken naturally — taste before adding extra salt.
Avocado-Lime: Fold in diced avocado, cucumber, cilantro, red onion, and lime juice. Add the lime wedge to the container as shown in the photo — it keeps the avocado from browning and adds a pop of freshness.
Spicy: Stir the sriracha into the portion of base dressing for this container before mixing in the chicken. Fold in sliced jalapeños, then dust the top with smoked paprika, cayenne, and red pepper flakes exactly as visible in the photo.
Step 5: Seal, Label, and Refrigerate
Seal each glass container with its lid immediately after building to prevent oxidation and flavor transfer between containers in the refrigerator. Label each container with the variant name and the date prepared. Refrigerate for up to 4 days. The avocado-lime variant should be eaten on days 1 or 2 since avocado begins to oxidize even in a sealed container after 48 hours — the lime juice slows this but doesn’t stop it entirely.
Pro Tips for Perfect High Protein Chicken Salad Meal Prep
1. Use chicken broth, not plain water, for simmering.
Poaching chicken in seasoned broth rather than plain water adds a baseline layer of flavor that carries into every variant. The chicken absorbs flavor during the simmer — a bland poaching liquid produces a bland chicken base that requires more seasoning at the mixing stage to compensate.
2. Simmering-method Pro Tip — watch the bubble pattern, not just the clock.
The key to perfectly simmered chicken is maintaining a specific temperature range — small, lazy bubbles from the bottom of the pot, not a vigorous boil. If the water is barely moving, the chicken will take too long and can become slightly rubbery at the surface; if it’s boiling hard, the exterior toughens before the center cooks through. Adjust the burner until the bubble pattern is steady and gentle, then trust the thermometer rather than the timer to tell you when the chicken is done.
3. Shred while the chicken is still warm.
Cold chicken shreds poorly — the muscle fibers tighten as the meat cools and pulling them apart becomes much harder work. Shred within 5–7 minutes of removing from the simmering liquid, while the internal temperature is still above 140°F. The strands separate easily and stay longer and more uniform.
4. Build the avocado-lime variant last.
Avocado oxidizes fastest — even when treated with lime juice. Prepare the other three variants first, then dice and fold in the avocado at the very end of your prep session to minimize the time between cutting and sealing the container.
5. Taste each variant before sealing.
The Mediterranean version has salty feta and olives that may require less added salt; the spicy variant’s heat level can vary significantly based on the jalapeño’s potency. A quick taste at the container stage catches any seasoning imbalances before they’re locked in for four days.
Common Mistakes to Avoid
1. Boiling the chicken instead of simmering it. (Method-specific mistake)
A rolling boil is the most common reason poached chicken turns out tough and stringy. High heat causes the exterior proteins to seize rapidly before the interior is done, producing dry, chewy strands rather than the moist, pull-apart texture this recipe relies on. Reduce heat to medium-low immediately when bubbles appear and maintain that gentle simmer for the full cook time.
2. Skipping the thermometer and cutting into the chicken to check.
Cutting into chicken during or after simmering releases the internal juices immediately, leaving a drier result. Use an instant-read thermometer instead — it gives you the answer in 3 seconds without compromising the moisture of the meat.
3. Mixing the avocado in too early.
Avocado diced and mixed into chicken salad more than 30 minutes before refrigerating will oxidize noticeably — turning from bright green to an unappetizing brownish-gray — even with lime juice. Dice and add at the very last moment before sealing the container.
4. Using plastic containers instead of glass for longer storage.
Plastic absorbs odors and can impart flavor to refrigerated chicken salad over multiple days. Glass containers are airtight, odor-neutral, and allow you to see the contents without opening — which preserves freshness longer and makes grabbing lunch faster.
5. Overdressing the chicken base.
Too much Greek yogurt or mayo at the base stage produces a salad that looks flooded rather than creamy, and adding vegetables to an overdressed base makes it watery quickly. Dress lightly at the mixing stage — you can always add more to an individual container before eating, but you can’t remove it once it’s mixed in.
6. Not tasting the base before portioning.
The base dressing is the flavor foundation of all four variants. An under-seasoned base produces four containers that all taste flat, regardless of what variant ingredients get added. Taste, adjust, and confirm you’re happy before the chicken is split into four portions.
7. Freezing the assembled salads.
Mayo and Greek yogurt both separate and become watery upon thawing — the assembled chicken salad does not freeze well. Only the plain simmered, shredded chicken (without any dressing) can be frozen successfully for later use.
Variations
Healthier Version
Replace the mayonnaise entirely with additional plain nonfat Greek yogurt — use 6 tablespoons total of Greek yogurt as the only binder. This reduces total fat by approximately 8 grams per serving and adds an additional 3–4 grams of protein. The result is tangier and slightly less rich than the original, but still creamy enough to coat the chicken well.
Vegetarian Version
Replace the simmered chicken with 2 cans (15 oz each) of white cannellini beans or chickpeas, drained and roughly mashed with a fork until chunky. The texture is looser than shredded chicken but holds up well with all four variant flavor profiles. Protein per serving drops to approximately 18 grams — stir in 2 tablespoons of hemp seeds per container to bring it closer to 25 grams.
Spicy Version (Amplified)
The fourth container is already the spicy variant. To increase the heat further across all four containers, add ¼ teaspoon of cayenne to the base dressing before dividing — this creates a consistent mild heat across every variant as a foundation, with the jalapeño container being the hottest by a clear margin.
Gluten-Free Version
Every ingredient in this recipe is naturally gluten-free as written. Confirm that your chicken broth brand is certified gluten-free (some brands add yeast extract processed on shared equipment). All four variants are safe for celiac and gluten-intolerant eaters without any further modification.
Low-Carb / Keto Version
This recipe is already low-carb across all four variants. To make it explicitly keto, swap the light mayo for full-fat avocado oil mayo and increase the quantity to 4 tablespoons total. Add 1 tablespoon of olive oil to the base dressing to increase the fat-to-protein ratio appropriate for strict ketogenic targets. Omit the lime wedge garnish from the avocado variant if tracking net carbs to the gram.
What to Serve With This Recipe
- Whole grain crackers or rice cakes — the most portable pairing for eating the salad as a scoop-and-eat lunch.
- Butter lettuce or romaine cups — wrap the chicken salad in sturdy leaves for a low-carb handheld option.
- Sliced sourdough or multigrain toast — for an open-faced chicken salad sandwich with any of the four variants.
- Sliced cucumber rounds — thin discs work as edible scoops and add crunch without calories.
- A simple side of fresh fruit — apple slices or grapes alongside the classic variant create a classic lunch combination.
- Hard-boiled eggs — add two alongside any container to push the meal’s protein content above 50 grams. Try pairing with Grilled Chicken Tomato Cucumber Salad – Best 30-Min Meal for a full-day high-protein plan.
- Warm pita or flatbread — works especially well with the Mediterranean feta-olive variant as a wrap.
- Cherry tomato and mozzarella side salad — a simple Caprese-style side complements all four variants without competing with their individual flavors. For more ideas on building a full meal prep week, browse Garlic Herb Roasted Chicken & Potatoes – Best 1-Pan Dinner.
Storage Instructions
Refrigerator
Seal each glass container immediately after building and refrigerate. The classic, Mediterranean, and spicy variants hold well for up to 4 days. The avocado-lime variant should be consumed within 2 days — the avocado softens and can brown despite the lime treatment. Store on the middle or upper shelves of the refrigerator where temperature is most consistent.
Freezer
The assembled chicken salad does not freeze — the dressing separates upon thawing and the vegetable components become watery. However, the plain simmered, shredded chicken (no dressing, no vegetables) freezes well for up to 2 months in a zip-top freezer bag. Thaw overnight in the refrigerator, then build fresh variants with new dressing and vegetables.
Shelf Life Summary
| Variant | Refrigerator | Freezer (assembled) |
|---|---|---|
| Classic | Up to 4 days | Not recommended |
| Mediterranean | Up to 4 days | Not recommended |
| Avocado-Lime | Up to 2 days | Not recommended |
| Spicy Jalapeño | Up to 4 days | Not recommended |
| Plain shredded chicken only | Up to 4 days | Up to 2 months |
Reheating Instructions
Oven
These chicken salads are designed to be served cold or at room temperature — they are not intended to be reheated. If you prefer warm chicken, the plain shredded base can be reheated in a 325°F oven in a covered dish with 2 tablespoons of broth for 10 minutes. Add fresh dressing and variant ingredients after reheating, not before.
Microwave
Not recommended for the fully assembled salads — the mayonnaise and Greek yogurt dressing separates at high temperatures and the vegetable components steam and soften. Remove the container from the refrigerator 10–15 minutes before eating and allow to reach a cool room temperature naturally for the best texture.
Stovetop
If reheating plain poached chicken before using, warm gently in a skillet over medium-low heat with a splash of chicken broth for 3–4 minutes until heated through. Per the USDA food safety guidelines for cooked poultry leftovers, reheated chicken must reach an internal temperature of 165°F before consuming.
Nutrition Facts
Per container (average across all 4 variants; avocado-lime is highest in fat, spicy variant is lowest)
| Nutrient | Amount |
|---|---|
| Calories | ~360 kcal |
| Total Fat | 15g |
| Saturated Fat | 3g |
| Cholesterol | 130mg |
| Sodium | 580mg |
| Total Carbohydrates | 6g |
| Dietary Fiber | 2g |
| Sugars | 2g |
| Protein | 38g |
Nutrition Disclaimer: These values are estimates based on standard nutritional databases and will vary meaningfully between the four variants — the avocado-lime version is higher in fat and calories; the spicy version is lowest in fat. Specific values depend on the exact brands of Greek yogurt, mayonnaise, and feta used. This information is intended for general reference only and is not a substitute for personalized guidance from a registered dietitian.
Frequently Asked Questions
1. Can I use a rotisserie chicken instead of simmering chicken breasts?
Yes — and it’s the fastest shortcut available. Pull 2 lbs of meat from a store-bought rotisserie chicken, shred it, and proceed directly to Step 3. You save 25 minutes of cooking time and the result is nearly identical in texture. The flavor will be slightly more seasoned from the rotisserie seasoning, so adjust added salt carefully.
2. How do I keep the avocado from browning in the container?
The lime juice in the avocado-lime variant provides meaningful protection but doesn’t prevent browning indefinitely. Eat that container within 48 hours, press a piece of plastic wrap directly against the surface of the salad before sealing the lid (reducing oxygen contact), and store it in the coldest part of the refrigerator.
3. Can I make all four variants identical in protein content?
The avocado-lime and Mediterranean variants are slightly lower in protein than the classic and spicy due to the volume taken up by avocado and olives. Adding 2 tablespoons of hemp seeds to each container equalizes the protein content across all four to approximately 40 grams per serving.
4. Is simmering really better than baking the chicken for this recipe?
For a creamy, shredded chicken salad specifically — yes. Simmering (poaching) produces a moister, more easily shredded texture than baking because the liquid environment prevents the surface from drying out during cooking. Baked chicken produces a firmer exterior that shreds into shorter, slightly drier pieces. Both are food-safe at 165°F internal temperature, but the simmer produces a better result for this application.
5. How do I prevent the salad from getting watery after a couple of days?
Two main causes: vegetables releasing moisture over time, and over-dressing at the initial mixing stage. Dice vegetables as small as possible (smaller pieces release less water), dress lightly, and store the classic variant’s celery and cucumber slightly underseasoned — the salt draws water from cut vegetables. You can also store the variant vegetables separately and fold them in each morning rather than pre-building the full container.
6. Can I use canned chicken instead of fresh?
Canned chicken works as a shortcut — drain thoroughly and flake before mixing with the dressing. The texture is finer and more uniform than simmered shredded chicken, and the flavor is milder. It’s a completely valid option when time is tight; just drain very thoroughly or the dressing will thin out quickly.
7. What’s the best way to portion the base chicken evenly across 4 containers?
Weigh the total dressed chicken base after mixing using a kitchen scale, then divide by 4. Portioning by weight is significantly more accurate than portioning by eye and ensures each container has the same protein content rather than one container being noticeably more generous than the others.
8. Can I prepare the variant vegetables ahead of time and store them separately?
Yes — pre-dice all the vegetables for each variant and store in small separate containers or zip-top bags in the refrigerator. This lets you assemble each variant’s container fresh each morning, which maintains better vegetable texture and prevents any moisture migration from sitting overnight with the dressed chicken.
9. How long does plain simmered chicken last in the refrigerator before building the salads?
Plain poached chicken stored in an airtight container with a small amount of the poaching broth keeps for up to 4 days in the refrigerator. This means you can simmer the chicken on Sunday, then build individual variants fresh on Monday, Tuesday, and Wednesday if you prefer maximum freshness over full-batch assembly.
10. Is this recipe suitable for someone tracking macros strictly?
Yes — the recipe is transparent enough for macro tracking. The primary variables are the quantity of Greek yogurt versus mayo and the specific variant you’re eating. Weighing ingredients rather than measuring by volume will give you the most accurate macro counts. All four variants are naturally low in carbohydrates (under 8g net carbs per container).
11. Can children eat all four variants?
The classic variant is the most universally kid-friendly. The spicy jalapeño version is too hot for most children — substitute the jalapeño with diced green bell pepper and omit the cayenne for a mild version that keeps the same color and crunch profile. The avocado-lime and Mediterranean variants are typically well-received by older children.
Expert Chef Tips
1. Salt the simmering water generously — it’s your only chance to season the chicken from the inside.
Unlike sautéing, where you season directly before cooking, simmering chicken relies on the liquid to carry seasoning into the meat. Use at least 1 teaspoon of salt per 4 cups of liquid and consider adding a few peppercorns and a bay leaf as shown in the recipe. Bland poaching liquid produces bland chicken regardless of how much dressing you apply.
2. Shred in a stand mixer for speed and uniformity.
The paddle attachment of a stand mixer at low speed shreds 2 lbs of warm simmered chicken in under 20 seconds — producing consistently sized strands that coat evenly with dressing. For anyone meal-prepping regularly, this technique alone reduces prep time by 5–8 minutes every session.
3. Build from mildest to boldest variant.
Prepare the classic variant first (minimal flavor impact on your tools), then Mediterranean, then avocado-lime, then spicy. This progression prevents cross-contamination of heat from the jalapeño or boldness from the feta from accidentally flavoring the milder variants through shared utensils between steps.
4. Use the leftover poaching broth the same week.
The broth left from simmering 2 lbs of chicken is a genuinely flavorful stock that elevates rice, soup, and grain cooking dramatically. Strain it, let it cool, and store in a jar in the refrigerator — it keeps for 5 days and tastes significantly better than most store-bought broths because of the garlic, bay leaf, and chicken fat that flavored it during the poach.
5. Prep a double batch of plain chicken for flexibility.
Simmer 4 lbs of chicken instead of 2, dress half for the four-variant meal prep, and store the other half plain in the refrigerator. The plain reserve gives you a protein source ready for grain bowls, wraps, or a second round of salads midweek without any additional cooking time.
Recipe Summary
This high protein chicken salad meal prep starts with one core technique — gently simmering chicken breasts in seasoned broth to 165°F until pull-apart tender — and branches into four distinct weekly lunches: classic, Mediterranean, avocado-lime, and spicy. The base Greek yogurt and mayo dressing is made once and portioned into four glass containers, with each variant’s ingredients folded in separately. Total prep time is 45 minutes for a full week of high-protein lunches averaging 38 grams of protein per container.
Conclusion
The best meal prep is the kind that makes the whole week genuinely easier — not just logistically easier, but tastier and more satisfying at every meal. This high protein chicken salad meal prep does that by giving you variety built on consistency: one simmering session, four completely different lunches, four days of not having to think about what to eat. Make it once on a Sunday and notice how differently the week feels when lunch is already handled. That’s the real return on 45 minutes of kitchen time.
High Protein Chicken Salad Meal Prep – Best 4 Ways
Description
There's a version of meal prep that actually works all week — not the kind that turns sad and soggy by Tuesday, but the kind you genuinely look forward to pulling out of the refrigerator. This high protein chicken salad meal prep is exactly that. Four glass containers, four completely distinct flavor profiles, all built on the same base of gently simmered, tender shredded chicken: a classic with celery and cucumber, a Mediterranean with Kalamata olives and feta, an avocado-lime with fresh herbs and cucumber, and a spicy version with jalapeño and red pepper flakes. Each one delivers approximately 38 grams of protein per serving, holds beautifully in the refrigerator for up to four days, and takes less than 45 minutes to prepare in one focused session. Whether you're fueling workouts, managing your macros, or just tired of figuring out lunch at noon, this is the meal prep that solves the problem for the entire week.
Ingredients
Instructions
-
How to Make High Protein Chicken Salad Meal Prep Step by Step
-
Step 1: Simmer the Chicken
-
Place the chicken breasts in a large saucepan and pour in the chicken broth and water — the liquid should cover the chicken by at least 1 inch. Add the smashed garlic cloves, bay leaf, salt, and black pepper. Bring to a gentle simmer over medium heat; you're looking for small, steady bubbles rising from the bottom of the pot, not a rolling boil. A hard boil agitates and toughens chicken — the gentle simmer is what produces the tender, pull-apart texture visible across all four containers in the photo.
-
Once the liquid reaches a simmer, reduce heat to medium-low and cook for 18–22 minutes depending on the thickness of the breasts. The chicken is done when an instant-read thermometer inserted into the thickest part reads 165°F. According to the USDA poultry food safety guidelines, 165°F is the minimum safe internal temperature for all chicken — confirm this before removing from the liquid.
-
Embedded Tip: Don't discard the poaching broth. Strain it and refrigerate for up to 5 days — it's a flavorful, homemade chicken stock that works beautifully for soups, rice, or sauces throughout the week.
-
Step 2: Cool and Shred the Chicken
-
Transfer the simmered chicken to a cutting board and let it rest for 5 minutes before shredding — the brief rest allows the interior juices to redistribute through the meat. Using two forks, shred the chicken by pulling in opposite directions along the grain of the muscle fibers. The result should be long, moist strands rather than dry, short pieces. If the chicken is resisting, it may need another minute of simmer time; properly poached chicken pulls apart with almost no effort.
-
Embedded Tip: For the fastest shredding method, place all the cooked chicken in a stand mixer bowl fitted with the paddle attachment. Run on low for 15–20 seconds — the paddle shreds the entire batch in the time it would take to fork-shred a single breast.
-
Step 3: Make the Base Dressing and Combine
-
In a large mixing bowl, whisk together the Greek yogurt, light mayonnaise, fresh lemon juice, garlic powder, onion powder, salt, and pepper. Add all of the shredded chicken to the bowl and toss to coat thoroughly — every strand should be lightly covered in the creamy base. The mixture should look cohesive and creamy, not dry or soupy. Taste at this stage and adjust salt and lemon before dividing into variants, since the flavor intensity of each variant will build on this base.
-
Step 4: Divide and Build the 4 Variants
-
Using a ladle or large spoon, divide the dressed chicken base evenly into four portions — approximately 1 to 1¼ cups per container. Then build each variant directly in its glass container:
-
Classic: Fold in diced celery, cucumber, and fresh parsley. Season with a pinch of additional salt and pepper.
-
Mediterranean: Fold in Kalamata olives, crumbled feta, cucumber, parsley, and red onion. The salty feta and olives season the chicken naturally — taste before adding extra salt.
-
Avocado-Lime: Fold in diced avocado, cucumber, cilantro, red onion, and lime juice. Add the lime wedge to the container as shown in the photo — it keeps the avocado from browning and adds a pop of freshness.
-
Spicy: Stir the sriracha into the portion of base dressing for this container before mixing in the chicken. Fold in sliced jalapeños, then dust the top with smoked paprika, cayenne, and red pepper flakes exactly as visible in the photo.
-
Step 5: Seal, Label, and Refrigerate
-
Seal each glass container with its lid immediately after building to prevent oxidation and flavor transfer between containers in the refrigerator. Label each container with the variant name and the date prepared. Refrigerate for up to 4 days. The avocado-lime variant should be eaten on days 1 or 2 since avocado begins to oxidize even in a sealed container after 48 hours — the lime juice slows this but doesn't stop it entirely.
Nutrition Facts
Servings 4
- Amount Per Serving
- Calories 360kcal
- % Daily Value *
- Total Fat 15g24%
- Saturated Fat 3g15%
- Protein 38g76%
* Percent Daily Values are based on a 2,000 calorie diet. Your daily value may be higher or lower depending on your calorie needs.