Best Creamy Chicken Mac and Cheese (Easy 1-Pot)

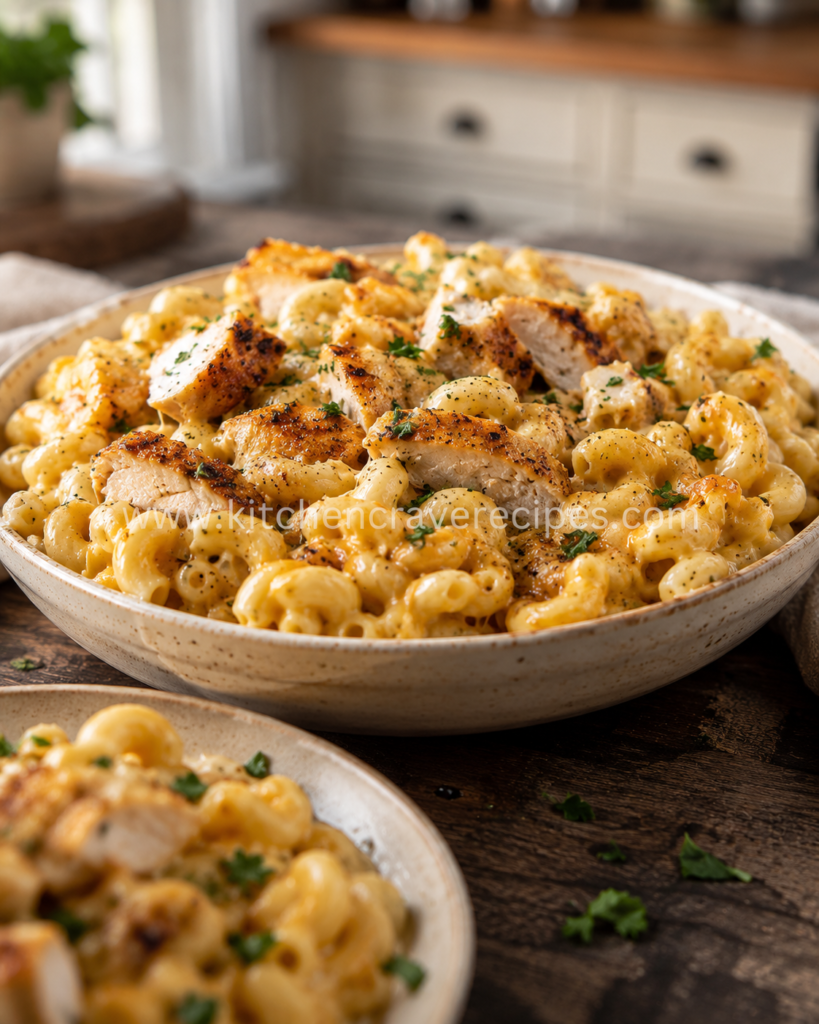

There are comfort food dinners, and then there is a steaming pot of creamy chicken mac and cheese — the kind where the sauce clings to every elbow, the chicken pulls apart into tender little shreds, and the whole thing glows that deep golden-orange that makes everyone at the table lean in. This recipe delivers exactly that, built entirely on one stovetop pot and a low, steady simmer that coaxes the sauce into something impossibly rich without a single complicated technique.
If you have been relying on the boxed stuff, this is the upgrade you did not know you needed. Real cheddar melts into a velvety cheese sauce, seasoned chicken adds protein and heartiness, and the whole dish comes together in about 45 minutes — most of it hands-off while the pot does the work. This is the creamy chicken mac and cheese you will make on repeat all fall and winter long.
Recipe Quick Info
| Detail | Info |
|---|---|
| Prep Time | 15 minutes |
| Cook Time | 30 minutes |
| Total Time | 45 minutes |
| Servings | 6 |
| Cuisine | American |
| Course | Main Dish |
| Cooking Method | Simmering |
| Calories | ~580 per serving |
| Difficulty | Easy |
Why You’ll Love This Recipe
- One-pot cleanup — everything simmers in a single large pot, which means fewer dishes and more time at the table.
- Ultra-rich, pull-apart chicken — gently simmering the chicken directly in the broth keeps it moist, tender, and perfectly seasoned all the way through.
- Sauce that actually coats the pasta — this is a real roux-based cheese sauce, not a thin liquid that pools at the bottom of the bowl.
- Ready in 45 minutes flat — the simmer method is low-effort, not low-speed; dinner is on the table on a weeknight without stress.
- Kid and adult approved — the flavor is deeply savory and cheesy without being sharp or fussy — universally loved at any dinner table.
- Easy to customize — spice it up, swap the protein, or go gluten-free without losing the soul of the dish (see Variations below).
- Leftovers reheat beautifully — the sauce stays creamy with just a splash of milk, making next-day lunch as good as day one.
Ingredients
For the Chicken
- 1½ lbs boneless, skinless chicken breasts (about 2 medium breasts)
- 4 cups low-sodium chicken broth
- 1 teaspoon garlic powder
- 1 teaspoon onion powder
- ½ teaspoon smoked paprika
- ½ teaspoon kosher salt
- ¼ teaspoon black pepper
For the Mac and Cheese Sauce
- 1 lb (16 oz) elbow macaroni, dry
- 3 tablespoons unsalted butter
- 3 tablespoons all-purpose flour
- 2 cups whole milk, warmed
- 1 cup heavy cream
- 2 cups sharp cheddar cheese, freshly shredded
- 1 cup mild cheddar cheese, freshly shredded
- 1 teaspoon Dijon mustard
- ½ teaspoon smoked paprika
- ½ teaspoon kosher salt, or to taste
- ¼ teaspoon black pepper
- ¼ teaspoon cayenne pepper (optional, for mild heat)
Optional Add-Ins
- ½ cup cream cheese, softened (for extra richness)
- 1 cup frozen peas (stir in at the end for color and freshness)
- ½ cup cooked, crumbled bacon (fold in just before serving)
Ingredient Substitutions
| Original Ingredient | Substitution | Notes |
|---|---|---|
| Chicken breasts | Rotisserie chicken (shredded, 2 cups) | Skip the simmering step; add chicken with the pasta |
| Heavy cream | Evaporated milk | Slightly less rich but still very creamy |
| Sharp cheddar | Gruyère or Colby Jack | Gruyère adds nuttiness; Colby Jack melts even smoother |
| All-purpose flour | Cornstarch (2 tbsp) | For a gluten-free roux alternative; whisk with cold milk |
| Whole milk | 2% milk | Sauce will be slightly thinner; add an extra tbsp of butter |
| Elbow macaroni | Cavatappi or small shells | Both hold the sauce beautifully |
Kitchen Tools Needed
- Large pot or Dutch oven (5–6 quart) — the primary vessel for simmering both the chicken and the sauce; needs to be wide enough for even heat distribution
- Medium saucepan — for warming the milk and cream before adding to the roux
- Whisk — essential for a lump-free roux and smooth cheese sauce
- Wooden spoon or silicone spatula — for stirring the pasta and preventing sticking during the simmer
- Ladle or tongs — for removing chicken from the broth
- Two forks — for shredding the poached chicken
- Box grater or food processor with grater attachment — for freshly shredding cheese (pre-shredded bags will not melt as smoothly)
- Liquid measuring cups and dry measuring cups — for accuracy with the sauce ratios
- Instant-read thermometer — to confirm chicken reaches 165°F internally before shredding
Step-by-Step Instructions
Step 1: Simmer the Chicken in Seasoned Broth
Add the chicken breasts to your large pot or Dutch oven and pour in the chicken broth. The broth should just cover the chicken — add a splash of water if needed. Stir in the garlic powder, onion powder, smoked paprika, salt, and pepper. Bring the liquid up to a gentle simmer over medium heat: you are looking for small, lazy bubbles breaking the surface, not a rolling boil. Once you see that steady, gentle bubble, reduce the heat to medium-low and cover the pot.
Simmer the chicken for 18–20 minutes, or until an instant-read thermometer inserted into the thickest part reads 165°F — this is the USDA-recommended safe internal temperature for poultry (see USDA safe minimum internal temperatures). The surface of the broth should stay at a gentle murmur the entire time; if it starts to boil aggressively, lower the heat immediately or the chicken will tighten up and become rubbery.
Embedded Tip: Resist the urge to rush this step with high heat. A patient, low simmer is what makes the chicken pull apart into soft, silky shreds — not tough chunks.
Step 2: Shred the Chicken and Reserve the Broth
Use tongs to transfer the cooked chicken to a cutting board. Pour the seasoned broth through a fine-mesh strainer into a large measuring cup or bowl — do not discard it. You will use 2 cups of this flavor-packed broth in the cheese sauce. Let the chicken rest for 3–4 minutes, then use two forks to shred it into generous bite-sized pieces. The chicken should pull apart with almost no resistance — a sign the simmer did its job correctly.
Step 3: Cook the Macaroni in the Same Pot
Return the pot to medium-high heat and add the reserved broth plus enough water to cook the pasta according to package directions (usually about 6–8 cups total liquid). Bring to a boil, add the elbow macaroni, and cook until just barely al dente — typically 1–2 minutes less than the package suggests. The pasta will finish absorbing liquid when you add it back to the cheese sauce, so pulling it slightly underdone now prevents mushiness later. Drain the pasta and set aside, reserving about ½ cup of the pasta water.
Step 4: Build the Roux
Wipe the pot dry and return it to medium heat. Melt the butter until it foams and just begins to smell nutty — about 1 minute. Add the flour all at once and whisk constantly for 90 seconds. The mixture should look pale golden and smell faintly like popcorn; that cooked-flour smell means the raw flour taste is gone. Do not rush past this step — an undercooked roux will leave a starchy, chalky flavor in the finished sauce.
Step 5: Build the Cheese Sauce with a Gentle Simmer
Pour in the warmed milk slowly, whisking constantly, then add the heavy cream. Keep the heat at medium and whisk until the mixture is completely smooth. Bring it to a gentle simmer — those small, steady bubbles again — and let it cook for 3–4 minutes, stirring often, until it thickens enough to coat the back of a spoon. You should be able to draw a clean line through the sauce on the spoon with your finger and have it hold.
Reduce the heat to low. Add the shredded sharp cheddar and mild cheddar in two or three handfuls, stirring between each addition and waiting until each handful is fully melted before adding the next. Stir in the Dijon mustard, smoked paprika, salt, pepper, and cayenne if using.
Embedded Tip: Keep the heat on low when melting the cheese — if the sauce simmers hard at this stage, the proteins in the cheese can seize and turn grainy. Low and slow is the rule here.
Step 6: Combine, Simmer Briefly, and Serve
Add the drained pasta and shredded chicken to the cheese sauce. Fold everything together gently with a silicone spatula until every elbow is coated in that thick, glossy sauce. If the sauce feels too thick, add reserved pasta water a tablespoon at a time until it reaches your ideal consistency — it should fall off the spoon in slow, lazy ribbons, not pour like liquid. Let the whole pot sit over the lowest heat setting for 2–3 minutes, stirring once or twice, to let the flavors meld and the pasta finish absorbing the sauce. Serve immediately, directly from the pot.
Pro Tips for Perfect Creamy Chicken Mac and Cheese
- Grate your own cheese. Pre-shredded cheese is coated with anti-caking agents like cellulose that actively resist melting. Freshly grated cheddar melts into the sauce in seconds and produces that ultra-smooth, glossy texture you see in the photos.
- Warm your dairy before adding it. Cold milk added to a hot roux causes temperature shock and can create lumps. Heat your milk and cream until steaming (not boiling) in a separate saucepan before pouring them in.
- Keep the simmer gentle throughout — this is the key to the whole dish. For simmering recipes, the difference between a lazy bubble and a rolling boil is the difference between silky sauce and broken, grainy sauce. If you ever see the liquid churning aggressively, pull the pot off the heat for 30 seconds and reduce the burner. A real simmer is a patient cook’s best friend.
- Season in layers. You seasoned the broth, the roux gets its own seasoning, and you should always do a final taste-and-adjust before serving. Cheese sauce needs more salt than you think — taste it before you fold in the pasta.
- Let it rest two minutes before serving. Like a good steak, this dish benefits from just a couple of minutes off direct heat to let the sauce tighten slightly and cling to the pasta even better.
Common Mistakes to Avoid
1. Boiling the chicken instead of simmering it.
A hard boil makes chicken tough and stringy. Keep the heat low enough that you only see gentle bubbles — the chicken will be far more tender and easier to shred.
2. Adding cold cheese to a hot sauce.
Cheese added straight from the fridge can clump and turn the sauce grainy. Let it sit at room temperature for 10–15 minutes before stirring it in.
3. Using pre-shredded bagged cheese.
The starch coatings on pre-shredded cheese prevent proper melting. Always grate a block from scratch for a smooth sauce.
4. Cooking the pasta all the way through before adding it to the sauce.
Fully cooked pasta absorbs less sauce and turns mushy. Pull it 1–2 minutes before the package al dente time — it finishes in the sauce.
5. Rushing the roux.
If you whisk in the milk before the butter-flour mixture has cooked for a full 90 seconds, you will taste raw flour in the finished sauce. The roux needs that time to lose its starch flavor.
6. Letting the cheese sauce simmer on high heat after adding the cheese.
This is the most common simmering mistake in this recipe. Once the cheese goes in, the heat must drop to low. Simmering a cheese sauce too aggressively after the cheese is added causes the proteins to tighten and the fat to separate — you will end up with a greasy, grainy sauce instead of a creamy one. Low heat only, and stir constantly.
7. Skipping the pasta water.
That starchy water is your emergency texture fix. If the sauce is too thick, it loosens it without diluting the flavor. Always set aside half a cup before you drain.
8. Not tasting before serving.
Cheese sauce needs a confident hand with salt. Taste after everything is combined and adjust seasoning — it often needs more than you expect.
Variations
Lighter / High-Protein Version
Swap heavy cream for evaporated skim milk and use reduced-fat sharp cheddar. Add an extra half pound of shredded chicken breast to boost protein without significantly adding calories. The sauce will be slightly thinner — whisk in a cornstarch slurry (1 tsp cornstarch + 1 tbsp cold water) if you want more body.
Vegetarian Version
Skip the chicken entirely and replace the chicken broth with vegetable broth. Add 1½ cups of small-diced roasted butternut squash or sautéed mushrooms for a hearty, satisfying substitute. The cheese sauce is so full-flavored it holds up beautifully without the protein. Check out Best Cheesy Ground Beef Pasta Bake (Easy 45-Minute Dinner) for another meatless comfort food idea.
Spicy Jalapeño Version
Add 2 finely diced fresh jalapeños (seeds in for serious heat, seeds out for moderate) to the butter before building the roux. Substitute 1 cup of the cheddar with pepper Jack cheese for an extra layer of heat in the sauce. The spice blooms beautifully into the dairy without overpowering the cheese flavor.
Gluten-Free Version
Replace the all-purpose flour with 2 tablespoons of cornstarch whisked into the cold milk before adding to the pot — no separate roux needed. Use certified gluten-free elbow macaroni (widely available from brands like Barilla and Jovial). Every other element of this recipe is naturally gluten-free. Note: this variation uses slightly different sauce-building technique than the standard method above.
Low-Carb / Keto Version
This one requires a different approach: skip the pasta entirely and use 4 cups of small cauliflower florets, steamed until just tender. Build the cheese sauce as directed and fold in the cauliflower and shredded chicken. It is not macaroni — but it is genuinely delicious, and the cheese sauce recipe itself is naturally low-carb. Serve immediately, as cauliflower releases water as it sits.
What to Serve With Creamy Chicken Mac and Cheese
- Simple green salad with lemon vinaigrette — the brightness cuts through the richness of the cheese sauce perfectly.
- Steamed or roasted broccoli — a classic pairing; the florets can even be stirred directly into the pot.
- Crusty garlic bread — for scooping up every last bit of sauce from the bowl.
- Classic coleslaw — creamy or vinegar-based; both work, and the crunch is a welcome contrast.
- Sliced beefsteak tomatoes with sea salt — a simple, fresh counterpoint to the warm, heavy dish.
- Dill pickle spears — the acid and brine sharpen the palate between bites of rich mac.
- Sweet corn on the cob — especially in summer; sweet corn and cheddar are a natural pairing.
- Our Best Cheesy Keto Taco Soup — Easy 30-Minute Foolproof Bowl — serve a small cup alongside for the ultimate comfort food combo.
Storage Instructions
Refrigerator
Transfer cooled leftovers to an airtight container and refrigerate for up to 4 days. The pasta will absorb more sauce as it sits, which is normal — it reheats beautifully with a splash of milk stirred in.
Freezer
Creamy chicken mac and cheese can be frozen, though dairy-based sauces can separate slightly upon thawing. For best results, freeze in individual portions in freezer-safe containers for up to 2 months. Thaw overnight in the refrigerator before reheating — do not thaw on the counter.
Shelf Life Summary
| Storage Method | Container | Duration |
|---|---|---|
| Refrigerator | Airtight container | Up to 4 days |
| Freezer | Freezer-safe container | Up to 2 months |
| Counter (cooked) | Covered | 2 hours maximum |
Reheating Instructions
Stovetop (best results): Add the desired portion to a small saucepan over low heat. Add 2–3 tablespoons of whole milk or chicken broth and stir continuously until the sauce loosens and the mac is heated through — usually 4–6 minutes. Keep the heat gentle; aggressive heat will break the sauce.
Microwave (quickest option): Transfer a single serving to a microwave-safe bowl. Add 1 tablespoon of milk, cover loosely with a damp paper towel, and heat in 60-second intervals, stirring between each, until steaming throughout. Total time is typically 2–3 minutes depending on portion size.
Oven (for larger portions): Place leftovers in an oven-safe dish, stir in ¼ cup milk, cover tightly with foil, and heat at 325°F for 20–25 minutes until warmed through. Remove the foil for the last 3 minutes if you want a lightly set top.
For food safety, always ensure reheated chicken dishes reach an internal temperature of 165°F before eating — per FDA food safety guidance on reheating.
Nutrition Facts
Per serving (based on 6 servings; includes chicken and full cheese sauce)
| Nutrient | Amount |
|---|---|
| Calories | ~580 kcal |
| Total Fat | 28g |
| Saturated Fat | 16g |
| Cholesterol | 130mg |
| Sodium | 680mg |
| Total Carbohydrates | 48g |
| Dietary Fiber | 2g |
| Total Sugars | 5g |
| Protein | 38g |
| Calcium | 390mg |
Nutrition Disclaimer: Nutrition values are estimates calculated using standard ingredient databases and may vary based on specific brands used, portion sizes, and any ingredient substitutions made. These figures are provided for general informational purposes and should not replace advice from a registered dietitian or healthcare provider.
Frequently Asked Questions
What is the best cheese for creamy chicken mac and cheese?
Sharp cheddar is the gold standard because its bold flavor stands up to the richness of the sauce. A combination of sharp and mild cheddar gives you flavor plus ultra-smooth meltability. Gruyère or Colby Jack are excellent alternatives if you want a slightly different flavor profile.
Can I use rotisserie chicken instead of simmering raw chicken?
Absolutely — this is one of the best shortcuts in the recipe. Use about 2 cups of shredded rotisserie chicken and skip Steps 1 and 2 entirely. Add the chicken directly to the finished cheese sauce in Step 6. You will lose the flavored broth for the sauce base, so substitute 2 cups of store-bought low-sodium chicken broth.
How do I keep the cheese sauce from getting grainy?
Two rules: grate your own cheese and keep the heat low when melting it. Pre-shredded cheese contains anti-caking starches that resist melting. High heat causes the cheese proteins to seize. Add the cheese in small handfuls over low heat, stirring constantly, and your sauce will stay silky every time.
Can I make this creamy chicken mac and cheese ahead of time?
Yes, with one adjustment. Cook the pasta slightly more underdone than al dente — it will continue absorbing moisture as the dish sits. Store separately if possible (pasta and sauce in separate containers), then combine and reheat on the stovetop with a splash of milk. If stored already combined, it reheats well with a bit of added liquid.
What pasta shapes work other than elbows?
Cavatappi, small shells, ditalini, and small penne all hold cheese sauce excellently. Avoid long, thin pastas like spaghetti or linguine — they do not trap sauce in the same way and the dish loses that scoopable, hearty quality.
Is simmering better than baking for this dish?
For a stovetop version like this one, simmering gives you a silkier, creamier sauce because the pasta finishes cooking in the sauce and absorbs the flavor directly. Baking adds a golden crust on top, which is delicious but different — the interior sauce tends to be slightly thicker and the pasta drier. This simmered version prioritizes maximum creaminess throughout.
How do I know the simmer is at the right temperature?
Look at the surface of the liquid. A proper simmer shows small, steady bubbles breaking the surface lazily — typically 185–205°F. If you see a rapid, churning boil, the heat is too high. If nothing is moving at the surface, the heat is too low. That sweet spot of gentle bubbling is what you are maintaining throughout the chicken cook time.
Can I make this in a slow cooker?
Yes. Add raw chicken, all the broth, and the seasonings to the slow cooker and cook on LOW for 3–4 hours or HIGH for 1.5–2 hours until the chicken reaches 165°F. Shred the chicken, then build the cheese sauce separately on the stovetop and combine with separately cooked pasta. The slow cooker is great for hands-off cooking but cannot simmer and reduce a roux-based sauce the way a stovetop can.
How spicy is this recipe as written?
As written, the ¼ teaspoon cayenne is very mild — barely a background warmth. Most kids will not notice it. If you want zero heat, simply omit the cayenne. If you want noticeable spice, increase to ½ teaspoon or follow the jalapeño variation above.
Can I double this recipe?
Yes, and it scales well. Use a 8–10 quart pot for a double batch and allow an extra 5 minutes for the sauce to thicken due to the larger volume. Keep the heat slightly lower than you think you need — a bigger pot holds heat longer and the risk of scorching the bottom increases with volume.
Why did my sauce get too thick as it sat?
The pasta keeps absorbing sauce even off the heat — this is normal. Stir in whole milk or warm broth, one tablespoon at a time, until you reach the consistency you want. Do this over low heat if the dish has already been plated and cooled.
Can I add vegetables directly to the simmering pot?
Yes — broccoli florets, frozen peas, and diced bell pepper all work well. Add frozen or par-cooked vegetables in the last 2–3 minutes of the final simmer in Step 6 so they warm through without losing color or turning mushy.
Expert Chef Tips
1. Build flavor into the simmering broth, not just the sauce.
The broth the chicken simmers in becomes part of your sauce. Do not under-season it — taste it before adding the chicken. It should be savory enough to drink on its own. That flavor transfers directly into the final dish in a way that no amount of after-the-fact seasoning can fully replicate.
2. The Dijon mustard is non-negotiable.
A small amount of Dijon acts as an emulsifier and flavor enhancer in cheese sauce. You will not taste “mustard” — you will taste a fuller, more complex cheese flavor. This is a technique used in classic French cheese sauce recipes and it works every single time.
3. Finish the pasta in the sauce, not in water.
If you have a few extra minutes, cook your pasta 4 minutes shy of done in the water, drain it, and let it finish the final minutes directly in the simmering cheese sauce. The pasta drinks up the sauce and the starch from the pasta thickens the sauce simultaneously — the result is noticeably more cohesive and flavorful.
4. Use a wide, heavy-bottomed pot.
A narrow, lightweight pot creates hot spots that cause the sauce to scorch on the bottom while staying cooler at the top. A Dutch oven or wide enamel pot distributes the gentle simmer heat evenly, which is critical for keeping the sauce silky rather than scorched.
5. Rest, taste, and season at the very end.
After you fold everything together, take the pot off the heat entirely for 2 minutes. Then taste. The flavors will have melded and you will have a much clearer sense of what it needs — usually a pinch more salt and sometimes a squeeze of lemon juice to lift the richness.
Recipe Summary
This creamy chicken mac and cheese builds its deep, satisfying flavor through a gentle simmering method — poached chicken, a roux-based cheese sauce, and pasta that finishes cooking right in the sauce. The entire dish comes together in one pot in 45 minutes. It reheats well, scales easily, and is endlessly customizable without losing the rich, scoopable quality that makes it a guaranteed crowd-pleaser.
Conclusion
When you want something that genuinely satisfies — not just fills a plate — this creamy chicken mac and cheese is the answer. The simmering method is patient but effortless, and the result is a sauce so rich and glossy it coats every elbow from end to end. Make it once on a Tuesday night and it will be in your regular rotation by Friday. Grab your pot, grate that cheese fresh, and let the simmer do its magic. You already have everything you need.
Best Creamy Chicken Mac and Cheese (Easy 1-Pot)
Description
There are comfort food dinners, and then there is a steaming pot of creamy chicken mac and cheese — the kind where the sauce clings to every elbow, the chicken pulls apart into tender little shreds, and the whole thing glows that deep golden-orange that makes everyone at the table lean in. This recipe delivers exactly that, built entirely on one stovetop pot and a low, steady simmer that coaxes the sauce into something impossibly rich without a single complicated technique.
Ingredients
Instructions
-
Step-by-Step Instructions
-
Step 1: Simmer the Chicken in Seasoned Broth
-
Add the chicken breasts to your large pot or Dutch oven and pour in the chicken broth. The broth should just cover the chicken — add a splash of water if needed. Stir in the garlic powder, onion powder, smoked paprika, salt, and pepper. Bring the liquid up to a gentle simmer over medium heat: you are looking for small, lazy bubbles breaking the surface, not a rolling boil. Once you see that steady, gentle bubble, reduce the heat to medium-low and cover the pot.
-
Simmer the chicken for 18–20 minutes, or until an instant-read thermometer inserted into the thickest part reads 165°F — this is the USDA-recommended safe internal temperature for poultry (see USDA safe minimum internal temperatures). The surface of the broth should stay at a gentle murmur the entire time; if it starts to boil aggressively, lower the heat immediately or the chicken will tighten up and become rubbery.
-
Embedded Tip: Resist the urge to rush this step with high heat. A patient, low simmer is what makes the chicken pull apart into soft, silky shreds — not tough chunks.
-
Step 2: Shred the Chicken and Reserve the Broth
-
Use tongs to transfer the cooked chicken to a cutting board. Pour the seasoned broth through a fine-mesh strainer into a large measuring cup or bowl — do not discard it. You will use 2 cups of this flavor-packed broth in the cheese sauce. Let the chicken rest for 3–4 minutes, then use two forks to shred it into generous bite-sized pieces. The chicken should pull apart with almost no resistance — a sign the simmer did its job correctly.
-
Step 3: Cook the Macaroni in the Same Pot
-
Return the pot to medium-high heat and add the reserved broth plus enough water to cook the pasta according to package directions (usually about 6–8 cups total liquid). Bring to a boil, add the elbow macaroni, and cook until just barely al dente — typically 1–2 minutes less than the package suggests. The pasta will finish absorbing liquid when you add it back to the cheese sauce, so pulling it slightly underdone now prevents mushiness later. Drain the pasta and set aside, reserving about ½ cup of the pasta water.
-
Step 4: Build the Roux
-
Wipe the pot dry and return it to medium heat. Melt the butter until it foams and just begins to smell nutty — about 1 minute. Add the flour all at once and whisk constantly for 90 seconds. The mixture should look pale golden and smell faintly like popcorn; that cooked-flour smell means the raw flour taste is gone. Do not rush past this step — an undercooked roux will leave a starchy, chalky flavor in the finished sauce.
-
Step 5: Build the Cheese Sauce with a Gentle Simmer
-
Pour in the warmed milk slowly, whisking constantly, then add the heavy cream. Keep the heat at medium and whisk until the mixture is completely smooth. Bring it to a gentle simmer — those small, steady bubbles again — and let it cook for 3–4 minutes, stirring often, until it thickens enough to coat the back of a spoon. You should be able to draw a clean line through the sauce on the spoon with your finger and have it hold.
-
Reduce the heat to low. Add the shredded sharp cheddar and mild cheddar in two or three handfuls, stirring between each addition and waiting until each handful is fully melted before adding the next. Stir in the Dijon mustard, smoked paprika, salt, pepper, and cayenne if using.
-
Embedded Tip: Keep the heat on low when melting the cheese — if the sauce simmers hard at this stage, the proteins in the cheese can seize and turn grainy. Low and slow is the rule here.
-
Step 6: Combine, Simmer Briefly, and Serve
-
Add the drained pasta and shredded chicken to the cheese sauce. Fold everything together gently with a silicone spatula until every elbow is coated in that thick, glossy sauce. If the sauce feels too thick, add reserved pasta water a tablespoon at a time until it reaches your ideal consistency — it should fall off the spoon in slow, lazy ribbons, not pour like liquid. Let the whole pot sit over the lowest heat setting for 2–3 minutes, stirring once or twice, to let the flavors meld and the pasta finish absorbing the sauce. Serve immediately, directly from the pot.
Nutrition Facts
Servings 6
- Amount Per Serving
- Calories 580kcal
- % Daily Value *
- Total Fat 28g44%
- Saturated Fat 16g80%
- Protein 38g76%
* Percent Daily Values are based on a 2,000 calorie diet. Your daily value may be higher or lower depending on your calorie needs.