
Best Garlic Herb Butter Chicken — Easy 1-Pan Bake
If a chicken dinner could be simultaneously effortless and genuinely impressive, this garlic herb butter chicken is exactly that. Large chicken pieces bake in a glass dish surrounded by buttery, herb-infused pan juices, roasted garlic cloves, and potatoes that absorb every drop of that fragrant, golden liquid as they cook. The result looks like something you’d order at a sit-down restaurant — and it takes about 15 minutes of hands-on effort to pull off.
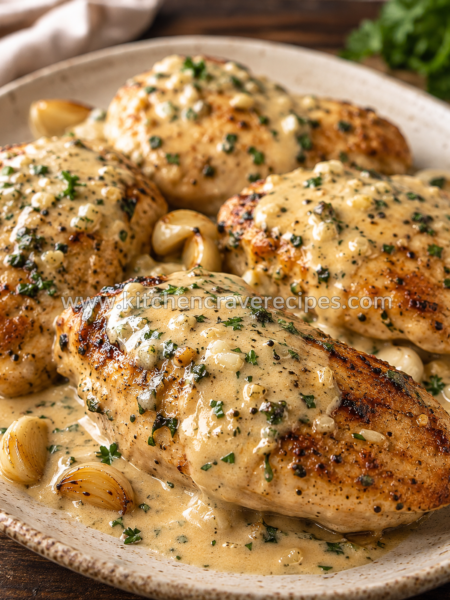
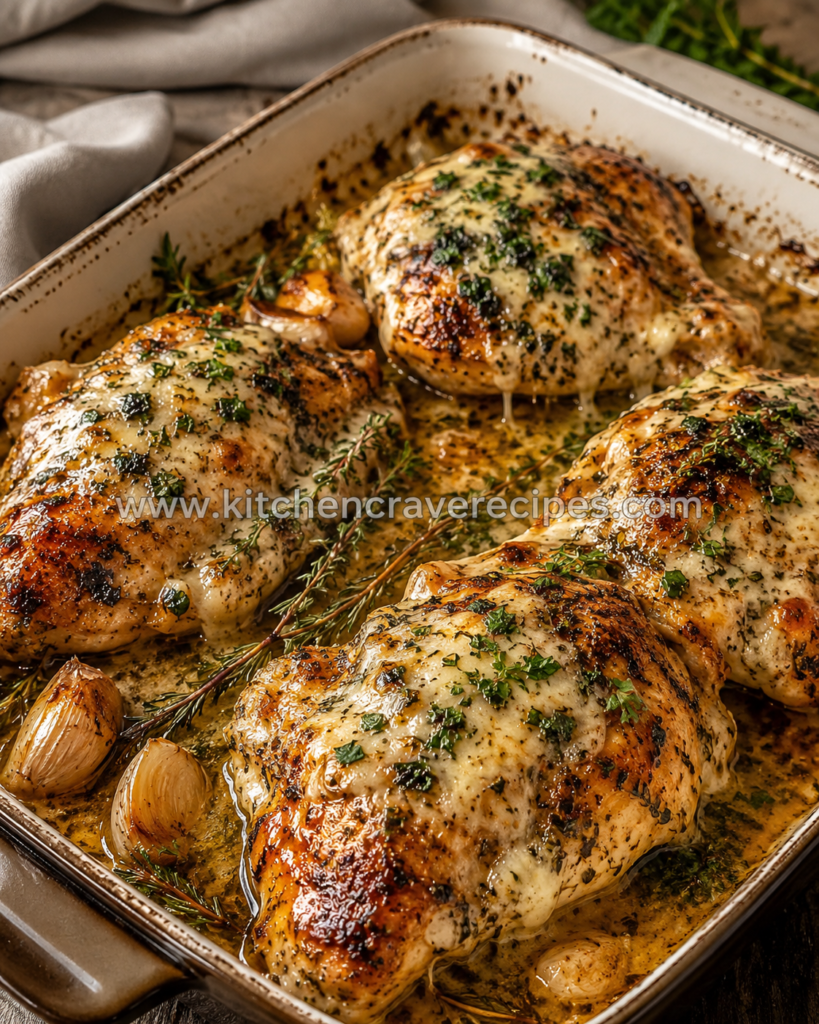
The photo tells the whole story: deeply golden chicken blanketed in herb butter with visible parsley and thyme, whole garlic cloves softening in the bubbling pan drippings, tongs lifting a piece that’s glistening and lacquered from the oven. Baking in a covered glass dish creates a self-basting environment where the butter and chicken juices circulate continuously — that’s the technique that produces the moist, deeply flavored result without any hovering or babysitting on your part.
Recipe Quick Info
| Detail | Info |
|---|---|
| Prep Time | 15 minutes |
| Cook Time | 45 minutes |
| Total Time | 1 hour |
| Servings | 4 servings |
| Cuisine | American |
| Course | Main Course / Dinner |
| Cooking Method | Baking |
| Calories | ~520 kcal per serving |
| Difficulty | Standard |
Why You’ll Love This Garlic Herb Butter Chicken Recipe
- One glass baking dish, zero extra pans — Everything from the chicken to the potatoes to the herb butter sauce bakes together, which means the pan juices flavor every component and cleanup takes under five minutes.
- The herb butter does serious work — A compound of softened butter, minced garlic, fresh parsley, and dried thyme coats the chicken before baking, melting into the pan as the dish heats and creating a built-in basting sauce that keeps every bite moist.
- Baking produces reliably juicy chicken — The enclosed glass dish traps steam during the initial baking phase, surrounding the chicken with moist heat that prevents drying out before the uncovered finish adds color and caramelization.
- Whole garlic cloves roast right in the pan — As visible in the photo, whole or halved garlic cloves roast alongside the chicken and turn sweet, buttery, and spreadable — a bonus that makes every bite in the pan taste better.
- Potatoes built into the dish — Baby potatoes bake in the herb butter drippings and absorb all that garlicky, savory flavor so they’re never boring, never bland, and never need to be made separately.
- Looks restaurant-worthy, feels weeknight-friendly — Tongs lifting a glistening, golden chicken breast from a bubbling glass dish is a genuinely impressive presentation that requires almost no skill to achieve.
- Completely customizable — The herb butter base is adaptable to dozens of flavor profiles; swap the herbs, add lemon zest, or stir in Dijon — the baking method handles all of it equally well.
Ingredients
For the Chicken
- 4 bone-in, skin-on chicken breasts (or large boneless breasts, about 8–10 oz each)
- 1 teaspoon kosher salt
- ½ teaspoon black pepper
- ½ teaspoon smoked paprika
- ½ teaspoon onion powder
For the Herb Butter
- 4 tablespoons unsalted butter, softened to room temperature
- 5 cloves garlic, finely minced (plus 4–6 whole cloves for the pan)
- 2 tablespoons fresh parsley, finely chopped
- 1 teaspoon fresh thyme leaves (or ½ teaspoon dried thyme)
- ½ teaspoon dried Italian seasoning
- ¼ teaspoon red pepper flakes (optional)
- ¼ teaspoon kosher salt
For the Potatoes and Pan
- 1 lb baby Yukon Gold potatoes, halved
- 1 tablespoon olive oil
- ½ teaspoon garlic powder
- ½ teaspoon kosher salt
- ¼ teaspoon black pepper
- ½ cup low-sodium chicken broth (poured into the base of the dish to encourage pan sauce)
For Finishing
- 2 tablespoons fresh parsley, roughly chopped
- Optional: juice of ½ lemon squeezed over the dish right before serving
- Optional: 2 tablespoons shredded Parmesan scattered over the chicken for the last 5 minutes of baking
Substitution Guide
| Original Ingredient | Easy Substitute | Notes |
|---|---|---|
| Bone-in, skin-on chicken breasts | Boneless, skinless chicken breasts | Reduce baking time by 10–12 minutes; monitor internal temp carefully |
| Unsalted butter | Ghee or salted butter | Reduce added salt by ¼ tsp if using salted butter |
| Fresh parsley | Fresh chives or fresh basil | Basil gives a more Italian-leaning flavor profile |
| Fresh thyme | Fresh rosemary (chopped) | Rosemary is more assertive; use ½ teaspoon rather than 1 full teaspoon |
| Baby Yukon Gold potatoes | Fingerling potatoes or quartered red potatoes | Keep pieces roughly 1–1.5 inches for even baking |
| Chicken broth | Dry white wine or vegetable broth | White wine adds depth and a slight acidity to the pan sauce |
Kitchen Tools Needed
- 9×13 inch glass baking dish — As shown in the photo, a glass baking dish is the ideal vessel for this recipe; glass heats evenly, doesn’t react with acidic ingredients, and lets you monitor browning through the sides without lifting the lid.
- Oven — Preheated to 400°F; this temperature bakes the chicken through completely while allowing the skin (or surface of the breast) to develop the golden color visible in the photo.
- Aluminum foil — For covering the dish during the first phase of baking to trap steam and keep the chicken moist while it cooks through.
- Small mixing bowl — For combining the softened butter, garlic, and herbs into a spreadable compound.
- Rubber spatula or butter knife — For spreading the herb butter over and under the chicken skin.
- Instant-read meat thermometer — Non-negotiable for confirming the chicken reaches a safe internal temperature without guessing.
- Tongs — For safely lifting and turning chicken pieces without piercing the meat and releasing the juices.
- Cutting board + sharp knife — For halving potatoes, mincing garlic, and chopping fresh herbs.
How to Bake Garlic Herb Butter Chicken Perfectly Every Time
Step 1 — Preheat the Oven and Prep the Potatoes (5 minutes)
Preheat your oven to 400°F — a complete preheat is essential for baking chicken correctly. A partially preheated oven starts the chicken in unstable, fluctuating heat, which affects both cook time and moisture retention. While the oven heats, toss the halved baby potatoes with olive oil, garlic powder, salt, and pepper in the baking dish. Pour in the chicken broth and spread the potatoes in an even layer across the bottom — they’ll form the base that the chicken sits on and absorbs the herb butter drippings throughout the bake.
Step 2 — Make the Herb Butter (3 minutes)
In a small bowl, combine the softened butter, minced garlic, chopped parsley, thyme leaves, Italian seasoning, red pepper flakes if using, and salt. Mash and stir together until fully combined — the mixture should be fragrant, bright green from the herbs, and spreadable without being liquid. Taste a small amount on your finger and adjust the seasoning; this herb butter is doing all the flavor work in the dish, so it should taste confidently seasoned before it goes anywhere near the chicken.
Embedded tip: Softened butter (not melted) is critical here — it stays in place on the surface of the chicken as you apply it and doesn’t immediately run off when the dish goes into the oven. Pull the butter from the refrigerator at least 20 minutes ahead, or soften it quickly in 5-second microwave intervals.
Step 3 — Season and Coat the Chicken (5 minutes)
Pat the chicken breasts completely dry with paper towels — this step removes surface moisture that would otherwise create steam and prevent the golden color you see in the photo. Season each piece on all sides with kosher salt, black pepper, smoked paprika, and onion powder. Then spread a generous portion of the herb butter over the top of each breast, and if your chicken has skin, work some of the butter underneath the skin directly onto the meat using your fingers. Tuck the whole garlic cloves between and around the chicken pieces in the baking dish.
Step 4 — First Bake: Covered (25 minutes)
Cover the baking dish tightly with aluminum foil and place it on the middle rack of the preheated 400°F oven. Bake covered for 25 minutes — during this phase, the steam trapped under the foil creates a self-basting environment that drives heat and herb-butter flavor into the chicken without drying the exterior. At the 25-minute mark, the potatoes should be beginning to soften, the butter will have melted completely into the pan juices, and the whole garlic cloves will smell deeply caramelized.
Step 5 — Second Bake: Uncovered (20 minutes)
Remove the foil carefully — the escaping steam is hot. Baste the chicken pieces with the pan juices using a spoon or basting brush, making sure to coat the tops generously. Return the dish to the oven, uncovered, and bake for another 20 minutes until the chicken surfaces are deeply golden, lightly caramelized, and fragrant. The potatoes at the edges of the dish should be golden and fork-tender. The pan juices will have reduced slightly into a glossy, concentrated herb butter sauce — exactly the bubbling, lacquered result visible in the photo.
Use your instant-read thermometer to check the thickest part of the largest chicken breast. Chicken is safe to eat at a minimum internal temperature of 165°F, per USDA poultry safety guidelines. Bone-in breasts often benefit from going to 170°F, where the meat near the bone is fully cooked and tender without being dry.
Embedded tip: If the top of the chicken is golden before the internal temperature hits 165°F, tent the dish loosely with foil and continue baking — the foil slows additional surface browning while the center finishes cooking through.
Step 6 — Rest and Serve (5 minutes)
Remove the dish from the oven and let the chicken rest, uncovered, for 5 minutes before serving. Scatter the fresh parsley over the top and add a squeeze of lemon juice if using. Serve directly from the baking dish — use the tongs to lift each piece onto plates and spoon the pan juices over everything generously.
Pro Tips for the Best Garlic Herb Butter Chicken
- Always bake in two stages: covered, then uncovered. The covered stage is what keeps the chicken moist by trapping steam and butter vapor around the meat; the uncovered stage is what develops the golden surface color. Skipping the covered stage and baking fully uncovered at 400°F from the start will dry out the chicken long before the potatoes are done.
- Use block butter softened to room temperature, not margarine or spreadable butter from a tub. Spreadable butter products contain water and emulsifiers that cause the herb butter to behave differently in the oven — it splatters, thins too quickly, and doesn’t cling to the chicken surface the way real softened butter does.
- Baste once during the uncovered phase for a glossy finish. At the 35-minute total mark when you remove the foil, spooning the pan juices back over the chicken immediately before the final 20 minutes adds another flavor layer and contributes to the lacquered, glistening surface you see in the photo.
- Rest the chicken before serving — no exceptions. Cutting into a just-baked chicken breast releases the juices immediately. Five minutes of rest allows the muscle proteins to relax and reabsorb the liquid, which means the meat is visibly juicier when you slice into it at the table.
- Add the Parmesan in the last 5 minutes, not before. If you’re using shredded Parmesan as a finish (excellent choice), scatter it over the chicken only in the final 5 minutes of the uncovered bake. Added earlier, Parmesan can over-brown or even burn under 400°F heat before the chicken is done.
Common Mistakes to Avoid
1. Not drying the chicken before applying the herb butter.
Surface moisture creates steam that prevents the skin from browning properly and causes the herb butter to slide off rather than adhere. Pat every surface completely dry before seasoning and buttering.
2. Using cold butter for the herb compound.
Cold butter won’t spread evenly, which means gaps in coverage and uneven flavor across each piece. Always start with butter that’s genuinely room temperature — soft enough to press a finger into easily.
3. Skipping the chicken broth in the base of the pan.
The broth prevents the potatoes from scorching on the bottom of the glass dish before they’re cooked through and gives the butter somewhere to collect and concentrate rather than burning. Don’t skip it, and don’t substitute with water — the broth adds flavor to the pan sauce.
4. Opening the oven during the covered baking phase.
The foil traps steam and heat to cook the chicken through from above and below simultaneously. Opening the oven releases that steam and drops the internal temperature of the dish, extending cook time and disrupting moisture retention. Set a timer and let the oven work.
5. Using a metal baking pan instead of glass.
Metal pans conduct heat more aggressively and unevenly than glass, which can cause the potatoes and pan juices to scorch on the bottom before the chicken is done. Glass distributes heat more gently and lets you see the pan juice level through the sides — a meaningful advantage for monitoring this dish.
6. Not checking internal temperature before serving.
The golden surface of a baked chicken breast can look done long before the center reaches 165°F, especially with bone-in pieces where the bone slows heat transfer. Always verify with a thermometer inserted into the thickest part away from the bone.
7. Overcrowding the baking dish.
Chicken pieces that touch or overlap during baking trap steam between them and prevent proper browning on the sides. Each piece should have at least ½ inch of clearance around it; use a larger dish or two dishes if needed.
8. Pouring off the pan juices before serving.
The liquid at the bottom of the dish after baking is the sauce — garlic-infused, herb-flavored, butter-enriched chicken drippings. Spoon it generously over every plate rather than discarding it. It’s arguably the best part of the dish.
Variations
Healthy Version
Use boneless, skinless chicken breasts and replace 2 tablespoons of the butter with extra-virgin olive oil in the herb compound — olive oil creates a lighter coating that still browns well and carries the herb flavors effectively. Skip the Parmesan garnish and finish with extra fresh lemon juice instead for brightness without added fat. Reduce baking time by 10–12 minutes and check internal temperature at the 30-minute mark.
Vegetarian Version
Replace the chicken with two large heads of cauliflower cut into thick 1-inch steaks. Apply the herb butter compound generously to both sides of each steak and bake them in the same glass dish at 400°F — covered for 20 minutes, uncovered for 15–18 minutes — until deeply golden and fork-tender. Use vegetable broth in place of chicken broth. The herb butter caramelizes beautifully on cauliflower and produces a genuinely impressive result.
Spicy Version
Add ½ teaspoon of cayenne pepper and 1 teaspoon of crushed red pepper flakes directly into the herb butter compound. A thin drizzle of hot honey over the chicken during the last 3 minutes of the uncovered bake creates a sweet-heat glaze that caramelizes against the herb butter — the contrast with the buttery pan sauce is genuinely excellent.
Gluten-Free Version
This recipe is naturally gluten-free as written. Confirm that your chicken broth is labeled gluten-free (most are, but some brands use additives that contain gluten), and verify that any shredded Parmesan you use doesn’t carry a gluten cross-contamination warning. No other modifications are needed.
Low-Carb / Keto Version
Swap the baby potatoes for large cauliflower florets, halved Brussels sprouts, or a combination of both — they absorb the herb butter pan drippings beautifully and become tender in roughly the same baking window as potatoes. The herb butter compound and chicken are both already keto-compatible. Check the vegetables for fork-tenderness at the 35-minute total mark since some cruciferous vegetables soften faster than potatoes.
What to Serve With This Recipe
- Crusty bread or garlic dinner rolls — essential for soaking up the herb butter pan juices; don’t let a drop of that sauce go to waste.
- Simple arugula salad with lemon vinaigrette — the peppery bitterness and acidity cut through the richness of the butter sauce and balance the plate.
- Steamed or roasted asparagus — a clean, elegant side that pairs naturally with the garlic and herb flavors without competing with the pan sauce.
- Buttered egg noodles or white rice — for a heartier, more filling plate; spoon the herb butter pan drippings directly over the noodles for a built-in sauce. Take a look at Best Garlic Herb Roasted Chicken — Easy 1-Pan Dinner for a simple 20-minute side.
- Roasted broccolini — slightly bitter and caramelized; pairs beautifully with the buttery, herb-forward chicken without overwhelming it.
- A dry white wine — Chardonnay or Pinot Grigio are natural companions to baked garlic herb chicken; the wine’s acidity brightens the rich, buttery flavors.
- Cucumber and tomato salad — cool, crisp, and refreshing; a simple palate-cleanser between bites of rich herb butter chicken.
Storage Instructions
Refrigerator
Allow the chicken and potatoes to cool to room temperature before transferring to an airtight container. Store the pan juices separately in a small jar — they congeal when cold but re-liquefy when warmed and make an excellent reheating sauce. Everything keeps in the refrigerator for up to 4 days.
Freezer
Baked chicken breasts freeze well for up to 3 months. Wrap individual pieces tightly in plastic wrap and then in foil before placing in a freezer-safe bag. The potatoes freeze acceptably but tend to become slightly grainy after thawing — consume them within the refrigerator window for the best texture. Freeze the pan juices separately in a small freezer-safe container for up to 2 months.
Shelf Life Summary
| Component | Refrigerator | Freezer |
|---|---|---|
| Baked chicken | Up to 4 days | Up to 3 months |
| Roasted potatoes | Up to 4 days | Not recommended |
| Herb butter pan juices | Up to 4 days | Up to 2 months |
Reheating Instructions
Oven (Best Method)
Preheat to 325°F. Place the chicken in an oven-safe dish, spoon a few tablespoons of the reserved pan juices or fresh chicken broth over the top, and cover tightly with foil. Bake for 15–18 minutes until warmed through and the internal temperature reaches 165°F. The low temperature and added liquid prevent the chicken from drying out during reheating.
Microwave (Fastest Option)
Place a single serving in a microwave-safe dish with 1–2 tablespoons of the reserved pan juices or broth drizzled over the chicken. Cover loosely with a damp paper towel and heat in 60-second intervals at 70% power for 2–3 minutes until steaming hot. Per FDA food safety guidance, all reheated poultry should reach an internal temperature of 165°F before eating.
Stovetop
Place the chicken in a skillet over medium-low heat with a splash of chicken broth or reserved pan juices. Cover with a lid and heat for 8–10 minutes, turning once at the halfway mark. This method works particularly well for sliced leftover chicken — the low, covered heat warms the meat gently without toughening it.
Nutrition Facts
Per serving (approximately ¼ of recipe, including one chicken breast and a portion of potatoes)
| Nutrient | Amount |
|---|---|
| Calories | ~520 kcal |
| Total Fat | 28g |
| Saturated Fat | 12g |
| Cholesterol | 165mg |
| Sodium | 620mg |
| Total Carbohydrates | 20g |
| Dietary Fiber | 2g |
| Sugars | 1g |
| Protein | 46g |
Disclaimer: Nutrition values are estimates calculated using standard ingredient databases and will vary depending on the specific size and cut of chicken used, the exact amount of butter applied, and any ingredient substitutions made. These figures are provided for general informational purposes only and are not a substitute for personalized guidance from a registered dietitian or healthcare professional.
Frequently Asked Questions
1. Can I use boneless, skinless chicken breasts instead of bone-in for this garlic herb butter chicken?
Yes — boneless, skinless breasts work well and are slightly more convenient to serve. Reduce the total bake time to approximately 30–35 minutes (15 covered, 15–20 uncovered) and begin checking internal temperature at the 28-minute mark. Boneless breasts are thinner and cook faster; overbaking them is the most common mistake.
2. Can I prepare the herb butter ahead of time?
Absolutely — the herb butter can be made up to 3 days in advance and stored in a small airtight container in the refrigerator. It can also be rolled into a log in plastic wrap and frozen for up to 2 months. Just allow it to soften at room temperature for 20 minutes before applying it to the chicken.
3. Why does the recipe use a glass baking dish rather than a metal pan?
Glass distributes heat more gently and evenly than metal, which is particularly important when baking in butter — metal pans can cause the butter and pan juices to scorch on the bottom before the chicken is done. Glass also allows you to monitor the pan juice level through the sides without opening the oven.
4. My chicken surface browned too fast before the inside reached 165°F — what should I do?
Tent the dish loosely with a piece of foil and continue baking. The foil deflects direct oven heat from the surface while allowing the ambient oven temperature to continue cooking the interior. This situation is common with larger bone-in breasts; adding 5–8 minutes under loose foil usually resolves it.
5. Do the whole garlic cloves in the pan actually add much flavor?
Significantly. Whole garlic cloves that roast in butter and chicken drippings for 45 minutes become sweet, nutty, and spreadable — nothing like raw minced garlic. They absorb and mellow as they cook, and you can squeeze or spread them over the chicken or potatoes at serving for a concentrated hit of roasted garlic flavor.
6. Can I make this garlic herb butter chicken in a slow cooker?
You can, but the result will be fundamentally different — the slow cooker creates a steamy, braised environment rather than a baked one, so the chicken surface will be soft rather than golden. If you go this route, cook on LOW for 4–5 hours or HIGH for 2.5–3 hours, and accept that the texture and appearance will differ significantly from the baked version in the photo.
7. How do I know when the potatoes are fully cooked without checking every few minutes?
At the end of the total bake time (45 minutes), pierce the largest potato half with a thin knife — it should slide in with no resistance. If there’s any firmness in the center, return the dish uncovered for an additional 5–8 minutes. Halving the potatoes before baking ensures they cook through in the same window as the chicken.
8. Can I add other vegetables to the baking dish?
Yes — thick-cut zucchini, halved cherry tomatoes, or sliced bell peppers can all be added. Add heartier vegetables like carrots or parsnips at the start with the potatoes; add quicker-cooking vegetables like cherry tomatoes and zucchini in the last 15 minutes of baking so they don’t become mushy.
9. What’s the best way to apply herb butter under the skin?
Use your fingers to gently separate the skin from the meat without tearing it — start at the thick end of the breast and work your hand inward. Push a generous tablespoon of the herb butter directly onto the meat under the skin and press the skin back down. The butter under the skin bastes the meat from the inside during baking and keeps the breast moist even as the exterior browns.
10. Can I make this recipe dairy-free?
Yes — replace the butter with a high-quality dairy-free butter alternative (such as Miyoko’s or Country Crock Plant Butter). These products behave very similarly to real butter in the oven and carry the herb flavors effectively. Skip the Parmesan garnish or use a dairy-free Parmesan alternative. Everything else in the recipe is naturally dairy-free.
11. Should I cover or uncover the dish the entire time if I’m making it for the first time?
Follow the two-stage method exactly as written: covered for 25 minutes, then uncovered for 20 minutes. The covered stage is what keeps the chicken from drying out; the uncovered stage is what creates the golden, caramelized surface. Doing either stage alone for the full 45 minutes will give you suboptimal results — either pale, steamed chicken or dry, over-browned chicken.
12. Can I use this herb butter on other proteins?
The herb butter compound is extremely versatile. It works beautifully on salmon fillets (bake at 400°F for 12–15 minutes), pork tenderloin (bake at 425°F for 20–25 minutes), or thick-cut cod. For another easy herb butter dinner idea, check out Best Garlic Herb Roasted Chicken — Easy 1-Pan Dinner.
Expert Chef Tips
1. Make more herb butter than you need and freeze the rest.
A double batch of the herb butter compound (rolled into a log in plastic wrap and frozen) means the next time you want garlic herb butter chicken, the hardest part of the recipe is already done. Slice off rounds directly from the frozen log and lay them over the chicken before baking — they melt perfectly into the dish.
2. Add the lemon juice at the end, not during baking.
Lemon juice added to the dish before it goes in the oven can cause the butter to break and produce a slightly grainy pan sauce. A fresh squeeze of lemon over the finished dish right before serving brightens everything without affecting the sauce texture — and the hit of acid makes the herb butter flavor pop in a way that baking-in lemon doesn’t.
3. Use a rimmed baking dish with at least 2-inch sides.
The pan juices and butter generate significant bubbling during the covered bake — a shallow baking dish risks overflow and smoking oven messes. The glass dish in the photo has deep enough sides to contain the bubbling comfortably; a 9×13 with 2-inch sides is the minimum to work with safely.
4. Baste a second time right after the foil comes off.
The immediate baste when you remove the foil at the 25-minute mark is visible in the recipe steps — but a second baste at the 35-minute mark (10 minutes before the end) adds a final layer of glossy, concentrated pan juice flavor to the surface that makes the finished chicken look and taste genuinely luxurious.
5. Rest the dish on a wire rack, not directly on a cold surface.
A hot glass baking dish placed directly on a cold granite or marble countertop can crack due to thermal shock. Set the dish on a wire cooling rack, a folded kitchen towel, or wooden trivet during the rest period. For another elegant but approachable baked chicken dinner, take a look at Best Creamy Garlic Meatballs — Easy 45-Minute Bake.
Recipe Summary
This garlic herb butter chicken delivers restaurant-quality results from a single glass baking dish using a reliable two-stage baking method: covered at 400°F for 25 minutes to lock in moisture, then uncovered for 20 minutes to develop the golden, herb-butter-lacquered surface visible in the photo. A compound of softened butter, minced garlic, fresh parsley, and thyme does all the flavor work — coating the chicken before baking and melting into the pan juices to create a built-in sauce that bastes both the chicken and potatoes continuously throughout the cook. With 15 minutes of prep and one pan to clean, it’s the kind of dinner that earns a permanent place in your weekly rotation.
Conclusion
Every cook needs a few recipes that look impressive without requiring impressive effort — and this garlic herb butter chicken is one of the best of them. The herb butter does the heavy lifting, the oven handles the timing, and what comes out of that glass dish is golden, juicy, and fragrant enough to make the whole kitchen smell like a dinner worth sitting down for. Make it once and it’ll quickly become one of those meals you can pull together on a weeknight without even checking the recipe. Serve it straight from the dish, spoon those incredible pan juices over everything, and enjoy every single bite.
Best Garlic Herb Butter Chicken — Easy 1-Pan Bake
Description
If a chicken dinner could be simultaneously effortless and genuinely impressive, this garlic herb butter chicken is exactly that. Large chicken pieces bake in a glass dish surrounded by buttery, herb-infused pan juices, roasted garlic cloves, and potatoes that absorb every drop of that fragrant, golden liquid as they cook. The result looks like something you'd order at a sit-down restaurant — and it takes about 15 minutes of hands-on effort to pull off.
Ingredients
Instructions
-
How to Bake Garlic Herb Butter Chicken Perfectly Every Time
-
Step 1 — Preheat the Oven and Prep the Potatoes (5 minutes)
-
Preheat your oven to 400°F — a complete preheat is essential for baking chicken correctly. A partially preheated oven starts the chicken in unstable, fluctuating heat, which affects both cook time and moisture retention. While the oven heats, toss the halved baby potatoes with olive oil, garlic powder, salt, and pepper in the baking dish. Pour in the chicken broth and spread the potatoes in an even layer across the bottom — they'll form the base that the chicken sits on and absorbs the herb butter drippings throughout the bake.
-
Step 2 — Make the Herb Butter (3 minutes)
-
In a small bowl, combine the softened butter, minced garlic, chopped parsley, thyme leaves, Italian seasoning, red pepper flakes if using, and salt. Mash and stir together until fully combined — the mixture should be fragrant, bright green from the herbs, and spreadable without being liquid. Taste a small amount on your finger and adjust the seasoning; this herb butter is doing all the flavor work in the dish, so it should taste confidently seasoned before it goes anywhere near the chicken.
-
Embedded tip: Softened butter (not melted) is critical here — it stays in place on the surface of the chicken as you apply it and doesn't immediately run off when the dish goes into the oven. Pull the butter from the refrigerator at least 20 minutes ahead, or soften it quickly in 5-second microwave intervals.
-
Step 3 — Season and Coat the Chicken (5 minutes)
-
Pat the chicken breasts completely dry with paper towels — this step removes surface moisture that would otherwise create steam and prevent the golden color you see in the photo. Season each piece on all sides with kosher salt, black pepper, smoked paprika, and onion powder. Then spread a generous portion of the herb butter over the top of each breast, and if your chicken has skin, work some of the butter underneath the skin directly onto the meat using your fingers. Tuck the whole garlic cloves between and around the chicken pieces in the baking dish.
-
Step 4 — First Bake: Covered (25 minutes)
-
Cover the baking dish tightly with aluminum foil and place it on the middle rack of the preheated 400°F oven. Bake covered for 25 minutes — during this phase, the steam trapped under the foil creates a self-basting environment that drives heat and herb-butter flavor into the chicken without drying the exterior. At the 25-minute mark, the potatoes should be beginning to soften, the butter will have melted completely into the pan juices, and the whole garlic cloves will smell deeply caramelized.
-
Step 5 — Second Bake: Uncovered (20 minutes)
-
Remove the foil carefully — the escaping steam is hot. Baste the chicken pieces with the pan juices using a spoon or basting brush, making sure to coat the tops generously. Return the dish to the oven, uncovered, and bake for another 20 minutes until the chicken surfaces are deeply golden, lightly caramelized, and fragrant. The potatoes at the edges of the dish should be golden and fork-tender. The pan juices will have reduced slightly into a glossy, concentrated herb butter sauce — exactly the bubbling, lacquered result visible in the photo.
-
Use your instant-read thermometer to check the thickest part of the largest chicken breast. Chicken is safe to eat at a minimum internal temperature of 165°F, per USDA poultry safety guidelines. Bone-in breasts often benefit from going to 170°F, where the meat near the bone is fully cooked and tender without being dry.
-
Embedded tip: If the top of the chicken is golden before the internal temperature hits 165°F, tent the dish loosely with foil and continue baking — the foil slows additional surface browning while the center finishes cooking through.
-
Step 6 — Rest and Serve (5 minutes)
-
Remove the dish from the oven and let the chicken rest, uncovered, for 5 minutes before serving. Scatter the fresh parsley over the top and add a squeeze of lemon juice if using. Serve directly from the baking dish — use the tongs to lift each piece onto plates and spoon the pan juices over everything generously.
Nutrition Facts
Servings 4
- Amount Per Serving
- Calories 520kcal
- % Daily Value *
- Total Fat 28g44%
- Saturated Fat 12g60%
- Protein 46g92%
* Percent Daily Values are based on a 2,000 calorie diet. Your daily value may be higher or lower depending on your calorie needs.