Rosemary Garlic Artisan Bread — Easy 4-Ingredient No-Knead Loaf


The Rosemary Garlic Artisan Bread That Proves Anyone Can Bake
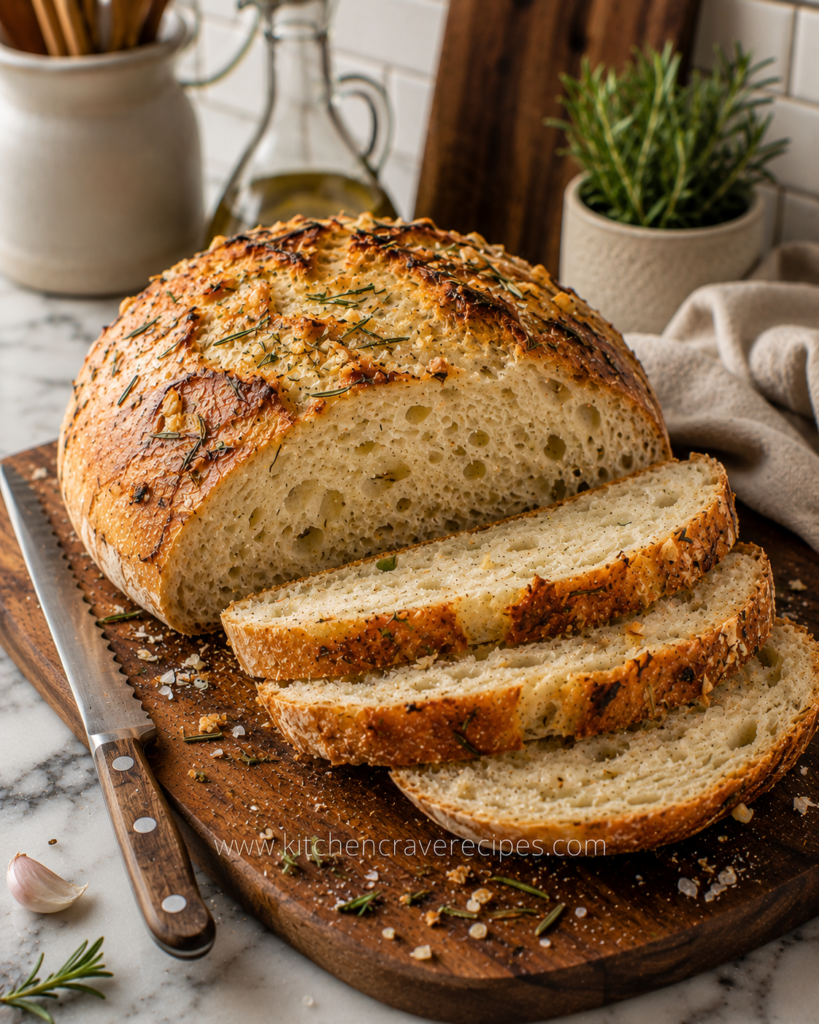
There is something quietly thrilling about pulling a round, golden loaf from the oven — especially when it took almost no hands-on effort to get there. This rosemary garlic artisan bread delivers a shatteringly crisp crust, an open, chewy crumb, and a deeply savory herb-and-garlic aroma that fills the entire kitchen. The photo tells the whole story: a domed, rustic loaf with dark golden patches, visible rosemary sprig fragments embedded in the crust, and a soft interior full of irregular air pockets — exactly what a proper no-knead loaf should look like.
Four ingredients. Zero kneading. One Dutch oven. That is genuinely the whole process. A long, slow overnight rise does all the work that kneading would normally do, developing both flavor and structure while you sleep. Whether this is your first homemade loaf or your fiftieth, this recipe is the one you will reach for every time.
Recipe Quick Info
| Detail | Info |
|---|---|
| Prep Time | 10 minutes (plus 12–18 hours rise time) |
| Cook Time | 45 minutes |
| Total Time | About 13–19 hours (mostly hands-off rising) |
| Servings | 1 loaf (12 slices) |
| Cuisine | American / Rustic European |
| Course | Bread / Side |
| Calories | ~165 kcal per slice |
| Difficulty | Easy |
Why You’ll Love This Rosemary Garlic Artisan Bread
- No kneading, no stand mixer, no special skills required. The dough comes together with a spoon in one bowl, and time does everything else — including building the complex flavor and open crumb.
- Only 4 main ingredients. Flour, water, yeast, and salt — plus the rosemary and garlic that transform a plain loaf into something genuinely craveable.
- The crust is extraordinary. Baking in a covered Dutch oven traps steam in the critical early minutes, producing a crackling, deeply golden crust that rivals anything from a professional bakery.
- The flavor actually improves with a longer rise. A 12-hour rise is good; an 18-hour rise develops complex, lightly tangy notes that make every slice taste like it came from somewhere very deliberate.
- It freezes beautifully. Slice the cooled loaf and freeze individual pieces — you will always have artisan bread on hand without starting a new batch every time.
- Completely adaptable. Swap in whole-wheat flour for part of the white, add olives or sun-dried tomatoes, or adjust the garlic quantity up or down based on preference.
- Impressive enough for a dinner party, easy enough for a Tuesday. This bread looks like it required a professional baker, and it requires exactly 10 minutes of your actual attention.
Ingredients
For the Dough
- 3 cups (360g) all-purpose flour, plus more for dusting
- 1½ teaspoons kosher salt
- ½ teaspoon instant yeast (or active dry yeast — see note)
- 1½ cups (355ml) warm water (about 105–110°F)
For the Rosemary Garlic Flavoring
- 2 tablespoons fresh rosemary, roughly chopped (plus a few whole sprigs for the top)
- 4 cloves garlic, minced (about 1½ tablespoons)
- 1 tablespoon olive oil (drizzled over the dough before the second rise)
- ½ teaspoon flaky sea salt (for the crust — visible in the finished photo)
Optional Add-Ins
- ¼ cup pitted kalamata olives, roughly chopped
- 2 tablespoons sun-dried tomatoes, finely chopped
- ¼ cup freshly grated parmesan, folded into the dough
- 1 teaspoon lemon zest (brightens the herb flavor noticeably)
Substitutions
| Original Ingredient | Substitution | Notes |
|---|---|---|
| All-purpose flour | Bread flour | Higher protein = slightly chewier crumb and better rise |
| All-purpose flour (up to 1 cup) | Whole-wheat flour | Replace up to ⅓ of the flour; add 1–2 tablespoons extra water |
| Instant yeast | Active dry yeast | Use the same amount; dissolve in the warm water for 5 minutes first |
| Fresh rosemary | Dried rosemary | Use 1 teaspoon dried; rehydrate in the olive oil for 5 minutes first |
| Fresh garlic | ¾ teaspoon garlic powder | Milder flavor; mix directly into the dry ingredients |
| Kosher salt | Fine sea salt | Use 1¼ teaspoons (fine salt is denser than kosher) |
| Flaky sea salt topping | Everything Bagel seasoning | Adds sesame, poppy seed, and onion flavor to the crust |
Kitchen Tools Needed
- Large mixing bowl (at least 4-quart capacity)
- Wooden spoon or stiff silicone spatula
- Plastic wrap or a tight-fitting lid
- Dutch oven (5–6 quart cast iron — this is non-negotiable for the crust)
- Parchment paper
- Bench scraper (optional but helpful for shaping)
- Instant-read thermometer (to check water temperature and baked loaf doneness)
- Sharp serrated knife or bread lame (for scoring)
- Wire cooling rack
- Kitchen scale (recommended for accuracy over volume measurements)
Step-by-Step Instructions
Step 1: Mix the Dough (10 minutes)
Combine the flour, salt, and instant yeast in a large bowl and whisk briefly to distribute. Add the minced garlic and chopped rosemary, then pour in the warm water. Stir with a wooden spoon until a rough, shaggy dough forms — it will look messy and uneven, and that is completely correct. There should be no dry flour left at the bottom of the bowl.
Embedded tip: Water temperature matters more than most bakers realize. Too hot (above 120°F) kills the yeast before it can do anything; too cold slows or prevents the rise dramatically. Use an instant-read thermometer and target 105–110°F — it should feel comfortably warm on your wrist, not hot.
Step 2: The Long Rise (12–18 hours)
Cover the bowl tightly with plastic wrap or a lid. Leave it at room temperature (ideally 68–72°F) for 12 to 18 hours. By the time the rise is complete, the dough will have roughly doubled in size, and the surface will be covered in bubbles. Those bubbles are carbon dioxide from the yeast, and they are the key to the open, irregular crumb visible in a properly made rosemary garlic artisan bread.
Longer is generally better here. A 12-hour rise produces a good loaf; an 18-hour rise produces a noticeably more flavorful one, with a slightly more complex, mild tanginess that develops as the dough ferments slowly.
Step 3: Shape the Dough (5 minutes)
Generously flour a clean work surface. Turn the risen dough out onto it — do not punch it down aggressively, as you want to keep as many of those air bubbles intact as possible. Using lightly floured hands or a bench scraper, gently fold the edges of the dough toward the center two or three times, then flip it so the seam side is down. Cup your hands around the back of the dough and drag it gently toward you on the surface to build surface tension and form a round shape.
Embedded tip: The dough will be sticky — this is normal and actually a sign of proper hydration. Resist the urge to add excessive flour during shaping. A light dusting on the surface is enough; too much extra flour will tighten the crumb and dry out the final loaf.
Step 4: Second Rise (1–2 hours)
Cut a piece of parchment paper large enough to line the inside of your Dutch oven with some overhang. Place the shaped dough seam-side down on the parchment. Drizzle the olive oil lightly over the top of the dough and scatter the whole rosemary sprigs and a pinch of flaky sea salt across the surface — these are what create the herb-studded, golden crust visible in the finished loaf. Cover loosely with a clean kitchen towel and let the dough rest for 1–2 hours until noticeably puffed.
Step 5: Preheat the Dutch Oven (30 minutes)
Place your Dutch oven (with its lid) in the oven and preheat to 450°F. The Dutch oven must preheat for a full 30 minutes — it needs to be screaming hot when the dough goes in. This sudden blast of heat from all sides is what creates the initial oven spring that gives the loaf its dramatic dome. According to King Arthur Baking’s bread science guide, a preheated vessel produces significantly better crust and rise than a cold one.
Step 6: Score and Bake (45 minutes)
Carefully remove the Dutch oven from the oven using heavy oven mitts — it is extremely hot. Using the parchment paper as a sling, lower the dough into the Dutch oven. Use a sharp serrated knife or bread lame to score the top of the dough with one confident slash about ½ inch deep — this controls where the loaf expands and prevents it from splitting unpredictably at the sides.
Cover with the lid and bake at 450°F for 30 minutes. Remove the lid and continue baking for 12–15 minutes until the crust is deep amber-brown. The internal temperature of a fully baked loaf should reach 195–210°F — use an instant-read thermometer inserted into the bottom of the loaf. This range ensures the crumb is fully set without being gummy at the center.
Step 7: Cool Before Slicing (1 hour minimum)
Transfer the finished loaf to a wire rack and let it cool for at least 1 hour before slicing. Cutting into hot bread disrupts the steam still finishing the interior — the crumb will be gummy and compressed rather than the open, springy texture it becomes as it cools. The cooling time is part of the baking process, not optional.
Pro Tips
- Weigh your flour instead of measuring by cup. Spooning flour into a measuring cup compacts it — a loosely measured cup of flour weighs around 120g, but a packed cup can reach 150g or more. That extra flour produces a dry, dense loaf. A kitchen scale eliminates this variable entirely.
- Score confidently, not tentatively. A shallow, hesitant score tears rather than cuts. Hold the blade at a 30-degree angle and draw it across the dough in one smooth, deliberate motion — depth matters less than decisiveness.
- If your kitchen is cold, rise in the oven. Turn the oven light on (do not turn on any heat) and leave the covered bowl inside overnight. The residual warmth from the light creates a consistently warm 70–75°F environment that reliably activates the yeast.
- Use the parchment sling every time. Dropping raw, sticky dough directly into a 450°F Dutch oven without a parchment sling is how burns happen. The sling also makes removing the finished loaf effortless.
- Cool completely on a wire rack, not a solid surface. Steam trapped under a loaf sitting on a plate or solid board softens the bottom crust. A wire rack keeps air circulating on all sides.
Common Mistakes to Avoid
1. Using water that is too hot.
Water above 120°F kills yeast cells, and the dough will simply never rise. Always measure water temperature with a thermometer rather than guessing.
2. Not letting the dough rise long enough.
A dough that has only risen for 6–8 hours in a cool kitchen will not have developed enough gluten structure or flavor. Aim for at least 12 hours, and closer to 18 if your kitchen runs below 68°F.
3. Skipping the Dutch oven preheat.
A cold or lukewarm Dutch oven cannot generate the steam necessary for crust development. Preheat it for a full 30 minutes at 450°F — there are no shortcuts here.
4. Over-flouring during shaping.
It is tempting to add flour until the dough stops sticking to your hands, but excess flour incorporated during shaping makes the final crumb dense and dry. Lightly floured hands and a bench scraper are the correct tools.
5. Cutting into the bread too soon.
Slicing a loaf that is still hot releases steam that has not finished setting the crumb structure. The interior will look and feel gummy even though the bread is technically done. Wait the full hour.
6. Under-scoring the loaf.
A score that is too shallow closes up as the dough expands in the oven and the loaf splits at the side instead of the top. Score at least ½ inch deep in one confident motion.
7. Skipping the second rise after shaping.
Going straight from shaping to the oven produces a tighter, less open crumb with minimal oven spring. The 1–2 hour second rise after shaping allows the gluten to relax and the loaf to puff before hitting the heat.
Variations
Whole-Wheat Version — Heartier and Nuttier
Replace 1 cup of the all-purpose flour with an equal amount of whole-wheat flour. Add 2 extra tablespoons of warm water to compensate for the added absorption of whole-wheat flour. The crumb will be slightly tighter than an all-white loaf, but the flavor is notably richer and earthier — a genuinely different bread, not just a healthier version.
Olive and Sun-Dried Tomato — Fully Loaded Rustic Loaf
Fold ¼ cup of roughly chopped pitted kalamata olives and 2 tablespoons of finely chopped oil-packed sun-dried tomatoes into the dough during the initial mix. Both ingredients are packed with salt and oil, so reduce the kosher salt in the dough to 1 teaspoon and skip the olive oil drizzle before the second rise. This version pairs especially well with sharp cheeses and cured meats.
Spicy Calabrian Chili and Rosemary
Add 1 tablespoon of Calabrian chili paste (or ½ teaspoon of crushed red pepper flakes) to the dough during the initial mix alongside the rosemary and garlic. The heat is subtle in the finished loaf — warm rather than sharp — and it pairs particularly well with creamy ricotta or whipped butter.
Gluten-Free Adaptation
Use a 1:1 gluten-free all-purpose flour blend (Bob’s Red Mill or King Arthur brands both work reliably). Add ½ teaspoon of xanthan gum if your blend does not already include it. The dough will be more batter-like than traditional bread dough — do not try to shape it by hand. Instead, pour it directly into a parchment-lined Dutch oven and bake as directed. The crumb will be slightly denser but the crust behavior remains similar.
Herb-Swapped — Thyme and Lemon Zest
Replace the rosemary with 1½ tablespoons of fresh thyme leaves and add 1 teaspoon of lemon zest to the dough. Thyme is softer and more floral than rosemary, and the lemon zest brightens the entire flavor profile significantly. This version works especially well alongside fish dishes and light summer soups where rosemary might feel too heavy.
What to Serve With This Recipe
- Whipped herbed butter or compound butter — a swipe of softened butter mixed with a little garlic and sea salt is the simplest and best accompaniment for a fresh-from-the-oven slice.
- Creamy tomato soup — this bread was built for dunking. The crust holds up without turning immediately soggy. Try Garlic Parmesan Chicken Zucchini Bake — Easy 45-Minute Dinner for a pairing that genuinely belongs together.
- Extra-virgin olive oil and balsamic for dipping — pour both into a small dish and let people tear and dip at the table.
- A sharp cheese board — aged cheddar, manchego, or a creamy brie all complement the rosemary and garlic notes in the bread without competing with them.
- Pasta dishes with olive oil or cream-based sauces — the bread is substantial enough to serve as a real side rather than just a table filler.
- Soup or stew of any kind — the open, airy crumb soaks up broth beautifully. See Garlic Parmesan Chicken Zucchini Bake — Easy 45-Minute Dinner for a match that feels intentional.
- Soft scrambled eggs and roasted vegetables — this bread makes an outstanding savory breakfast platform, especially toasted and drizzled with good olive oil.
Storage Instructions
Room Temperature
Store the fully cooled loaf wrapped loosely in a clean kitchen towel or placed cut-side down on a wooden cutting board. Avoid airtight plastic bags for whole-day storage — they trap moisture and soften the crust that took 45 minutes to develop. The bread stays fresh at room temperature for 2 days.
Refrigerator
Refrigerating bread is generally not recommended — the cool temperature accelerates starch retrogradation and makes the crumb go stale faster than room-temperature storage does. If you must refrigerate (for food safety reasons involving add-ins like cheese), wrap tightly in foil and consume within 3 days.
Freezer
Slice the fully cooled loaf before freezing for maximum convenience. Wrap individual slices in plastic wrap, then place them in a freezer-safe zip-top bag with the air pressed out. Frozen slices keep well for up to 3 months and go directly from freezer to toaster with no thawing required.
Shelf Life Summary
| Storage Method | Duration | Notes |
|---|---|---|
| Room temperature | Up to 2 days | Wrapped in a kitchen towel; avoid plastic for the crust |
| Refrigerator | Up to 3 days | Only if add-ins require it; crust softens |
| Freezer | Up to 3 months | Slice before freezing; reheat directly from frozen |
Reheating Instructions
Oven (Best Method — Restores the Crust)
Preheat the oven to 375°F. Place the room-temperature or thawed slice directly on the oven rack or a baking sheet. Heat for 8–10 minutes until the crust re-crisps and the interior is warm throughout. This method comes closest to the texture of the bread on baking day and is strongly preferred over any other method.
Microwave (Fastest — Softer Texture)
Wrap a single slice in a damp paper towel and microwave on high for 20–25 seconds. The steam from the paper towel keeps the crumb soft and moist, but the crust will be soft rather than crisp. Acceptable for a quick breakfast slice; not ideal for serving to guests.
Toaster or Toaster Oven
Place a slice in the toaster or toaster oven on a medium setting. The direct radiant heat re-crisps the crust surfaces while warming the center, producing an excellent texture — arguably better than the oven method for individual slices. Frozen slices toast directly from frozen on a slightly higher setting.
For general food storage and safe reheating guidance, the USDA Food Safety and Inspection Service is a reliable reference for any questions about temperature and timing.
Nutrition Facts
Per serving (1 slice, approximately 1/12 of the loaf), estimated values:
| Nutrient | Amount |
|---|---|
| Calories | ~165 kcal |
| Total Fat | 2g |
| Saturated Fat | 0.3g |
| Cholesterol | 0mg |
| Sodium | 290mg |
| Total Carbohydrates | 32g |
| Dietary Fiber | 1g |
| Total Sugars | 0g |
| Protein | 5g |
| Iron | 2mg |
| Calcium | 10mg |
Nutrition Disclaimer: All values are estimates calculated using standard ingredient databases and will vary based on flour brand, exact measurements, add-ins used, and slice thickness. These figures are provided for general reference only and are not a substitute for professional nutritional guidance. If you have specific dietary needs, input your exact ingredients into a verified nutrition calculator.
Frequently Asked Questions
1. Can I make rosemary garlic artisan bread without a Dutch oven?
A Dutch oven is strongly recommended because the trapped steam during the covered bake phase is what produces the crackling crust. Without one, place a metal pan of boiling water on the lower oven rack to create steam and bake the dough in a covered oven-safe pot or on a preheated baking stone for the best available alternative.
2. Why didn’t my dough rise?
The most likely cause is inactive yeast — either killed by water that was too hot, or too old to be effective. Check the expiration date on your yeast and verify that your water was between 105–110°F. A simple test: dissolve ½ teaspoon of yeast in ¼ cup of warm water with a pinch of sugar — if it does not foam within 10 minutes, the yeast needs to be replaced.
3. Can I use active dry yeast instead of instant yeast?
Yes, and in the same quantity. The only difference is that active dry yeast benefits from being dissolved in the warm water for 5 minutes before combining with the flour — this activates it slightly faster than simply mixing it dry into the other ingredients.
4. How long should the overnight rise actually be?
Anywhere from 12 to 18 hours at room temperature (68–72°F) produces excellent results. A 12-hour rise makes a good loaf; 18 hours develops more complex flavor and a slightly more open crumb. If your kitchen is warmer than 72°F, check the dough at the 10-hour mark — it may be ready sooner.
5. My loaf came out dense with no open crumb. What went wrong?
Dense crumb usually comes from one of three things: too much flour added during mixing or shaping, under-risen dough that was baked too soon, or a Dutch oven that was not preheated long enough. Weigh your flour, give the dough the full 12–18 hours, and preheat the Dutch oven for a full 30 minutes.
6. Can I make this rosemary garlic artisan bread same-day instead of overnight?
Yes, with adjustments. Increase the instant yeast to 1 teaspoon and rise the dough in a warm spot (80–85°F) for 3–4 hours, or until doubled. The flavor will be noticeably less complex than the overnight version, but the technique and crust will be the same.
7. What internal temperature should finished bread reach?
A fully baked artisan loaf should register between 195°F and 210°F at the center. Below 195°F, the crumb is likely still gummy; above 210°F, the loaf can begin to dry out. An instant-read thermometer inserted into the bottom of the loaf gives the most accurate reading.
8. Can I double this recipe?
Yes, but bake two separate loaves rather than one double-sized one — a single Dutch oven cannot properly bake a loaf twice the weight. Make both doughs simultaneously in separate bowls, let them rise together, and bake them back to back.
9. Why do I need to score the bread?
Scoring controls where the bread expands during baking. An unscored loaf will find its own weak point and tear there unpredictably — usually on the side rather than the top, producing an uneven shape. A confident score directs that expansion intentionally, creating the ear (the curled flap of crust) visible on well-made artisan loaves.
10. Can I add cheese to this dough?
Freshly grated parmesan or gruyère fold in beautifully during the initial mix. Use about ¼ cup and reduce the salt in the dough slightly, since aged cheeses contribute significant salt. Cheese bread benefits from the longer 18-hour rise, which develops flavor that counterbalances the dairy richness.
Expert Chef Tips
1. Autolyse before adding the garlic and rosemary.
Mix only the flour and water together and let the mixture sit for 20 minutes before adding the yeast, salt, garlic, and rosemary. This autolyse period allows the flour to fully hydrate and begins gluten development before fermentation even starts — producing a more extensible dough and a more open crumb in the finished loaf with no additional effort.
2. Use the cold-retard method for maximum flavor.
After the initial 12-hour room-temperature rise, cover the bowl and transfer it to the refrigerator for another 12–24 hours before shaping. Cold fermentation slows the yeast dramatically and extends flavor development in a way that room-temperature fermentation alone cannot replicate. Pull the dough out, shape it cold, and allow the full 2-hour second rise before baking.
3. Score at a low angle, not straight down.
Most home bakers score vertically, which produces a basic split. Hold your blade at a 30–45 degree angle to the surface of the dough and score in one decisive motion. This angle creates the classic baker’s ear — the dramatic curled flap of caramelized crust that is the hallmark of well-made artisan bread.
4. Brush the crust with olive oil immediately after baking.
The moment the loaf comes out of the Dutch oven, brush the hot top crust with a small amount of good olive oil. It absorbs in seconds, adds a subtle richness to the crust flavor, and gives the finished loaf a beautiful sheen that enhances both the color and the visual appeal significantly.
5. Freeze the Dutch oven lid handle separately if it is plastic.
Many home Dutch ovens have a plastic or silicone knob on the lid that is only rated to 400°F — not 450°F, which is what this recipe requires. Before your first bake, check the manufacturer’s temperature rating. If the knob is not rated to 450°F, replace it with a stainless steel knob (a $5 hardware store fix) before preheating.
Recipe Summary
This rosemary garlic artisan bread uses just four main ingredients — flour, water, yeast, and salt — plus fresh rosemary, minced garlic, olive oil, and flaky sea salt on the crust, and requires only 10 minutes of active preparation followed by a 12–18 hour no-knead overnight rise. Baking the shaped, scored loaf in a preheated 450°F Dutch oven produces the crackling, deeply golden crust and open, chewy crumb visible in the finished loaf without any kneading, shaping experience, or special equipment beyond the Dutch oven itself. A full hour of cooling on a wire rack completes the process and sets the crumb properly before slicing.
Conclusion
Once you have made this rosemary garlic artisan bread once, you will find it difficult to go back to store-bought loaves for everyday use. The overnight method asks almost nothing of you — a few minutes of mixing before bed, a shape and second rise the next afternoon, and 45 minutes in the oven — and it gives you a loaf that looks, smells, and tastes like real bakery bread. Share it warm with good olive oil, serve it alongside soup, or keep a few slices in the freezer for the mornings when you need something better than a plain slice of toast. Either way, this recipe has a habit of making people feel more capable in the kitchen than they thought they were.
✅ Quick Tips: Read the recipe in its entirety before you start cooking. This will help you understand the ingredients, steps, and timing involved, and allow you to prepare any necessary equipment or ingredients beforehand.
Rosemary Garlic Artisan Bread — Easy 4-Ingredient No-Knead Loaf
Description
There is something quietly thrilling about pulling a round, golden loaf from the oven — especially when it took almost no hands-on effort to get there. This rosemary garlic artisan bread delivers a shatteringly crisp crust, an open, chewy crumb, and a deeply savory herb-and-garlic aroma that fills the entire kitchen. The photo tells the whole story: a domed, rustic loaf with dark golden patches, visible rosemary sprig fragments embedded in the crust, and a soft interior full of irregular air pockets — exactly what a proper no-knead loaf should look like.
Ingredients
Instructions
-
Step 1: Mix the Dough (10 minutes)
-
Combine the flour, salt, and instant yeast in a large bowl and whisk briefly to distribute. Add the minced garlic and chopped rosemary, then pour in the warm water. Stir with a wooden spoon until a rough, shaggy dough forms — it will look messy and uneven, and that is completely correct. There should be no dry flour left at the bottom of the bowl.
-
Embedded tip: Water temperature matters more than most bakers realize. Too hot (above 120°F) kills the yeast before it can do anything; too cold slows or prevents the rise dramatically. Use an instant-read thermometer and target 105–110°F — it should feel comfortably warm on your wrist, not hot.
-
Step 2: The Long Rise (12–18 hours)
-
Cover the bowl tightly with plastic wrap or a lid. Leave it at room temperature (ideally 68–72°F) for 12 to 18 hours. By the time the rise is complete, the dough will have roughly doubled in size, and the surface will be covered in bubbles. Those bubbles are carbon dioxide from the yeast, and they are the key to the open, irregular crumb visible in a properly made rosemary garlic artisan bread.
-
Longer is generally better here. A 12-hour rise produces a good loaf; an 18-hour rise produces a noticeably more flavorful one, with a slightly more complex, mild tanginess that develops as the dough ferments slowly.
-
Step 3: Shape the Dough (5 minutes)
-
Generously flour a clean work surface. Turn the risen dough out onto it — do not punch it down aggressively, as you want to keep as many of those air bubbles intact as possible. Using lightly floured hands or a bench scraper, gently fold the edges of the dough toward the center two or three times, then flip it so the seam side is down. Cup your hands around the back of the dough and drag it gently toward you on the surface to build surface tension and form a round shape.
-
Embedded tip: The dough will be sticky — this is normal and actually a sign of proper hydration. Resist the urge to add excessive flour during shaping. A light dusting on the surface is enough; too much extra flour will tighten the crumb and dry out the final loaf.
-
Step 4: Second Rise (1–2 hours)
-
Cut a piece of parchment paper large enough to line the inside of your Dutch oven with some overhang. Place the shaped dough seam-side down on the parchment. Drizzle the olive oil lightly over the top of the dough and scatter the whole rosemary sprigs and a pinch of flaky sea salt across the surface — these are what create the herb-studded, golden crust visible in the finished loaf. Cover loosely with a clean kitchen towel and let the dough rest for 1–2 hours until noticeably puffed.
-
Step 5: Preheat the Dutch Oven (30 minutes)
-
Place your Dutch oven (with its lid) in the oven and preheat to 450°F. The Dutch oven must preheat for a full 30 minutes — it needs to be screaming hot when the dough goes in. This sudden blast of heat from all sides is what creates the initial oven spring that gives the loaf its dramatic dome. According to King Arthur Baking's bread science guide, a preheated vessel produces significantly better crust and rise than a cold one.
-
Step 6: Score and Bake (45 minutes)
-
Carefully remove the Dutch oven from the oven using heavy oven mitts — it is extremely hot. Using the parchment paper as a sling, lower the dough into the Dutch oven. Use a sharp serrated knife or bread lame to score the top of the dough with one confident slash about ½ inch deep — this controls where the loaf expands and prevents it from splitting unpredictably at the sides.
-
Cover with the lid and bake at 450°F for 30 minutes. Remove the lid and continue baking for 12–15 minutes until the crust is deep amber-brown. The internal temperature of a fully baked loaf should reach 195–210°F — use an instant-read thermometer inserted into the bottom of the loaf. This range ensures the crumb is fully set without being gummy at the center.
-
Step 7: Cool Before Slicing (1 hour minimum)
-
Transfer the finished loaf to a wire rack and let it cool for at least 1 hour before slicing. Cutting into hot bread disrupts the steam still finishing the interior — the crumb will be gummy and compressed rather than the open, springy texture it becomes as it cools. The cooling time is part of the baking process, not optional.
Nutrition Facts
Servings 1
- Amount Per Serving
- Calories 165kcal
- % Daily Value *
- Total Fat 2g4%
- Saturated Fat 1g5%
- Protein 6g12%
* Percent Daily Values are based on a 2,000 calorie diet. Your daily value may be higher or lower depending on your calorie needs.