
Introduction
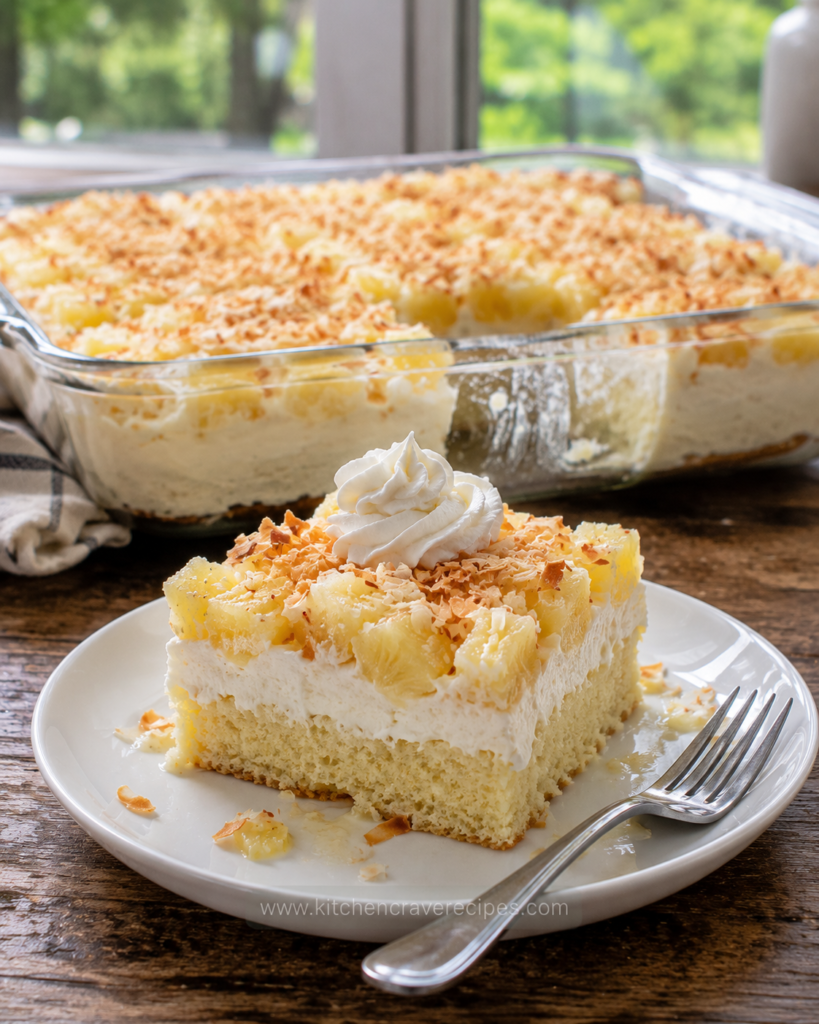
Some desserts are beautiful but fussy. Some are easy but forgettable. This pineapple cream cake sits firmly in neither category — it’s the one that gets requested at every summer potluck, every birthday, and every “what should I bring?” moment because it looks impressive in the pan and tastes even better than it looks. A fluffy white cake base soaks up sweet pineapple juice, gets layered with billowy whipped cream, piled with chunks of fresh pineapple, and finished with a generous scatter of golden toasted coconut that adds crunch and a faintly nutty warmth to every bite.
The entire thing bakes in a single 9×13-inch glass pan and chills in the refrigerator until the layers meld together into something that’s part cake, part no-bake dessert, and fully irresistible. Whether you’re making it for a crowd or just for the week, this pineapple cream cake is one of those recipes that earns compliments every single time it appears on a table.
Recipe Quick Info Table
| Detail | Info |
|---|---|
| Prep Time | 20 minutes |
| Cook Time | 30 minutes (plus 2 hours chilling) |
| Total Time | 2 hours 50 minutes |
| Servings | 12 squares |
| Cuisine | American |
| Course | Dessert |
| Calories | ~340 per serving |
| Difficulty | Standard |
Why You’ll Love This Recipe
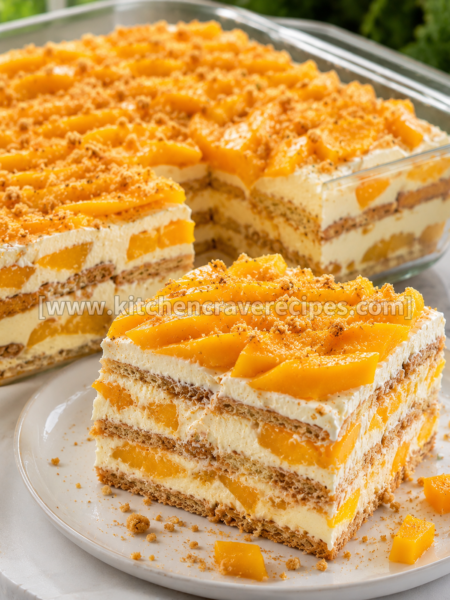
- Three distinct layers in one simple pan. A baked white cake base, a thick whipped cream middle, and a pineapple-coconut topping create a visually stunning cross-section in every square slice without requiring any special equipment or assembly skills.
- The toasted coconut topping is genuinely addictive. Golden, slightly crispy toasted coconut scattered across the top adds texture and a warm, nutty counterpoint to the cold cream and sweet pineapple underneath — it’s the detail that makes this cake memorable.
- Chills overnight with zero quality loss. This cake actually improves after refrigerating for several hours, as the cake base absorbs the pineapple juice and the cream layer sets into a firmer, more sliceable consistency.
- Easy enough for a beginner baker. White cake from scratch or from a box both work beautifully here — the recipe is forgiving and flexible, and the whipped cream and topping assembly requires no special technique.
- Made with ingredients you can find anywhere. White cake ingredients, heavy cream, canned or fresh pineapple, and sweetened shredded coconut are available at every grocery store in America without any hunting.
- Feeds a crowd from one pan. Twelve generous squares from a single 9×13-inch dish make this one of the most practical party desserts in the summer repertoire — and it travels well, chilled in the pan with a lid.
- No frosting skills required. The cream layer spreads in 60 seconds with an offset spatula, the pineapple chunks go on top, and the toasted coconut covers any imperfections — it’s one of the most forgiving cake presentations imaginable.
Ingredients
For the White Cake Base
- 2¼ cups all-purpose flour
- 1½ cups granulated sugar
- 3½ teaspoons baking powder
- 1 teaspoon kosher salt
- ½ cup (1 stick) unsalted butter, softened to room temperature
- 1 cup whole milk, room temperature
- 3 large egg whites, room temperature
- 2 teaspoons pure vanilla extract
- 1 tablespoon vegetable oil (adds moisture)
For the Pineapple Cream Layer
- 2 cups heavy whipping cream, very cold
- 3 tablespoons powdered sugar
- 1 teaspoon pure vanilla extract
- 4 oz full-fat cream cheese, softened (stabilizes the whipped cream)
- 1 can (20 oz) crushed pineapple in juice, well drained (reserve the juice)
- ¼ cup reserved pineapple juice (for soaking the cake base)
For the Pineapple Topping (as shown in photo)
- 1 can (20 oz) pineapple tidbits or chunks in juice, drained
- 1½ cups sweetened shredded coconut, toasted
For Serving
- Whipped cream, for topping individual slices (as shown in the reference photo)
Optional Add-Ins
- 1 teaspoon coconut extract (added to the whipped cream for a more tropical flavor)
- ¼ cup macadamia nuts, roughly chopped and toasted (scattered over the coconut topping)
- 1 tablespoon lime zest (stirred into the cream layer for a bright citrus note)
Ingredient Substitution Table
| Original Ingredient | Best Substitute | Notes |
|---|---|---|
| All-purpose flour | 1-to-1 gluten-free baking flour | Use the same amount; texture is nearly identical in a sheet cake format |
| Whole milk | Full-fat canned coconut milk | Adds a subtle coconut flavor and keeps the crumb moist |
| Heavy whipping cream | Full-fat coconut cream, chilled | Whips well; adds tropical flavor naturally; dairy-free option |
| Cream cheese | Mascarpone cheese | Very similar fat content and texture; slightly sweeter flavor |
| Sweetened shredded coconut | Unsweetened toasted coconut | Less sweet overall; works well if you prefer a less sugary topping |
| Canned pineapple tidbits | Fresh pineapple, cubed | Fresh pineapple must be used carefully — see FAQ for important note |
Kitchen Tools Needed
- 9×13-inch glass baking dish (as shown in the reference photo)
- Stand mixer or hand mixer with whisk and paddle attachments
- Large mixing bowls (2)
- Rubber spatula or offset spatula
- Fine mesh strainer or colander (for draining pineapple)
- Baking sheet (for toasting coconut)
- Toothpick or cake tester
- Measuring cups and spoons
- Plastic wrap or fitted pan lid (for refrigerating)
Step-by-Step Instructions
Step 1: Toast the Coconut
Spread the sweetened shredded coconut in a single even layer on a dry baking sheet. Toast in a 325°F oven for 8–12 minutes, stirring every 3–4 minutes, until the coconut is golden and lightly browned. Watch closely — coconut can shift from golden to burned in under a minute, especially at the edges of the pan. Remove and let cool completely on the baking sheet. Toasted coconut can be prepared up to 3 days in advance and stored in an airtight container at room temperature.
Embedded Tip: Alternatively, toast coconut in a dry skillet over medium-low heat, stirring constantly, for 4–6 minutes. The skillet method is faster and gives you more immediate control over the browning — better for smaller batches.
Step 2: Make the White Cake Base
Preheat the oven to 350°F and grease the 9×13-inch glass baking dish. In a large bowl, whisk together the flour, sugar, baking powder, and salt. Add the softened butter and mix on low speed until the mixture resembles coarse sand. In a separate bowl, whisk together the milk, egg whites, vanilla extract, and vegetable oil. Add the wet ingredients to the dry ingredients in two additions, mixing on medium speed until just combined after each addition — a few small lumps are fine. Pour into the prepared pan and spread evenly.
Step 3: Bake the Cake
Bake at 350°F for 28–32 minutes, until the top is lightly golden and a toothpick inserted in the center comes out clean or with just a few dry crumbs attached. The cake should spring back lightly when pressed in the center. Remove from the oven and let cool in the pan on a wire rack for 15 minutes.
Embedded Tip: Don’t overbake the white cake base. A slightly underdone cake that finishes cooling in the pan stays moist and absorbs the pineapple juice more readily than a fully set, dry cake — which is exactly what you want in this layered dessert.
Step 4: Soak the Cake with Pineapple Juice
While the cake is still warm (not hot), use a fork or toothpick to poke holes evenly across the entire surface — about 20–30 holes in a grid pattern. Slowly drizzle the reserved ¼ cup of pineapple juice evenly over the surface of the cake, letting it soak into the holes rather than pool on top. The warm cake absorbs the juice much more readily than a cold one. Allow the cake to cool completely to room temperature before proceeding to the cream layer.
Step 5: Make the Stabilized Whipped Cream
In a large bowl, beat the softened cream cheese on medium speed until completely smooth — no lumps. Add the powdered sugar and vanilla and beat until combined. In a separate cold bowl, whip the very cold heavy cream to stiff peaks. Fold the whipped cream into the cream cheese mixture in three additions, using a rubber spatula with a gentle folding motion to preserve the volume. The cream cheese stabilizes the whipped cream, which is what allows this cake to hold its shape cleanly in the refrigerator for multiple days without weeping.
Step 6: Fold In the Crushed Pineapple
Gently fold the well-drained crushed pineapple into the stabilized whipped cream mixture. The crushed pineapple must be very thoroughly drained — press it firmly against a strainer or squeeze it in a clean kitchen towel. Excess pineapple juice in the cream layer will prevent it from setting properly and will make the layer wet and unstable.
Note on fresh pineapple: If using fresh pineapple in the cream layer, blanch it briefly in boiling water for 60 seconds and pat dry. Fresh pineapple contains bromelain, an enzyme that breaks down proteins — including the gelatin in whipped cream and the protein in dairy. According to food science information from the FDA’s database of enzyme resources, bromelain is an active protease that can prevent cream and gelatin from setting properly when used raw. Canned pineapple has been heat-processed, which deactivates the enzyme entirely.
Step 7: Assemble and Chill
Spread the pineapple cream mixture evenly over the completely cooled cake base using an offset spatula — work from the center outward in smooth, even strokes. The layer should be about 1 inch thick. Arrange the drained pineapple tidbits or chunks evenly over the cream layer, pressing them gently to adhere. Scatter the toasted coconut generously over the entire top surface. Cover the pan tightly with plastic wrap and refrigerate for at least 2 hours — overnight is ideal for the cleanest slices and the most cohesive texture.
Pro Tips
- Drain the pineapple twice. Press the crushed pineapple through a fine mesh strainer, then transfer to a clean kitchen towel and squeeze again. Any remaining juice in the cream layer will slowly weep out during chilling, thinning the cream and making the cake difficult to slice cleanly.
- Use very cold cream. Cold cream whips faster and holds its structure longer. Refrigerate the mixing bowl and whisk attachment for 15 minutes before whipping for the most stable result, especially in a warm kitchen.
- Cool the cake completely before adding cream. Even slightly warm cake will begin to melt the whipped cream layer from below, creating a wet, unstable dessert. Patience here directly affects the final texture.
- Toast the coconut first. Completing the coconut toasting step before anything else means it has time to cool completely — hot coconut placed on whipped cream will melt and deflate the layer immediately.
- Refrigerate overnight for the best slices. A two-hour chill produces a good result, but an overnight chill produces clean, bakery-style square slices that hold their shape on the plate — like the presentation visible in the reference photo.
Common Mistakes to Avoid
1. Not draining the crushed pineapple thoroughly enough.
Wet pineapple in the cream layer releases juice during chilling, thinning the whipped cream into a soupy layer that can’t hold its shape or slice cleanly.
Fix: Drain through a strainer, then squeeze in a clean kitchen towel until virtually no more liquid comes out. Reserve the juice for the cake soak.
2. Adding the cream layer to a warm cake.
Warm cake melts whipped cream almost immediately, producing a liquid mess that runs to the edges and never sets properly during chilling.
Fix: Cool the cake fully to room temperature — at least 45 minutes on a wire rack — before spreading any cream.
3. Overbeating the whipped cream before folding.
Stiff peaks are the target; over-beaten cream turns grainy and begins to separate, making it impossible to fold smoothly into the cream cheese base.
Fix: Stop beating the moment the cream holds firm, glossy peaks that stand straight without drooping.
4. Using warm or room-temperature cream for whipping.
Warm cream won’t whip — it needs to be very cold (straight from the refrigerator) to incorporate enough air to form stiff peaks.
Fix: Keep the cream refrigerated until the exact moment it goes into the bowl, and chill the bowl and beaters if your kitchen is warm.
5. Skipping the poke holes in the cake base.
Without holes, the pineapple juice soaks only the very top surface of the cake and doesn’t penetrate deep enough to flavor the crumb throughout.
Fix: Use a fork or the handle of a wooden spoon to poke 20–30 holes evenly across the entire surface before soaking.
6. Toasting coconut at too high a temperature.
High oven heat causes coconut to brown unevenly — burned at the edges, pale in the center — rather than achieving the uniform golden color visible in the reference photo.
Fix: Toast at 325°F and stir every 3–4 minutes. The lower temperature gives you more control and produces even browning across the whole pan.
7. Slicing before the minimum chill time.
Cutting into a pineapple cream cake before it has chilled fully produces messy, crumbling slices where the cream layer slides off the cake base.
Fix: Two hours minimum, overnight preferred. Chill the cake with the pan covered in plastic wrap and don’t rush this step.
Variations
Lighter Version with Whipped Topping
Replace the stabilized whipped cream with 2 cups of thawed frozen whipped topping (like Cool Whip) folded directly with the drained crushed pineapple. Omit the cream cheese and powdered sugar. The result is lighter in fat and slightly sweeter, with a texture that’s softer and more mousse-like. This version sets faster in the refrigerator — 1 hour is usually sufficient — making it the best option when you’re short on time.
Coconut Pineapple Layer Cake Version
Replace ¼ cup of the whole milk in the cake batter with canned full-fat coconut milk and add ½ teaspoon of coconut extract to the batter. Stir 1 teaspoon of coconut extract into the whipped cream layer as well. This creates a double coconut flavor that runs through both the cake and the cream, making the whole dessert taste more emphatically tropical without changing any of the techniques.
Mango-Pineapple Tropical Version
Replace half the pineapple tidbits in the topping with fresh or frozen (thawed and drained) mango chunks. The mango’s floral sweetness contrasts beautifully with the tangy pineapple and the rich cream layer. Keep the crushed pineapple in the cream layer unchanged — it’s the moisture and binding that makes the layer work. Garnish with a few fresh mint leaves for an especially vibrant presentation.
Gluten-Free Version
Swap the all-purpose flour for a 1-to-1 gluten-free baking flour (Bob’s Red Mill 1-to-1 or King Arthur Measure for Measure are both reliable). Use the same measurements and all other ingredients unchanged — both brands perform very closely to all-purpose flour in a sheet cake format. Confirm that your baking powder is labeled gluten-free if strict celiac avoidance is required.
Dairy-Free Version
Replace the butter with refined coconut oil (softened), the whole milk with full-fat coconut milk, the heavy cream with very cold canned coconut cream (the solid portion), and the cream cheese with a dairy-free cream cheese (Violife or Kite Hill). The coconut cream whips into stiff peaks when very cold. The flavor shifts slightly toward a piña colada profile, which works beautifully with the pineapple and coconut topping.
What to Serve With This Recipe
- Fresh tropical fruit salad — mango, papaya, and kiwi alongside a slice of this cake make a complete, colorful summer dessert spread.
- A scoop of vanilla or coconut ice cream — the warm-cold contrast against a chilled slice of cake is a genuinely lovely combination, especially in summer.
- Sparkling lemonade or passion fruit iced tea — light, acidic drinks complement the sweetness of the cream and pineapple without competing.
- A simple green salad with citrus vinaigrette — if serving this cake after a heavier main course, the acidic dressing resets the palate before dessert beautifully.
- Whipped cream rosette on each slice — as shown in the reference photo; a small piped rosette of whipped cream on each square makes individual servings look polished and finished.
- Our Garlic Parmesan Chicken Bake: Best Easy 45-Minute Recipe — if you love the coconut-pineapple tropical flavor pairing in this cake, this companion recipe uses the same flavor profile in a classic pie format.
- Hot coffee or Earl Grey tea — the slight bitterness of both complements the sweetness of the cream and coconut topping without fighting the flavors.
Storage Instructions
Refrigerator
Cover the pan tightly with plastic wrap or a fitted lid and refrigerate for up to 4 days. The cake base actually improves over the first 24 hours as it continues to absorb the pineapple juice and the cream layer firms further. After day three, the coconut topping begins to soften slightly from moisture absorption — the flavor remains excellent but the crunch diminishes.
Freezer
This pineapple cream cake can be frozen in individual portions — cut into squares, wrap each tightly in plastic wrap, and place in a zip-top freezer bag for up to 1 month. Thaw individual portions overnight in the refrigerator. The cream layer may weep slightly after thawing; blot gently with a paper towel before serving. The overall texture is best fresh or refrigerator-stored.
Shelf Life Summary
| Storage Method | Duration | Notes |
|---|---|---|
| Room temperature | 2 hours maximum | Keep refrigerated; cream layer is not shelf stable |
| Refrigerator (covered) | 4 days | Best within first 2 days; coconut softens after day 3 |
| Freezer (individual portions) | 1 month | Thaw overnight in fridge; slight weeping is normal |
Serving Instructions
This cake is served cold from the refrigerator — there is no reheating recommended for this dessert. Remove it from the refrigerator 5 minutes before serving to take the sharp chill off, which makes the cream layer slightly softer and more luscious on the palate. Use a sharp knife wiped clean between cuts for the cleanest square slices. For individual servings, add a small whipped cream rosette to each square just before plating, as shown in the reference photo.
If you need to transport this cake, keep it in the baking dish with the plastic wrap on and place the whole pan in a cooler with ice packs. The cream layer is stable when cold but will begin to soften if left at room temperature for more than 2 hours. Per FDA food safety guidelines for cream-based desserts, dairy cream desserts should not be left unrefrigerated for more than 2 hours.
Nutrition Facts
| Nutrient | Per Serving (1 of 12 squares) |
|---|---|
| Calories | ~340 |
| Total Fat | 18g |
| Saturated Fat | 12g |
| Cholesterol | 55mg |
| Sodium | 210mg |
| Total Carbohydrates | 43g |
| Dietary Fiber | 1g |
| Total Sugars | 30g |
| Protein | 4g |
Nutrition Disclaimer: Nutrition values are estimated using standard USDA nutritional data and a recipe analysis tool based on the listed main ingredients. Actual values will vary depending on specific brands of cream cheese, pineapple, and coconut used, as well as the cake base method chosen (scratch vs. box mix). These figures are for general informational purposes only and do not constitute medical or dietary advice. Consult a registered dietitian for personalized nutritional guidance.
Frequently Asked Questions
Can I use a box of white cake mix for the base?
Absolutely — a standard 15.25-oz box of white cake mix prepared according to package directions works perfectly. Pour the prepared batter into a greased 9×13-inch pan and bake as directed on the box, then proceed with the poke, soak, and cream layers exactly as written. Using a box mix saves about 10 minutes of prep and produces a very consistent result.
Why can’t I use fresh pineapple in the cream layer?
Raw fresh pineapple contains an active enzyme called bromelain that breaks down the proteins in dairy cream and gelatin, preventing them from setting properly. Canned pineapple has been heat-processed, which permanently deactivates the enzyme. If you want to use fresh pineapple, blanch it in boiling water for 60 seconds and pat dry first — this deactivates the bromelain before it can interfere with the cream.
How long does pineapple cream cake need to chill before serving?
A minimum of 2 hours is required for the cream layer to set and the cake to absorb the pineapple juice. An overnight chill produces significantly cleaner slices and a more cohesive texture throughout — if you’re making this for a gathering, overnight refrigeration is the way to go.
Can I make this cake a day ahead?
Yes — this is actually one of the best qualities of this dessert. Make it the day before, cover tightly, and refrigerate overnight. The flavors deepen and the layers meld more completely after 8–12 hours in the refrigerator, making the day-after version arguably better than the same-day version.
How do I keep the toasted coconut from getting soggy?
The coconut will naturally soften slightly after 24–48 hours in the refrigerator as it absorbs ambient moisture. To minimize this, add the toasted coconut layer no more than 4 hours before serving rather than immediately after assembly. Store extra toasted coconut in an airtight container at room temperature and add it fresh to each slice at serving time.
Can I use light cream cheese or light whipped topping instead?
Light cream cheese works well — it stabilizes the whipped cream similarly to full-fat cream cheese, and the texture difference is minimal. Light whipped topping (like reduced-fat Cool Whip) can replace the homemade whipped cream entirely in a pinch; fold it directly with the drained crushed pineapple and omit the sugar and vanilla since it’s already sweetened.
What’s the best way to get clean square slices?
Chill overnight for the firmest possible layers. Use a long, sharp knife and wipe it clean with a damp cloth between every cut. Make all lengthwise cuts first, then all crosswise cuts — working in one direction minimizes dragging the cream layer across already-cut slices.
Can I make this as a round layer cake instead of a sheet pan cake?
Yes — divide the batter between two greased 9-inch round cake pans and bake for 22–25 minutes. Poke and soak each layer, let them cool completely, then layer with the pineapple cream and stack. Use the remaining cream as a thick outer frosting and top with pineapple chunks and toasted coconut. The assembled round cake needs at least 4 hours to chill before slicing.
Is this recipe the same as a pineapple poke cake?
They’re related but different. A traditional pineapple poke cake typically soaks the whole cake with sweetened condensed milk or pudding and uses Cool Whip. This pineapple cream cake uses a stabilized homemade whipped cream layer with cream cheese, which is thicker, richer, and more distinct as a separate layer — producing the visible three-layer cross-section in the reference photo rather than a single soaked, uniform cake.
Expert Chef Tips
1. Stabilize the whipped cream — always.
Adding softened cream cheese to the whipped cream before folding is the single most important technique in this recipe. It prevents the cream from weeping or deflating during the chilling time and produces a firm, sliceable layer that holds its shape for multiple days in the refrigerator — something plain whipped cream cannot do reliably.
2. Reserve the pineapple juice deliberately.
Drain your crushed pineapple over a bowl and measure out exactly ¼ cup of juice for the soak. Discard the rest or save it for a cocktail. The measured amount is calibrated to moisten the cake base without making it soggy — too much juice produces a wet, unstable base that collapses under the weight of the cream layer.
3. Toast the coconut to deep golden, not pale.
Lightly toasted coconut that’s still mostly white adds very little flavor or crunch. Properly toasted coconut — deep amber in color with brown edges — adds genuine nuttiness, distinct crunch, and a visual contrast that makes the topping look as good as it tastes. Don’t pull it too early.
4. Use room-temperature cream cheese for the cream layer.
Cold cream cheese clumped into whipped cream creates lumps that don’t incorporate no matter how long you beat them. Softened cream cheese (left at room temperature for 30–45 minutes) whips smooth in seconds and folds into the whipped cream without any visible streaks or lumps.
5. Build the layers in the correct order — always.
Cake base → pineapple juice soak → fully cooled → whipped cream layer → crushed pineapple folded in → tidbits on top → toasted coconut. Each step depends on the previous one being complete. Skipping or reordering steps is the most common source of texture problems in this recipe, and the sequence exists for specific structural reasons.
Recipe Summary
This pineapple cream cake layers a tender white cake base soaked in pineapple juice with a thick, stable whipped cream and cream cheese filling studded with crushed pineapple, then tops the whole thing with fresh pineapple chunks and deeply toasted coconut for crunch. It bakes in one 9×13-inch glass pan, requires no frosting technique, and feeds 12 people cleanly with picture-perfect square slices. Make it the day before and it genuinely improves overnight — one of the most practical and crowd-pleasing summer desserts in the category.
Conclusion
There’s a reason this pineapple cream cake becomes the most requested dessert at every gathering it shows up to — the combination of fluffy cake, creamy tropical filling, and crunchy toasted coconut just works in a way that’s hard to argue with. It’s easy enough for a weeknight bake, impressive enough for a party, and forgiving enough that even first-time bakers can pull it off without stress. Make it once and you’ll understand exactly why it keeps getting asked for. Leave a comment letting us know how yours turned out — and don’t forget to tag us in your photos!
Pineapple Cream Cake: Best Easy 3-Layer Foolproof Recipe
Description
Some desserts are beautiful but fussy. Some are easy but forgettable. This pineapple cream cake sits firmly in neither category — it's the one that gets requested at every summer potluck, every birthday, and every "what should I bring?" moment because it looks impressive in the pan and tastes even better than it looks. A fluffy white cake base soaks up sweet pineapple juice, gets layered with billowy whipped cream, piled with chunks of fresh pineapple, and finished with a generous scatter of golden toasted coconut that adds crunch and a faintly nutty warmth to every bite.
ingredients
Instructions
-
Step-by-Step Instructions
-
Step 1: Toast the Coconut
-
Spread the sweetened shredded coconut in a single even layer on a dry baking sheet. Toast in a 325°F oven for 8–12 minutes, stirring every 3–4 minutes, until the coconut is golden and lightly browned. Watch closely — coconut can shift from golden to burned in under a minute, especially at the edges of the pan. Remove and let cool completely on the baking sheet. Toasted coconut can be prepared up to 3 days in advance and stored in an airtight container at room temperature.
-
Embedded Tip: Alternatively, toast coconut in a dry skillet over medium-low heat, stirring constantly, for 4–6 minutes. The skillet method is faster and gives you more immediate control over the browning — better for smaller batches.
-
Step 2: Make the White Cake Base
-
Preheat the oven to 350°F and grease the 9×13-inch glass baking dish. In a large bowl, whisk together the flour, sugar, baking powder, and salt. Add the softened butter and mix on low speed until the mixture resembles coarse sand. In a separate bowl, whisk together the milk, egg whites, vanilla extract, and vegetable oil. Add the wet ingredients to the dry ingredients in two additions, mixing on medium speed until just combined after each addition — a few small lumps are fine. Pour into the prepared pan and spread evenly.
-
Step 3: Bake the Cake
-
Bake at 350°F for 28–32 minutes, until the top is lightly golden and a toothpick inserted in the center comes out clean or with just a few dry crumbs attached. The cake should spring back lightly when pressed in the center. Remove from the oven and let cool in the pan on a wire rack for 15 minutes.
-
Embedded Tip: Don't overbake the white cake base. A slightly underdone cake that finishes cooling in the pan stays moist and absorbs the pineapple juice more readily than a fully set, dry cake — which is exactly what you want in this layered dessert.
-
Step 4: Soak the Cake with Pineapple Juice
-
While the cake is still warm (not hot), use a fork or toothpick to poke holes evenly across the entire surface — about 20–30 holes in a grid pattern. Slowly drizzle the reserved ¼ cup of pineapple juice evenly over the surface of the cake, letting it soak into the holes rather than pool on top. The warm cake absorbs the juice much more readily than a cold one. Allow the cake to cool completely to room temperature before proceeding to the cream layer.
-
Step 5: Make the Stabilized Whipped Cream
-
In a large bowl, beat the softened cream cheese on medium speed until completely smooth — no lumps. Add the powdered sugar and vanilla and beat until combined. In a separate cold bowl, whip the very cold heavy cream to stiff peaks. Fold the whipped cream into the cream cheese mixture in three additions, using a rubber spatula with a gentle folding motion to preserve the volume. The cream cheese stabilizes the whipped cream, which is what allows this cake to hold its shape cleanly in the refrigerator for multiple days without weeping.
-
Step 6: Fold In the Crushed Pineapple
-
Gently fold the well-drained crushed pineapple into the stabilized whipped cream mixture. The crushed pineapple must be very thoroughly drained — press it firmly against a strainer or squeeze it in a clean kitchen towel. Excess pineapple juice in the cream layer will prevent it from setting properly and will make the layer wet and unstable.
-
Note on fresh pineapple: If using fresh pineapple in the cream layer, blanch it briefly in boiling water for 60 seconds and pat dry. Fresh pineapple contains bromelain, an enzyme that breaks down proteins — including the gelatin in whipped cream and the protein in dairy. According to food science information from the FDA's database of enzyme resources, bromelain is an active protease that can prevent cream and gelatin from setting properly when used raw. Canned pineapple has been heat-processed, which deactivates the enzyme entirely.
-
Step 7: Assemble and Chill
-
Spread the pineapple cream mixture evenly over the completely cooled cake base using an offset spatula — work from the center outward in smooth, even strokes. The layer should be about 1 inch thick. Arrange the drained pineapple tidbits or chunks evenly over the cream layer, pressing them gently to adhere. Scatter the toasted coconut generously over the entire top surface. Cover the pan tightly with plastic wrap and refrigerate for at least 2 hours — overnight is ideal for the cleanest slices and the most cohesive texture.
Nutrition Facts
Servings 12
- Amount Per Serving
- Calories 340kcal
- % Daily Value *
- Total Fat 18g28%
- Saturated Fat 12g60%
- Protein 4g8%
* Percent Daily Values are based on a 2,000 calorie diet. Your daily value may be higher or lower depending on your calorie needs.