
Caramel Apple Ice Cream with Cinnamon-Sautéed Apples
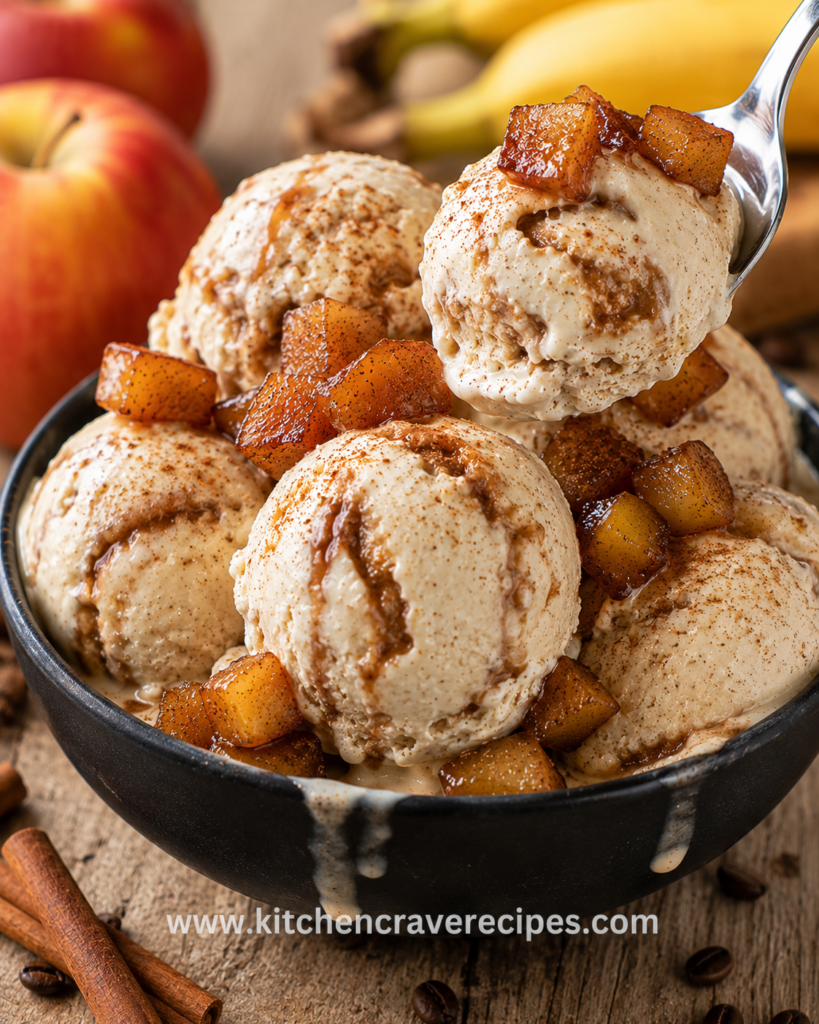
Picture a dark ceramic bowl piled high with creamy, cinnamon-flecked scoops, each one studded with glistening caramelized apple chunks that catch the light like amber. A silver spoon lifts one perfect ball from the pile, showing off the warm-toned, speckled interior. Cinnamon sticks, coffee beans, and whole apples frame the scene on a rustic wood surface — this is what fall dessert actually looks like when it’s done right.
This caramel apple ice cream is built around two components that work together: a no-churn cinnamon cream base with genuine caramel flavor baked in, and a quick stovetop sauté of diced apples in butter, brown sugar, and cinnamon that gets folded in before freezing. Every scoop delivers both the cold creaminess of ice cream and the tender, jammy bite of warm-spiced apple. It’s an autumn dessert that requires no ice cream maker and no custard cooking — just real ingredients handled well.
Recipe Quick Info
| Detail | Info |
|---|---|
| Prep Time | 25 minutes |
| Cook Time | 15 minutes |
| Total Time | 40 minutes active (plus 6 hours freeze time) |
| Servings | 8 scoops (serves 4–6) |
| Cuisine | American |
| Course | Dessert / Frozen Treat |
| Calories | ~380 per serving (2 scoops) |
| Difficulty | Standard |
Why You’ll Love This Caramel Apple Ice Cream
- No ice cream maker required — The no-churn base uses whipped cream and sweetened condensed milk, so you need nothing but a mixer and a freezer to get there.
- Real sautéed apple pieces in every bite — Buttery, cinnamon-glazed apple chunks are folded directly into the base, giving the finished ice cream a genuinely fruity, tender texture rather than just apple flavoring.
- Deep caramel flavor without candy-making — Brown sugar and a touch of vanilla in the apple sauté do the caramel work without any dangerous sugar-cooking steps.
- Tastes like apple pie in frozen form — The cinnamon-forward cream base combined with jammy apple pieces delivers every note of a classic fall pie, cold and scoopable.
- Freezes in a standard loaf pan — No specialty equipment, no individual molds; a 9×5-inch pan is all you need for a full batch.
- Impressive enough for guests, easy enough for a weeknight — The active work takes under 45 minutes; the freezer does the rest overnight.
- Endlessly adaptable — Swap the apple variety, add a bourbon note, swirl in extra caramel sauce — the base recipe supports all of it without changing the technique.
Ingredients
For the Cinnamon Ice Cream Base
- 2 cups (480ml) heavy whipping cream, cold
- 1 can (14 oz / 397g) sweetened condensed milk
- 1 teaspoon pure vanilla extract
- 1½ teaspoons ground cinnamon
- ¼ teaspoon fine salt
For the Caramel Apple Sauté
- 2 medium apples (about 2 cups diced) — Honeycrisp or Granny Smith recommended
- 3 tablespoons unsalted butter
- ¼ cup (55g) packed light brown sugar
- 1 teaspoon ground cinnamon
- ¼ teaspoon ground nutmeg
- 1 tablespoon fresh lemon juice
- Pinch of fine salt
For Serving (as shown)
- Extra caramel drizzle (store-bought or homemade)
- Ground cinnamon, dusted lightly over each scoop
Optional Add-Ins
- 2 tablespoons bourbon (adds depth; fold into condensed milk before whipping)
- ¼ cup chopped toasted pecans or walnuts (fold in with the apple pieces)
- 1 teaspoon apple pie spice (use in place of separate cinnamon and nutmeg)
Ingredient Substitutions
| Original Ingredient | Substitution | Notes |
|---|---|---|
| Heavy whipping cream | Full-fat coconut cream | Makes the base dairy-free; chill the can overnight before whipping |
| Sweetened condensed milk | Sweetened condensed coconut milk | Works 1:1; slightly more coconut flavor in the background |
| Honeycrisp apples | Fuji, Braeburn, or Pink Lady | All hold their shape well when sautéed; avoid Red Delicious (becomes mushy) |
| Granny Smith apples | Granny Smith preferred for tartness | The tartness balances the sweetness of the base most effectively |
| Light brown sugar | Dark brown sugar | More pronounced molasses note; works well, slightly richer flavor |
| Unsalted butter | Salted butter | Reduce the added pinch of salt in the sauté to avoid over-salting |
Kitchen Tools Needed
- Stand mixer or hand mixer with whisk attachment
- Large mixing bowl (chilled if possible)
- 9×5-inch loaf pan or similar freezer-safe container
- Plastic wrap
- Medium skillet or sauté pan
- Cutting board and chef’s knife
- Rubber spatula
- Measuring cups and spoons
- Ice cream scoop
- Fine-mesh strainer (optional, for straining any excess apple liquid)
Step-by-Step Instructions
Step 1: Sauté the Caramel Apples
Peel, core, and dice the apples into ½-inch cubes — uniform size ensures they cook evenly and stay distinct in the finished ice cream. Melt the butter in a medium skillet over medium heat. Add the diced apples, brown sugar, cinnamon, nutmeg, lemon juice, and salt. Cook, stirring occasionally, for 8–10 minutes until the apples are tender and glossy and the liquid has reduced to a thick, syrupy glaze that coats each piece.
Embedded Tip: Don’t rush this step on high heat. Cooking the apples over medium heat gives the brown sugar time to caramelize slowly rather than just dissolving, which produces a noticeably deeper, more complex flavor in the finished caramel apple ice cream.
Step 2: Cool the Apple Mixture Completely
Transfer the sautéed apples and any remaining glaze to a bowl and let them cool to room temperature, about 15–20 minutes. Then refrigerate until fully cold, at least 30 minutes. Folding warm apples into the whipped cream base will deflate the cream and result in a dense, greasy texture rather than a light, scoopable one. This cooling step is not optional.
Step 3: Whip the Heavy Cream
Pour the cold heavy cream into a chilled mixing bowl. Whip on medium-high speed until stiff peaks form — the cream should hold its shape firmly when the beaters are lifted, about 3–4 minutes. Stop before the cream looks grainy or starts separating into butter. Properly whipped cream is what gives the no-churn base its light, airy structure, so it’s worth stopping and checking every 30 seconds near the end.
Step 4: Make the Ice Cream Base
In a separate bowl, whisk together the sweetened condensed milk, vanilla extract, ground cinnamon, and salt until combined. Gently fold the condensed milk mixture into the whipped cream using a rubber spatula, working in slow, deliberate strokes from the bottom of the bowl up. Stop folding the moment the mixture looks uniform — overmixing deflates the cream and produces a dense final texture.
Embedded Tip: For a stronger caramel note, stir 2 tablespoons of your caramel drizzle directly into the condensed milk before folding it into the cream. It distributes evenly throughout the base without requiring any additional cooking.
Step 5: Fold In the Apple Pieces
Add the chilled caramelized apples and all of their glaze to the ice cream base. Fold gently with the spatula — 8 to 10 strokes is usually enough to distribute the apples evenly without breaking them down. The goal is visible chunks of apple in every scoop, not a puree. If the base looks slightly streaked with caramel from the glaze, that’s ideal.
Step 6: Freeze Until Solid
Pour the mixture into a 9×5-inch loaf pan and smooth the top with the spatula. Press a sheet of plastic wrap directly against the surface to prevent ice crystals from forming. Freeze for a minimum of 6 hours, or overnight for best results. The ice cream is ready when it holds its shape firmly but scoops cleanly without crumbling. For safe food storage temperature guidelines during freezing, refer to USDA food safety recommendations on freezing.
Step 7: Scoop and Serve
Let the pan sit at room temperature for 4–5 minutes before scooping. Use a scoop run briefly under hot water for clean, round balls. Pile 2–3 scoops into a dark ceramic bowl as shown, letting the caramelized apple chunks that didn’t make it into a scoop fall around the base naturally. Finish with a light drizzle of caramel sauce and a dusting of ground cinnamon over the top.
Pro Tips for the Best Results
- Start with cold cream and a cold bowl. Warm cream takes significantly longer to whip to stiff peaks and is more prone to over-whipping. Chill the bowl in the freezer for 10 minutes before you start.
- Cut apples uniformly. Half-inch cubes sauté evenly and stay visible as distinct pieces in the finished scoop — larger chunks can become icy, and smaller pieces disappear into the base.
- Taste the apple sauté before it cools. This is your one chance to adjust sweetness or spice. Add another pinch of cinnamon or a teaspoon more brown sugar while the pan is still warm, before the glaze sets.
- Use the right apple variety. Honeycrisp apples hold their shape exceptionally well through both sautéing and freezing. Granny Smith adds tartness that cuts the sweetness of the cream base — using one of each gives you the best of both.
- Label the container with the date. Caramel apple ice cream is best within the first two weeks; the apple pieces maintain the best texture in that window. A simple piece of tape on the container keeps you honest.
Common Mistakes to Avoid
- Folding in warm apples.
The fix: The apple sauté must be completely cold — not just room temperature — before it goes into the whipped cream base. Even slightly warm fruit deflates the cream structure and creates a dense, oily result. - Over-whipping the cream.
The fix: Stop at firm, glossy stiff peaks. If the cream starts looking lumpy or yellow-tinged, it’s beginning to butter. At that point, there’s no recovery — start with a fresh batch of cold cream. - Using watery or mushy apple varieties.
The fix: Red Delicious and McIntosh apples break down into mush when sautéed. Stick with firm varieties — Honeycrisp, Fuji, Braeburn, or Granny Smith — that hold their structure through cooking and freezing. - Skipping the plastic wrap directly on the surface.
The fix: Air contact creates a thick, icy crust across the top of the ice cream during freezing. Press the wrap flush against the surface before the lid goes on, every single time. - Under-freezing and scooping too early.
The fix: Six hours is the absolute minimum; overnight is better. Ice cream pulled from the freezer at the 3-hour mark will be too soft to scoop and will melt quickly in the bowl. - Adding too much apple liquid to the base.
The fix: If the apple sauté has released a lot of excess liquid in the pan, drain the apples briefly through a strainer before folding them in. Too much liquid creates icy pockets in the finished ice cream. - Rushing the condensed milk fold.
The fix: Work slowly and in wide arcs from the bottom of the bowl up. Aggressive stirring knocks air out of the whipped cream, undoing the work of Step 3. - Scooping straight from a hard overnight freeze.
The fix: Let the container sit on the counter for exactly 4–5 minutes. Set a timer — it takes longer than you expect to soften and faster than you’d like to melt.
Variations
Healthy Lightened-Up Version
Replace the heavy cream with whipped full-fat coconut cream (chilled overnight) and use sweetened condensed coconut milk. Reduce the brown sugar in the apple sauté to 2 tablespoons and increase the lemon juice to balance. The base trades some of the rich dairy creaminess for a lighter coconut-forward flavor, but the caramel apple ice cream structure remains entirely intact and the calorie count drops meaningfully.
Vegetarian Version
This recipe is fully vegetarian as written — all ingredients are plant-free animal products. No modifications are needed. If you’d like to make it fully vegan, the substitutions in the table above (coconut cream, condensed coconut milk) cover that completely without any technique changes.
Spiced Bourbon-Apple Variation
Add 2 tablespoons of good bourbon to the condensed milk before folding it into the whipped cream. Increase the nutmeg in the apple sauté to ½ teaspoon and add a pinch of ground cloves. The bourbon deepens the caramel notes significantly and pairs naturally with the warm spices — it works because alcohol also lowers the freezing point slightly, keeping the texture just a touch softer and more scoopable.
Gluten-Free Version
This caramel apple ice cream is naturally gluten-free as written — every main ingredient is free of wheat, barley, and rye. If adding mix-ins like crushed graham crackers or cookie pieces, confirm they are certified gluten-free. All other components require no modification.
Low-Sugar Version
Reduce the sweetened condensed milk to ¾ of the can and compensate with 2 tablespoons of a powdered erythritol sweetener blended into the cream. Cut the brown sugar in the apple sauté to 1½ tablespoons. The texture will be slightly less creamy since sugar plays a structural role in freezing, but the flavor profile stays fully recognizable as caramel apple ice cream — warm, spiced, and genuinely satisfying.
What to Serve With This Recipe
- Warm apple pie or apple crisp — A scoop of caramel apple ice cream melting over a hot slice is one of the definitive fall dessert combinations —The Best Hot Fudge Brownie Sundae (5-Star Ultimate Dessert)
- Shortbread cookies — Buttery, crumbly shortbread alongside a cold scoop cuts the richness cleanly without competing with the apple and cinnamon flavors.
- Salted caramel sauce — An extra drizzle just before serving amplifies the caramel note in the base and gives each bowl a glossy, restaurant-quality finish.
- Candied pecans — A small handful scattered over the top adds crunch and a nutty warmth that fills the gap between the cream and the apple perfectly.
- Warm cinnamon waffles — A slightly sweet, crisp waffle as a base plate turns this into a full breakfast-for-dessert moment.
- Hot coffee or espresso — The bitterness of black coffee served alongside cuts the sweetness of the ice cream and makes each bite taste more intensely of caramel.
- Sparkling apple cider — A glass alongside keeps the apple theme running through the whole meal without adding competing sweetness.
-
Storage Instructions
Freezer
Store the caramel apple ice cream in its loaf pan or transfer it to an airtight freezer-safe container. Press plastic wrap directly against the surface before sealing with a lid. It keeps at peak quality for up to 2 weeks. Beyond that, the apple pieces may begin to develop larger ice crystals, and the overall texture becomes slightly more granular — still safe, but noticeably less smooth.
Refrigerator
Do not store ice cream in the refrigerator. It will soften and melt within 20–30 minutes and cannot be re-frozen to the same smooth, consistent texture. Always move straight from the freezer to the bowl.
Shelf Life Summary
| Storage Method | Duration | Quality Notes |
|---|---|---|
| Freezer (optimal) | Up to 2 weeks | Best texture and apple piece integrity |
| Freezer (extended) | Up to 4 weeks | Edible but apple pieces may become icy |
| Refrigerator | Not recommended | Melts within 20–30 minutes |
| Room temperature | Serve immediately | Begins softening within 5 minutes |
Serving After Freezing (Tempering Instructions)
Because this is a no-churn ice cream rather than a store-bought product, it freezes firmer than commercial varieties. A brief tempering step before serving is always necessary.
From a Fresh Freeze (6 Hours)
Let the pan sit on the counter for 4–5 minutes. The outside layer will soften enough to scoop while the center remains firm and cold.
From an Overnight or Extended Freeze
Allow 5–7 minutes at room temperature before scooping. Run your ice cream scoop under hot water and dry it quickly between each scoop for the cleanest round balls.
If the Texture Becomes Icy Over Time
Let the container soften until the ice cream can be broken into chunks, then transfer to a food processor and pulse 5–6 times until smooth. Re-pack into the container and re-freeze for 2 hours. This restores most of the original texture. For guidance on safe freezing and thawing practices, see FoodSafety.gov’s cold storage chart.
Nutrition Facts
(Per serving: approximately 2 scoops / ⅙ of total batch)
| Nutrient | Amount |
|---|---|
| Calories | ~380 kcal |
| Total Fat | 22g |
| Saturated Fat | 14g |
| Cholesterol | 75mg |
| Sodium | 120mg |
| Total Carbohydrates | 44g |
| Dietary Fiber | 1g |
| Total Sugars | 40g |
| Protein | 5g |
Disclaimer: Nutrition values are estimates calculated using standard ingredient databases and will vary based on specific apple variety, brand of condensed milk, portion size, and any optional add-ins used. These figures are intended for general reference only and are not medical or dietary advice. For precise nutritional data, use a certified nutrition calculator with your exact ingredients.
Frequently Asked Questions
Q: Do I need an ice cream maker to make this caramel apple ice cream?
A: No — this is a no-churn recipe built specifically around a whipped cream and sweetened condensed milk base. A standard hand mixer or stand mixer is all the equipment you need beyond a freezer and a loaf pan.
Q: Which apple variety works best in this recipe?
A: Honeycrisp is the top pick for texture — it holds its shape through sautéing and freezing while staying tender. Granny Smith adds a tart contrast that balances the sweet cream base nicely. Using one of each gives you the best result. Avoid Red Delicious and McIntosh, which turn mushy when cooked.
Q: Can I use store-bought caramel sauce instead of making the apple sauté from scratch?
A: You can drizzle store-bought caramel sauce into the base as a swirl, but it won’t give you the tender apple pieces visible throughout the finished ice cream. The sautéed apple component is what makes this caramel apple ice cream distinct — the sauce alone doesn’t replicate that.
Q: Why is my no-churn ice cream base dense instead of light and airy?
A: Almost always, the cause is over-mixing after the condensed milk is added, or folding warm ingredients into the whipped cream. Fold gently with wide, slow strokes, and make sure every add-in — including the apple pieces — is completely cold before it goes into the base.
Q: Can I make this recipe ahead of time for a party?
A: Absolutely. The ice cream keeps at peak quality for up to 2 weeks in the freezer, so you can make it 3–5 days ahead without any loss of quality. Pull it from the freezer 5–7 minutes before serving so it’s ready to scoop the moment guests are seated.
Q: Can I add mix-ins other than the caramel apples?
A: Yes — toasted pecans, crushed graham crackers, a swirl of dulce de leche, or a handful of toffee bits all work beautifully alongside the apple pieces. Add any additional mix-ins at the same stage as the apples in Step 5, and keep the total volume of add-ins under 1½ cups to avoid over-loading the base.
Q: What does the lemon juice do in the apple sauté?
A: It serves two purposes: it brightens the flavor of the cooked apples and prevents them from turning grey-brown during the cooling period. Even a tablespoon makes a noticeable difference in the appearance and freshness of the apple pieces once they’re frozen into the ice cream.
Q: Can I use apple pie filling from a can instead of fresh apples?
A: In a pinch, yes — drain it well and roughly chop the pieces to ½-inch size before folding in. The flavor will be sweeter and less complex than fresh-sautéed apples, and the texture will be softer after freezing. If fresh apples are available, they produce a significantly better result.
Q: How do I prevent ice crystals from forming in the finished ice cream?
A: Three steps matter most: pressing plastic wrap directly against the surface before freezing, making sure the apple mixture is completely cold before folding in, and storing the container in the back of the freezer where temperatures are most consistent rather than near the door where warm air enters frequently.
Q: Can I make individual portions instead of one large batch?
A: Yes — divide the finished base evenly among six to eight freezer-safe ramekins or silicone muffin molds. Press plastic wrap against each surface. Individual portions freeze faster (about 3–4 hours) and are easy to unmold and plate for a clean, restaurant-style presentation.
Expert Chef Tips
1. Brown the butter in the apple sauté.
Instead of melting plain butter, let it cook for an extra 2 minutes until it turns golden-amber and smells nutty before adding the apples. Browned butter adds a toffee-like depth to the glaze that makes the caramel apple ice cream taste noticeably more complex — it costs nothing but 2 minutes of attention.
2. Layer the apple pieces rather than scattering them.
When adding the apples to the loaf pan, alternate spoonfuls of ice cream base with spoonfuls of apple pieces rather than folding everything together at once. This produces more distinct layers and ensures visible apple chunks in every scoop rather than all the fruit settling to the bottom.
3. Season the cream base, not just the apples.
The ¼ teaspoon of salt in the cream base is doing real work — it sharpens the sweetness and makes the cinnamon flavor more pronounced. Don’t leave it out in an effort to reduce sodium; at this quantity, it functions as a flavor enhancer, not a seasoning in the traditional sense.
4. Chill the loaf pan before pouring.
Set the empty loaf pan in the freezer for 15 minutes before adding the ice cream base. A pre-chilled pan starts the freezing process immediately from the outside in, which produces smaller ice crystals and a smoother final texture — the same principle used in professional ice cream production.
5. Serve in a dark or contrasting bowl.
The warm caramel tones and cinnamon-dusted surface of this ice cream are most visually striking against a dark background — a matte black or deep navy bowl makes the colors pop in a way that a white bowl simply doesn’t. Presentation is part of the experience, especially when you’ve taken the time to make something this good from scratch.
Recipe Summary
This caramel apple ice cream brings together a no-churn cinnamon cream base and a buttery stovetop apple sauté into one of the most satisfying fall desserts you can make at home. The active work takes under 45 minutes; the freezer handles everything else overnight. Serve it scooped generously into a bowl with an extra drizzle of caramel sauce and a dusting of cinnamon — it looks far more impressive than the effort involved would suggest.
Conclusion
Fall desserts don’t get much more satisfying than a bowl of homemade caramel apple ice cream — deep with warm spice, rich with cream, and full of those tender, caramelized apple pieces that make every bite something worth slowing down for. This recipe doesn’t require special equipment or advanced technique, just good ingredients and a little patience while the freezer does its work. Make it once and you’ll understand why the bowl in the photo never quite makes it to the table with all the scoops intact.
Caramel Apple Ice Cream: 6-Ingredient Best & Foolproof Recipe
Description
Picture a dark ceramic bowl piled high with creamy, cinnamon-flecked scoops, each one studded with glistening caramelized apple chunks that catch the light like amber. A silver spoon lifts one perfect ball from the pile, showing off the warm-toned, speckled interior. Cinnamon sticks, coffee beans, and whole apples frame the scene on a rustic wood surface — this is what fall dessert actually looks like when it's done right.
Ingredients
Instructions
-
Step-by-Step Instructions
-
Step 1: Sauté the Caramel Apples
-
Peel, core, and dice the apples into ½-inch cubes — uniform size ensures they cook evenly and stay distinct in the finished ice cream. Melt the butter in a medium skillet over medium heat. Add the diced apples, brown sugar, cinnamon, nutmeg, lemon juice, and salt. Cook, stirring occasionally, for 8–10 minutes until the apples are tender and glossy and the liquid has reduced to a thick, syrupy glaze that coats each piece.
-
Embedded Tip: Don't rush this step on high heat. Cooking the apples over medium heat gives the brown sugar time to caramelize slowly rather than just dissolving, which produces a noticeably deeper, more complex flavor in the finished caramel apple ice cream.
-
Step 2: Cool the Apple Mixture Completely
-
Transfer the sautéed apples and any remaining glaze to a bowl and let them cool to room temperature, about 15–20 minutes. Then refrigerate until fully cold, at least 30 minutes. Folding warm apples into the whipped cream base will deflate the cream and result in a dense, greasy texture rather than a light, scoopable one. This cooling step is not optional.
-
Step 3: Whip the Heavy Cream
-
Pour the cold heavy cream into a chilled mixing bowl. Whip on medium-high speed until stiff peaks form — the cream should hold its shape firmly when the beaters are lifted, about 3–4 minutes. Stop before the cream looks grainy or starts separating into butter. Properly whipped cream is what gives the no-churn base its light, airy structure, so it's worth stopping and checking every 30 seconds near the end.
-
Step 4: Make the Ice Cream Base
-
In a separate bowl, whisk together the sweetened condensed milk, vanilla extract, ground cinnamon, and salt until combined. Gently fold the condensed milk mixture into the whipped cream using a rubber spatula, working in slow, deliberate strokes from the bottom of the bowl up. Stop folding the moment the mixture looks uniform — overmixing deflates the cream and produces a dense final texture.
-
Embedded Tip: For a stronger caramel note, stir 2 tablespoons of your caramel drizzle directly into the condensed milk before folding it into the cream. It distributes evenly throughout the base without requiring any additional cooking.
-
Step 5: Fold In the Apple Pieces
-
Add the chilled caramelized apples and all of their glaze to the ice cream base. Fold gently with the spatula — 8 to 10 strokes is usually enough to distribute the apples evenly without breaking them down. The goal is visible chunks of apple in every scoop, not a puree. If the base looks slightly streaked with caramel from the glaze, that's ideal.
-
Step 6: Freeze Until Solid
-
Pour the mixture into a 9×5-inch loaf pan and smooth the top with the spatula. Press a sheet of plastic wrap directly against the surface to prevent ice crystals from forming. Freeze for a minimum of 6 hours, or overnight for best results. The ice cream is ready when it holds its shape firmly but scoops cleanly without crumbling. For safe food storage temperature guidelines during freezing, refer to USDA food safety recommendations on freezing.
-
Step 7: Scoop and Serve
-
Let the pan sit at room temperature for 4–5 minutes before scooping. Use a scoop run briefly under hot water for clean, round balls. Pile 2–3 scoops into a dark ceramic bowl as shown, letting the caramelized apple chunks that didn't make it into a scoop fall around the base naturally. Finish with a light drizzle of caramel sauce and a dusting of ground cinnamon over the top.
Nutrition Facts
Servings 8
- Amount Per Serving
- Calories 380kcal
- % Daily Value *
- Total Fat 22g34%
- Saturated Fat 14g70%
- Protein 5g10%
* Percent Daily Values are based on a 2,000 calorie diet. Your daily value may be higher or lower depending on your calorie needs.