
The Pepperoni Pizza Pull Apart Ring That Disappears in Minutes
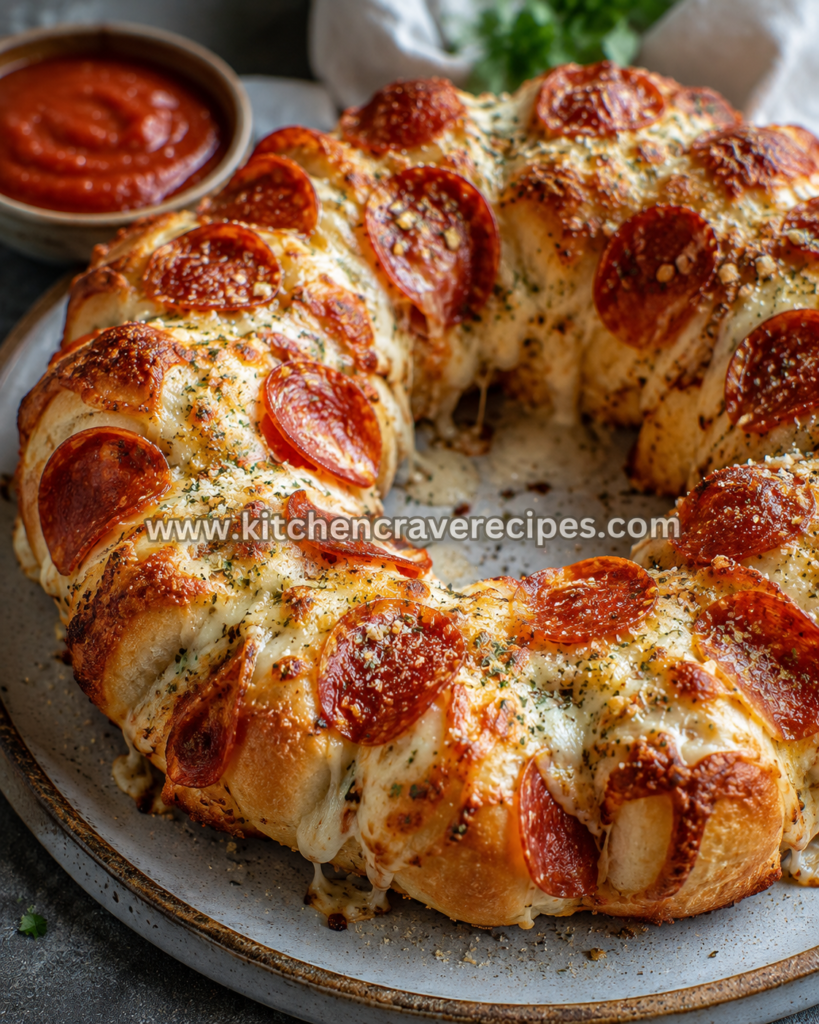
Some recipes earn their spot at every game day table, every party spread, and every Friday night when nobody wants to cook but everyone wants something spectacular. This pepperoni pizza pull apart ring is exactly that recipe. The photo shows it in full glory: a golden, wreath-shaped ring of dough balls packed with melted mozzarella, topped with crispy cupped pepperoni rounds, dusted with Parmesan and Italian herbs, and served on a speckled ceramic plate with a ceramic cup of warm marinara on the side.
Every piece pulls free cleanly, trailing cheese and loaded with pizza flavor. The baking method is what makes it — 375°F in a preheated oven produces the even, deep golden color across every surface without burning the exposed pepperoni on top. This is the kind of pull-apart bread that looks like you spent serious time on it but comes together in 45 minutes using store-bought dough.
Recipe Quick Info
| Detail | Info |
|---|---|
| Prep Time | 20 minutes |
| Cook Time | 25 minutes |
| Total Time | 45 minutes |
| Servings | 8 |
| Cuisine | American / Italian-American |
| Course | Appetizer / Snack / Game Day |
| Cooking Method | Baking |
| Estimated Calories | ~380 per serving |
| Difficulty | Easy |
Why You’ll Love This Pepperoni Pizza Pull Apart Ring
- It looks wildly impressive for the effort involved. A ring shape formed from stuffed dough balls arranged in a circle and baked until golden and bubbling is genuinely stunning — and it takes 20 minutes of hands-on work.
- The pepperoni crisps directly on top during baking. At 375°F, the pepperoni rounds placed on top of the ring caramelize and cup slightly at the edges, becoming salty, crispy, and deeply flavorful — exactly as the photo shows.
- Melted mozzarella is built into every single piece. Each dough ball is stuffed with a cube of whole-milk mozzarella, so every pull produces that satisfying cheese stretch nobody can resist.
- Garlic herb butter ties every element together. A brushed coat of melted garlic butter mixed with Italian seasoning, dried parsley, and Parmesan goes on before baking — it’s the detail that separates this from any basic pizza bread.
- Store-bought dough works perfectly and saves 30+ minutes. Refrigerated pizza dough or biscuit dough both bake beautifully into this ring without any yeast work, rising time, or bread-making experience.
- Marinara on the side is non-negotiable. The warm dipping sauce isn’t decorative — it’s half the eating experience, adding acidity and tomato richness that balances the buttery, cheesy ring.
- Scales effortlessly for any crowd size. Use one can of dough for 8 servings or two cans for a double ring that feeds 16 — the technique is identical either way.
Ingredients
For the Dough and Assembly
- 2 cans (16.3 oz each) refrigerated pizza dough or biscuit dough
- 8 oz whole-milk mozzarella block, cut into approximately 24 small cubes (¾-inch each)
- 4 oz sliced pepperoni (divided — half for stuffing, half for topping)
For the Garlic Herb Butter
- 4 tablespoons unsalted butter, melted
- 3 cloves garlic, finely minced
- 1 teaspoon dried Italian seasoning
- 1 teaspoon dried parsley
- ¼ teaspoon kosher salt
- ¼ teaspoon black pepper
- ¼ teaspoon crushed red pepper flakes (optional)
For the Topping
- ½ cup freshly grated Parmesan
- Additional pepperoni slices (for topping, as shown in the photo)
- 1 teaspoon dried Italian seasoning (for final dusting)
For Serving
- 1 cup marinara sauce, warmed (for dipping, served in a small ceramic bowl as shown)
Optional Add-Ins
- ½ cup shredded provolone (mixed with the mozzarella cubes for extra melt complexity)
- 2 tablespoons sliced black olives (tuck inside the dough balls alongside the mozzarella)
- ¼ cup diced green bell pepper (a small piece inside each ball for a classic pizza flavor profile)
Substitution Table
| Original Ingredient | Substitution | Notes |
|---|---|---|
| Refrigerated pizza dough | Crescent roll dough | Flakier, slightly sweeter result; same baking time |
| Whole-milk mozzarella block | String cheese pieces | Easy to cut into portions; melts identically |
| Regular pepperoni | Turkey pepperoni | Lower fat; doesn’t cup as dramatically but still crisps |
| Unsalted butter | Olive oil | Less rich but still produces a golden, well-seasoned crust |
| Parmesan (topping) | Pecorino Romano | Saltier — reduce added salt in the garlic butter by ¼ tsp |
| Marinara (dipping) | Ranch dressing or garlic aioli | Very different flavor profile; both are crowd-pleasers |
Kitchen Tools Needed
- Rimmed baking sheet (half-sheet pan) or 12-inch oven-safe skillet
- Parchment paper
- Small saucepan or microwave-safe bowl (for melting garlic butter)
- Pastry brush or silicone brush (for applying garlic herb butter)
- Chef’s knife and cutting board
- Measuring cups and spoons
- Small oven-safe ramekin or ceramic bowl (to place in the center of the ring during baking — keeps the ring shape intact)
- Oven mitts
- Instant-read thermometer (optional but recommended)
How to Bake a Pepperoni Pizza Pull Apart Ring That Holds Its Shape
Step 1: Preheat the Oven and Prepare the Pan (5 minutes)
Preheat your oven to 375°F and position the rack in the center. Line a rimmed baking sheet with parchment paper. Place a small oven-safe ramekin or ceramic bowl in the center of the prepared pan — this acts as a mold to keep the ring shape intact during baking, preventing the dough balls from sliding toward the middle as they rise and expand. Lightly grease the outside of the ramekin with non-stick spray so the dough doesn’t stick to it.
Step 2: Make the Garlic Herb Butter (3 minutes)
Melt the butter in a small saucepan over low heat or in a microwave-safe bowl in 20-second intervals. Stir in the minced garlic, Italian seasoning, dried parsley, salt, pepper, and red pepper flakes if using. Set aside within reach of your assembly area — you’ll use this both during assembly (inside each ball) and as a final brush coat before baking.
Embedded Tip: Make the garlic butter before you start assembling the dough balls so it’s at brushing temperature — not too hot to handle but still fully liquid. Butter that’s too hot will start to cook the dough surface before it even enters the oven, which can affect how evenly the ring bakes.
Step 3: Portion and Fill the Dough Balls (10 minutes)
Open both cans of dough and cut each portion into 12 roughly equal pieces — you’ll have approximately 24 total pieces. Take one piece of dough, flatten it slightly in your palm, and place one mozzarella cube and 1–2 small pepperoni slices in the center. Pull the edges of the dough up around the filling and pinch firmly to seal — any gap will let the mozzarella escape during baking.
Roll the sealed ball between your palms to smooth it, then dip it lightly in the garlic herb butter before placing it on the parchment-lined pan against the outside of the ramekin. Repeat with all remaining dough pieces, arranging them in a circular ring around the ramekin, pressing them gently against each other so they touch and will bake into a unified ring shape.
Embedded Tip: Seal each dough ball as tightly as possible before placing it in the ring. A loose seal allows the mozzarella to melt out and pool on the pan during baking rather than staying inside the pull-apart piece where it belongs. Firm pinching and a smooth roll are all that’s needed — take the extra 5 seconds per ball.
Step 4: Add the Topping and Bake (25 minutes)
Brush the assembled ring generously with the remaining garlic herb butter, covering all visible dough surfaces. Scatter freshly grated Parmesan evenly over the entire ring. Arrange the remaining pepperoni slices on top of the ring — place them flat, pressing lightly so they adhere to the buttered surface. Dust with the additional teaspoon of Italian seasoning. The photo shows pepperoni distributed evenly across every section of the ring, which is exactly what you’re going for.
Slide the pan into the preheated 375°F oven and bake for 22–25 minutes. During this time, the dough balls will puff and join together, the Parmesan will toast to a golden crust, and the pepperoni on top will begin to cup and crisp at the edges — that curling and slight charring you see in the photo is the natural result of the pepperoni fat rendering under the oven’s heat.
At the 20-minute mark, check the ring: the dough should be deep golden-brown, with visible browning at the points where adjacent balls meet. Per USDA guidelines on safe internal temperatures for baked dough products, the interior of stuffed baked dough should reach 190°F to be fully set. An instant-read thermometer inserted into the thickest section of the ring will confirm this quickly.
Step 5: Rest, Remove the Ramekin, and Serve
Remove the baking sheet from the oven and let the ring rest for 5 minutes before carefully lifting out the center ramekin — it should slide free cleanly at this point. Transfer the ring (still on parchment) to a large serving plate or serving board. Place the warm marinara in a small ceramic bowl in the center of the ring, exactly as shown in the photo. Serve immediately while the cheese is fully molten and the pepperoni is at its crispiest.
Pro Tips for the Best Baked Pepperoni Pizza Pull Apart Ring
- Don’t open the oven door before the 20-minute mark — this is the critical baking method tip. Opening the door too early causes the oven temperature to drop before the dough balls have fully set their structure, which can make them collapse slightly inward and lose the defined pull-apart shape. Set a timer and use the oven light to monitor visually if needed.
- Use block mozzarella, not shredded. Pre-shredded mozzarella melts too fast and runs out of the dough balls before the exterior has a chance to set around it. A solid cube of whole-milk block mozzarella stays contained through the early bake and produces a proper molten center.
- Press the dough balls firmly against each other when arranging the ring. They should be touching — not just close. The points where adjacent balls make contact are where the ring fuses together and becomes pull-apart rather than just a collection of individual rolls.
- Brush with garlic butter twice — once when assembling and once right before the pan goes in. The first coat goes on when you dip each ball during assembly. The second coat, applied just before baking, is what gives the Parmesan and herbs something to cling to and creates the deep golden color in the photo.
- Warm the marinara before serving. Cold marinara against hot, just-baked dough and molten cheese creates an unpleasant temperature contrast that distracts from the eating experience. Two minutes on the stovetop over low heat or 60 seconds in the microwave is all it needs.
Common Mistakes to Avoid
1. Opening the oven door too early — the method-specific baking mistake.
Fix: The dough ring needs uninterrupted heat for the first 20 minutes to set its structure and develop the golden crust visible in the photo. Every early door opening drops the temperature and risks collapsing the rise. Wait until at least the 20-minute mark before checking.
2. Skipping the center ramekin.
Fix: Without something in the center, the dough balls will drift inward as they expand during baking and the ring loses its circular shape. A small oven-safe ramekin or even a ball of aluminum foil in the center keeps the ring form consistent through the full bake.
3. Using shredded mozzarella instead of block.
Fix: Shredded cheese melts too quickly and escapes through any small gaps in the dough seal before the exterior sets. A ¾-inch cube of block mozzarella holds its shape long enough for the dough to firm around it, producing a molten center rather than a pool of cheese on the pan.
4. Not sealing the dough balls firmly enough.
Fix: Even a small unsealed gap becomes a significant hole under oven heat, and the melting cheese will find it. Pinch firmly, roll smooth, and inspect each ball before placing it in the ring. If you can see the filling, seal it again before it goes down.
5. Placing the pepperoni only on top.
Fix: Stuffing pepperoni inside the dough balls (not just decorating the top) is what gives each individual pull-apart piece its pizza flavor. Top pepperoni adds crispiness and visual appeal; inside pepperoni adds the actual taste. Both are needed for the full effect.
6. Baking without parchment paper.
Fix: The melting cheese and garlic butter will caramelize onto the pan surface and make the ring nearly impossible to remove cleanly without parchment. Always line the pan before assembly — it takes 10 seconds and prevents a frustrating cleanup situation.
7. Serving the ring directly from the baking pan.
Fix: Transferring to a serving plate with the marinara in the center (as shown in the photo) is part of the presentation — it’s what makes this feel like a centerpiece dish rather than a sheet pan snack. A wide, flat spatula under the parchment makes the transfer easy.
Variations
Leaner / Higher-Protein Version
Swap standard pepperoni for turkey pepperoni (significantly lower in fat) and use part-skim mozzarella cut into the same-sized cubes. Add ¼ cup of cooked, crumbled ground turkey or chicken sausage inside each dough ball alongside the cheese — this increases the protein content per serving meaningfully without changing the baking time or ring shape. The result is a lighter but still very satisfying pull-apart ring.
Vegetarian Version
Remove the pepperoni entirely and fill each dough ball with a mozzarella cube, a small piece of roasted red pepper, and 3–4 baby spinach leaves pressed flat. The moisture from the roasted peppers and spinach steams slightly inside the dough during baking, keeping the interior tender. Top the ring with Parmesan, Italian herbs, and thinly sliced black olives instead of pepperoni rounds. The visual is different but equally appealing.
Spicy Version
Add ½ teaspoon of crushed red pepper flakes to the garlic herb butter (in addition to the optional amount listed), and substitute spicy or hot pepperoni for the regular variety. Tuck a small slice of pickled jalapeño inside each ball alongside the mozzarella and pepperoni. The heat builds gradually as you eat and contrasts excellently with the richness of the butter and cheese — serve with a cooling ranch dipping sauce alongside the marinara.
Gluten-Free Version
Use a certified gluten-free pizza dough (several brands are now widely available in refrigerated sections) in a direct 1:1 replacement. GF dough can be slightly stickier to work with — dust your hands lightly with GF flour or cornstarch when portioning and rolling the balls. The baking time remains the same; watch for the same golden color cues since GF doughs can sometimes brown slightly faster than wheat-based versions.
Low-Carb / Keto Version
Replace the standard pizza dough with a fathead dough made from 2 cups shredded mozzarella, 2 oz cream cheese, 1 egg, and ¾ cup almond flour — mix, microwave 90 seconds, stir, and cool before portioning. Fathead dough is higher in fat and protein and requires slightly shorter baking — check at 18 minutes rather than 22. This variation requires a genuinely different dough preparation but uses an identical ring-assembly and baking technique. Pair with Broccoli Cheese Bites — Best Baked 25-Min Easy Snack for a fully low-carb experience.
What to Serve With This Pepperoni Pizza Pull Apart Ring
- Warm marinara sauce — shown in the photo and the essential dipping partner; serve in a small bowl placed in the center of the ring.
- Ranch dressing — a classic alternative dip that works especially well with the garlic herb butter and Parmesan topping.
- Caesar salad — the crisp romaine and sharp dressing provide a fresh, acidic contrast to the rich, cheesy ring.
- A cold lager or sparkling water with lemon — both refresh the palate between pulls and balance the salt and richness of the pepperoni and cheese.
- Sliced crudités with hummus — lightens the overall spread at a party table without competing with the ring’s flavors.
- Garlic aioli — doubles down on the garlic already in the butter and pairs well with the crispy pepperoni surface.
For another baked pizza-inspired appetizer, check out Broccoli Cheese Bites — Best Baked 25-Min Easy Snack— same bold pizza flavor in a different format that works great alongside the ring at a party spread.
Storage Instructions
Refrigerator
Allow the ring to cool completely before storing — covering it while warm traps steam that softens the crust. Pull apart individual pieces and store in an airtight container lined with a paper towel to absorb any residual moisture. The pepperoni pizza pull apart ring keeps well in the refrigerator for up to 3 days. The crust softens slightly overnight but can be restored in the oven.
Freezer
Individual pull-apart pieces freeze well for up to 2 months. Cool completely, wrap each piece in plastic wrap, and place in a freezer-safe zip-lock bag with excess air pressed out. Freeze flat. Thaw overnight in the refrigerator before reheating. The full ring shape does not freeze or reheat as effectively as individual pieces — portion before freezing for best results.
Shelf Life Summary
| Storage Method | Duration |
|---|---|
| Room temperature | No more than 2 hours |
| Refrigerator (airtight) | Up to 3 days |
| Freezer (individual pieces) | Up to 2 months |
Reheating Instructions
Oven (Best Method — Restores the Crust)
Preheat to 350°F. Place individual pieces on a wire rack over a baking sheet and heat uncovered for 8–10 minutes until the crust is re-crisped and the cheese inside is molten again. Do not wrap in foil — it traps steam and produces a soft, bread-like texture rather than the golden crust you’re after.
Air Fryer (Fastest for Crunch)
Set to 350°F and heat individual pieces for 4–5 minutes. The circulating air re-crisps the exterior very effectively and re-melts the interior cheese faster than the oven method. This is the best approach for a single serving.
Microwave (Quickest, Softest Result)
Place a piece on a microwave-safe plate, cover with a damp paper towel, and heat on medium power (70%) for 40–60 seconds until warmed through. The crust will be soft rather than crispy — acceptable for convenience but not ideal for texture. For all reheating scenarios involving cheese-stuffed baked dough, refer to FDA guidelines on safe food reheating temperatures and ensure the internal temperature reaches 165°F.
Nutrition Facts (Per Serving — Based on 8 Servings)
| Nutrient | Amount |
|---|---|
| Calories | ~380 |
| Total Fat | 18g |
| Saturated Fat | 9g |
| Cholesterol | 50mg |
| Sodium | 860mg |
| Total Carbohydrates | 38g |
| Dietary Fiber | 1g |
| Total Sugars | 3g |
| Protein | 16g |
| Calcium | 200mg |
| Iron | 2mg |
Nutrition Disclaimer: These values are estimated using standard nutrition software based on the recipe as written with 8 servings. Actual values will vary significantly based on the specific brand of pizza dough used, the size of each dough ball, and any ingredient substitutions. The marinara dipping sauce is not included in the per-serving count. For precise dietary tracking, input your exact ingredients into a verified nutrition calculator.
Frequently Asked Questions
Can I use crescent roll dough instead of pizza dough?
Yes — crescent roll dough produces a slightly flakier, more buttery result than pizza dough. Roll each triangle portion into a ball around the filling the same way. The bake time is nearly identical; check at 20 minutes since crescent dough can brown slightly faster than standard pizza dough.
How do I keep the ring shape from collapsing during baking?
The center ramekin is the key. Without it, the dough balls drift inward as they expand under heat and the ring loses its circular definition. A small oven-safe ramekin, a ball of aluminum foil, or even a greased mason jar ring placed in the center before assembly keeps the shape consistent through the entire bake.
Can I assemble this pepperoni pizza pull apart ring the night before?
Yes — assemble through Step 4 (apply butter and toppings), cover the entire pan tightly with plastic wrap, and refrigerate overnight. The next day, let it come to room temperature for 15 minutes before baking. Add 3–5 minutes to the bake time since the pan will be cold from the refrigerator.
Why does my pepperoni on top burn before the dough is fully golden?
This typically happens when the rack is too close to the top heating element. Position the rack in the center of the oven — not upper-middle — for this recipe. The pepperoni is already pre-cooked and only needs light crisping, while the dough below needs full heat penetration from all directions.
Can I make this with homemade pizza dough?
Absolutely. Any standard pizza dough recipe that yields approximately 2 lbs of dough works well. Let the dough rest for the recommended rise time before portioning and assembling. Homemade dough tends to produce a chewier, more complex-flavored result than refrigerated store-bought dough, which some people strongly prefer.
How many dough balls do I need for a good-looking ring?
Twenty to twenty-four dough balls is the ideal range for a half-sheet pan ring. Fewer than 18 produces a sparse ring with visible gaps; more than 24 can overcrowd the pan and prevent the balls from browning properly on the sides. The recipe as written produces approximately 24 balls — aim for this number.
Can I add sauce inside the dough balls?
Yes, but sparingly. A small ½ teaspoon of marinara inside each ball alongside the mozzarella and pepperoni adds flavor depth. Too much sauce makes the dough soggy inside and can prevent a clean seal — keep it to a small smear rather than a full spoonful.
Is there a dairy-free version?
Yes — substitute dairy-free mozzarella shreds (or a firm plant-based cheese cut into cubes) and use vegan butter in the garlic herb butter mixture. Omit the Parmesan or replace it with nutritional yeast mixed with a pinch of salt. The baking technique and timing are unchanged, though dairy-free cheeses vary significantly in how they melt — test your brand beforehand if possible.
Expert Chef Tips
Use a bench scraper to portion the dough quickly and evenly. Rather than cutting dough with a knife (which can compress it unevenly), a bench scraper pressed straight down divides the dough into clean, consistent portions without dragging. Consistent size means consistent baking — every ball finishes at the same moment.
Rotate the pan once at the 15-minute mark if your oven runs hot on one side. Home ovens often have hot spots that cause uneven browning — one side of the ring can start to over-brown while the opposite side is still pale. A single 180-degree rotation at the 15-minute mark corrects this without opening the door long enough to affect the rise significantly.
Apply a final brush of garlic butter immediately when the ring comes out of the oven. One last quick brush while the ring is still hot allows the butter to absorb into the just-crisped crust and intensifies both the garlic aroma and the sheen of the finished ring. This is what gives it that freshly-from-a-bakery appearance rather than a home-baked look.
Serve within 10 minutes of baking for the best cheese pull. Mozzarella is at its stretchiest and most satisfying immediately after it melts — as it cools, it begins to firm up and the pull-apart experience becomes less dramatic. Time your bake to finish just before you’re ready to bring it to the table.
Recipe Summary
This pepperoni pizza pull apart ring is assembled from 24 stuffed dough balls — each filled with a cube of whole-milk mozzarella and a slice of pepperoni, dipped in garlic herb butter, and arranged in a circle around a center ramekin on a parchment-lined baking sheet. Topped with Parmesan, Italian herbs, and additional pepperoni rounds, the ring bakes at 375°F for 22–25 minutes until deeply golden and fragrant, with crispy pepperoni on top and molten cheese inside every pull-apart piece. It serves 8, takes 45 minutes total, and is served immediately with warm marinara in the center.
The Ring That Becomes the Reason Everyone Shows Up Early
Pull-apart bread has an almost unfair advantage at any table — it invites people in, encourages sharing, and disappears faster than anything else you set out. This pepperoni pizza pull apart ring takes that concept and turns it into a centerpiece that genuinely earns the attention it gets. The golden crust, the crispy pepperoni, the cheese pull, the marinara in the center — every element is doing its job. Make it once and it will become the recipe people request by name every time you host. That’s the kind of recipe worth keeping.
Pepperoni Pizza Pull Apart Ring — Best Baked 45-Min
Description
Some recipes earn their spot at every game day table, every party spread, and every Friday night when nobody wants to cook but everyone wants something spectacular. This pepperoni pizza pull apart ring is exactly that recipe. The photo shows it in full glory: a golden, wreath-shaped ring of dough balls packed with melted mozzarella, topped with crispy cupped pepperoni rounds, dusted with Parmesan and Italian herbs, and served on a speckled ceramic plate with a ceramic cup of warm marinara on the side.
Ingredients
Instructions
-
How to Bake a Pepperoni Pizza Pull Apart Ring That Holds Its Shape
-
Step 1: Preheat the Oven and Prepare the Pan (5 minutes)
-
Preheat your oven to 375°F and position the rack in the center. Line a rimmed baking sheet with parchment paper. Place a small oven-safe ramekin or ceramic bowl in the center of the prepared pan — this acts as a mold to keep the ring shape intact during baking, preventing the dough balls from sliding toward the middle as they rise and expand. Lightly grease the outside of the ramekin with non-stick spray so the dough doesn't stick to it.
-
Step 2: Make the Garlic Herb Butter (3 minutes)
-
Melt the butter in a small saucepan over low heat or in a microwave-safe bowl in 20-second intervals. Stir in the minced garlic, Italian seasoning, dried parsley, salt, pepper, and red pepper flakes if using. Set aside within reach of your assembly area — you'll use this both during assembly (inside each ball) and as a final brush coat before baking.
-
Embedded Tip: Make the garlic butter before you start assembling the dough balls so it's at brushing temperature — not too hot to handle but still fully liquid. Butter that's too hot will start to cook the dough surface before it even enters the oven, which can affect how evenly the ring bakes.
-
Step 3: Portion and Fill the Dough Balls (10 minutes)
-
Open both cans of dough and cut each portion into 12 roughly equal pieces — you'll have approximately 24 total pieces. Take one piece of dough, flatten it slightly in your palm, and place one mozzarella cube and 1–2 small pepperoni slices in the center. Pull the edges of the dough up around the filling and pinch firmly to seal — any gap will let the mozzarella escape during baking.
-
Roll the sealed ball between your palms to smooth it, then dip it lightly in the garlic herb butter before placing it on the parchment-lined pan against the outside of the ramekin. Repeat with all remaining dough pieces, arranging them in a circular ring around the ramekin, pressing them gently against each other so they touch and will bake into a unified ring shape.
-
Embedded Tip: Seal each dough ball as tightly as possible before placing it in the ring. A loose seal allows the mozzarella to melt out and pool on the pan during baking rather than staying inside the pull-apart piece where it belongs. Firm pinching and a smooth roll are all that's needed — take the extra 5 seconds per ball.
-
Step 4: Add the Topping and Bake (25 minutes)
-
Brush the assembled ring generously with the remaining garlic herb butter, covering all visible dough surfaces. Scatter freshly grated Parmesan evenly over the entire ring. Arrange the remaining pepperoni slices on top of the ring — place them flat, pressing lightly so they adhere to the buttered surface. Dust with the additional teaspoon of Italian seasoning. The photo shows pepperoni distributed evenly across every section of the ring, which is exactly what you're going for.
-
Slide the pan into the preheated 375°F oven and bake for 22–25 minutes. During this time, the dough balls will puff and join together, the Parmesan will toast to a golden crust, and the pepperoni on top will begin to cup and crisp at the edges — that curling and slight charring you see in the photo is the natural result of the pepperoni fat rendering under the oven's heat.
-
At the 20-minute mark, check the ring: the dough should be deep golden-brown, with visible browning at the points where adjacent balls meet. Per USDA guidelines on safe internal temperatures for baked dough products, the interior of stuffed baked dough should reach 190°F to be fully set. An instant-read thermometer inserted into the thickest section of the ring will confirm this quickly.
-
Step 5: Rest, Remove the Ramekin, and Serve
-
Remove the baking sheet from the oven and let the ring rest for 5 minutes before carefully lifting out the center ramekin — it should slide free cleanly at this point. Transfer the ring (still on parchment) to a large serving plate or serving board. Place the warm marinara in a small ceramic bowl in the center of the ring, exactly as shown in the photo. Serve immediately while the cheese is fully molten and the pepperoni is at its crispiest.
Nutrition Facts
Servings 8
- Amount Per Serving
- Calories 380kcal
- % Daily Value *
- Total Fat 18g28%
- Saturated Fat 9g45%
- Protein 16g32%
* Percent Daily Values are based on a 2,000 calorie diet. Your daily value may be higher or lower depending on your calorie needs.