Cottage Cheese Oat Pancakes — Best 25-Min Easy Stack


Cottage Cheese Oat Pancakes That Are Fluffy, Golden, and Actually Filling
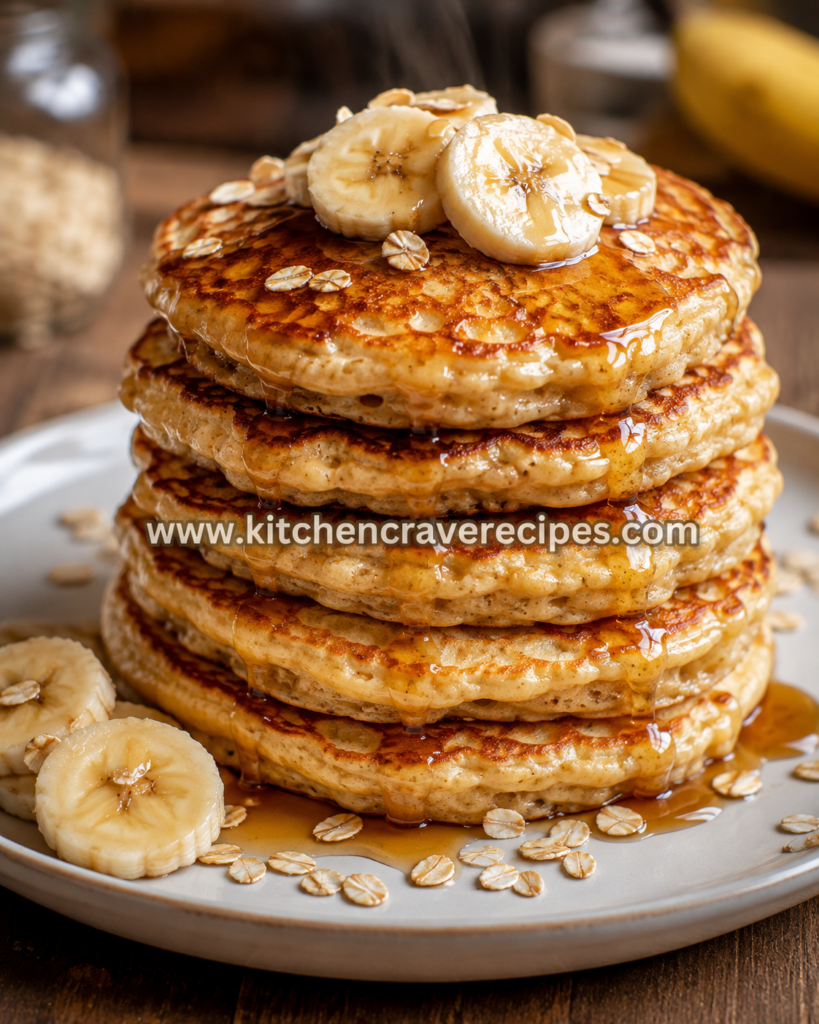
Pancakes that taste like a treat and fuel you like a real breakfast — that’s exactly what these cottage cheese oat pancakes deliver. The stack in the photo says everything: six thick, deeply golden pancakes piled high on a gray plate, drizzled with maple syrup that pools at the base, topped with fresh banana slices, and scattered with rolled oats. The edges on each pancake are caramelized from the skillet, the centers are soft and slightly textured from the blended oats, and the whole stack looks like something you’d wait in line for at a weekend brunch spot.
The cottage cheese does two things here that regular pancake recipes miss: it adds serious protein to every bite and keeps the interior moist without making the batter heavy. Blended rolled oats replace most of the flour, adding fiber and a subtle nuttiness that standard pancakes completely lack. Each serving delivers over 20 grams of protein — from cottage cheese, eggs, and oats — making this one of the smartest breakfasts you can make in 25 minutes.
Recipe Quick Info
| Detail | Info |
|---|---|
| Prep Time | 10 minutes |
| Cook Time | 15 minutes |
| Total Time | 25 minutes |
| Servings | 4 (makes 12 pancakes) |
| Cuisine | American |
| Course | Breakfast / Brunch |
| Cooking Method | Sautéing |
| Estimated Calories | ~380 per serving (3 pancakes) |
| Difficulty | Easy |
Why You’ll Love These Cottage Cheese Oat Pancakes
- Over 20 grams of protein per serving — from whole-food ingredients only. Cottage cheese, eggs, and oats each contribute protein without any powder or supplement needed.
- They taste like real pancakes, not a health substitute. The blended batter produces a fluffy, tender interior with golden, slightly crispy edges that rival any traditional buttermilk stack.
- The banana and maple syrup topping is shown in the photo for a reason. The natural sweetness of ripe banana slices and warm maple syrup complements the subtle savory-tang of the cottage cheese in a way that feels balanced, not sweet-on-sweet.
- One blender, one skillet — minimal cleanup. All wet ingredients get blended smooth, the skillet does the cooking, and the whole operation is done in 25 minutes with almost no mess.
- Naturally gluten-free adaptable with one swap. Certified gluten-free oats make this recipe accessible without any structural changes to the batter or cooking technique.
- Meal-prep and freezer friendly. These pancakes reheat beautifully in a toaster and freeze flat for up to 2 months — perfect for weekday mornings when you need a fast, high-protein breakfast.
Ingredients
For the Pancake Batter
- 1 cup whole-milk cottage cheese (full-fat, 4% milkfat)
- 1 cup rolled oats (old-fashioned, not instant)
- 2 large eggs
- 1 ripe banana, mashed (plus extra slices for topping)
- 2 tablespoons honey or maple syrup
- 1 teaspoon vanilla extract
- ½ teaspoon cinnamon
- ½ teaspoon baking powder
- Pinch of kosher salt
For the Skillet
- 1–2 tablespoons unsalted butter or coconut oil (for greasing between batches)
For Topping (as shown in the photo)
- 1 ripe banana, sliced into rounds
- 3–4 tablespoons pure maple syrup
- 2 tablespoons rolled oats (for garnish, scattered on the plate)
Optional Add-Ins
- 1 tablespoon ground flaxseed (adds omega-3s; blend directly into the batter)
- ½ teaspoon nutmeg (deepens the warm spice profile alongside cinnamon)
- 1 scoop vanilla protein powder (increases protein by ~20g per batch; add 2 tablespoons of milk to thin the batter slightly)
Substitution Table
| Original Ingredient | Substitution | Notes |
|---|---|---|
| Whole-milk cottage cheese | 2% cottage cheese | Slightly less rich; protein content nearly identical |
| Rolled oats | Certified GF rolled oats | 1:1 swap; makes the recipe fully gluten-free |
| Honey / maple syrup (in batter) | Mashed very ripe banana only | Skip the sweetener and increase banana to 1½ bananas |
| Unsalted butter (for skillet) | Coconut oil or avocado oil spray | Coconut oil adds a very subtle sweetness; spray reduces total fat |
| Ripe banana (in batter) | Unsweetened applesauce (¼ cup) | Milder flavor; less natural sweetness than banana |
| Whole eggs | 2 flax eggs (1 tbsp ground flax + 3 tbsp water each) | Makes the recipe vegan; texture is slightly denser |
Kitchen Tools Needed
- High-speed blender or food processor (essential for blending oats smooth)
- Large non-stick skillet or griddle (12-inch)
- Spatula (wide, thin-edged — critical for clean flips)
- ¼-cup measuring cup or ladle (for consistent portion sizes)
- Mixing bowl (for mashing banana before blending)
- Measuring cups and spoons
- Plate or tray for resting cooked pancakes
How to Sauté Cottage Cheese Oat Pancakes to Golden Perfection
Step 1: Blend the Batter (5 minutes)
Add the cottage cheese, rolled oats, eggs, mashed banana, honey (or maple syrup), vanilla extract, cinnamon, baking powder, and salt to a high-speed blender. Blend on high for 30–45 seconds until completely smooth — the batter should look uniform and slightly thick, with no visible oat flakes or cottage cheese curds. Scrape down the sides once if needed and blend for another 10 seconds to incorporate everything fully.
Embedded Tip: Let the blended batter rest for 3–5 minutes before cooking. The oats absorb liquid as they sit, and the batter thickens slightly — this resting period produces fluffier pancakes because the batter holds its shape better when it hits the hot pan.
Step 2: Preheat the Skillet (3 minutes)
Place a large non-stick skillet or griddle over medium heat. Allow it to preheat for 2–3 full minutes — a properly preheated skillet is the single most important factor in getting those deeply golden, evenly browned edges shown in the photo. Add ½ tablespoon of butter and let it melt and foam across the surface. When the foam begins to subside and the butter smells nutty rather than just milky, the skillet is at the right temperature.
Step 3: Cook the First Batch (6–8 minutes)
Pour ¼ cup of batter per pancake onto the skillet, leaving at least 1 inch between each one — you should fit 3 pancakes comfortably in a 12-inch skillet without crowding. Watch for the bubbles: within 2–3 minutes, small bubbles will begin forming across the surface of each pancake. When those bubbles reach the center and the edges look set and matte rather than wet and glossy, the pancake is ready to flip.
Embedded Tip: Resist the urge to press down on the pancakes with the spatula after flipping. Pressing releases the trapped steam that creates the fluffy interior — let the second side cook undisturbed for 1–2 minutes until the bottom is golden-brown and the center feels slightly springy when pressed gently with a fingertip.
Flip each pancake with a wide, thin-edged spatula in one confident motion. Cook the second side for 1–2 minutes. The finished pancake should feel set throughout with no raw, soft center when lifted. Transfer to a plate and cover loosely with a clean kitchen towel to keep warm while you cook the remaining batches.
Step 4: Adjust Heat and Grease Between Batches (2 minutes)
Wipe out any dark butter residue with a folded paper towel before each new batch — burnt butter from the previous round turns the next batch bitter and uneven in color. Add fresh butter between every batch and allow it to melt before pouring new batter. If the skillet runs too hot and the pancakes are browning before the bubbles appear, reduce the heat to medium-low and allow the pan to cool for 30 seconds before continuing.
Step 5: Stack, Garnish, and Serve
Stack the finished pancakes on a gray or white plate as shown in the photo — six to a stack makes for the most visually satisfying presentation. Layer banana slices on top of the stack, drizzle maple syrup generously over everything, and scatter a tablespoon of rolled oats around the base of the plate. Serve immediately while the stack is still warm and the syrup is running down the sides.
Pro Tips for Perfect Sautéed Cottage Cheese Oat Pancakes
- Preheat the skillet before adding butter — not after. A cold pan with butter added immediately heats the butter at the wrong rate, causing it to brown unevenly. Heat the skillet first, then add the butter and watch the foam — the moment the foam fades is when the pan is perfectly ready for batter.
- Use a ¼-cup measure for every pour. Consistent batter portions mean consistent cooking times across all twelve pancakes. Eyeballed pours result in uneven sizes that cook at different rates and look mismatched in the stack.
- Don’t flip more than once. These pancakes are done in two sides — flipping multiple times dries them out and destroys the structure built by the baking powder. One flip, confident and decisive, is all that’s needed.
- Medium heat is the sweet spot — this is the method-specific sautéing tip. Medium-high is too aggressive for a batter this thick and protein-rich: the outside browns before the center cooks through. Medium heat allows the inside to set fully while the surface caramelizes gradually to that deep golden color you see in the photo.
- Use full-fat cottage cheese for the best texture. Lower-fat varieties have a higher water content that can make the batter thinner than ideal. Full-fat (4% milkfat) produces the thickest, most cohesive batter and the fluffiest cooked result.
Common Mistakes to Avoid
1. Using heat that’s too high during sautéing — the method-specific mistake.
Fix: Medium heat is essential here. High heat caramelizes the exterior before the thick, protein-rich batter has time to cook through, leaving raw centers under a browned surface. If pancakes are browning in under 90 seconds, the heat is too high — reduce it immediately.
2. Not blending the batter fully smooth.
Fix: Partially blended batter with visible oat flakes or cottage cheese curds produces uneven texture and patchy color. Blend for the full 30–45 seconds on high speed and scrape down the sides if needed. The batter should look completely uniform before resting.
3. Skipping the resting period after blending.
Fix: Batter poured immediately into the skillet is thinner than ideal and spreads too wide, producing flat, lacy-edged pancakes rather than thick, fluffy ones. Three to five minutes of rest lets the oats absorb moisture and the batter thicken to the right consistency.
4. Not wiping the skillet between batches.
Fix: Residual dark butter from the previous batch burns into the bottom of subsequent pancakes, adding bitterness and uneven color. A quick wipe with a folded paper towel takes 10 seconds and makes every batch as clean-tasting as the first.
5. Flipping too early before bubbles set.
Fix: A pancake flipped before the surface bubbles reach the center and the edges look set will tear and collapse. Wait until the bubbles are fully formed across the top and the perimeter looks matte and dry — this visual cue is more reliable than any timer.
6. Pressing down on the pancakes after flipping.
Fix: Pressing with the spatula compresses the pancake and forces out the steam that creates the fluffy interior. After flipping, put the spatula down and let the second side cook completely undisturbed.
7. Using instant oats instead of rolled oats.
Fix: Instant oats break down into a near-powder when blended, producing a gummy, dense batter. Rolled oats blend into a coarser, more structured flour that gives these pancakes their characteristic slightly-textured, fluffy interior.
Variations
Extra-Protein Version
Add 1 scoop (about 30g) of vanilla or unflavored protein powder directly to the blender with all other ingredients. Thin the batter with 2–3 tablespoons of milk or water since the powder absorbs liquid and thickens the mix significantly. This version adds approximately 20–25 additional grams of protein per batch while keeping the same sautéing technique and cook time unchanged.
Vegan Version
Replace the eggs with 2 flax eggs (1 tablespoon ground flaxseed mixed with 3 tablespoons of water per egg, rested for 5 minutes until gel forms) and swap the cottage cheese for plain, whole-milk coconut yogurt or a thick plant-based cottage cheese alternative. The texture will be slightly denser and less fluffy but holds together well in the skillet. Cook on medium-low heat rather than medium, as the vegan batter browns a bit faster without eggs providing structure.
Spicy-Sweet Version
Add ½ teaspoon of cayenne pepper and ¼ teaspoon of cardamom to the batter alongside the cinnamon. The heat from the cayenne builds subtly in the background and contrasts well with the natural sweetness of the banana and maple syrup — it’s an unexpected combination that works particularly well for adults who want something slightly more complex than a standard breakfast stack.
Gluten-Free Version
The only swap needed is replacing the rolled oats with certified gluten-free rolled oats in the same quantity. Standard oats are often processed in facilities that also handle wheat, which can introduce cross-contamination — certified GF oats eliminate that risk. According to the FDA’s guidance on gluten-free labeling, products labeled gluten-free must contain fewer than 20 parts per million of gluten. All other ingredients in this recipe are naturally gluten-free.
Low-Carb / Keto Version
Replace the rolled oats with ½ cup of almond flour and ½ cup of unsweetened shredded coconut blended smooth, and substitute the banana with 2 tablespoons of unsweetened applesauce (to reduce the carbs from the natural fruit sugar). Use a keto-friendly sweetener like allulose instead of honey or maple syrup. The resulting pancakes are denser and smaller — use an 3-tablespoon portion rather than ¼ cup per pancake and cook on medium-low heat since almond flour browns faster than oat-based batter. Pair withHigh Protein Bang Bang Salmon — Best 25-Min Broiled for a fully low-carb breakfast spread.
What to Serve With Cottage Cheese Oat Pancakes
- Fresh banana slices and maple syrup — shown directly in the photo, and the most natural pairing for the banana already in the batter.
- Greek yogurt on the side — adds additional protein and a cool, tangy contrast to the warm, sweet stack.
- Fresh mixed berries — blueberries, raspberries, or strawberries add color, antioxidants, and bright acidity that cuts through the richness of the pancakes.
- A drizzle of almond butter or peanut butter — healthy fat, more protein, and a savory-sweet element that pairs well with the banana-cinnamon base.
- Soft scrambled eggs — rounds out the breakfast plate with additional protein and makes this genuinely filling until lunch.
- A glass of cold oat milk or whole milk — simple, balancing, and hydrating alongside a warm, filling stack.
For another protein-forward breakfast idea, check out High Protein Bang Bang Salmon — Best 25-Min Broiled — same high-fiber approach, zero cooking required, perfect for the mornings when you need breakfast ready before you wake up.
Storage Instructions
Refrigerator
Allow cooked pancakes to cool completely on a wire rack before storing — stacking them warm creates steam that makes them soggy. Layer them between sheets of parchment paper in an airtight container to prevent sticking. Stored this way, the cottage cheese oat pancakes keep well in the refrigerator for up to 4 days.
Freezer
These pancakes are excellent for freezer meal prep. Lay cooled pancakes in a single layer on a parchment-lined baking sheet and freeze for 1 hour until solid, then transfer to a zip-lock freezer bag. This flash-freeze step prevents them from sticking together. Frozen pancakes keep for up to 2 months and go directly from freezer to toaster — no thawing needed.
Shelf Life Summary
| Storage Method | Duration |
|---|---|
| Room temperature | No more than 2 hours |
| Refrigerator (parchment-layered, airtight) | Up to 4 days |
| Freezer (individually flash-frozen) | Up to 2 months |
Reheating Instructions
Toaster (Best Method — Restores Crispness)
Place one or two pancakes directly in the toaster on a medium setting for 1–2 cycles until warmed through and the edges re-crisp slightly. This is the fastest reheating method and the one that best restores the texture of the sautéed edges without any additional fat.
Microwave (Fastest for a Full Stack)
Place a stack of three pancakes on a microwave-safe plate, cover with a damp paper towel, and heat on medium power (70%) for 60–90 seconds. The damp towel prevents the pancakes from drying out. They won’t re-crisp in the microwave, but they’ll be hot, soft, and ready in under 2 minutes.
Skillet (Best for Texture Recovery)
Place the pancakes in a dry non-stick skillet over medium-low heat for 1–2 minutes per side until warmed through and the surface re-crisps slightly. No butter needed — the residual fat in the batter prevents sticking. For general food safety guidance when reheating any egg-containing dish, refer to FDA food safety reheating recommendations.
Nutrition Facts (Per Serving — 3 Pancakes, Based on 4 Servings)
| Nutrient | Amount |
|---|---|
| Calories | ~380 |
| Total Fat | 11g |
| Saturated Fat | 5g |
| Cholesterol | 115mg |
| Sodium | 320mg |
| Total Carbohydrates | 52g |
| Dietary Fiber | 4g |
| Total Sugars | 18g |
| Protein | 21g |
| Calcium | 120mg |
| Iron | 2mg |
Nutrition Disclaimer: These values are estimated using standard nutrition software based on the recipe as written with 4 servings of 3 pancakes each. Actual values will vary depending on the specific brands used, the size of the banana, and any ingredient substitutions. Topping choices like maple syrup and banana are not included in the per-serving count. For precise dietary tracking, input your exact ingredients into a verified nutrition calculator.
Frequently Asked Questions
Why use cottage cheese in pancakes instead of regular milk or buttermilk?
Cottage cheese adds significantly more protein per serving than either milk or buttermilk while also providing a creamy, moist texture to the batter. It blends completely smooth so there’s no curd texture in the finished pancake — just fluffiness, richness, and protein that standard pancake batter simply doesn’t deliver.
Do the pancakes taste like cottage cheese?
No — once blended and cooked, the cottage cheese flavor is entirely undetectable. What comes through instead is a slight richness and moisture that makes these pancakes taste more substantial than a typical stack, without any dairy tang or sourness.
Can I cook these on a griddle instead of a skillet?
Yes — a flat griddle works very well and lets you cook more pancakes simultaneously. Preheat the griddle to 350°F (medium setting on most electric griddles), grease lightly with butter or cooking spray, and follow the same visual cues: bubbles across the surface and set, matte edges before flipping.
What if my batter is too thin?
The batter should be thick enough to mound slightly when poured — if it spreads too fast and thin, the oats likely need more time to absorb moisture. Rest the batter for 5 minutes, stir once, and test again. If it’s still thin, add 1–2 tablespoons of additional oats to the blender and re-blend briefly.
Can I make the batter the night before?
Yes, with one note: store it covered in the refrigerator overnight and stir well before cooking. The batter will thicken considerably as the oats continue absorbing liquid — you may need to add 1–2 tablespoons of milk to bring it back to pourable consistency before sautéing.
How do I know when these are done cooking without cutting into them?
Press the center of the pancake gently with your fingertip after flipping — a fully cooked pancake will spring back immediately and feel set rather than soft and wet. If your finger leaves an indentation that doesn’t spring back, the center needs another 30–60 seconds of cook time.
Can I use steel-cut oats instead of rolled oats?
No — steel-cut oats are too dense and coarse to blend into a smooth batter even with a high-speed blender. They produce a gritty texture and don’t absorb liquid the same way as rolled oats. Stick with old-fashioned rolled oats for the best result.
Is this recipe suitable for toddlers and young children?
The ingredients are all whole-food and naturally sweetened with banana and a small amount of honey or maple syrup. Note that honey should not be given to children under 12 months due to the risk of infant botulism — for young toddlers, use maple syrup or mashed ripe banana exclusively as the sweetener.
Expert Chef Tips
Blend the oats before adding the wet ingredients for the most consistent batter. Blending dry oats first for 15–20 seconds creates an oat flour base before the cottage cheese and eggs go in — this makes the final blend faster and ensures no whole oat flakes survive in the finished batter. It’s a small sequencing change that produces a noticeably smoother result.
Use a banana that’s past its prime — not just ripe. A banana with dark spots and a very soft texture mashes almost to liquid and sweetens the batter more effectively than a firm yellow banana. The natural sugars are more concentrated in an overripe banana, which also contributes to better browning on the skillet surface.
Keep finished pancakes warm in a 200°F oven while you cook subsequent batches. Lay them flat on a baking sheet rather than stacking — stacking while hot traps steam and softens the edges you worked to brown. A 200°F oven is warm enough to keep them hot without continuing to cook them.
Clean your skillet between every single batch, not just when you notice buildup. A paper towel wipe takes 5 seconds and removes the small amount of dark butter residue that accumulates between pours. This keeps every batch tasting as clean and buttery as the first — and it’s one of those habits that separates pancakes that look consistent in the stack from ones that don’t.
Recipe Summary
These cottage cheese oat pancakes are sautéed in a non-stick skillet over medium heat, using a blended batter of whole-milk cottage cheese, rolled oats, eggs, ripe banana, and cinnamon. Each serving of three pancakes delivers approximately 21 grams of protein from whole-food ingredients, with no protein powder required. The recipe takes 25 minutes start to finish, produces 12 pancakes, and freezes well for up to 2 months — making it equally practical as a weekend brunch stack or a weekday meal-prep breakfast.
The Breakfast Stack Worth Making Every Weekend
There are recipes you make once and forget, and there are recipes that earn a permanent spot in your Saturday morning routine. These cottage cheese oat pancakes fall firmly in the second category. The stack is genuinely beautiful — golden, thick, banana-topped, syrup-drizzled — and the macros actually support your week rather than setting it back. Once you’ve made them, you’ll stop reaching for boxed pancake mix entirely. Make a double batch on Sunday, freeze half, and you’ve got high-protein breakfasts waiting on every weekday morning without any additional effort.
Cottage Cheese Oat Pancakes — Best 25-Min Easy Stack
Description
Pancakes that taste like a treat and fuel you like a real breakfast — that's exactly what these cottage cheese oat pancakes deliver. The stack in the photo says everything: six thick, deeply golden pancakes piled high on a gray plate, drizzled with maple syrup that pools at the base, topped with fresh banana slices, and scattered with rolled oats. The edges on each pancake are caramelized from the skillet, the centers are soft and slightly textured from the blended oats, and the whole stack looks like something you'd wait in line for at a weekend brunch spot.
Ingredients
Instructions
-
How to Sauté Cottage Cheese Oat Pancakes to Golden Perfection
-
Step 1: Blend the Batter (5 minutes)
-
Add the cottage cheese, rolled oats, eggs, mashed banana, honey (or maple syrup), vanilla extract, cinnamon, baking powder, and salt to a high-speed blender. Blend on high for 30–45 seconds until completely smooth — the batter should look uniform and slightly thick, with no visible oat flakes or cottage cheese curds. Scrape down the sides once if needed and blend for another 10 seconds to incorporate everything fully.
-
Embedded Tip: Let the blended batter rest for 3–5 minutes before cooking. The oats absorb liquid as they sit, and the batter thickens slightly — this resting period produces fluffier pancakes because the batter holds its shape better when it hits the hot pan.
-
Step 2: Preheat the Skillet (3 minutes)
-
Place a large non-stick skillet or griddle over medium heat. Allow it to preheat for 2–3 full minutes — a properly preheated skillet is the single most important factor in getting those deeply golden, evenly browned edges shown in the photo. Add ½ tablespoon of butter and let it melt and foam across the surface. When the foam begins to subside and the butter smells nutty rather than just milky, the skillet is at the right temperature.
-
Step 3: Cook the First Batch (6–8 minutes)
-
Pour ¼ cup of batter per pancake onto the skillet, leaving at least 1 inch between each one — you should fit 3 pancakes comfortably in a 12-inch skillet without crowding. Watch for the bubbles: within 2–3 minutes, small bubbles will begin forming across the surface of each pancake. When those bubbles reach the center and the edges look set and matte rather than wet and glossy, the pancake is ready to flip.
-
Embedded Tip: Resist the urge to press down on the pancakes with the spatula after flipping. Pressing releases the trapped steam that creates the fluffy interior — let the second side cook undisturbed for 1–2 minutes until the bottom is golden-brown and the center feels slightly springy when pressed gently with a fingertip.
-
Flip each pancake with a wide, thin-edged spatula in one confident motion. Cook the second side for 1–2 minutes. The finished pancake should feel set throughout with no raw, soft center when lifted. Transfer to a plate and cover loosely with a clean kitchen towel to keep warm while you cook the remaining batches.
-
Step 4: Adjust Heat and Grease Between Batches (2 minutes)
-
Wipe out any dark butter residue with a folded paper towel before each new batch — burnt butter from the previous round turns the next batch bitter and uneven in color. Add fresh butter between every batch and allow it to melt before pouring new batter. If the skillet runs too hot and the pancakes are browning before the bubbles appear, reduce the heat to medium-low and allow the pan to cool for 30 seconds before continuing.
-
Step 5: Stack, Garnish, and Serve
-
Stack the finished pancakes on a gray or white plate as shown in the photo — six to a stack makes for the most visually satisfying presentation. Layer banana slices on top of the stack, drizzle maple syrup generously over everything, and scatter a tablespoon of rolled oats around the base of the plate. Serve immediately while the stack is still warm and the syrup is running down the sides.
-
Pro Tips for Perfect Sautéed Cottage Cheese Oat Pancakes
-
Preheat the skillet before adding butter — not after. A cold pan with butter added immediately heats the butter at the wrong rate, causing it to brown unevenly. Heat the skillet first, then add the butter and watch the foam — the moment the foam fades is when the pan is perfectly ready for batter.
-
Use a ¼-cup measure for every pour. Consistent batter portions mean consistent cooking times across all twelve pancakes. Eyeballed pours result in uneven sizes that cook at different rates and look mismatched in the stack.
-
Don't flip more than once. These pancakes are done in two sides — flipping multiple times dries them out and destroys the structure built by the baking powder. One flip, confident and decisive, is all that's needed.
-
Medium heat is the sweet spot — this is the method-specific sautéing tip. Medium-high is too aggressive for a batter this thick and protein-rich: the outside browns before the center cooks through. Medium heat allows the inside to set fully while the surface caramelizes gradually to that deep golden color you see in the photo.
-
Use full-fat cottage cheese for the best texture. Lower-fat varieties have a higher water content that can make the batter thinner than ideal. Full-fat (4% milkfat) produces the thickest, most cohesive batter and the fluffiest cooked result.
Nutrition Facts
Servings 4
- Amount Per Serving
- Calories 380kcal
- % Daily Value *
- Total Fat 11g17%
- Saturated Fat 5g25%
- Protein 21g42%
* Percent Daily Values are based on a 2,000 calorie diet. Your daily value may be higher or lower depending on your calorie needs.